cajhin
-
Posts
35 -
Joined
-
Last visited
-
THANKS for the last two posts. A bunch of synapses just clicked in my brain, I think I get it now (and can remember it). I imagined "Image layer=file-based" vs "Pixel layer=memory-based". When I think of it as "image layer = Vector Object borrowed from AffinityDesigner" vs. "Pixel layer = regular AffinityPhoto canvas", things start to make sense. Depending on what is selected, the Color Picker tool is either the APhoto picker or the ADesigner picker, with different behavior. When you change layer, the "active tool color circle" changes. I would question these design decisions: - the classic two circles "Active Color for the selected tool" on the toolbar is reused for an entirely different function, "Color of the selected object", without any indication (other than "stuff stops working" like Shift-X). - the visual difference between image/pixel layer is very very subdued. I attach an example how it looks with sub-par eyes. I wish it was obvious (colored icon) and remind me. - it seems that by trying to hide the inconsistencies, the design is harder to comprehend? Thanks for your patience. I don't mean to complain, I just want to show ways how to make AP more intuitive and beginner-friendly.

-
 Sonja Mae reacted to a post in a topic:
Disable update reminder.
Sonja Mae reacted to a post in a topic:
Disable update reminder.
-
Out of curiosity, I played with the color thing for an hour. I still cannot explain it, but this is the details I noticed... the primitive approach, which I learned in PaintShopPro, Photoshop, Corel, .... 1. pick yellow 2. draw banana Result: BANANA!! My understanding how AP works [MacOS latest, AP2 2.4.1] Picking a color usually does not set the active color, possibly because the color picker has no active color, as it does not paint(?) The quickest workaround is to open the color panel, and explicitly click on the 'picked color' (which is always updated) to set the active color (thanks for the reminder, @fde101). Except when it doesn't work. I haven't figured out the reason, but it seems to not work when the color picker tool is active. When [Apply to Selection] is checked, painting may happen, and the picker (usually) sets the active color automatically, and also fill paints / tints the image. (how does "apply picked color to selection" really mean tint the image? Looks like there is an invisible color filter layer. Specifics might depend on image layer vs. pixel layer, and I still guess that having the image selected previously with the move tool, which gives you a blue border, makes a difference to the color picker tool. By the way, do not confuse selections with selections or selections, they are not the same thing). To stop the tinting, you can deselect all layers first. Note that changing the layer selection may change the active color. Note that clicking to start drawing may spontaneously change the color from no color to black (or maybe that's because of an automatic active layer change?) Clicking the <-> switch color icon on the toolbar does not always switch the color. Only the top 3 pixels of that small icon are active. And sometimes it actually does not work with Shift-X either. Clicking the <-> switch repeatedly undocks the tools panel. Snapping it to the left Window corner does not dock it. There is no right-click menu. Invisible trick: double click the toolbar header. Or menu>View>Dock Tools. (As I've noted before: this should be "Dock Toolbar". What is now called Toolbar contains no tools, it is a Tool Settings bar) When the cursor leaves the screen and returns, the color picker shows the regular arrow cursor instead of the crosshair cursor. Switching to the brush and back to Picker fixes this. This does not happen when I re-enter the screen on the lower left corner. I like the primitive approach, with no strings attached to the color picker -> active color function. Experts may of course disagree.
-
 HCl reacted to a post in a topic:
Another case for the UI team: the move tool
HCl reacted to a post in a topic:
Another case for the UI team: the move tool
-
bures reacted to a post in a topic:
Another case for the UI team: the move tool
-
I'm surprised everyone agrees with "That is not my experience.". Curious. My steps: 1. in Firefox, copy an image 2. in AP, File > New from Clipboard 3. Select the Color Picker tool 4. Click on the image, let's say a red pixel. Result: A) the color circles at the bottom of the toolbar show "background: (Red circle)" (good, this is how every other software works) B) the whole image is tinted red (did not expect that) 5. Undo 4. (the color circle again shows "no color (/)" 6. Uncheck "Apply to Selection" in the tool settings bar 7. Click on a red pixel again. Result: nothing happens. The color circle still shows (/), the image is unchanged Why? P.S. @loukash, I did spend quite a bit of time with AP when Corona hit, I bought the books, I watched dozens of videos. Three years later, I still occasionally fail miserably at supposedly simple tasks that I cannot figure out.
-
@Walt: thanks for the hint, looks like highlighting a layer (to define where I want to pick the color) is a second way to make a selection I don't see. Yes, there's the "Apply to selection" option in the toolbar. It made me double check that I had nothing selected (I thought I didn't). I hit CMD+D which deselects any selection. Right? Right? Fun fact: when you uncheck the "Apply to selection" option (one of the first things I tried), the Color Picker tool stops working and does not pick any color. it doesn't seem to do anything then. For reasons I cannot be bothered to figure out, I just learned to not approach the supposedly mundane task of picking a color with confidence.
-
After using 30 graphics tool in 30 years, I thought I could at least use the Color Picker tool without another fail. No. When I click on the image to pick a color, the whole image is recolored. Why? That took me another 30 minutes of my life. Turns out, the Move tool was active before. Then, when you click on the Color Picker tool, all signs of the Move tool disappear. When you click on the image, the tool selects the current pixel color, AND applies it to the image, because it somehow counts as "selection" from the Move tool. When I put on my glasses and look really close, I can see a faint blue shadow on dark grey on the right and bottom edges. That's just a trap. And a selection is something I do with a select tool, which is indicated by ant lines, no? Sorry for sounding so negative, I kinda like AP, but it keeps distracting me from my task at hand with weird stuff...
-
 TestTools reacted to a post in a topic:
Add a link to the online help
TestTools reacted to a post in a topic:
Add a link to the online help
-
How can I export a circular selection?
cajhin replied to cajhin's topic in Desktop Questions (macOS and Windows)
Thank you for the detailed reply. That works well indeed, and it's a logical concept, easy to remember, even if it is quite different from my old "select, make mask, refine mask, select, crop". Have a nice weekend j Proposal The actual steps around clipping are needlessly difficult to figure out, unfortunately. It could be much much easier if there was a new context menu entry: > Mask to below > Clip to below *new on the mask layer's context menu. View through newcomer eyes, and why I was confused: Mask layer is a child of the image layer, but the clipping mask layer is the parent of the image layer. Dragging the image layer on the clipping layer has two drop targets (icon and text), but no description (e.g. status bar text) what is about to happen. There is no textual description afterwards in the layer panel ('Clip mask'), it just says 'Pixel'. I would like to use a menu that says "clipping mask something", slow but predictable. Help says there is "menu > Arrange > Move inside", but you have to move the Background layer on top of the clipping layer first, and I would never have guessed what it does. It would be straight forward, and easy to figure out and memorize, IMHO, if: 1. you have layer on top of the image, to be used as a mask 2. you right click that layer 3. you choose either 'Mask to below' for a classic mask, or 'Ciip below' for a clipping mask The 'Clip below' entry does not exist, of course. I would have allowed me to perform the task reasonably fast, without knowing how it works beforehand. -
cajhin reacted to a post in a topic:
Tone Mapping Persona: split view slider goes missing
-
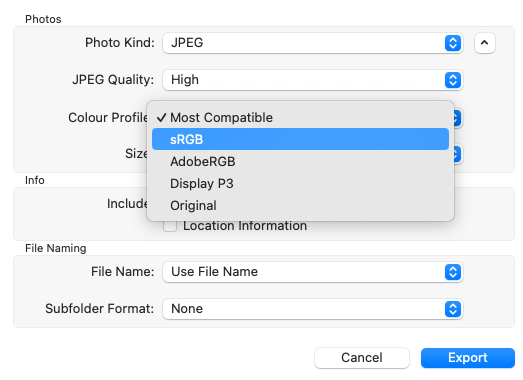
Solution: (note to self if I forget again) This is a conflict between "Renderer = Metal" and no color profile. In my case (iPhone13 mini, M2 Macbook, MacOS 14), when exporting an image from the Photos app, I have to: Switch 'color profile' from "Most Compatible" (which will result in "Unassigned") to sRGB. With the sRGB profile set, the flickering stops. (you can also, in AP, do menu > Document > Assign ICC Profile... > (sRGB), but then you have to do it every time).
-
Add a link to the online help
cajhin replied to cajhin's topic in Feedback for the Affinity V2 Suite of Products
Finally, that's the trick: Step 1: switch to the Photo Persona Otherwise the help menu looks like just one of the many things that are not intuitive...
-
Add a link to the online help
cajhin replied to cajhin's topic in Feedback for the Affinity V2 Suite of Products
I feel your pain, I still have horrible memories of using Robohelp. Is it worth the effort to maintain the offline help, when the online help is so good? (The actual content is very very well written once you find it). I would consider dropping the offline helps, and auto-generate a single PDF from the online help, just as a fallback for the few edge cases where online does not work. It's easy to search, platform-independent. (Or, as I do in my company, ship a generated html package with a simple javascript search engine - comes with extra trouble, browser security restrictions require a local webserver). -
Add a link to the online help
cajhin replied to cajhin's topic in Feedback for the Affinity V2 Suite of Products
Thanks. Just for 'fun', I spent 3 minutes trying to find said link in the in-app help. No success (consider that the in-app search does not work). What's the point in not having a link to the 'real' help where you would expect it? Why make it hard when it could be so easy? Anyway, I don't need that link anymore, and new users are not my problem... -
Add a link to the online help
cajhin replied to cajhin's topic in Feedback for the Affinity V2 Suite of Products
Thanks for making the effort. My point is not that I need help, now that I know about it. My point is that, as an educated Windows user, the INTUITIVE way to get help on a topic is to press F1 or go to menu > help. Which works, just not very well. I think AP would be a little better, if the app would guide you towards the much better online help immediately, instead of forcing you to figure it out. But I'll rest my case; there are more important things that are hard to figure out intuitively. -
Add a link to the online help
cajhin replied to cajhin's topic in Feedback for the Affinity V2 Suite of Products
Step 1: read the forums for 10 minutes and figure out that a better help exists online. Why make it so hard for new users? -
Tone Mapping Persona: split view slider goes missing
cajhin posted a topic in V2 Bugs found on macOS
steps: 1. open tone mapping persona 2. select split view. Result: you get a vertical before|after slider 3. Cancel. Result: you go to the Photo Persona 4. open tone mapping persona again Result: you are in split view, but there is no before|after slider, unless you switch out and back into split view (looks like activating the slider is tied to the split view button) -
All Personas have a top level entry, but the Tone Mapping Persona is missing. I'm trying to figure out how to use the Overlay Paint Tool, unsuccessful so far. Also: is there a reason why the entries for the personas are scattered around the Contents tab? (MacOS) P.S. if you'd rather not have me create a topic for every small nuisance, please just tell me.
-
There is no easy way to find the online help. The included menu > Affinity Photo Help is rather useless, because the search is broken. Text is also too small for me. Online is much nicer overall, I'm happy with it. There should be a link under menu > Help > Online Help