numberonesoniafan
-
Posts
7 -
Joined
-
Last visited
-
Confirmed this is still an issue in Affinity Photo 2.2.0.
-
@stokerg Thanks for the reply! I've attached these same files as a zip here. bird.zip
-
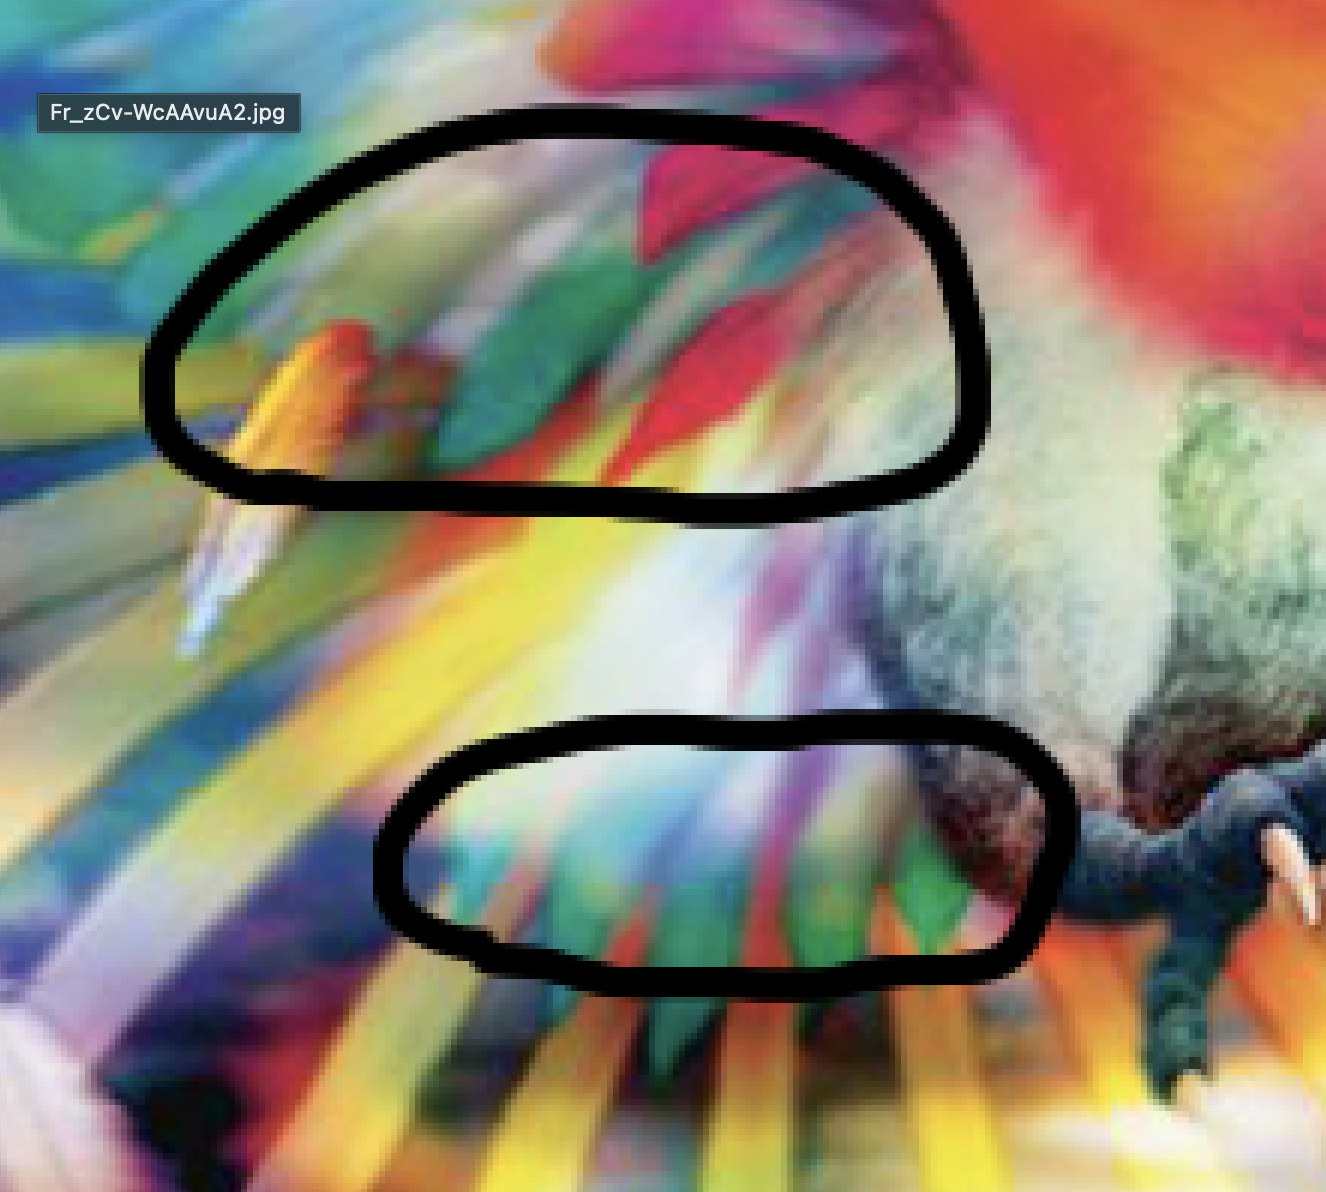
1. Are you using the latest release version? I am using 2.0.4, the latest version of Affinity Photo 2. 2. Can you reproduce it? This is 100% reproducible with the attached bird.jpg. 3. Does it happen for a new document? If not can you upload a document that shows the problem? This happens immediately upon opening the attached bird.jpg in Affinity Photo 2. * What is your operating system and version (Windows 11, OSX Ventura, iOS 16 etc)? macOS Ventura 13.2.1 on MacBook Pro 16-inch, 2021 (M1 Max). I am just using the laptop monitor for this. I have also tried changing the operating system color profile presets (System Settings->Displays->Preset) but that has no effect on this. * Is hardware acceleration (in Preferences > Performance) ON or OFF ? (and have you tried the other setting?) I have tried with it both on and off and it doesn't affect the result. * What happened for you (and what you expected to happen) To show the problem I am providing two images: bird.jpg - the original image bird-jpg-to-png-in-GIMP.png - the jpg converted to a png in GIMP (so even though png is lossless and jpg is lossy, in this case we expect our png to be identical to the jpg, since the jpg is the source image.) Expected: Upon opening bird.jpg and bird-jpg-to-png-in-GIMP.png in Affinity Photo 2, there is no visible difference between them, since the png is simply the jpg re-exported. Actual: Upon opening bird.jpg in AP2 there are visible artifacts in it (especially obvious when zooming in on the green tail feathers, but really quite noticeable all over the illustration). The artifacts noticeably form 16x16 pixel square regions. When opening bird-jpg-to-png-in-GIMP.png in AP2, it does not contain these artifacts. We can also place one image on top of the other, difference blend the top one, and the artifacts are also immediately apparent there. I've attached a screenshot circling the locations for some of the more obvious artifacts. I've opened the same images in Preview, GIMP, and Google Chrome, and in all of those programs bird.jpg looks identical to bird-jpg-to-png-in-GIMP.png (neither image has the blocky artifacts), even when zooming in very closely. This is more confirmation that Affinity Photo 2 is introducing the artifacts. Additionally I can do the following test: 1. Open bird.jpg in Affinity Photo 2 and export bird.jpg as a png called bird-jpg-to-png-in-AP2.png 2. Open bird-jpg-to-png-in-AP2.png in Preview or GIMP (or AP2), and zoom in to the green tail feathers. Now the artifacts are present. This shows that Affinity Photo 2 has actually changed the pixel values (and it is not merely an image display issue). Did this same thing used to work and if so have you changed anything recently? I do not know of an earlier version of Affinity Photo 2 that works as expected.

-
 Patrick Connor reacted to a post in a topic:
Affinity Photo for macOS - 1.10.0
Patrick Connor reacted to a post in a topic:
Affinity Photo for macOS - 1.10.0
-
Affinity Photo for macOS - 1.10.0
numberonesoniafan replied to Patrick Connor's topic in News and Information
Improved performance with: Converting documents between ICC profiles / pixel formats Are you folks free to elaborate a bit on the above? Is this actually a performance improvement (speed), or an accuracy-related one? Are there certain rendering intents or conversions where we might expect to see improvement? (I'm doing proofing-related work so ICC conversions are of particular interest to me.) Also, thanks to you folks for all your hard work on Affinity Photo! I continue to enjoy using it, and it's a great value. -
 Patrick Connor reacted to a post in a topic:
applying color profile followed by converting color profile results in noticeable color cast
Patrick Connor reacted to a post in a topic:
applying color profile followed by converting color profile results in noticeable color cast
-
I've confirmed this is resolved in Affinity 1.9.0, i.e. you can apply the profile, then convert (in 16-bit) to ProPhoto, and the colors are as expected (no color casts in dark colors). It wasn't mentioned in the patch notes, but I went and verified this myself because I was curious... 😁 Thanks to the devs for their hard work!
-
This still repros on 1.8.4; i.e there is still a reddish color cast for the dark greys when converting from the scanner profile to some RGB/16 profile. The workaround of converting to a 32-bit profile still works.
-
numberonesoniafan reacted to a post in a topic:
applying color profile followed by converting color profile results in noticeable color cast
-
Chris B reacted to a post in a topic:
applying color profile followed by converting color profile results in noticeable color cast
-
Expected behavior: In Affinity Photo, apply a scanner profile to a raw scan with no profile, then convert to a working space such as ROMM RGB. 1) Results should be very similar to doing the same steps in an external app (I don't expect that they'd be pixel-perfect, but any differences should not be perceptible). 2) There shouldn't be any visible color casts in the result. Actual behavior: Results are perceptibly different between Affinity Photo's result and argyllcms' cctiff. Given a scanned IT8/7.2 target with the profile applied and then converted to ROMM RGB (once in Affinity, and then once with cctiff on a copy of the image), for Affinity Photo the dark grey rectangles in the image have a reddish color cast to them, whereas the output of cctiff has those squares as a neutral grey. Repro steps: To generate the Affinity Photo output: Open the unprofiled image ("raw0010_2019-5-20-downsampled.tiff"). Document->Assign ICC Profile... then Assign the desired scanner profile ("2019-10-27_qh_as_u"). Document->Convert Format/ICC Profile... then Convert to the desired working space profile ("ProPhoto RGB"--see Note 1). Rendering Intent is Relative Colourimetric. Black Point Compensation is on (it also repros with BPC off... doesn't matter). Observe that the grey rectangles at the bottom of the image have a reddish color cast to some of them, #19-21 in particular. (The RGB values confirm that there's more red present.) To generate the cctiff output (can use GIMP instead--see Note 3): Install cctiff. I downloaded the source code, v2.1.1, at https://www.argyllcms.com/downloadsrc.html and compiled it on my Mac. Run cctiff like so: ~/Argyll_V2.1.1/imdi/cctiff -e ~/Argyll_V2.1.1/icc/ProPhoto.icm -ir /PATH/TO/2019-10-27_qh_as_u.icc -ir ~/Argyll_V2.1.1/icc/ProPhoto.icm /PATH/TO/raw0010_2019-5-20-downsampled.tiff /PATH/TO/2019-5-20-downsampled-output_of_cctiff.tiff Observe that the grey rectangles at the bottom of the image are all neutral grey. Notes: ProPhoto.icm (which displays as "ProPhoto RGB" in Affinity Photo) is argyll's included ProPhoto color profile (which I imported into Affinity's color profiles by just opening some existing file that already had that profile embedded). However, this still repros if I instead convert to the included ROMM RGB profile in Affinity. The scanner profile was generated by argyll separately (scanin and colprof). (I actually used this exact raw image to generate the profile.) I can also generate the expected output (i.e. no reddish color cast in the dark greys) with GIMP (it's using argyllcms under the hood). Just apply the scanner profile, then convert. I don't have Photoshop so I can't do this experiment there. I'm on Affinity Photo 1.8.3, but this repros on 1.7.x as well. I've also attached the output of Affinity Photo's Preferences->Color menu, just in case those settings matter. ProPhoto.icm 2019-10-27_qh_as_u.icc raw0010_2019-5-20-downsampled.tiff 2019-5-20-downsampled-output_of_affinity_photo.tiff 2019-5-20-downsampled-output_of_cctiff.tiff