steveKunkel
-
Posts
17 -
Joined
-
Last visited
-
Thanks Wonderings! Also I figured out the other problem... I had to adjust my "Document Setup" from the Designer Persona...

-
Hi Folks, I'm finding that my PNG slices export as 24 bit -- so no transparency. Is my setup wrong? I checked the Export Persona video and everything seems right. https://i.imgur.com/sjoyjbQ.png Also, how do you embed images in a post?? Using Windows 10 and Designer 1.8.5.703
-
 steveKunkel reacted to a post in a topic:
Change both sides of shape symmetrically?
steveKunkel reacted to a post in a topic:
Change both sides of shape symmetrically?
-
steveKunkel reacted to a post in a topic:
Change both sides of shape symmetrically?
-
firstdefence reacted to a post in a topic:
Change both sides of shape symmetrically?
-
Wow thank you both! I was able to do each of these as described. A+ for both of you!
-
Hi there, Long time DrawPlus user here, but still new to Affinity. I have a Rounded Rectangle shape that I've converted to curves. I selected the Node Tool on the tool bar and I'm dragging the handles to adjust the shape. If possible, I'd like to have my adjustment applied like a mirror image, to both side of the retangle. Even better would be all four corners. Is this possible? Below is a screen shot. (FYI I'm trying to reproduce the shape of this logo that is on the bottom layer... Some may recognize it as the logo for xyplorer.) https://i.imgur.com/5gnBxFC.png I see the annual closure notice. Happy Holidays to Everyone! EDIT: I'm on Windows 10. Designer 1.8.5.703 -Steve
-
steveKunkel reacted to a post in a topic:
Affinity Photo: Exorcist Style - Horror Photo Tutorial
-
steveKunkel reacted to a post in a topic:
[Solved] Erasing pixels in Designer
-
Yep, you were right. I'm using Windows, and it's the Crtl key. When the Pixel Tool is in use, holding the Ctrl key down makes the "Alternate" option work. This solution is quite handy. Kudos to Serif. Thanks again you guys. EDIT: Not sure if I can mark this "solved."
-
Hi Thanks for the reply R C-R. I did see the Alternate: Erase option, but I can't figure out how it works... Doesn't seem to do anything. I noticed it right after my original post. Still need to reread that part of the help.
-
Yes, excellent solution. Thanks v_kyr!
-
Hi There. I'm working on a bunch of little 20x20 px icons. I'm zoomed way in and doing pixel-level work. Basically "pixel art." The Pixel Tool works beautifully for this, but the Eraser Brush Tool doesn't work so well. It bleeds into neighboring pixels. Also, even though I have Opacity, Flow, and Hardness at 100%, it still takes many passes to actually erase the pixel. Is there a better way to remove this specific pixels? It would be good if I could set the Pixel Tool to color = "Transparency."
-
Alfred reacted to a post in a topic:
Best settings for SVG from DrawPlusX8 to Designer?
-
Hmm.. Now that you mention it, I seem to recall running into this in DPX8 several times. It can be quite an annoyance sometimes. On another note: I was able to get an even better crossover into Designer by removing a bunch of the filter effects from within DPX8 before exporting. And when I did export, I used the highest DPI setting.
-
Actually... I did a bit of experimenting. The "compatibility modes" don't seem to do anything. More parts seemed to get opened in Designer when I used the "Inline raster images" though. EDIT: It appears that the various colored shapes get saved over fine. They retain their outline properties and of course their shapes and colors. The components are no longer "grouped." If there is a gradient fill, then that appears okay. However if any 3D or inner-bevels have been applied in DPX8, then that component gets saved as a raster component (i.e. pixelated if you zoom in). Those pixelated components are completely stripped though, unless you have the "Inline raster images" option selected. EDIT 2: Kindof trippy to see the vector and the raster-converted parts next to each other.
-
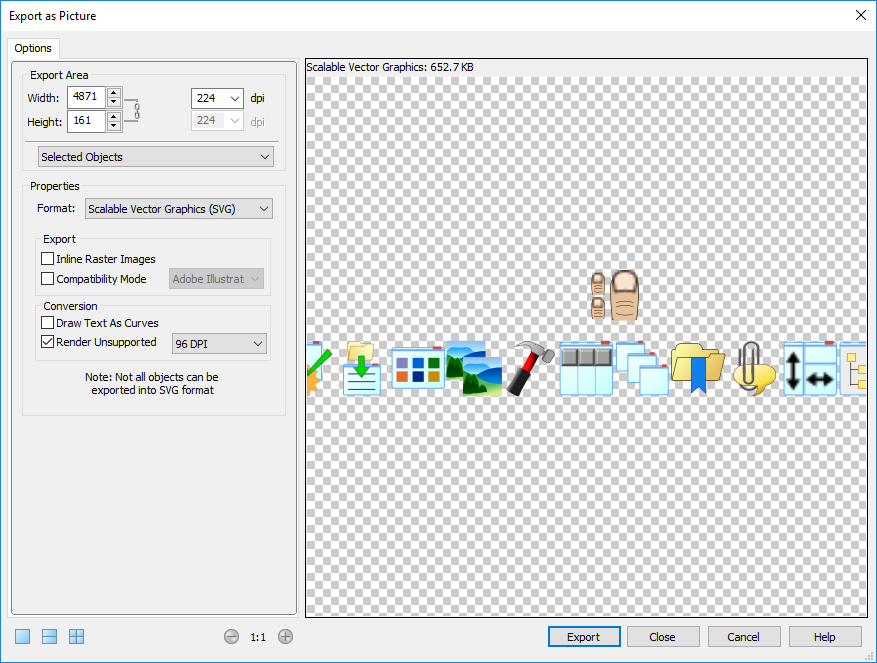
As the title suggests... I'd like to export old DrawPlusX8 jobs (or at least several objects from them) to open in Affinity Designer, and continue the project there. The defaults settings for exporting are shown in the img below. Would anyone recommend changing any of the settings to make the SVG more "Affinity-friendly?"
-
Thanks v_kyr! Yes, I think my problem is that I didn't always have the correct things selected in the layer panel...
-
Hi There. I'm using Designer on Win 10. I have a large PNG image that is a grid of 22x22 pixel icon images. I have the grid open in Designer, and I'd like to select one of the 22x22 pix "sub images" and copy (or duplicate) it and then paste it to another location in the same file. I'm able to sometimes do this, but other times the cut/copy/Duplicate commands are grayed out. The times that I've gotten it to work, what I've done is 1. Go to Pixel Persona 2. Use Rectangle Marque Tool and select part of image. 3. Go to Draw Persona 4. Select Move Tool 5. Then Edit > Copy, Edit > Paste, and drag to a new location. As I indicated though, often the selection cannot be copied. ...Any idea what I'm doing wrong, or where this may be covered in the help?
-
Yea that works. Thanks Callum!
-
Best way to draw icons?
steveKunkel replied to steveKunkel's topic in Pre-V2 Archive of Desktop Questions (macOS and Windows)
Wow! Pretty cool. I didn't even realize Designer could do all that. Thanks Lee!