Search the Community
Showing results for tags 'Node tool'.
-
 Node Tool Actions: Discoveries in Moving and/or Aligning Entire Objects using the Node Tool To select all of the nodes on any given object/path you must first click on either any part of the path or any node of the object to highlight all of the individual nodes on the object. Then you can drag a selection rectangle around every node to select all of them or individually do a “shift-click” on every node to individually select them all or just the one you chose. Once this is done you may then drag the object and/or the selected nodes by placing the cursor directly over any selected node and drag the object/nodes to a new location all at once You can also use this technique with the “Snap” option turned on to directly ‘snap” any given node of one object to any given node of another without distorting the original object. If the object/path you are trying to move as a whole with the cursor on any given node is overlapping another object the selection rectangle drawn by the “Node Tool” will only select the nodes on the selected object and not those of the underlying object. This is a big plus. Downside? Using the above method to move and snap an object/path without distorting the original only works if you move the object with the node tool directly over a node. If you accidentally happen to place the cursor over ANY line or curve segment and not directly over a node while trying to move the object (regardless of how many nodes you have selected) two things will happen. 1. If the cursor is on a curve segment it will modify the curve. 2. If the cursor is on a straight line segment it will convert it into a curve segment (immediatelyi use “command-z” to undo that action). Both of these options is an undesirable side effect that will unintentionally modify the object when your initial intent is to only move it in tact or just the selected nodes. Obviously this is an unintended consequence but something you should be completely aware of. I have one suggestion as to how to handle the accidental modification of a path at this point that might work. Possible Solution: If two or more nodes on a path are currently selected then DO NOT allow the tool to modify individual line or curve segments as this node selection would be a indication that the user is only interested in moving the individually selected nodes and not modifying any of the segments. Hope these discoveries are of help to all. Max
 -
 I love the possibility to stretch a curve directly (no need to control both handles). And I like the “organic forms” we can achieve with that options. But there are situations where we would need to stretch curves maintaining handles direction (even if that handles are not horizontal or vertical) My suggestion is: — Direct manipulation of curve ---> actual behavior — SHIFT + direct manipulation of curve ---> modify curve maintaining handles direction Next capture shows a practical case maintaining HV handles (very useful for corners):
- 13 replies
-
- 5
-

-
- stretch
- path curves
- (and 2 more)
-
My first question here! :-) Love the paths! Just a first thing that I don't get to find (maybe not implemented yet?) I know that I can press SHIFT to force Horizontal, Vertical, 45 degrees, when drawing. OK. But, how to force to that angles H/V/45 to some existing handles? (previously created, I mean) In Illustrator/Photoshop we press SHIFT. But Affinity uses that key to maintain existing angle (a fantastic utility, I love it). Thanks!
-
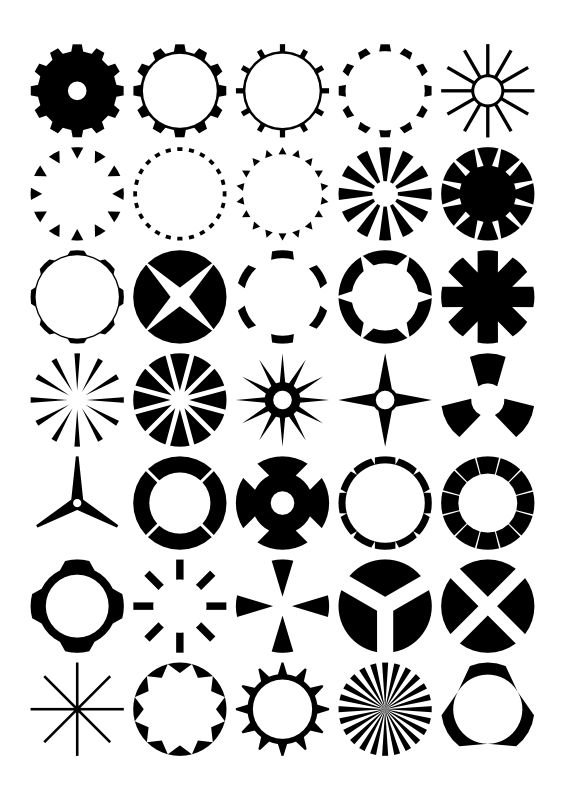
 I thought I'd give everyone a few samples of what can be achieved with some of our shapes. We've made the shapes available in Designer highly versatile. All of the shapes (apart from the basic Rectangle and Ellipse) can be customised, giving you a high degree of control. Certain shapes have carefully chosen snapping values for each of their control points which quickly allow you to find right angles, inline edges, mirrors, and other useful positions. You'll see what I mean when you try them out! The main reason for using our shape objects is that they remain fully editable in your document. They scale and resize with other objects, but they can maintain proportions, angles and sizes. You have the option to convert any shape to a regular curves object, but in doing so you will lose the unique dynamic properties of that shape. To kick off, the one shape I'm particularly proud of is the Cog. It may sound like quite a restrictive shape, but please look at the samples below to get an idea of the range of shapes that can be made with just the Cog. Here's the actual Designer document, so that you can see for yourself how these shapes were made with the Cog. CogSamples.afdesign