rnbutler87
-
Posts
76 -
Joined
-
Last visited
Everything posted by rnbutler87
-
https://www.useloom.com/share/ba63d3521bf74a2f89bf9ace3c32a2a3 In Pixel mode, when designing in the grey area around an artboard (regardless of whether the artwork is nested in an artboard or not), Rectangle marquee tool, Freehand selection tool and Flood fill tools do not work (not many other tools do either). Move the artwork above an artboard (again, regardless of whether it is nested within an artboard or not) and the tools work as expected. (Almost, the freehand selection tool, when nudging the selection, the artwork disappears....) Again, any questions or if you would like the file, please could I send it privately. Many thanks. Richard.
-
https://www.useloom.com/share/f21ea5e72740499f824922d7f3975cf1 The title and the vid explains it all really. Let me know if you have any questions or need me to send the file (would like to send privately if so) Many thanks, Richard
-
https://www.useloom.com/share/28ee96559df14300af129d144c19de10 Duplicating via ALT + Drag is OK Duplicating via CMD + J is OK But duplicating via Copy + Paste is not OK - the text frame becomes unlinked. I can confirm as well that in a blank document, symbolising a text frame and copying and pasting, the issue still occurs.
-
This is brilliant, thank you!
-
Hi I do have a real world example. Amongst other things I'm a character designer and have used Photoshop and Illustrator for over a decade to produce production artwork for major TV networks. I'm trying to move over to Affinity products for various reasons. In brief, if I'm drawing a character (the Pig character) that has spots on it's back, those spots need to dynamically move across the body, depending on the angle, without having to be redrawn every single time. For example, a back view, the spots would be visible in their entirety (i.e. full circles), for a 3/4 view, 3/4 of the circle needs to be visible, and from the side obviously only half the circle needs to be visible. (And various other subtle angles in between). At the same time, the artwork needs to have dynamic stroke widths. For example the artwork is used in marketing and promotional material. Also, they appear with other characters of different sizes and different scenes at different scales. So the stroke thickness of the characters needs to be dynamic - hence why vector artwork is used. With all this in mind, it's much more efficient to work with complete internal shape designs (e.g spots, clothes, patterns, facial features etc) that are clipped inside parent shapes (e.g. heads / body shapes) which can be moved around, masked by the parent, to create different poses quickly on the fly (looking up, down, left right, twisting left right etc, numberless poses, all quite subtle - the jargon is 2.5D) but without having to redraw these internal shapes every time. This is currently not possible in Affinity Designer. This is because the clipped artwork stroke weight does not change with the group as a whole. The only way to do it is to just clip the fill and redraw the stroke every time, outside of any clipping masks. For characters that needs lots of overt and subtle poses and body angles, redrawing all the internal shapes every time is hugely inefficient. --- Hopefully this is clear. I will try get time to show you an example of what I mean. Please let me know if you would like clarification on the above. Thanks.
-
Please see vid link: https://www.useloom.com/share/3db0fee3bd294fec8a72536cab9f9c66 Hopefully this is a bug and not by design. Would love to hear any thoughts. Thanks, Richard
-
How do I relink attributes of symbols?
rnbutler87 replied to seabirdr's topic in Feedback for Affinity Designer V1 on Desktop
I can reproduce it by inserting a symbol into a group and changing the groups stroke settings... -
Ahh this was good to see, thank you. So the bitmap is also being sort of mirrored but not 100% exactly... I'll create a topic in the bugs forum and refer to this post. Many thanks. EDIT Wait, I've read it again and you're saying it is behaving normally because the stroke isn't along the centre line...?
-
I've got some textured brushes which look awesome but when the curves are flipped, the lines become 'off'. The points are clearly flipped but it's as if the way the texture flows down the curve is not flipped. I know the solution would just be to expand the curve to be a fill but I need the stroke widths to remain editable. I want to flip the 'artwork' not just the mathematical points which make up the artwork. Is this something which could be looked at in the 1.7 beta?! Any advice would be greatly appreciated. Richard

-
Thanks you, this is great to know. I've also downloaded the latest 1.7 beta (updated on Tues, I think) and tried the recolour in a CMYK doc and it no longer crashes!
-
Thanks for taking the time to explain this. I may have to read about this more as not sure I entirely understand why HSL doesn't lighten black but it lightens other colours, even in CMYK. That being said, a CMYK document in photoshop behaves in a similar fashion with the HSL not lightening black very much so I suppose this is how these apps are designed to work. This is excellent! And it works on CMYK which is awesome. The ONLY thing is, in my 1.7 beta, if I lighten something and then shift the hue, the app crashes instantly. I suppose this is why it is still in beta tho... Anyway, thank you for all your responses, this has helped clarify things immensely so it's greatly appreciated. I look forward to the 1.7 version of the app going live.
-
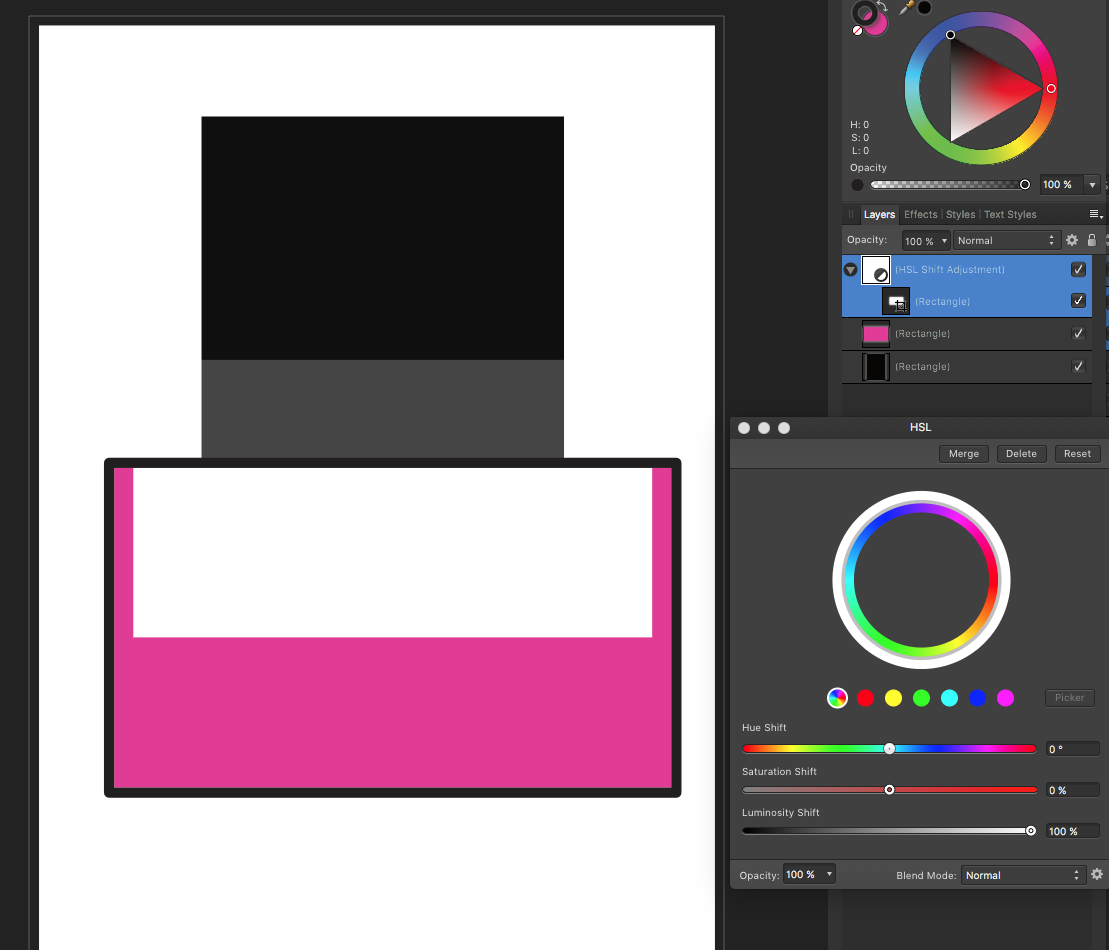
I think I've diagnosed the problem - I'm currently working in CMYK and experiencing this problem. However, when I change the document colour format to RGB, it works as expected.... Is this expected functionality for a CMYK document? Many thanks.
-
This is what I would expect too and I can clearly see it works for you but I'm still having no luck - I've even opened a new document and tried it in the Beta too... Affinity Designer 1.6.5 Affinity Designer Beta --- Any suggestions? I've also attached the AD 1.6.5 file should this be useful... Thanks again. AD_HSL-test.afdesign
-
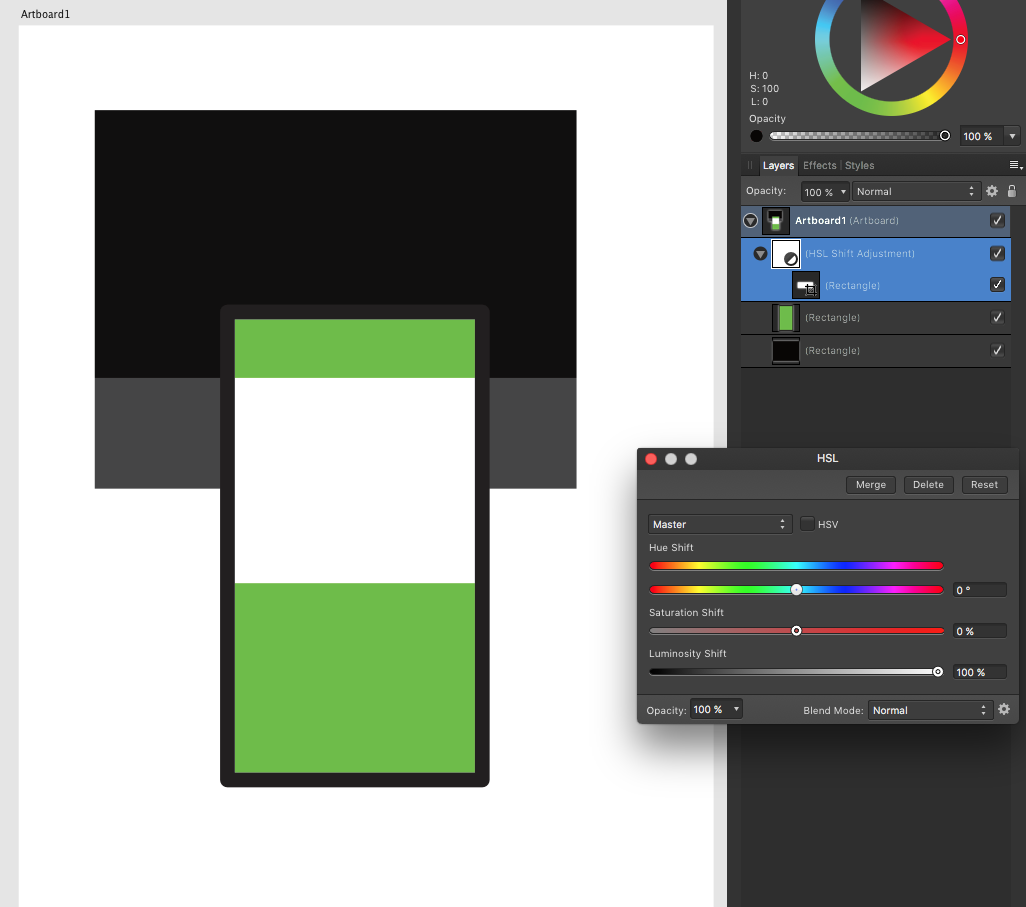
Hi thanks all for your replies! I suppose it's just for the continuation of a workflow I'm used to using in Photoshop. However I can adjust to alternative ways of working i.e. using a colour overlay effect (even though this seems buggy - it's very laggy to respond to colour wheel changes in the colour overlay effects (as opposed to the document colour wheel changes) and crashed yesterday when I was applying the colour effect across multiple objects...) It does seem to be lightening black but not very much, even at 100% - I would expect all colours, even black, to be completely white at 100% lightness. I've attached an example of what is going on in my document when using an HSL adjusment layer. It's at the top of the stack, set to normal, everything else is below it and only applied to the red square area so you can see the result. Is this expected functionality of is there any reason why it's not applying to the100% lightness to blacks? (I can think of some great examples when this would be useful but not in this instance!) Again, any thoughts would be appreciated. Thanks.
-
I'm trying to move away from Adobe and use Affinity products exclusively. Things are similar but on this one topic I can't seem to make headway. I have small black pixel graphics imported from Photoshop. And in Affinity Designer I'd like to colorize them using an adjustment layer, similar to how I'd do in Photohshop. However, the Lightness slider of the adjustment layer in AD doesn't seem to affect (i.e. lighten) black like it does in Photoshop and therefore I can't colorize the black graphic. I've found a way around it in AD by using the colour overlay effects set to screen or similarly putting a shape above the graphic and setting it to screen. However, out of curiosity for future use is there an adjustment layer in AD that will colorize black similar to that in Photoshop? Any help would be greatly appreciated. Kind regards, Richard
-
Ah yes, this is a great idea! Many thanks once again for all your help, really appreciate it and great that there is a readily available fix! Richard
-
Thank you, this is all great to know. Finally, do you have any indication of when the end of the 1.7 beta cycle will be? Any suggestion on time scale will be good as I'm starting a new major project in the new year and would be great to know if 1.7 will be available. Many thanks for your help!
-
This is so good to hear! I knew it would be worth asking on the forum, so happy about this, thank you! I've read through the 1.7 beta post and just a couple of further questions: - The post says: '...the beta will install as a separate app - alongside your store version'. Therefore if I start using 1.7 to gain the benefit of the corrected artboards PDF export, when the beta gets finished and becomes the new default for the store version, will my store version (1.6.5) update automatically to 1.7 and therefore I'll be able to delete the beta install? And furthermore, will the subsequently updated store version be able to open the files of the 1.7 beta and therefore allow me to continue working as normal? - Secondly, I also own Affinity Photo 1.6.11. I love the feature File > Edit in Photo... (or vice versa). Will this functionality still work OK between the programs if I begin working in the Designer 1.7 beta? If I'm in Photo, will it open the beta or my store bought version? I could just try it I suppose but I'd be interested to hear your thoughts on the use of this functionality. Many thanks!
-
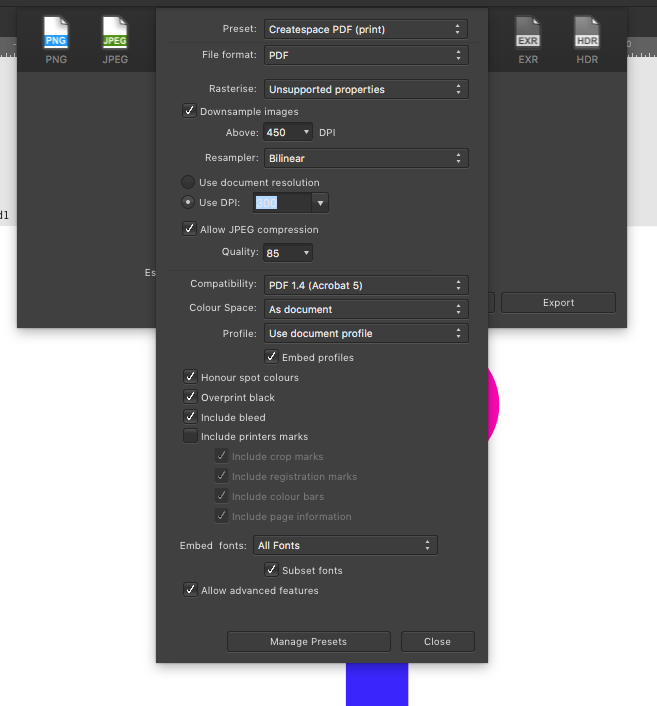
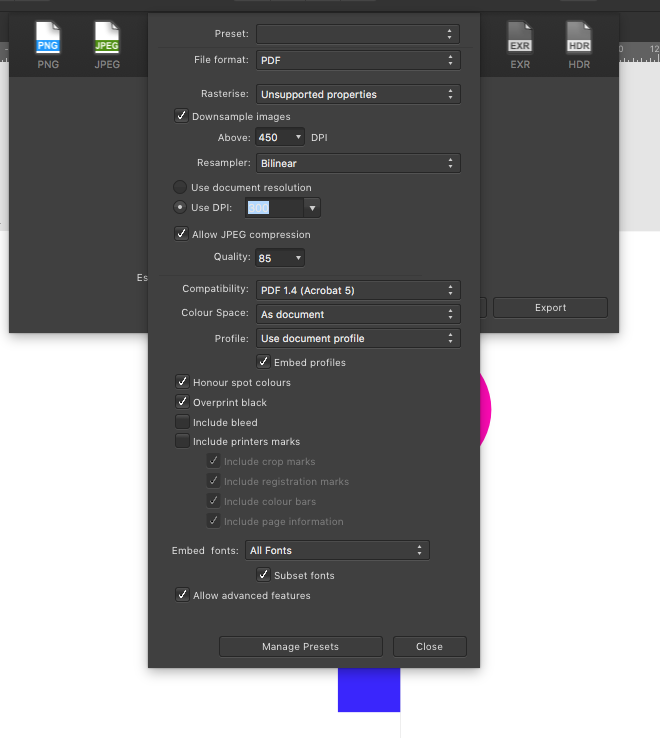
Hi thank you for the reply. It's great to know that the artboards should work as I expected them too! I've attached a test file with screenshots but I think I've managed to diagnose the problem: I created a new document as you did, and under the More section, when 'Include Bleeds' is left unchecked, the export works as expected, i.e. no overlap of artwork on neighbouring pages However, when 'Include Bleeds' is checked (in 'Document Settings', I'm using a 3mm bleed), this is when the problem arises with the overlapping artwork rendering on disparate artboards. As this is a PDF for print I need the bleed functionality so I'm hoping this is a bug and can be fixed! I'd prefer not to go down the route of removing the bleed from 'Document Settings' and adding a 3mm to the dimensions of each artboard (and thereby needing to use a rectangle guide as my dummy trim area.) It would solve the problem of the export because I wouldn't need to check 'Include Bleeds' but I wouldn't be able to place 2 artboards next to each other to visualise the spread because of the manually added visible bleed areas. Many thanks for your help and assistance in advance. Richard test7.afdesign test7_bleed.pdf test7_no-bleed.pdf
-
I have many artboards in Affinity Designer (more than 50) Each artboard will be a single page in a PDF document that I will export. As I understand it there are two routes to exporting PDFs: File > Export > PDF Make a slice for each artboard, and export each page as separate PDF The first option is problematic because in the exported PDF, artwork from one artboard, if larger than the artboard itself, is showing up on neighbouring artboards (i.e. pages). See the PDF attachment: the maroon rectangle overlaps the second artboard and (and the same in reverse for the green rectangle overlapping the first artboard). I'm aware that the obvious answer to this is move the artboards further away from each other but this isn't ideal for a few reasons: As I say, this document has over 50 artboards representing pages in the exported document so spacing them far enough apart from each other such that photos and other artwork don't overlap other artboards isn't feasible, especially as the artboards masks the artwork beyond the edge of the artboard; its impossible to see where the bounds of the artwork is to mitigate overlap on other artboards I'm actually trying to place two artboards side by side to represent each spread in the book in order to actually visualise what the art looks like together as a spread without a gap. So, I was wondering if there is an option I'm missing somewhere in File > Export > PDF that I can turn off artwork from separate artboards overlapping and appearing on other artboards (i.e. pages) in the export? At a push I'm aware that I can use option 2. above as a work around for this problem i.e. slicing up the artboards using export persona and exporting each board as a separate PDF document. But of course this leaves me with the hassle of having to combine all the PDFs back into one document using some third party program every time I want to export a version of the PDF document for preview. I'm also not sure what effect another round of compression will have on the document and am therefore reluctant to use this method especially as this will be going for print. Any help would be greatly appreciated! test5.pdf