HealingDoodle
-
Posts
33 -
Joined
-
Last visited
-
Hi Walt. Yes, this worked! Except for the hair, which has a shade layer. The color has to be 56% opacity to overlay in order to keep the shade and internal lines showing. I think this would be a different question, but I want to know how to replace the color at 100% opacity without overlaying the shade and inside lines. Thanks again for your help.
-
 walt.farrell reacted to a post in a topic:
Affinity Photo Selection Brush Tool not working right...
walt.farrell reacted to a post in a topic:
Affinity Photo Selection Brush Tool not working right...
-
Hi Walt, Thanks. I will try this. I appreciate it.
-
After a recent update, I'm having an issue with the selection brush tool as you can see by the attached image. It changed the whole image to red. But it should have only changed the hair color to red where the "marching ants" are. The picture also shows the settings and layer. What am I doing wrong? Thanks for your help!

-
Hi Toltec, Thanks. Took some searching, but I found it. Thanks so much!
-
Unfortunately, kerning would work if I typed all the letters at one time, but it's more about taking objects (each individual letter is an object) and placing them next to each other. Thanks.
-
Thanks. I'm not sure this is what I need. I did use the Artist shape tool and understand how to work with it and convert to curves, etc. I am typing on a straight line, but my question is about spacing between letters. For instance, if I am typing the word "dog" as three different letters of artistic text, not one single piece, then I need to align the "d" next to the "o" next to the "g." I'll look further at your suggested links though. I appreciate the help. Susan
-
Thanks to all of you in this great forum, I'm moving along with my t-shirt designs. Really grateful. So let's say I'm doing a single word for the design. I know how to align the top and bottom and arrange as well. But how do I ensure there is equal space between the letters? I've just been eyeballing it and I'm sure there is a better way that is as precise as using toolbars for the top and bottom. But I couldn't find anything when I searched. Thanks, Susan
-
Thank you!
-
Oh good grief. I'm such a newbie. Didn't even think to check that that panel! Thank you. As for the ellipse tool, yes, I started with those tools and broke the nodes. But I'm trying to match my drawn shape, in this case a letter G. Would Affinity designer have a better way to keep the roundness of the letter smooth? Thanks again. Really appreciate the help. Susan
-
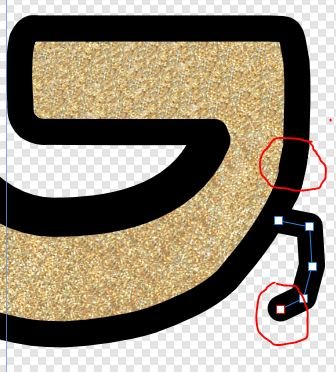
I'm learning how to use the pen tool to create an outline on scanned hand-drawn artwork. I created a couple of extra nodes to show you how the end is rounded off instead of flat. I'm trying to outline the letter "G." So notice that the bottom part of the image showing the nodes circled in red is the rounded piece. So the upper circled part is where I'm trying to overlap another section, but because it's rounded, it won't fit properly. Plus, even when I do a straight line, as in the part above it, the corners are rounded, but I drew straight lines. In this case, I like it, but I think there must be a setting. Also, I'm struggling to have the rounding look smooth in general. It's so hard to eyeball it and just pull on the curve here and there. I took a look at Designer, but don't see any way in there either. Thanks, as always, for your help. Susan
-
OK. Thanks.
-
Thank you. :-) That's great.
-
Gdenby, this is terrific. But I'm unsure of how to do most of the steps you suggest: 1. You wrote, "All nodes selected, and turned to smooth." I don't know how to do that. Can you please explain a bit more? 2. You wrote, "Nodes reduced by using the smooth curve widget." I see it (in screenshot), but don't know how to use it. Can you please explain? 3. You wrote, "Select a few nodes, and make them sharp again." I'm not sure what you mean. 4. You wrote, "This example probably would have been better if I'd bothered w. the stroke miter options to get a tighter alignment for the stroke to the outer curve." What are the stroke miter options? And I don't understand about tighter alignment to the outer curve. 5. An overall question: I have been able to do some of the curving, but the handles on other nodes seem to mean that when I fix one area, another goes out of alignment. Is there a way to remove the handles, so just the node is left so if I pull up the other side doesn't curve down? Thank you again. Susan
-
Thanks. I'll try that. I just don't have a steady hand and am doing this with a mouse. But I see why it's a good idea. I appreciate the help, Dutchshader.
-
I really am searching what help is out there before posting my questions. But I can't find what I need or at least I can't make it work on my own. So I'm hand drawing my art and scanning in. Then, because the drawn black outline looks cruddy , but I want to keep the color inside, I'm using the pen tool to create the outline. This is the top of a letter "D" and you can see how uneven the curves are. I know how to move a node, but moving one doesn't shift the rest properly. I tried using the Segment tool, but again, when I converted it to curves, I couldn't get a smooth curve when I moved it. Bear in mind it's still all uneven because I wanted to figure this out first. I can do straight lines fine, but these curves are a problem. I saw something called a corner tool but it seems only to be in Designer. I couldn't find it in Photo. Do you have any suggestions? Thanks, Susan