ApvdG
-
Posts
32 -
Joined
-
Last visited
Everything posted by ApvdG
-
I understand how I can record a macro, but when I have started editing a photo and arrived at a set of adjustments I am happy with, I would want to be able to consolidate that set of adjustments into a macro. I posted this question in https://forum.affinity.serif.com/index.php?/topic/112531-creating-macros-from-sequence-of-adjustments/. The replies indicate there is indeed no simple way to do this. Anon2 proposed to select all adjustments, copy (CTRL_C), press the record button and than paste (CTRL_V). That seems to work on a Mac, but not on a (my) windows machine (rather than the set of selected adjustments, a single line appears in the Macro: "Paste"..). If that is a bug, a repair would already be nice, but a more user friendly workflow would be much better. Hence the following request: Once the user has developed a nice sequence of adjustments / live filters, allow the user to select them all in the layers panel and offer the option (e.g. on a right mouse click) to "save as macro". Thanks in advance. Ap van der Graaf
-
Thanks all for reacting. All interesting, although as a relative novice it is not all that clear to me (e.g. not sure what an asset is). So, back to the original question, would it be an idea to ask the development team to consider implementing the following: Once the user has developed a nice sequence of adjustments / live filters, allow the user to select them all in the layers panel and offer the option (on a right mouse click) to "save as macro".
-
Anon2, Thanks, looks like a straight forward solution, but after pasting with cntl - V I see this in my macro window, and after storing this to the library and applying it, nothing happens... What could I be doing wrong?

-
I understand how I can record a macro, but when I have a set of adjustments I am happy with, but did not press the record button before I started, is it still possible to create a macro from the set of adjustments?
-
When I first do a selection on the initial image, an then perform one adjustment and then another one, both adjustments are performed on the same selection. I would like to do the same (running two or more adjustments) using a mask, either one created separately or one created in conjunction with an adjustment. But I cannot figure out how to have the same mask acting on several adjustments (so that id I then change the mask, both all these adjustments are affected. I noticed I already put the same question in October last year, and also got a workable reply so this entry is obsolete (can therefore be removed)
-
Thanks for your reply. It looks like there is not a simple intuitive way to do this... I tried what you proposed, but did not really succeed (I had two adjustments, created the spare channel having one of the two adjustments selected, then wanted to "load it" to the other adjustment, but "loading" was only offered fir the initial adjustment). Ap
-
I start tyo understand the concept of masks, and how to mask individual adjustments / layers. I was looking however for a way to have several adjustments (e.g. "levels" and "White Balance"), but then crate one mask that masks the two adjustments. Is that possible? Ap
-
Improve usability of auto - levels etc.
ApvdG replied to ApvdG's topic in Feedback for Affinity Photo V1 on Desktop
Affinity does have a button to automatically adjust levels. The thing is that the levels proposed by Affinity can not then be adjusted. -
Hi, thanks. Yes, I saw that as well in the meantime. So, what is then the difference between a live filter and an adjustment?
-
Thanks for the quick reply. A bit clearer indeed, except that I am still looking for an option to mask a filter. Example: Portrait where I want to blur the background but not the head. Are there other tricks to accomplish this? Regarding split screen not being possible for adjustments, I do not see a reason why this would not be possible. I can also switch a layer on and off ... If anything, I can imagine it is more difficult in filters, as that uses surrounding pixels ...
-
I do not understand what the logic is behind when an operation is called a filter and when it is an adjustment and also why options offered in both are so different. It looks as if masking part of an adjustments is not possible in filters. Inversely, showing a split screen before and after is a very nice feature in filters, but why is that not available in adjustments?
-
Improve usability of auto - levels etc.
ApvdG replied to ApvdG's topic in Feedback for Affinity Photo V1 on Desktop
Thanks, very cleaver. I tried this with auto levels, but could not really figure out how to change the levels in the duplicated layer to arrive at a black picture. Possibly too many possible solutions if you also include changing levels for all colours... ? Let's hope Serif will implement this improvement proposal. -
A lot of photo editing software tools automatically crop a photo when the user does a small rotation for instance to straighten the horizon. In Infinity Photo this seems not to be the case (unless I overlook an option). This means 4 additional mouse-move operations, that are not really needed in my view. Can this auto-cropping be implemented, even if only as an option (for those that want the control)?
-
I noticed that a number of automatic adjustments such as auto levels and auto contrast are available as buttons in the menu, but there is not an "auto" button on the equivalent adjustment window. But moreover, the parameters of any auto adjustment, are not exposed, and not adjustable later on. I would like to propose to implement either of both of the following: add a button on the adjustment window (for all adjustments where it makes sense) to adjust the relevant parameters automatically (resulting in the values and slider positions to be adjusted accordingly). When any of the existing auto buttons is clicked, an adjustment layer is added (like when starting the equivalent adjustment), and the settings found by the software are shown. This will offer (in hopefully most cases) a good starting point to the allow the user to fine tune these settings.
-
inverting a mask
ApvdG replied to ApvdG's topic in Pre-V2 Archive of Desktop Questions (macOS and Windows)
Perfect, worked, even on a hidden mask in an adjustment layer. Thanks. -
Is it possible to "invert" a mask in Infinity Photo, similar to inverting a selection, but then also including inverting the greyscale (i.e. 20% white becomes 80% white)?
-
I want to darken the sky compared to the lower part of the picture, and not having a sharp boundary. I was trying to do this by using a gradient mask. Starting from the original picture I added one adjustment (levels), then press Alt and click on the adjustment layer (= white), and then select the gradient tool and create the gradient. Works very nice, only affecting the sky, and no sharp transitions. However, if I add a second adjustment (e.g. exposure), that adjustment is (obviously) affecting the whole picture again. I have two questions. How can I create a gradient mask that works on several adjustments, and how can I do that in such a way that I am able to modify the initial gradient at a later stage, using the same interface as when I create the gradient in the first place (so retrieving the line with the end-dots, to then just moving them slightly)?
-
Rotation resulting in poor result
ApvdG replied to ApvdG's topic in Pre-V2 Archive of Desktop Questions (macOS and Windows)
Thanks Owenr. The artifact is not happening at export, but straight away visible after the rotation. So, for a minute I thought your suggestion would not help me. But I changed the setting you proposed after all and the artifact indeed disappeared. Perhaps still a bug, but then that the default setting is not ok ? Great help, thanks ! -
I posted a feature request on Tuesday and apart from one like I did not receive any reaction from a forum member, or from the developers. What is a usual reaction time of the Serif staff to a bug report or a feature request? Or do they only react on topics that are actioned ... ?
-
Rotation resulting in poor result
ApvdG replied to ApvdG's topic in Pre-V2 Archive of Desktop Questions (macOS and Windows)
Perhaps this should be placed as a bug ... ? Can I re-locate this item myself, or can this otherwise be done by a staff member? -
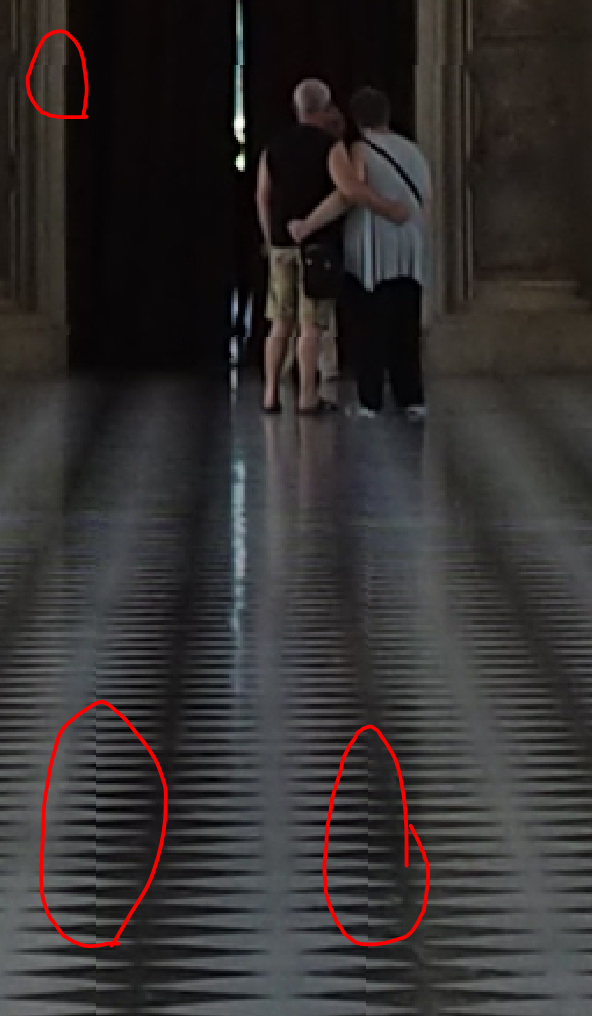
When I apply a (small) straiten correction (by manual rotation), the result is quite disappointing. I see discontinuities I should not be seeing, and am indeed not seeing when doing the same operation in the standard windows 10 photo app. See attached screenshot of a zoomed in part of the picture, where the mentioned discontinuities are marked. I also tried to attach the original jpg, but it does not upload ... (error -200 ... ?)
-
I noticed that a number of automatic adjustments such as auto levels and auto contrast are rather hidden in the menus, and that when they are used, they are applied to the pixel layer selected, without creating an adjustment layer. I think it would be useful for a lot of users to have an auto - button on (at least some of) the adjustment settings window(s). I realize this may not always provide the desired settings, but in many cases may at least be a good starting point for further fine tuning.
-
- 1
-

-
Selecting a raw file
ApvdG replied to Simon Blackwood's topic in Pre-V2 Archive of Desktop Questions (macOS and Windows)
Thanks for finding out and letting me know. I bought the software, but it did not work for me ... Still only a logo shown for each Rwa photo. I informed them and waiting for an answer. Still waiting ... -
Selecting a raw file
ApvdG replied to Simon Blackwood's topic in Pre-V2 Archive of Desktop Questions (macOS and Windows)
Olympus omd10 mark3, windows 10, plus example ORF file attached. P8030205.ORF -
Selecting a raw file
ApvdG replied to Simon Blackwood's topic in Pre-V2 Archive of Desktop Questions (macOS and Windows)
I have the same question / issue. Opening a new image and selecting a folder with only raw files gives me ... : Indeed a rather huge disappointment and quite a surprise for such a good quality photo editing software. Any other suggestions ... ?