dstraigh
-
Posts
20 -
Joined
-
Last visited
Everything posted by dstraigh
-
I've got a basic equation. I've added some text. There's a box or frame around the text with handles. Other programs will word wrap text when the box/frame is resized larger/smaller. However Affinity Photo resizes the text font when the box/frame is resized. Is there a setting to allow Affinity Photo to only wrap the text when resizing the box instead of resizing the font? I'm using version 1.10.6 of Affinity Photo on a MacBook running Monterey Ver. 12.6.6
-
I can't seem to do a simple crop without also cropping the canvas. What I want is the canvas to be larger than the photo (because I'll be adding text and other images later - kind of making a poster). Anyway, I have to use a totally different tool the first crop the image the way I want it and then import/place that image. There should be a better way - but, I don't see how. I'm using version 1.10.6 of Affinity Photo on a MacBook running Monterey Ver. 12.6.6
-
Does Affinity have the ability add arrows to a drawing. If so then how?
-
Okay, so, if at all possible, is there an ultra simple way of describing what one needs to do to edit existing text in Photo Affinity? I've got the same problem. Just can't do simple things like change the text or change the text color. Perhaps I need a simpler program to use. I don't need anything fancy.
-
I've attached the jpg

-
Yes, it's sorted out. I had opened a picture (jpg/png or similar) then added text. After exporting (as a jpg/png/whatever) Affinity was, basically saying 'do I want to save as an Affinity Photo file so I don't lose my edits (layers of text)'. That's how I see it anyway. So, I did save as an Affinity Photo type (just incase I'd like to change that text!).
-
I'm imagining some type of 'grow' function that selects a color and expands it. I have a black and white jpg with a simple design using thin black lines - I'd like to make those lines thicker.
-
I opened up an image that came directly out of my iPhone and added some text (using Affinity). Then, I exported a PNG. Now, I'm closing Affinity and I got a message asking if I want to save. Sure. Why not? I might want to edit the text at a later time and that cannot be done with the exported photo. But, if I flatten, wouldn't that make the text un-editable? Here is the message I got upon closing (without saving): The document contains non-pixel elements. Would you like to save the document flattened to pixels, or save as a new document? What should I do? EDIT: Okay, I played around a bit - and it seems that if I want to keep the layers then I need to select Save As... to save the work as an Affinity Photo file. I was able to re-open and then edit the text after using Save As.. (instead of just Save). I believe if I simply click Save this will save the picture, a flattened image file, with the added text (similar to exporting an image - I guess). I would imagine this is because I STARTED by opening an image file (with the jpg extension) and therefore need to use Save As... to save as another type. True?
-
Not sure if this is correct - but File --> Open won't place images together (that's how I remember it (going a back a couple of months) - which is how I came to use the place command in the first place. So, if this (the Place command) is causing the embedded image issue - then, I guess I'll always have that situation. But, I know what to do now.
-
Okay, got it! Thanks again!
-
Okay, that seems to work. How'd you know it was an embedded file?
-
My wand just doesn't select anything. You can see that in the video I published.
-
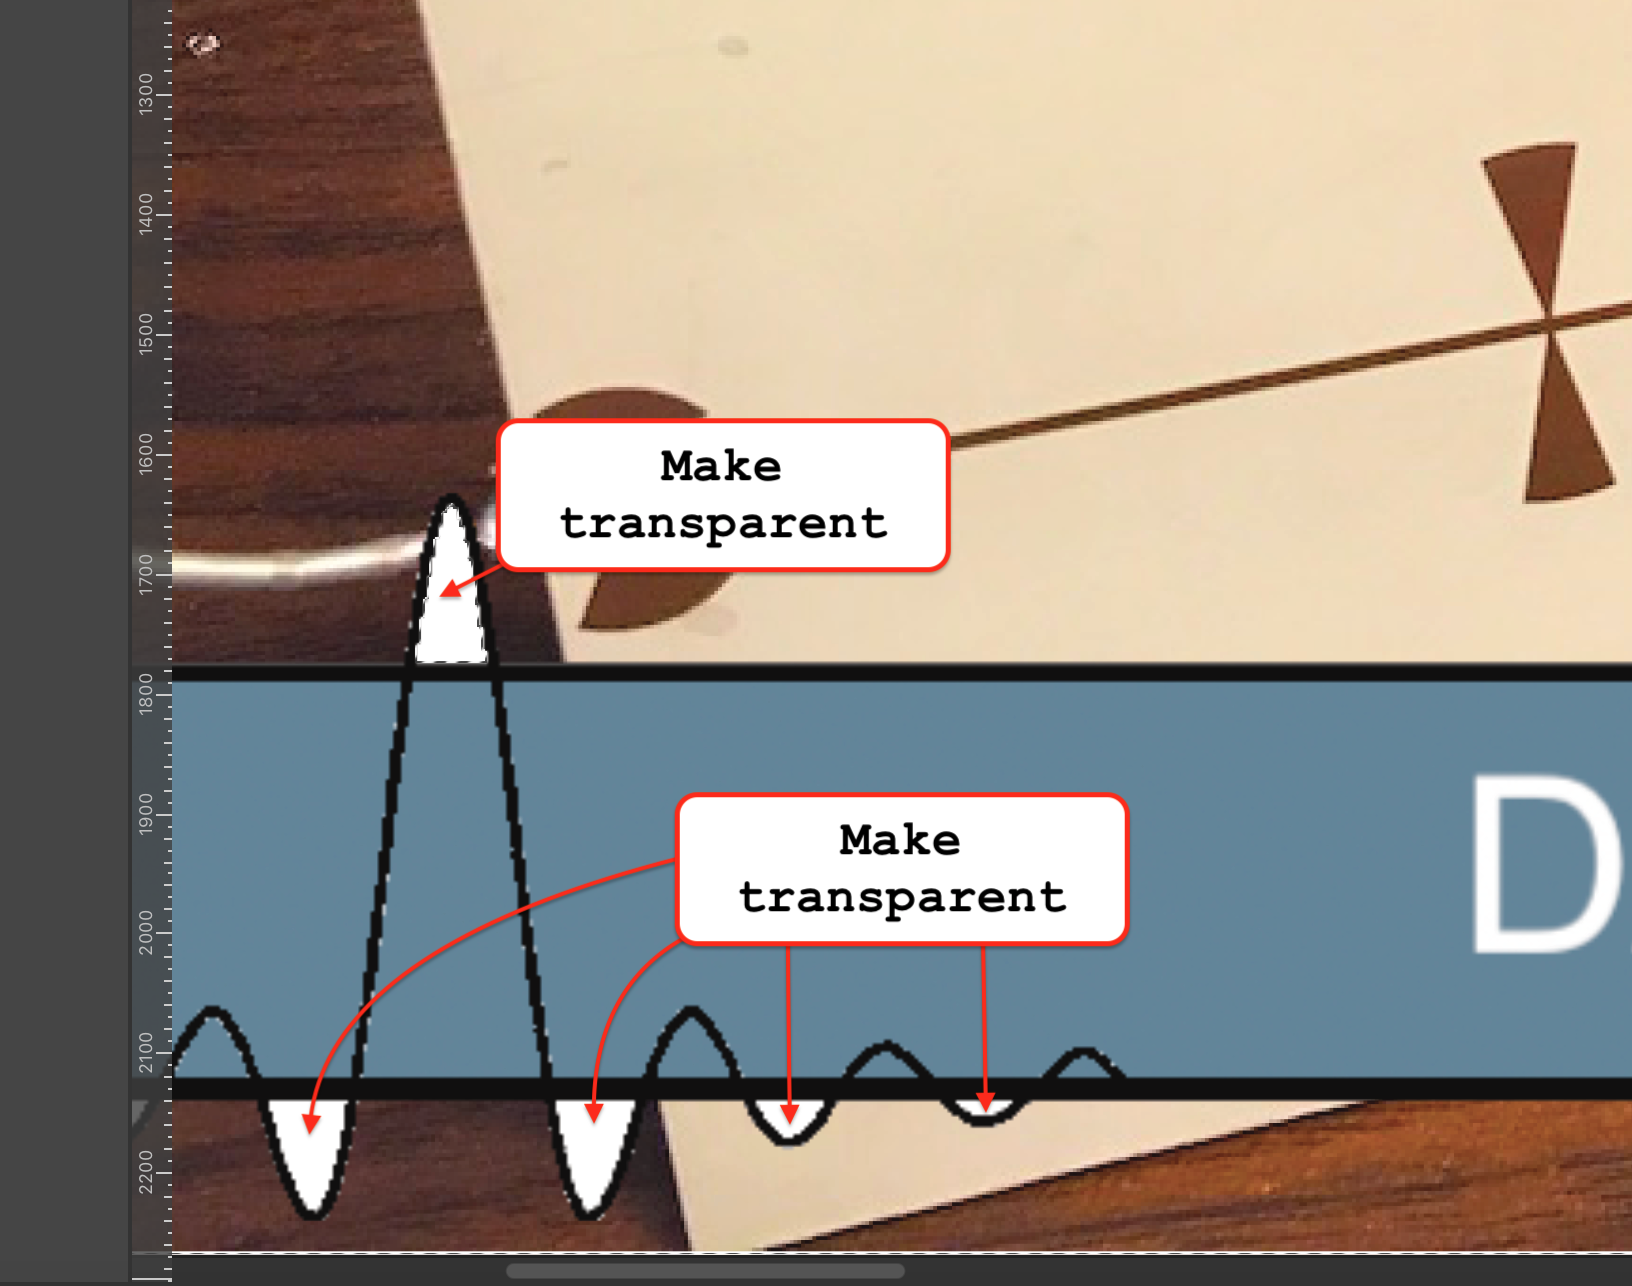
Thanks! Now I can repeat the transparent mask. I just cut out all the white areas and made them transparent. But, I'm still wondering, what's going on with the wand? Why is mine seemingly different from yours?
-
It's really not working. The wand simply does not work at all. It must be some setting or mode or maybe not even the correct icon (although it looks identical to your screen capture). I've managed to haphazardly create a transparent mask - but I still don't know what I did (I can't repeat it reliably). I documented my troubles in a video. You must watch the video all the way to the end to see what I'm taking about (it's a very short video). Here's the video https://youtu.be/RJlohmblYSo
-
I don't have a Magic Wand Tool (the icon that looks like a wand says it's a "Flood Select Tool" and it does nothing - it doesn't select anything). Interestingly, I accidentally got the Selection Brush Tool + Command X to remove one of the white areas (and it is now transparent). Unfortunately, I don't know what I did to make that work and cannot make the other white areas transparent. Frustrating.
-
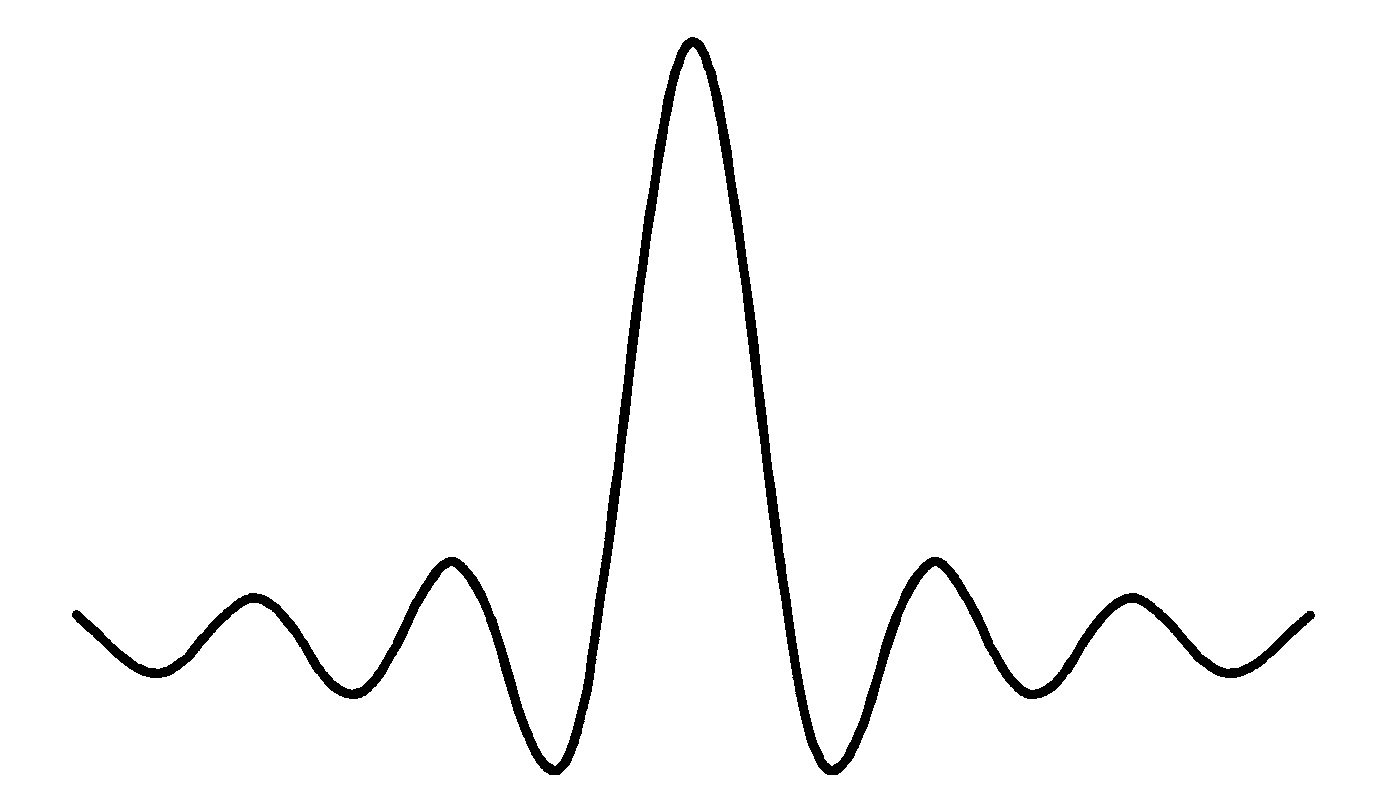
Hi, I have two images each in their own layer. The image that is on top is a graphic. The image that is behind is a photo. I wish to cut a (sort of) hole in the graphic so that the photo behind shows. However when I use the Selection Brush Tool + Command X instead of cutting a hole - everything outside the selection gets deleted. I pressed a button that says Invert Selection - but this did not alter the original selection. I've attached an annotated screen capture showing what I want to accomplish. Any help much appreciated. David EDIT: I'm using a MacBook Pro with High Sierra.
-
Yes, that's exactly what I did - I used File --> Place. I fixed the issue using a clunky workaround. I've got a MacBook Pro - I opened the PNG image in Preview and then did a screen capture. After saving the screen capture I was able to use File --> Place in Photo Affinity without incident. Next, time I'll check out the color profile. Although, I suspect I might be in situations where different photos have different color profiles. If that's the case I'll have to normalize everything before working (importing/placing) on the main document. Anyway, thanks for your help. -David
-
Egad. I didn't really understand the procedure illustrated by @josh.b . I'm doing something ultra simple and only need to clone a color. At the moment I dick around with manually adjusting colors until they match other colors. Cloning colors in other programs such as Gimp and maybe Photoshop (haven't used PS in years) is trivial. I would have hoped it would have been equally as easy to clone a color in Photo Affinity I hope I'm wrong, but given the dates of this thread - starting in 2016 - I take it Affinity Photo has no plans of adding a clone color feature that is easy to use - easy enough even for me to use.
-
Hi, I'm new to Affinity Photo. I've produced a few graphic documents using a combination of importing graphic image files and text. Today, I imported a PNG file and the hue unexpected shifted. The first thing I attempted to do was find an easy way to adjust the hue (although I'd prefer colors not to shift in the first place). Is there some 'color space' setting associated with PNG files or something? David