simonlayfield
-
Posts
80 -
Joined
-
Last visited
Everything posted by simonlayfield
-

Node Tool Curve Selection Accuracy
simonlayfield replied to simonlayfield's topic in [ARCHIVE] Designer beta on macOS threads
@fde101 I do find naming layers, groups and curves useful in certain cases. In this case, though, sorting and naming 80 grid lines isn't what you'd call a sustainable workflow. For example, what would be the best way to name these grid-style lines? horizontal 1, horizintal 2, horizontal 3...? I that case if I decide to add more lines in between later then these numbers become semantically incorrect and misleading. I appreciate that some manual management of layer/curve naming can help in some way with navigating the elements, but it's kind of sidestepping the issue that curves should probably be directly selectable in this instance - if not by default then perhaps a setting that can be toggled. That's my POV, but I do appreciate your suggestion and agree that it is helpful - just not ideal. -
Node Tool Curve Selection Accuracy
simonlayfield replied to simonlayfield's topic in [ARCHIVE] Designer beta on macOS threads
Also on a separate note - can you try creating a simple dashed line in this document? It doesn't seem to work at all for me. If this is a bug I'm happy to create another ticket but thought I'd check first. Thanks -
Node Tool Curve Selection Accuracy
simonlayfield replied to simonlayfield's topic in [ARCHIVE] Designer beta on macOS threads
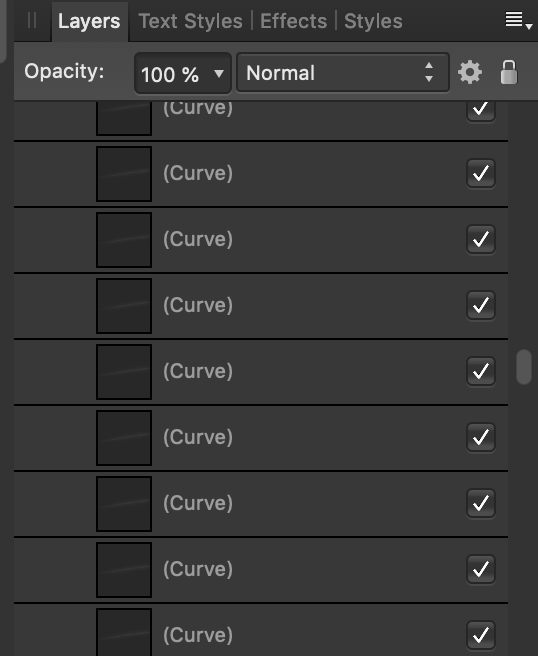
@Sean P Sure thing! file attached. The issue isn't that the lines aren't at all selectable, it's that the Node Selection tool presumably isn't designed to select lines (curves) directly. So when you have lines close enough together it seems to prioritise the selection of lines that are higher in the layer order (perhaps this also involves the curve's boundary box). Try clicking directly on a line in the roof in the attached file and you'll see what I mean. It might be that when you zoom in close enough you can directly select a curve but it's unreasonable to suggest that this is a manageable workflow when numerous adjustments may need to be made, and despite zooming in to select you'd only have to zoom out again to see the context of your change. @fde101 While you're right that you can select the curve in the layers panel, it's in no way easier. When dealing with lines like this, all part of the same section of artwork (and so alongside each other in the layers panel) this is what you see: ^ In this case there are about 80 curves - all indestinguishable from one another in the layers panel. It's like bobbing for apples, essentially. church-sketch.afdesign
-
Apologies, I think I may have caused the global colour confusion by suggesting it in a previous comment. I did stress that this only satisfies the single use case of changing the colour of multiple objects (fill/stroke) without having to selecting them - something that if you weren't aware of might save you some time. In hindsight perhaps I shouldn't have muddied the thread topic. My bad.
-
I searched the forums but couldn't see this issue (or at least how to work around it) so apologies if this is a duplicate. I have a grid of curves (lines) and need to select one line in particular, but unfortunately the node tool struggles to identify the curve I'm attempting to select (the vertical line): Is there a way that the Node tool can explicitly select the curve I'm actually clicking on and not curves in the surrounding space? My guess is the node tool is selecting the other curves based on their boundary boxes - which being higher in the layer stack take priority. Either way it's super fiddly to deal with when adjusting each curve in the grid by having to move the layer order around every few seconds. Or am I going the wrong way about this? Thanks in advance
-
@VectorVonDoom It's true - and I wasn't suggesting this is a sufficient replacement for that feature. Select by same colour/fill/stroke appearance is powerful because it allows you to perform number of options once selected. I thought it was worth posting because it covers one of the many use cases that might apply, and global colours are a feature perhaps not everyone would know about. I'm hanging out for the feature requested in this thread because I've felt the pain of having to select a crazy number of shapes and curves in order to make document-wide amends to complex artwork. Yeah, this involves some manual management of global colours. If it helps, you can show global colours as a list and then rename them to more useful/descriptive terms. See below: The only caveat here is that if you end up using the 'Face Tone Dark' global colour for something that isn't part of the face then semantically it can get confusing. It really depends on the complexity and level of granular control as to what naming system is most useful.
-
@madtho If you happen to be creating a project from scratch you can workaround having to change colours in multiple places by using global colours within a Document Palette. If, when creating new objects the global colour swatch is used as a fill or stroke colour then you can change this colour later and it will update whereve it is being used in the document. See below: The only thing to be aware of is that a global colour isn't a global colour in the strictest sense - the swatch actually has to be active when you're creating new objects. It will, however remain 'attached' to the object if a shape is duplicated (as above). Of course this isn't the same as selecting by same fill/stroke/appearance but as far as amending colours in a document goes it saves having to essentially go through the same manual process of selecting a huge number of shapes and curves (which would have to be selected separately by whether the colour of the stroke or fill needed changing). Hope this helps
-
Section Manager
simonlayfield replied to iceritchie's topic in [ARCHIVE] Publisher beta on macOS threads
Just wondering if there's a known workaround for this? Unfortunately my page numbering relies on sections and is currently uneditable. Is there any other way to remove/edit sections? I'm guessing not, but thought I'd check. -
Had a quick look for this on the forums but could see it. Thought I might see if others would find it useful. So If I want multiple shapes to maintain the same fill, the way of achieving this is to set a global colour and then select the relevant shapes and set the fill to the global colour. Now if I want to affect the fill of all of the shapes together (without having to select them) I can change this global colour and they'll all change accordingly. Now, if I were to then import a palette that contains the same fill colour as the colour of these shapes, I feel like I'd benefit immensely from keeping that colour global for those shapes. If there's a concern that some shapes have global control and others don't (i.e. there are shapes incidentally the same colour that I don't want to control globally with the others) then there'd have to be a separate fill of the same colour that isn't global for those. Ultimately I don't see a problem with, when importing a palette for artwork with global colours set, and the palette contains those global colours, a prompt to say: "This palette contains colours that are currently set as global, would you like to maintain global colours?" Yes | No This way I don't have to go through the effort of selecting all of these shapes again and setting their fill as global - a big time saver considering I'm currently using global colours as a workaround to this issue: Does anyone else think this would be useful?
-
Cut a Path
simonlayfield replied to Mushr00m's topic in Pre-V2 Archive of Affinity on Desktop Questions (macOS and Windows)
Ah, ok I see. Thanks all for your time, I'll move ahead with the solution @R C-R has suggested. I guess I'm used to Compound Paths in Illustrator maintaining their structure when adding and subtracting separate shapes. This is fine though, just a little less intuitive - thanks all! -
Cut a Path
simonlayfield replied to Mushr00m's topic in Pre-V2 Archive of Affinity on Desktop Questions (macOS and Windows)
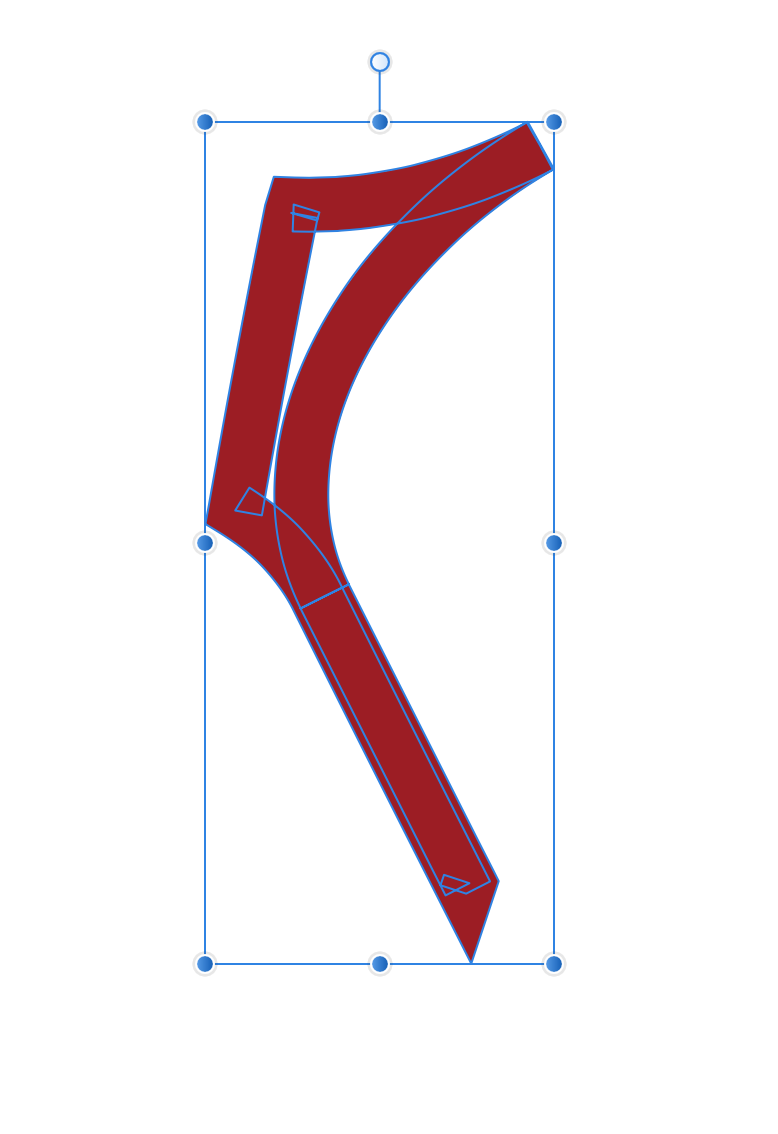
Hey team, So I'm working with this vector that I need to break apart, that is, I need to remove part of the vector shape. The first issue is that it's a complex-ish path that I want to combine with other smaller shapes that make up the lettering etc. (indicated in purple below) If I attempt to combine these two curves there's a section of the main path (the face) that doesn't quite act as intended. It seems that the only choice I have from here is to divide the curve and reconstruct the path as intended by subtracting the letter sections. I feel like this use case is simple enough to warrant not having to do that. The second issue is that I need to break the main path in order to remove the top section - effectively I need to erase an unnecessary part of the path (indicated below). Using both methods suggested in this thread doesn't appear to do this effectively. Creating a shape and subtracting (as below) takes me to the point mentioned above where the main path breaks apart. Creating nodes and selecting Break Curve doesn't work because the nodes still appear as connected i.e. the fill colour persists between the broken nodes. I've uploaded the file if anyone wants to give it a go and see if I'm missing something. Thanks in advance And apologies for massive screenshots. happy-shopper.afdesign
-
Oh and sorry @GabrielM yeah I did try expanding stroke but this appears to do nothing. @gdenby Thanks so much for the time you spent tracing to illustrate this as an option, however when you see the EPS I attached you'll realise this just isn't a solution for the entirety of the file. There are just WAY too many tiny curves that would require tracing. Why not remake the logo from scratch? ^ Yeah, I mean this is an option. However, this also requires a considerable amount of effort and time in order to successfully recreate a like-for-like result. I'm not against the idea, but I feel that this option should be a last resort given that Affinity should be able to handle this scenario. The EPS I was provided sucks and is the product of lazy/generated vector work but...¯\_(ツ)_/¯...it is what it is. There are times when we are passed the ball and we just have to work with what we're given. I'd like to think I've got the know-how and software features to forge on. I'd also like to say that, despite this particular issue and those connected with it, Affinity is EXCELLENT. I've been a designer a long time and there's so much that's gone in to it that makes my job that much more enjoyable when performing day-to-day tasks. Big fan right here.
-
Thanks both and apologies for the delay. @gdenby Yeah, they are oddly made vector lines. I was provided an EPS by a client of their existing logo and decided I would simplify the file by expanding/merging the shapes - but this is where Affinity struggles for me. This file is pretty crazy, and while I wouldn't personally create a file this complex, I simply have to deal with it being so as it was provided to me. Some shapes/curves are solid fill, others are with strokes of varying widths and ON TOP OF THAT there are shapes like the one I posted above that can't be 'Added' to other shapes because of their overlapping nature. It'd be a VERY useful feature in this case to select by fill or stroke, but that's still in the pipeline. @GabrielM I've attached an afdesign file containing the curve I originally posted. Unfortunately it looks like I'll have to find a copy of Illustrator to use in order to get this work done. Using Affinity just can't handle the complex (crazy) curve lines and sheer number of curves of different fills/stroke that require unifying. Bug on that I posted to here I've also attached the original EPS that I was hoping to simplify. I think this file is a mix of a previous designer's work and perhaps some auto-generated vector elements that have been pasted/imported in to the artwork (hence why some of the the shapes/curves are so unexpectedly crazy). overlapping-curve.afdesign Corn-Stars-Logo-Emblem.eps
-
Hey all, So I've been provide with a pretty complex logo EPS file from a client and I basically need to reduce a crazy number of curves, both with and without strokes, to a solid shape. There are a number of curves that appear as simple solid shapes but in fact have overlapping areas - example below. When selecting this curve the only option available to me is Divide, which isn't what I need. Using Illustrator previously there was the option to Expand, which I believe would have simplified the shape to basically merge the overlapping areas. Is there any way you might suggest I can achieve this in Affinity?
-
@firstdefence This actually worked, thanks! @Pšenda I managed to work around it by redrawing the path. Thanks anyway!
-
I had a look but couldn't find this exact issue in the Forums, so apologies if it's a duplicate. The corner tool seems to go a bit nuts when used on a particular path I'm working on at the moment.
-
Hey all, I'm also having an issue whereby AD hangs when selecting multiple complex curves and selecting Add. There's unfortunately no way to cancel the action or engage with the UI, and so forcing the software to quit from within Activity Monitor seems to be the only way out. I don't tend to work with crazy complex curves or shapes, but in this case it's unavoidable as I've opened an old AI with a vectorised illustration. All I need to do is unify the two areas of the illustration (the black 'outline' as one shape, the white 'fill' the other) but this involves selecting many, many small shapes (curves) of the same colour and combining them - which is where AD appears to struggle. Is this expected? I can understand that performing operations on complex curves can require some processing but, in the event that it takes an unexpectedly long amount of time to process it would be worthwhile having a Cancel button beneath the Union dialog so that an alternative method of unifying curves can be attempted without forcing the software to quit. Loving AD, though. Massive fan right here.
-
Loving Affinity more and more, but working around this can be a bit tedious. +1 for this feature.