Beck
-
Posts
77 -
Joined
-
Last visited
Everything posted by Beck
-
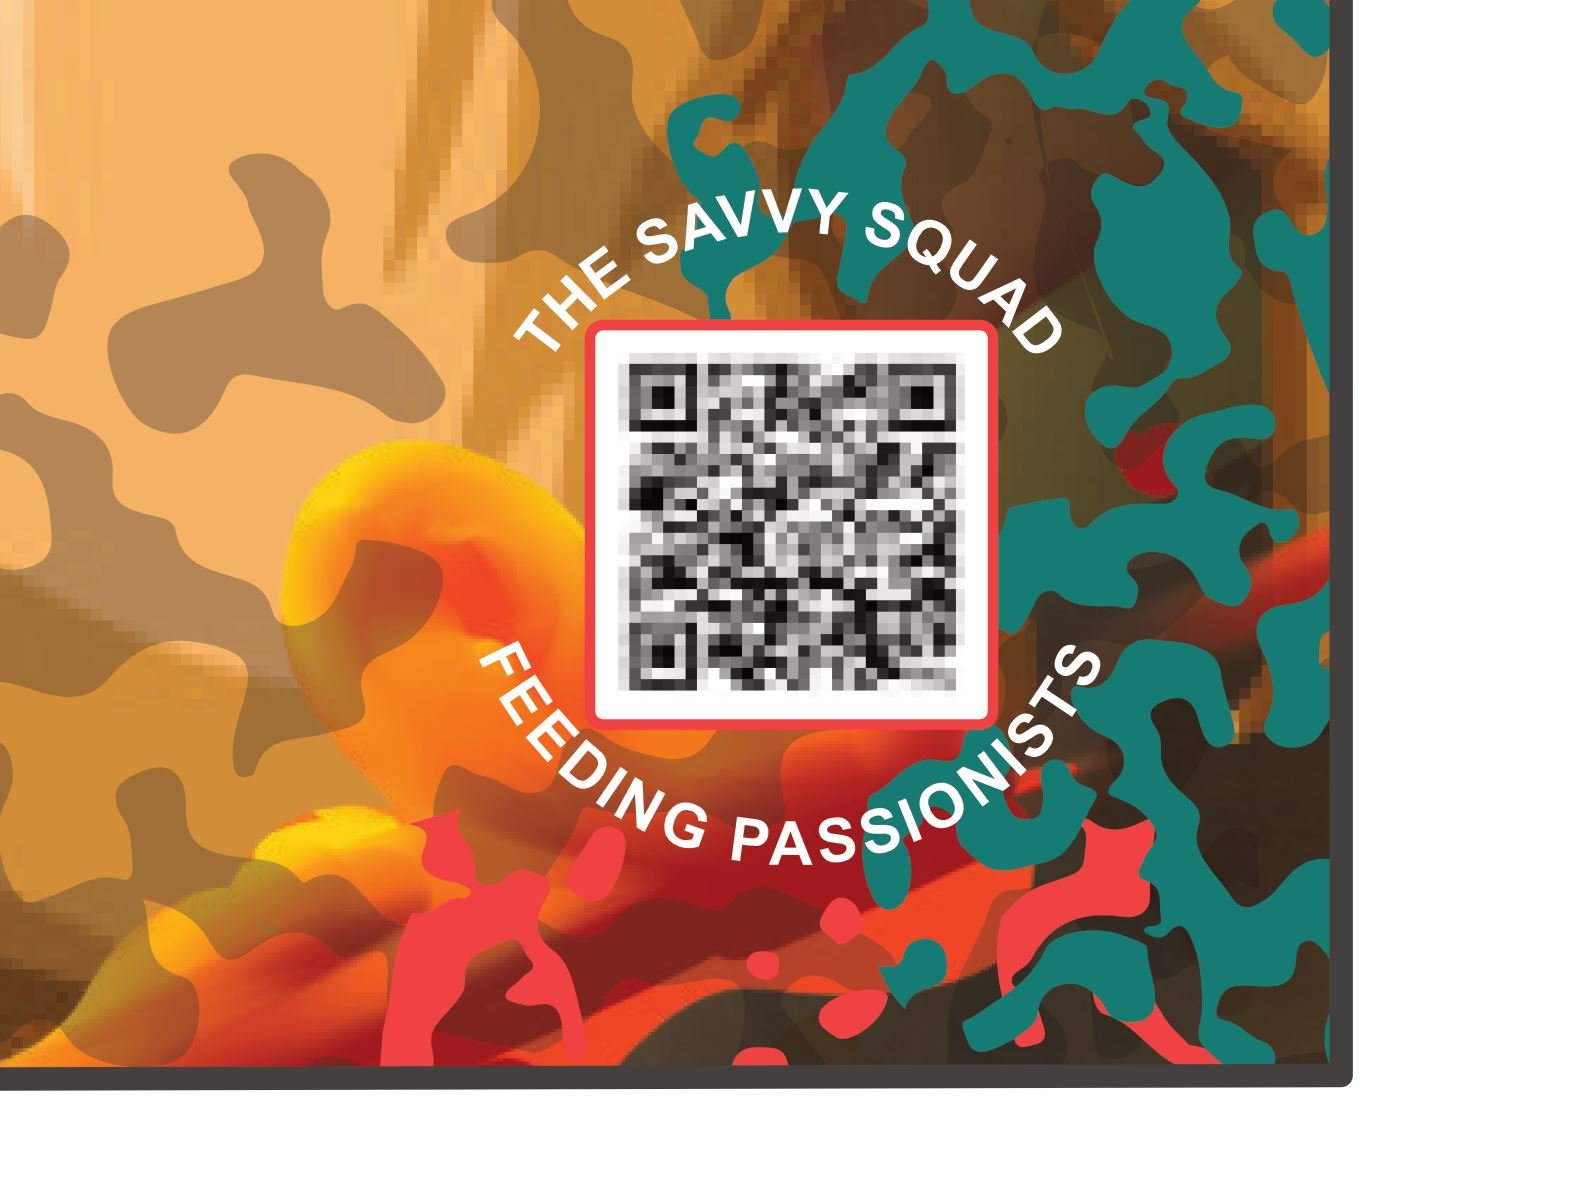
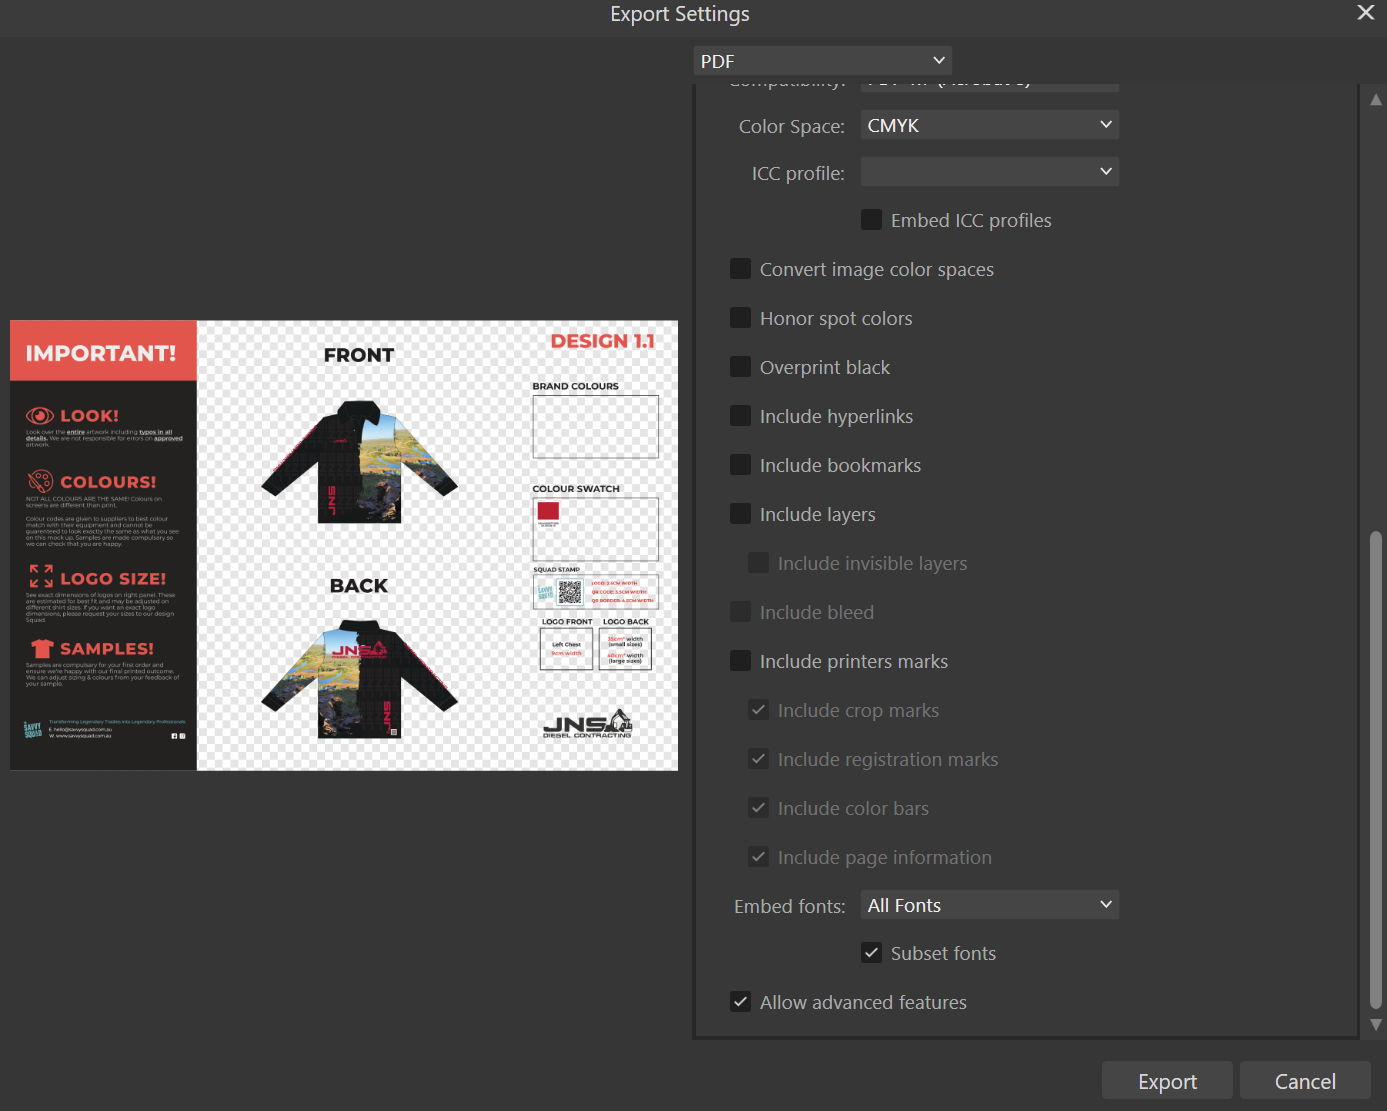
Hi all, Thank you for all your comments and input! I had changed our QR code to SVG file and this helped a lot with exporting it crisp and clean! I handover these files to a printing team that prints the shirts so I need to provide files in High Quality and also editable so they can adjust things into their template. The team use Adobe Illustrator and prefer .ai file but I can only provide what Affinity exports. If anyone knows which is the best File & Export settings to use, I would appreciate your input! I usually export to PDF with settings: For Export - No compression on images - Allow advanced features. Just curious to see if there are better options out there to ensure my printer has the best file possible for the job! Thank you!
-
Hi all, All of a sudden my QR codes are exporting very pixelated when in the past, they have exported fine. I am wondering if this started happening after my update as usually I can export a final file as High Quality PDF with no issues. Export settings: PDF > For Export > Allow advanced features Jeremy - Squad Workfile - 2024 - for export.pdf Jeremy - Squad Workfile - 2024.afdesign

-
Hey Stuart! The file you provided is a cleaner curve! I followed your steps and recreated this and it worked! Thank you so much For anyone following this, just a few more tips that I found: a. Change Colour to black b. Rasterise c. Scale Down d. Copy into inkscape e. Convert back to vector (by going to Path > Trace Bitmap > apply settings on right sidebar) *Simplifying the curve may help clean things up too by going to PATH > SIMPLIFY f. Paste back into AD Thanks everyone for your help!
-
Thanks for the suggestion Lee! My only concern with rasterising is that it wont have the high quality crisp finish. This shape goes very pixelated and im unsure if that will be best for High Quality print output
-
Thanks for your suggestion and this is pretty much what I want to do, not sure how to. I've purchased this pattern online and the file has come as is so I want to clean things up. Im just not sure how to? Usually when I select multiple curves and go to GEOMETRY > MERGE CURVES - this combines everything and usually there are no random nodes throughout the middle. I've tried to add a rectangle in the middle and merge to remove these nodes but this happens - the rectangle is "added in" So im a little stuck on how to achieve this in an efficient way rather than having to select all the nodes manually and delete.
-
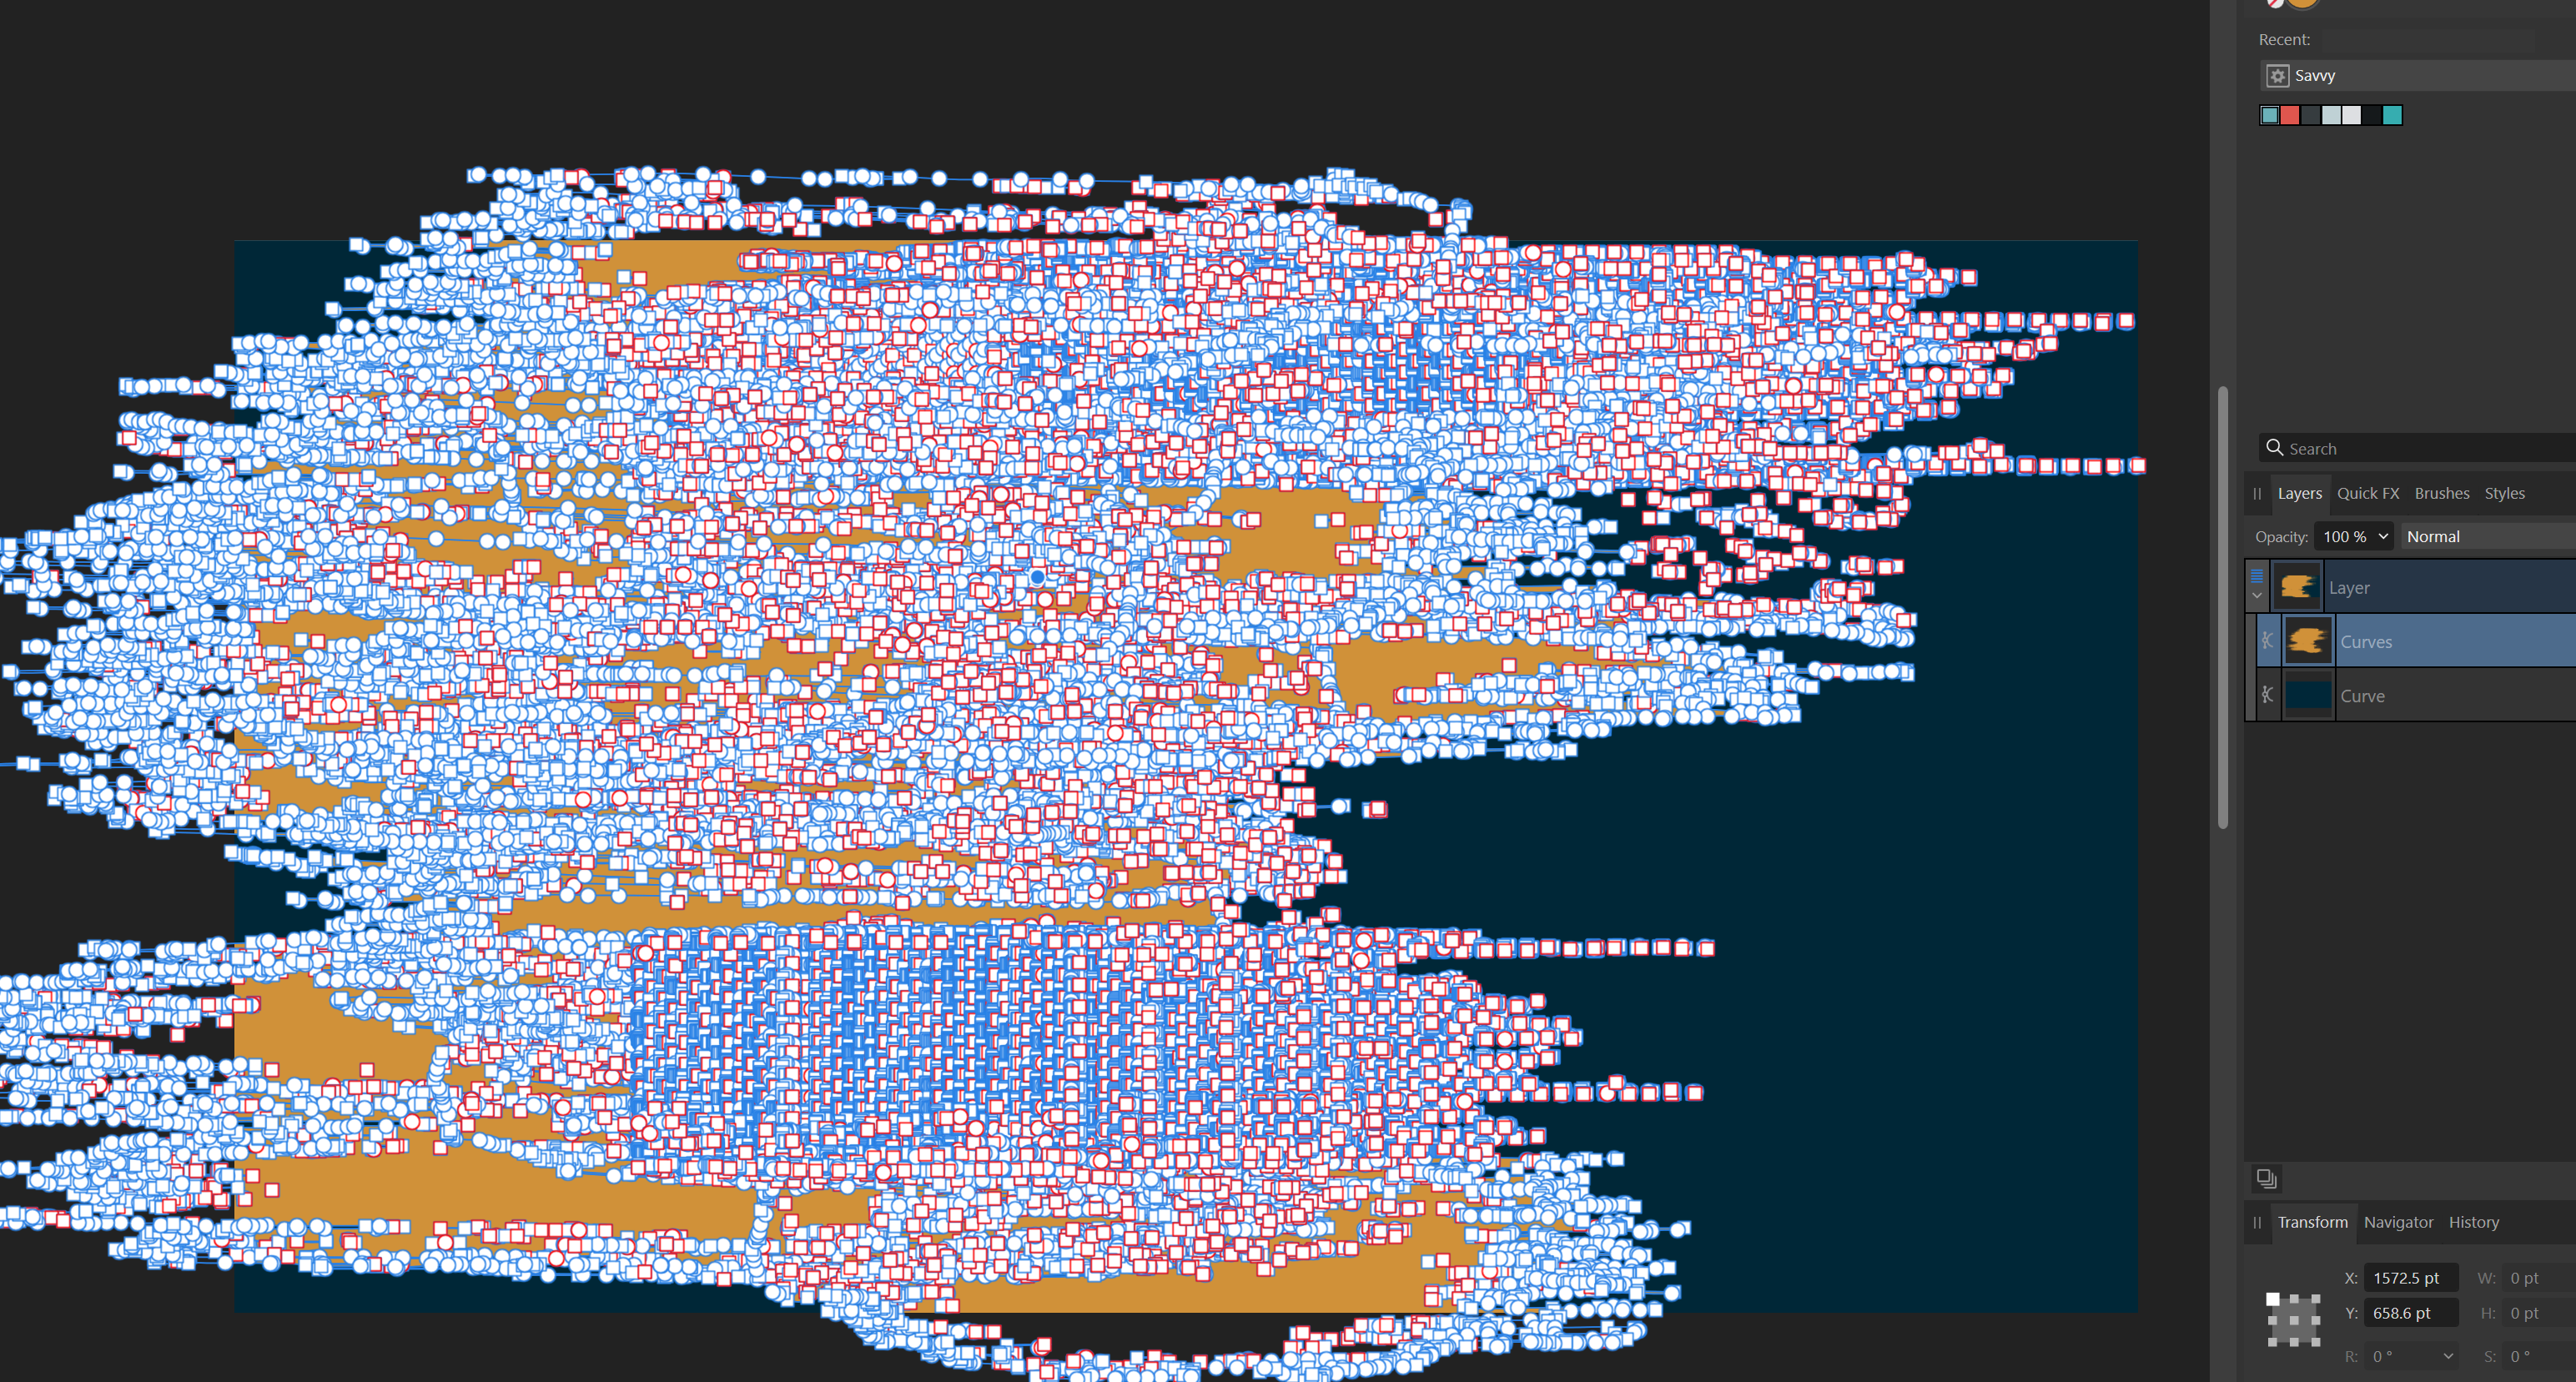
Hey guys! I've merged a number of curves into one in hope to simplify and just have one curve. Unfortunately, it has create a million nodes. Im hoping to clean this up without needing to individually delete all of them manually. Having so many nodes slows my computer down too. grunge pattern.afdesign
-
Matching Colour Profiles for Affinity & Illustrator
Beck replied to Beck's topic in V2 Bugs found on Windows
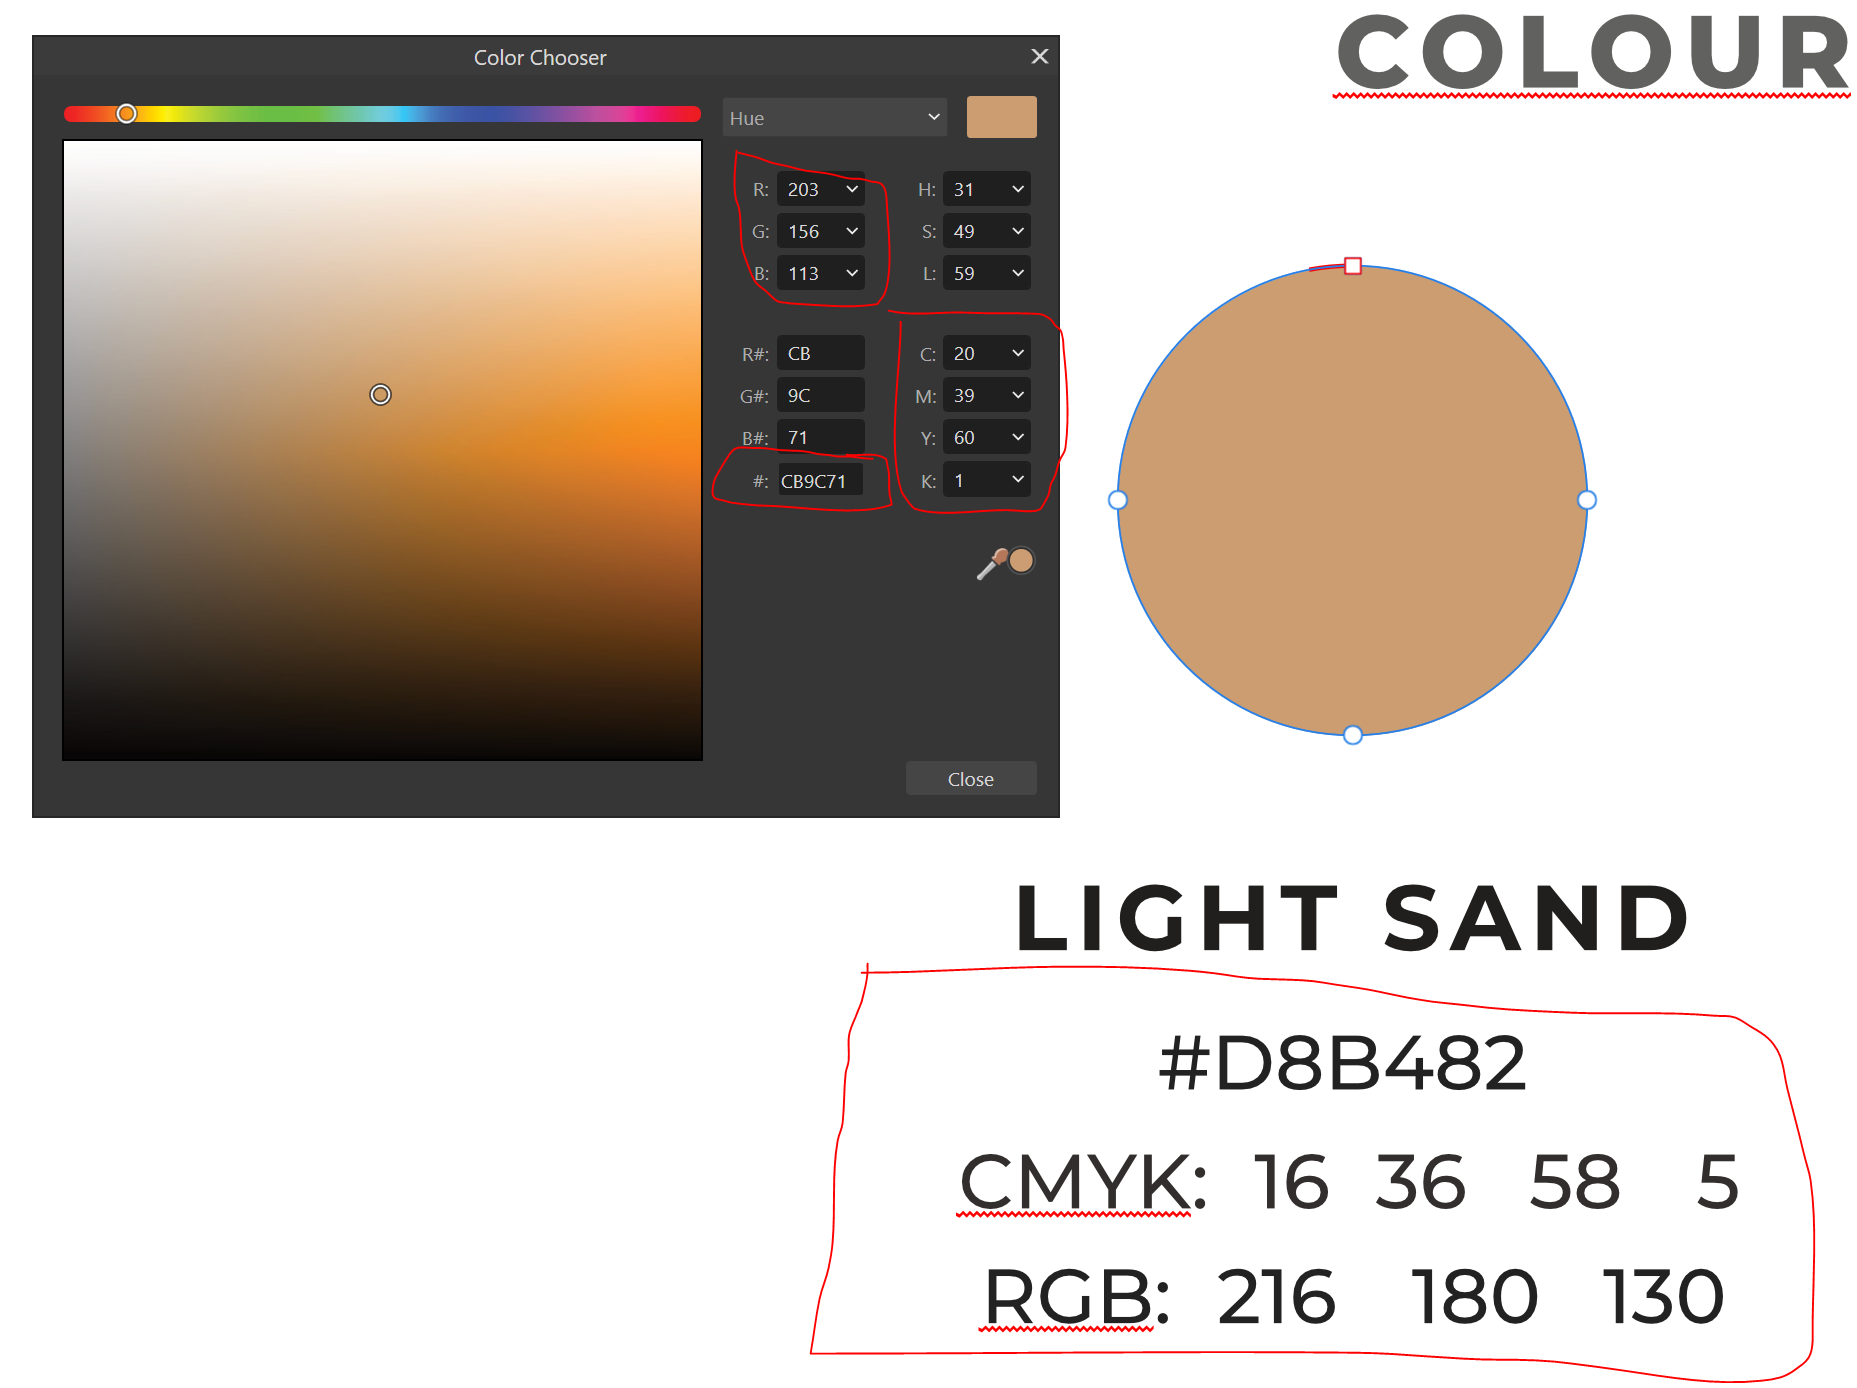
Hey Callum! The original codes were adopted from an illustrator file. When I open in Affinity, the RGB & #hex codes arent exactly the same. I'm just wondering what colour profile others best use for projects that will be design with in teams using Affinity Designer & Illustrator? Is US coated SWOP V2 colour profile the best profile to use? And does the difference in colour codes make much of a difference when it comes to printing. All i am looking for is just the best consistency in colours for our clients
-
Matching Colour Profiles for Affinity & Illustrator
Beck replied to Beck's topic in V2 Bugs found on Windows
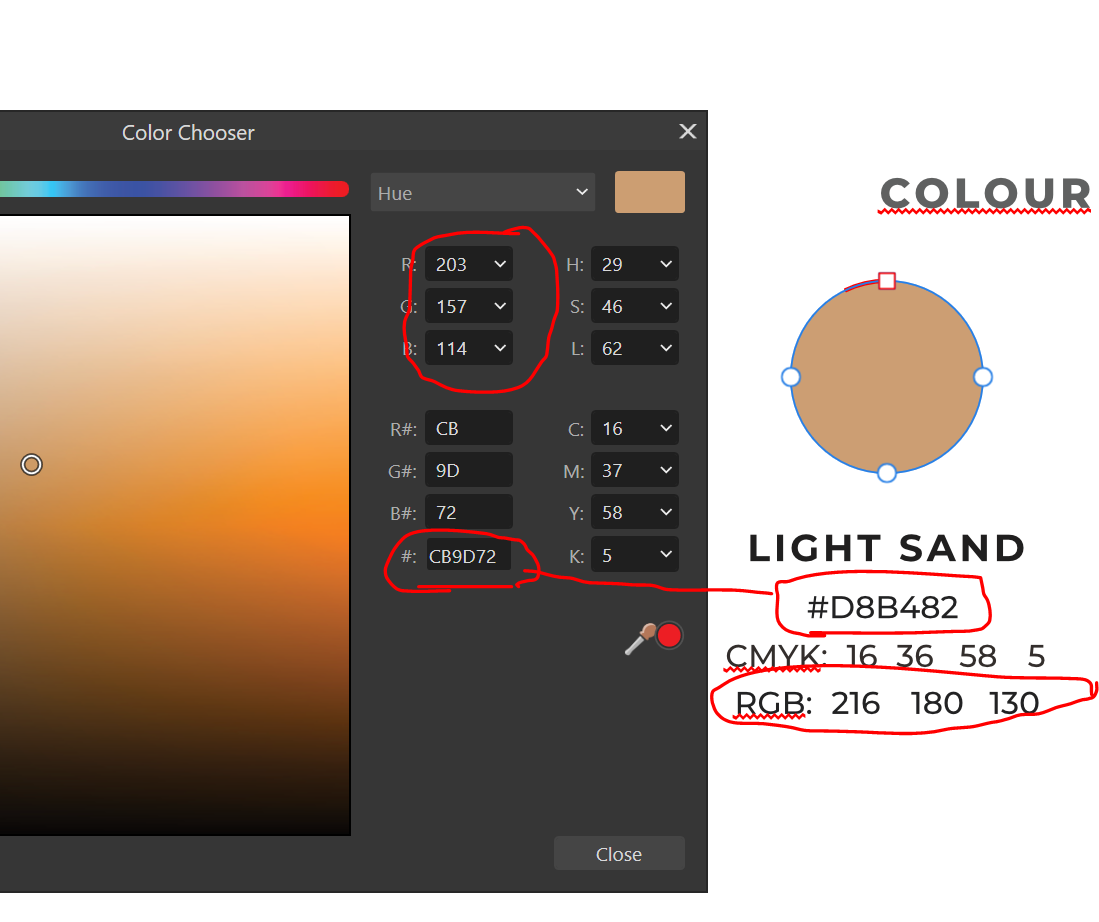
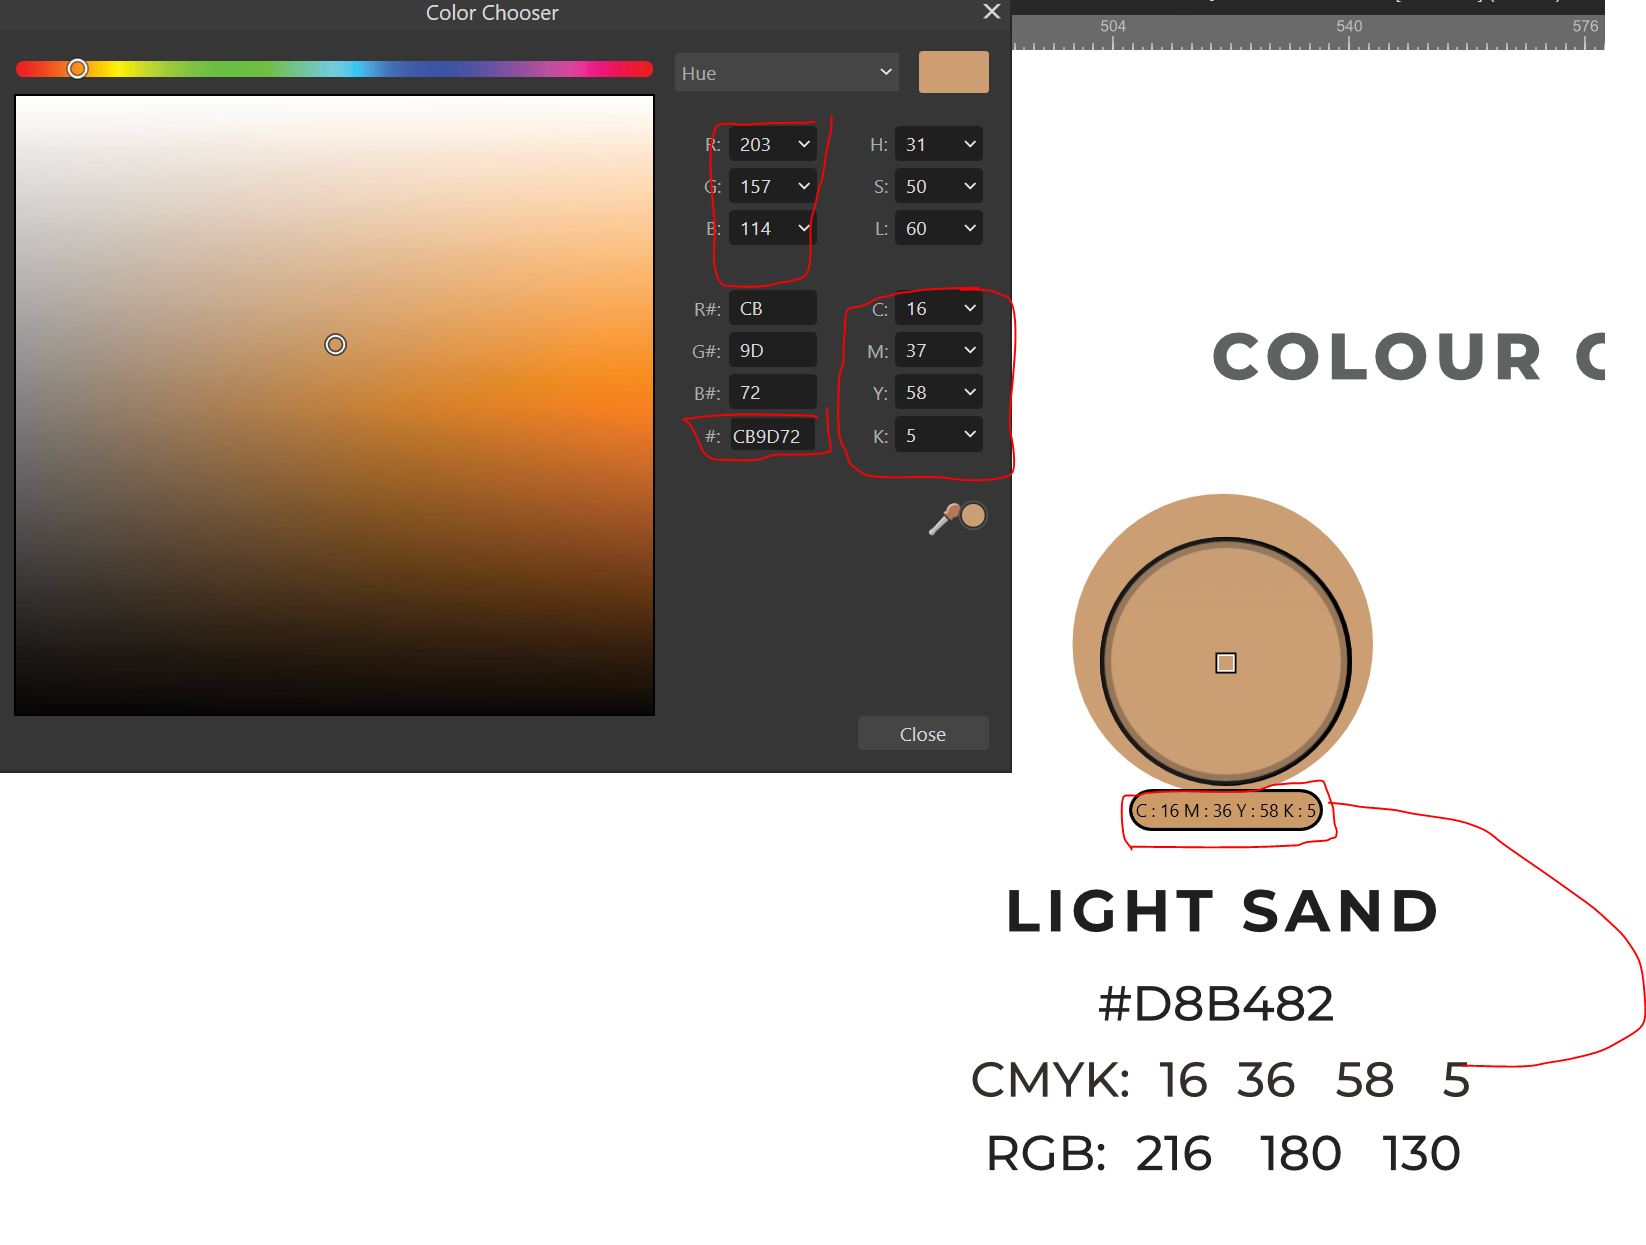
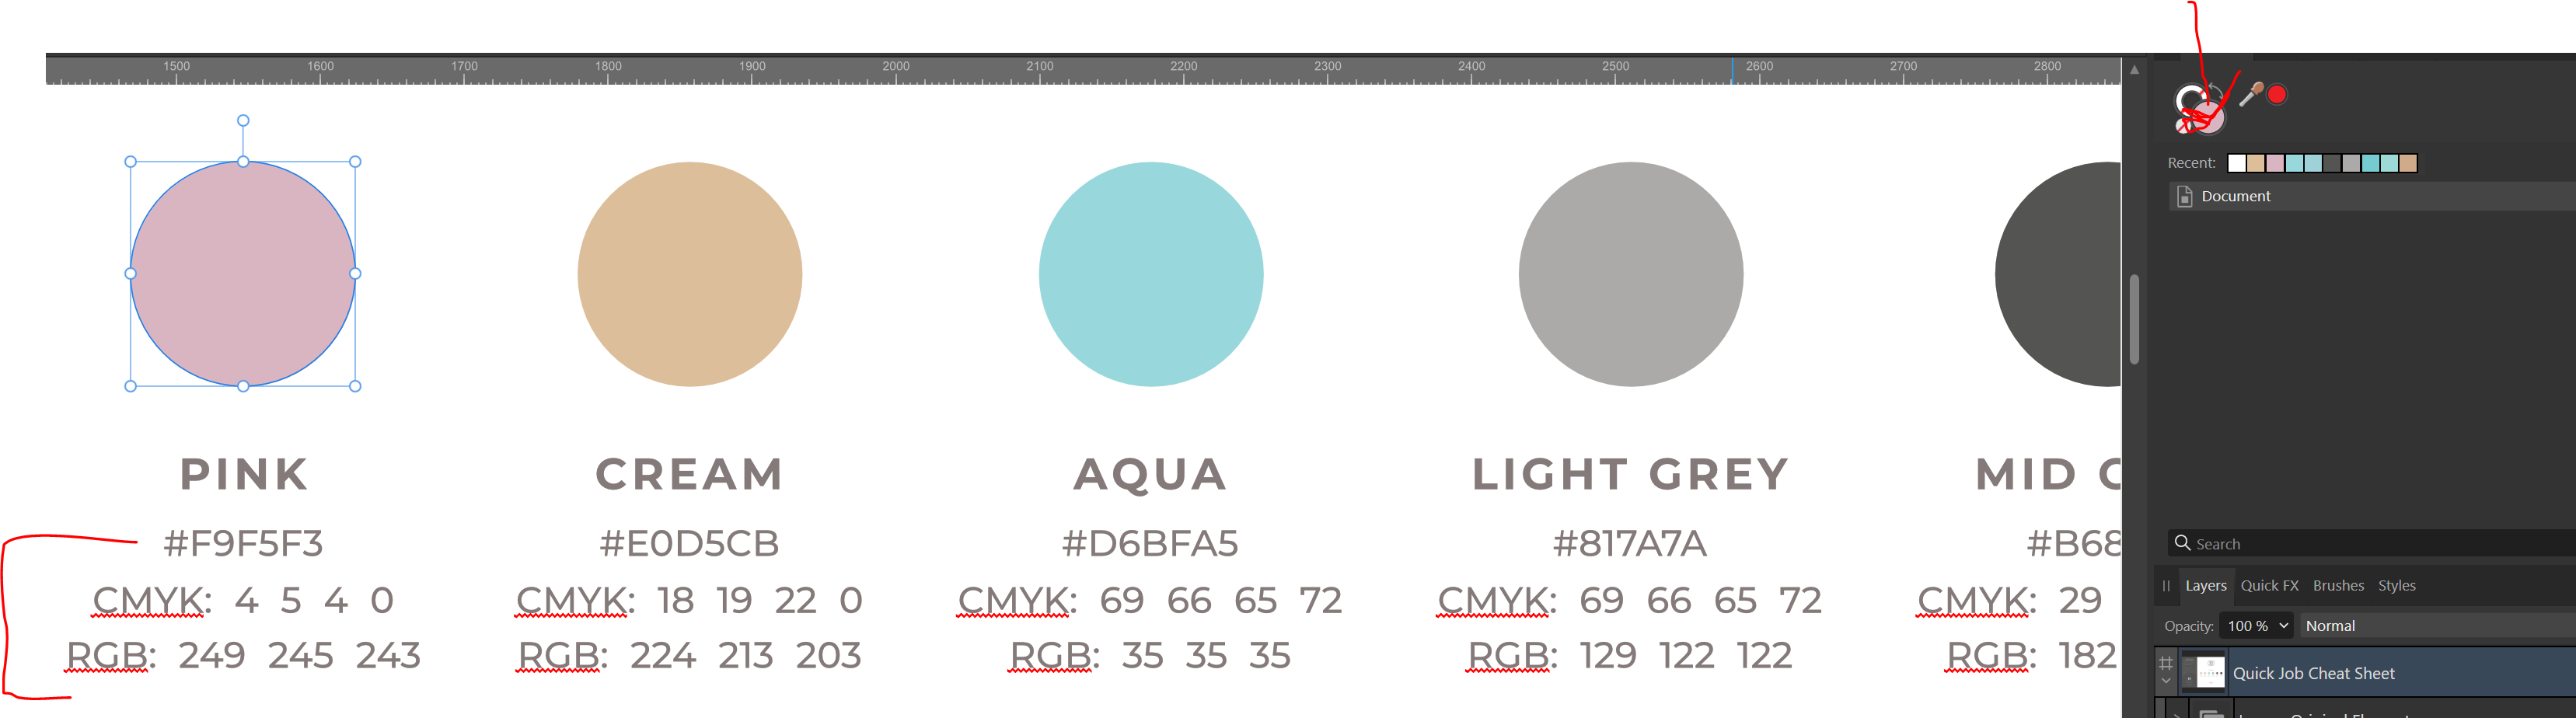
Just doing some extra testing. This illustrator file was open straight into Affinity designer. US Web Coated (SWOP) v2 colour profile is automatically set. And CMYK shows in Color Chooser slightly different (but the same when I hover my colour picker tool over the colour) RGB & #hex code is very different: I'm wondering how we can create consistency with colours when using both affinity & illustrator programs - or are these colour codes very much the same? The Savvy Squad-Colour Fix - Beach Lyf Co-NS-01Dec23-QuickJobCheatSheet.ai
-
We create Logos and brands for clients and include handing over colour codes for colour consistency. I've noticed that when opening Illustrator files in Affinity, the colour codes don't match for the #code, CMYK & RGB: We also run into some issues that supplier prints arent quite printing exact colours. I know that this can depend on their equipment but we can set the best colour profile to ensure colours are provided as best they can from our end, I'll be happy with that! I also can see that I can change the Colour Profile setting for my documents, is there a recommended colour Profile to use when handing files over to other suppliers who will be using Illustrator/Photoshop? By default, Affinity chooses US web coasted SWOP v2. In the past, ice used Photoshop 4 Default CMYK. I'm not too familiar with all these profiles, is there much difference? And if I was to provide #code, CMYK & RGB codes from what I see in affinity, will these be close enough for someone to use in Illustrator/photoshop for print?
-
I'd prefer to export in one PDF, just wanting a much smaller file which I can get if exporting in RGB. Im just not sure if the colours will look very different than CMYK as they are for printing. I have these artboards set up to match the specs of the printer's garments. That's one thing I thought was to downscale the file size
-
Thanks! I've tested your way! Exporting JPEG creates one long image, which I dont want to present to client - I would rather individual pages like a PDF for each artboard. For PDF, I was first exporting in CMYK which was still giving a file size of 13MB then i tested exporting as RGB which gave 5.5MB file size - so I'm assuming this is what is making the file so large! Usually with our projects that will be printed (shirts, flyers, promo products etc) I export the client's revision mockup as CMYK so colours stay as "true" or as close as they can be when printed. In the past, I've noticed RGB colours can look very different to CMYK and the final printed item looking much different to what the client's revision was. I'm curious to know what other designers do here? In this instance, the document is CMYK (because it will be printed) and the RGB export isnt showing different in colour. Do most designers export client revisions as RGB and export finalised print files as CMYK? JNS - test file.afdesign JNS - test file.pdf JNS - test file-rgb.pdf
-
Jpeg colour changes when uploaded to Social Media (Facebook)
Beck replied to Beck's topic in V2 Bugs found on Windows
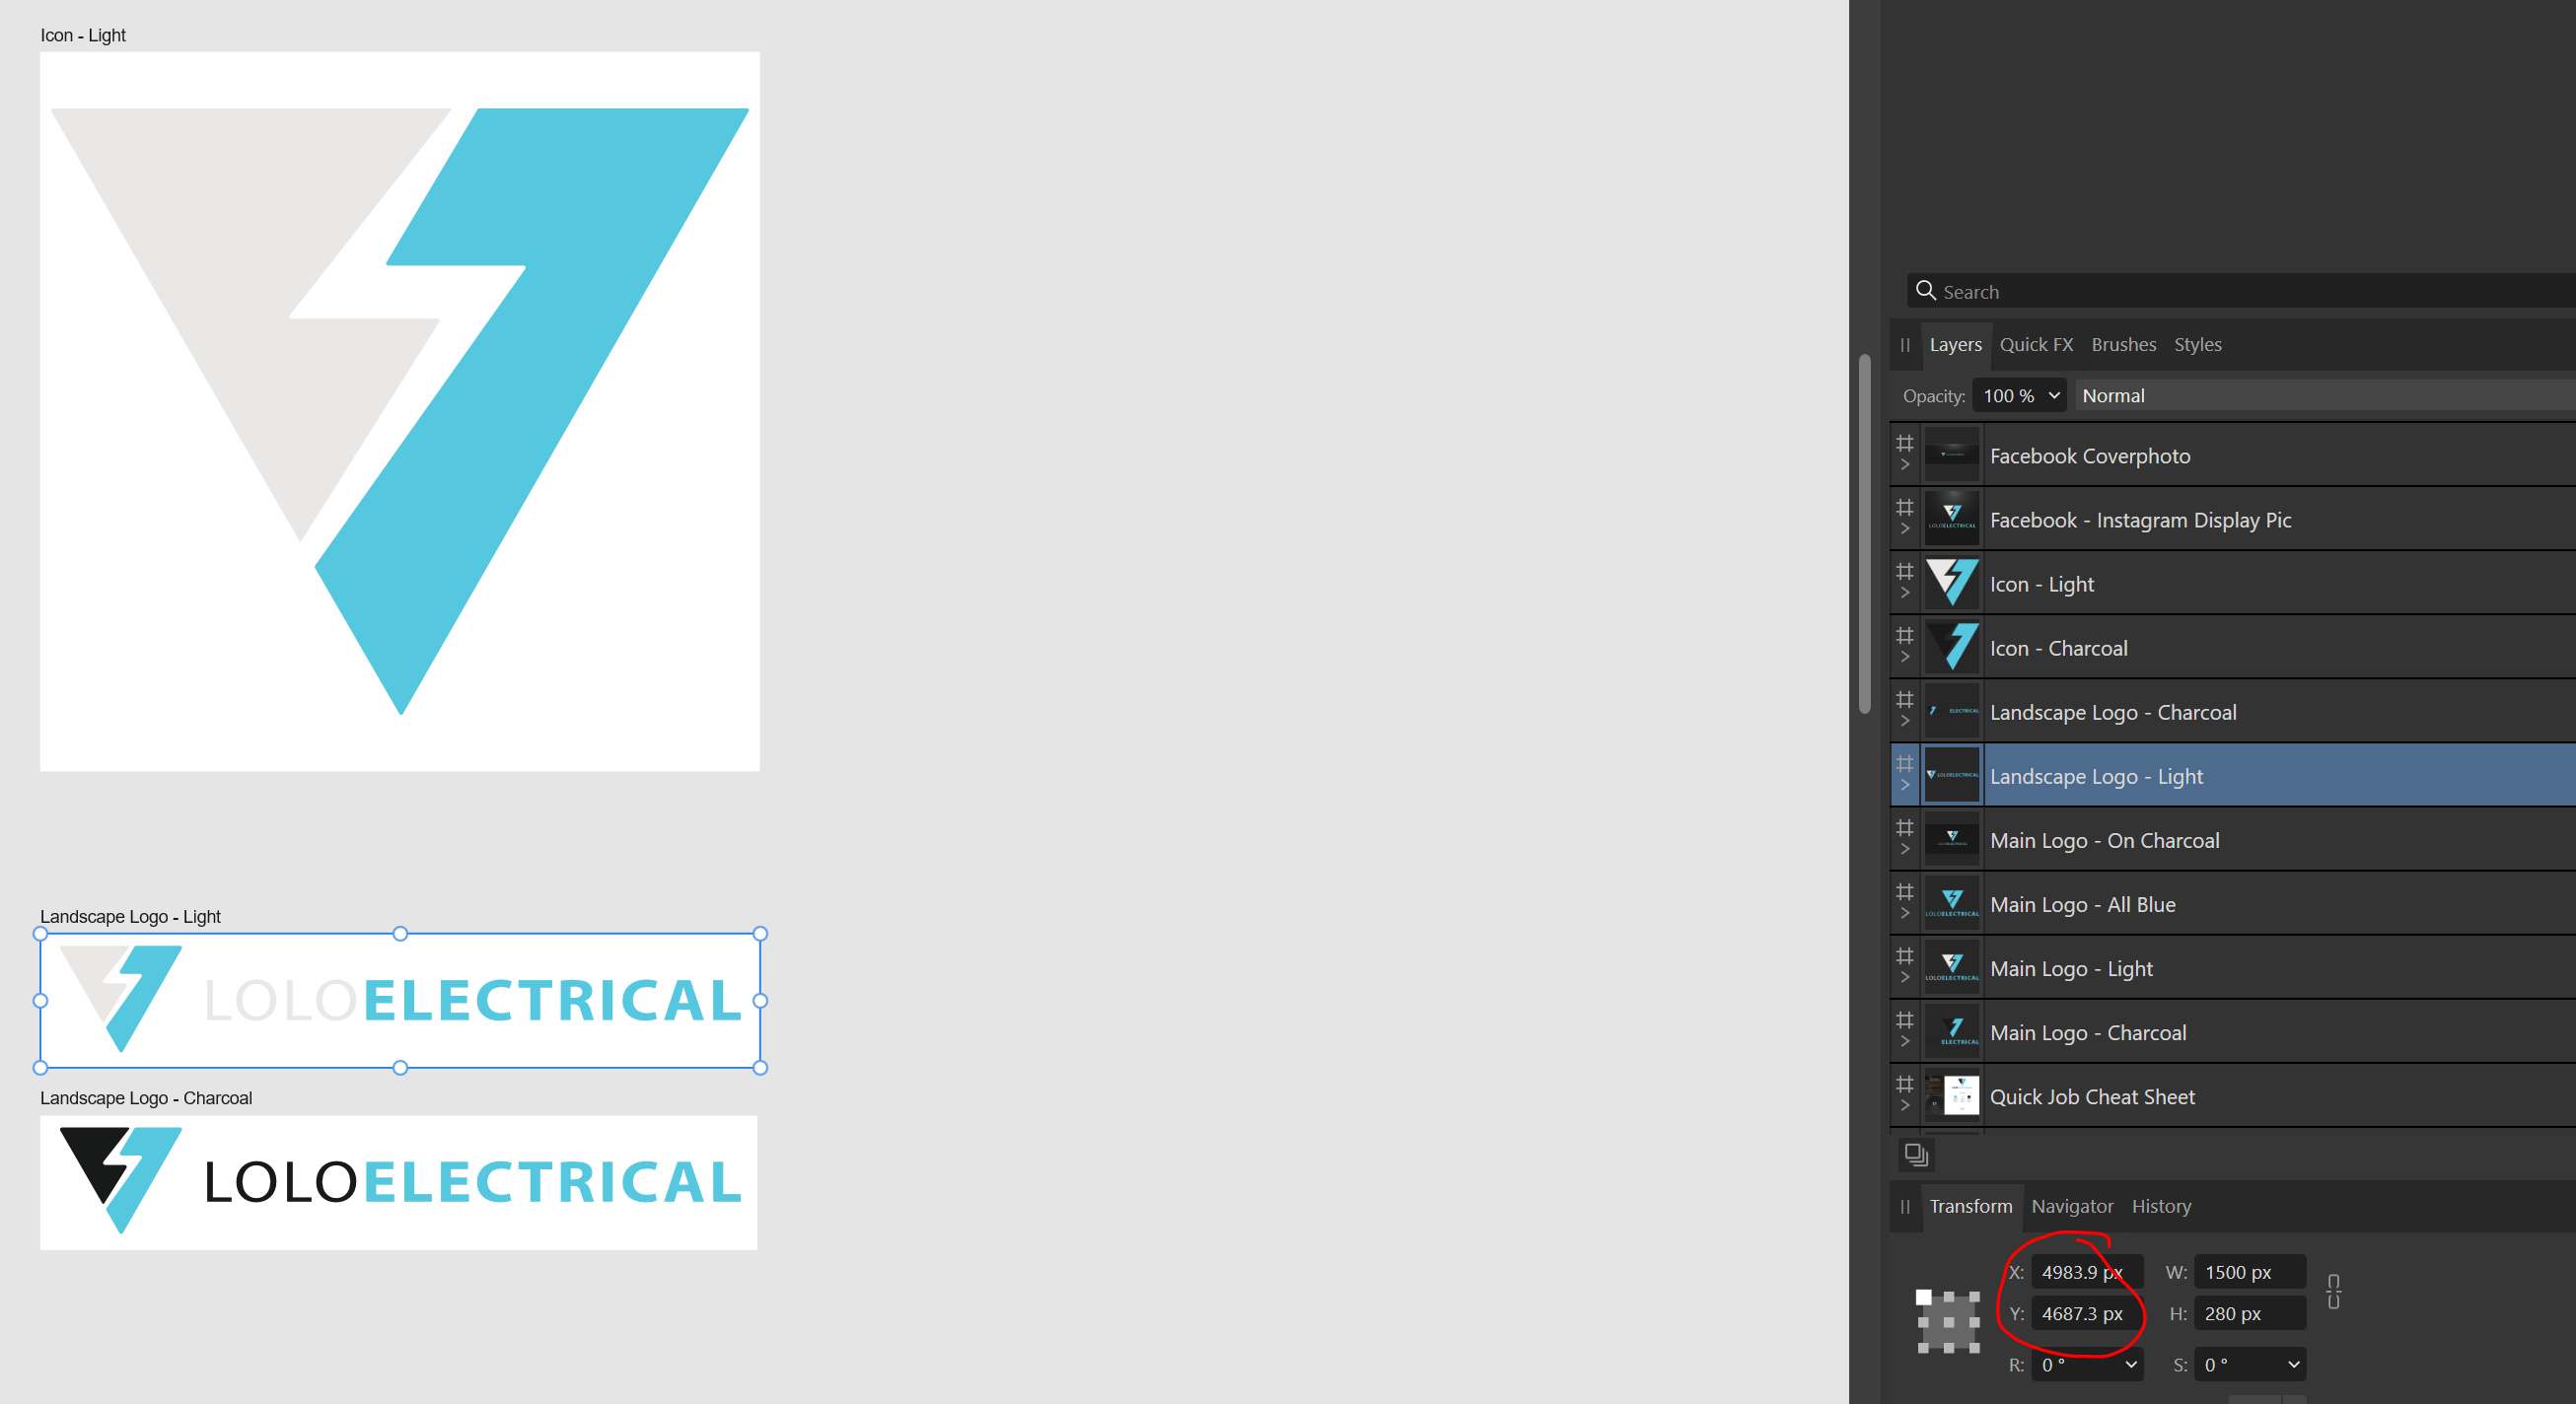
Thank you! usually I export in CMYK with colours looking fine online but this time exported RGB and colours not changing, they stay the same. Thanks for this, for some reason this constantly changes when i move around my artboards. I had looked into this and found that it has to do when the X & Y axis have decimal points. Do you know of a way to stop this from creating decimals? Or is this something we just have to continually be aware of and adjust as we design?
-
Hey all! First time ever experiencing this! For some weird reason, my jpeg files are changing colour when my client uploads it to Facebook. They show completely fine on my computer, only when uploaded they change colour. I always use my usual Settings and this is what i've used when testing: These two files are exported as Jpegs and look normal: But when uploading to Facebook and even onto this forum, they come out like this: When Exported as PNG they are fine but I would like to give JPEG files too. Any pointers? thanks!
-
FYI I'm also happy to export the client revision file as a different file type if possible if I can do it as one file. I stick with PDF because it creates one file from the get go. JPEG is great but these get saved as individual files - im wondering if there's a way to save artboards as JPEGS in one document as pages like a PDF?
-
White space / border on PDF export - Affinity Designer 2
Beck replied to Beck's topic in V2 Bugs found on Windows
Hey all, I realised I hadn't replied in here! After testing these, some of my artworks had the decimals in under transform which I removed. Some of the files also showed white line on certain screens too, so this is all fixed Thanks for your input everyone! -
Hey all, I'm looking for an efficient way to export my Affinity Designer 2 projects in two ways. 1. As a much Lower File Size for client revision only I don't want to go over 5MB - these can be lower quality as they are only for client revision. I've tried exported using the settings: Raster DPI: 144 Rasterize everything Downsample images above: 30 DPI Jpeg Compressions Quality: 15 Colour space: CMYK (so they produce closest to colours we will print) Unchecked: convert image color spaces, honor colour spots, hyperlinks, layers, bookmarks Allow advanced features - checked This still produced a file size of 45MB which is huge and not necessary for client revisions by email. The export process is super slow too and takes ages. 2. High Quality file to specs for suppliers/printers I also want to export this same project as the current specs for supplier/printers. Happy to have these highest quality for print output. Maybe there are others out there who have tips on what they do as a work around. I'd like to avoid having to use any 3rd party programs to compress, this very time consuming. Most of our projects also include High Quality images, so heavy files. Just hoping we have more flexibility on file size when exporting! thanks! JNS - test file.afdesign
-
Complete Curves not Subtracting - Affinity Designer
Beck replied to Beck's topic in V2 Bugs found on Windows
Hey Lee! I wasnt sure what you meant about "reversing the selection order" - so i tried a few things with still no luck: 2023_11_15_09_13_06.mp4 - changed the layers order (tractor ontop of pattern) - selected layers in different orders (tractor then pattern, pattern then tractor) Are you able to screen record or snapshot the steps you are taking to do this? Maybe im misinterpreting your steps or missing a step! -
Complete Curves not Subtracting - Affinity Designer
Beck replied to Beck's topic in V2 Bugs found on Windows
Hey All! Thanks for your help! I have tried these suggested ways but none have worked unfortunately! Layer > Geometry > Separate Curves on the distressed pattern. Then Add it back together. Now Subtract from the digger. This didnt work: 2023_11_13_10_17_03.mp4 Right click on the cracked object, geometry > separate curves, then immediately right click on the layers panel whilst the many objects are still selected and group them. This unfortunately didnt work either: 2023_11_13_10_18_48.mp4 Open to more suggestions on how to do this! -
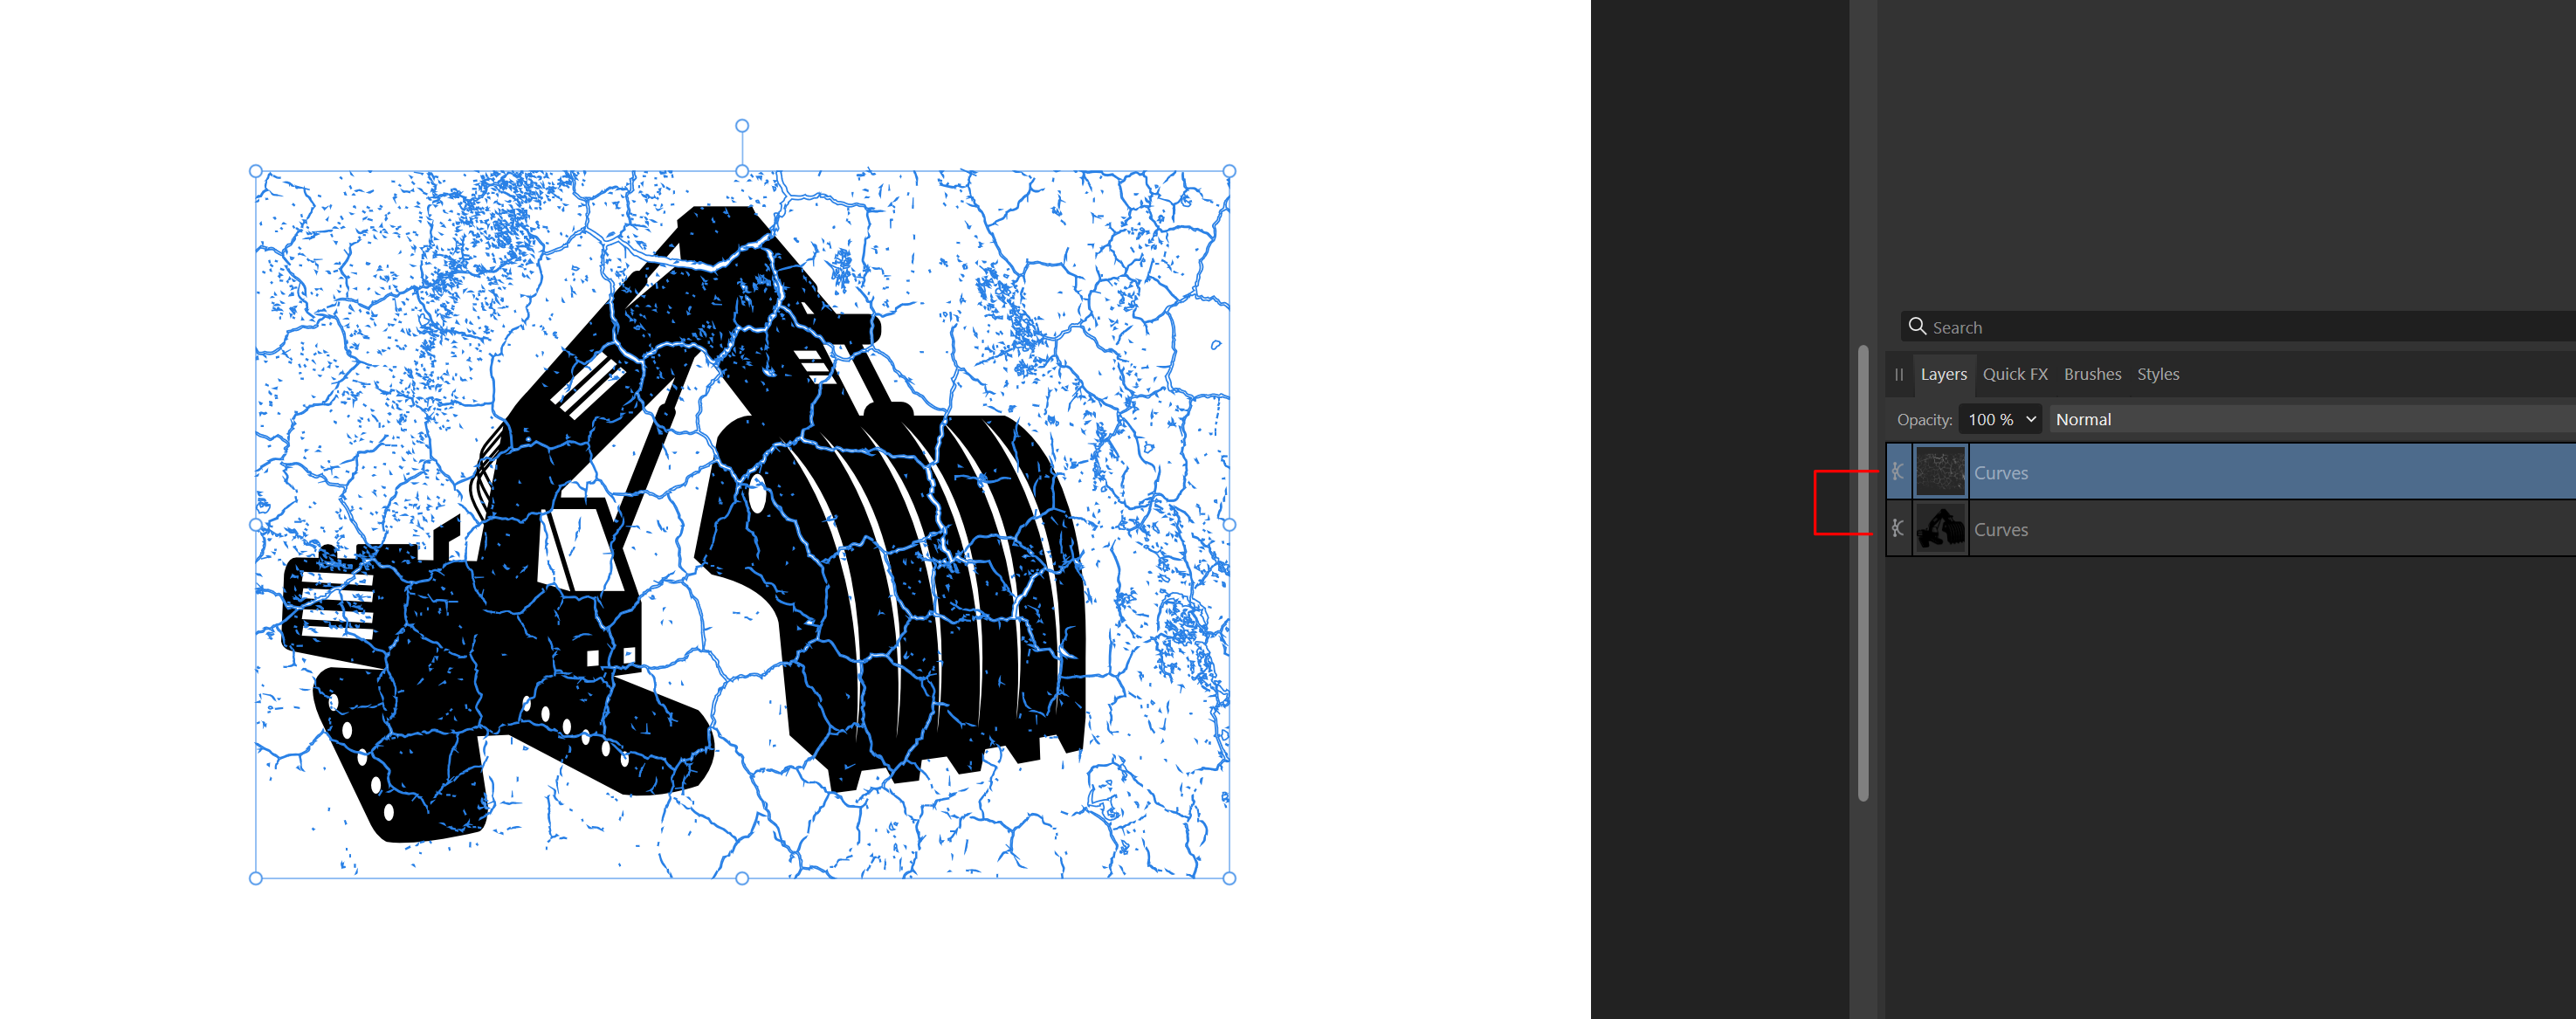
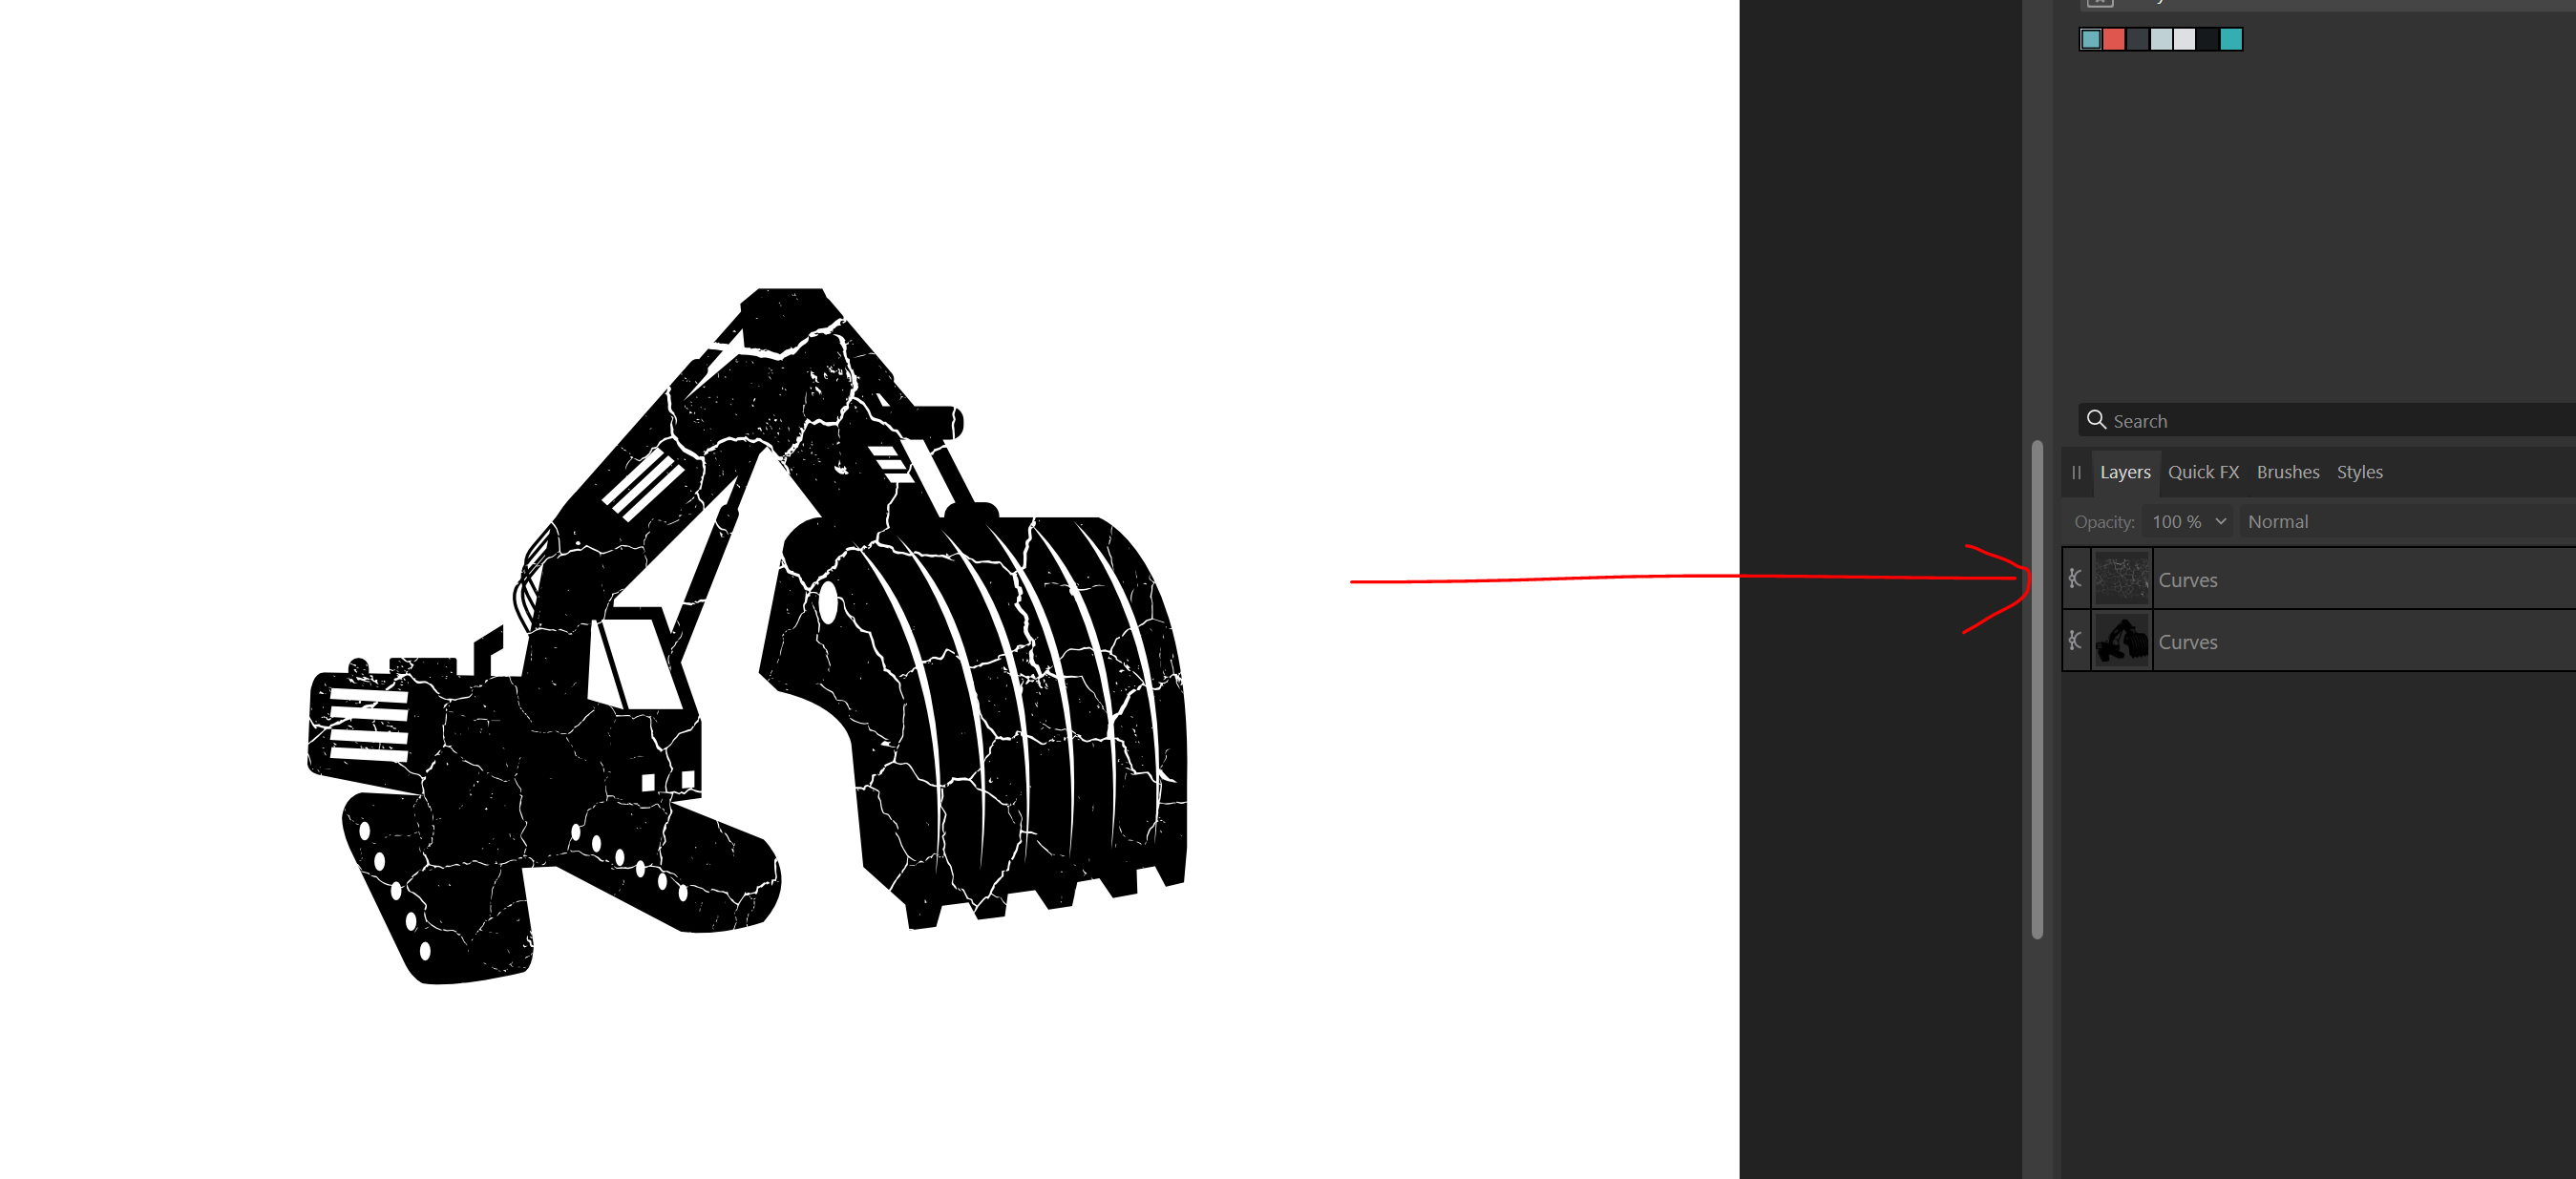
Hey everyone, I am having trouble subtracting one curve with another. Usually I can go to Layer > Fill Mode and change settings here which fixes it, but this time it doesn't. I want this top curve pattern to subtract into the bottom excavator - but here, when clicking "subtract" nothing is happening: Curves still appear as is after highlighting both and subtracting: Is there another setting or trick somewhere that can help with this? I've attached Affinity file if need subtract curves.afdesign
-
Colour details not opening when double clicking
Beck replied to Beck's topic in V2 Bugs found on Windows
Hey guys! thank you very much for your input. The window was opening in another screen! I have no idea how this happened and it was hidden off screen. Thanks for that!! -
Hey All! Im pretty sure this is a bug. When I'm double clicking on the colour so I can get all the details (#code, CMYK codes, RGB codes) the window that usually pops up isnt. I've restarted my programs - still not working. This was happening on and off which I could work around but now I need the codes. Is there any other way to get this pop up? thanks!
-
Vector Overlay Shadow Effect opens as squares & images
Beck replied to Beck's topic in V2 Bugs found on Windows
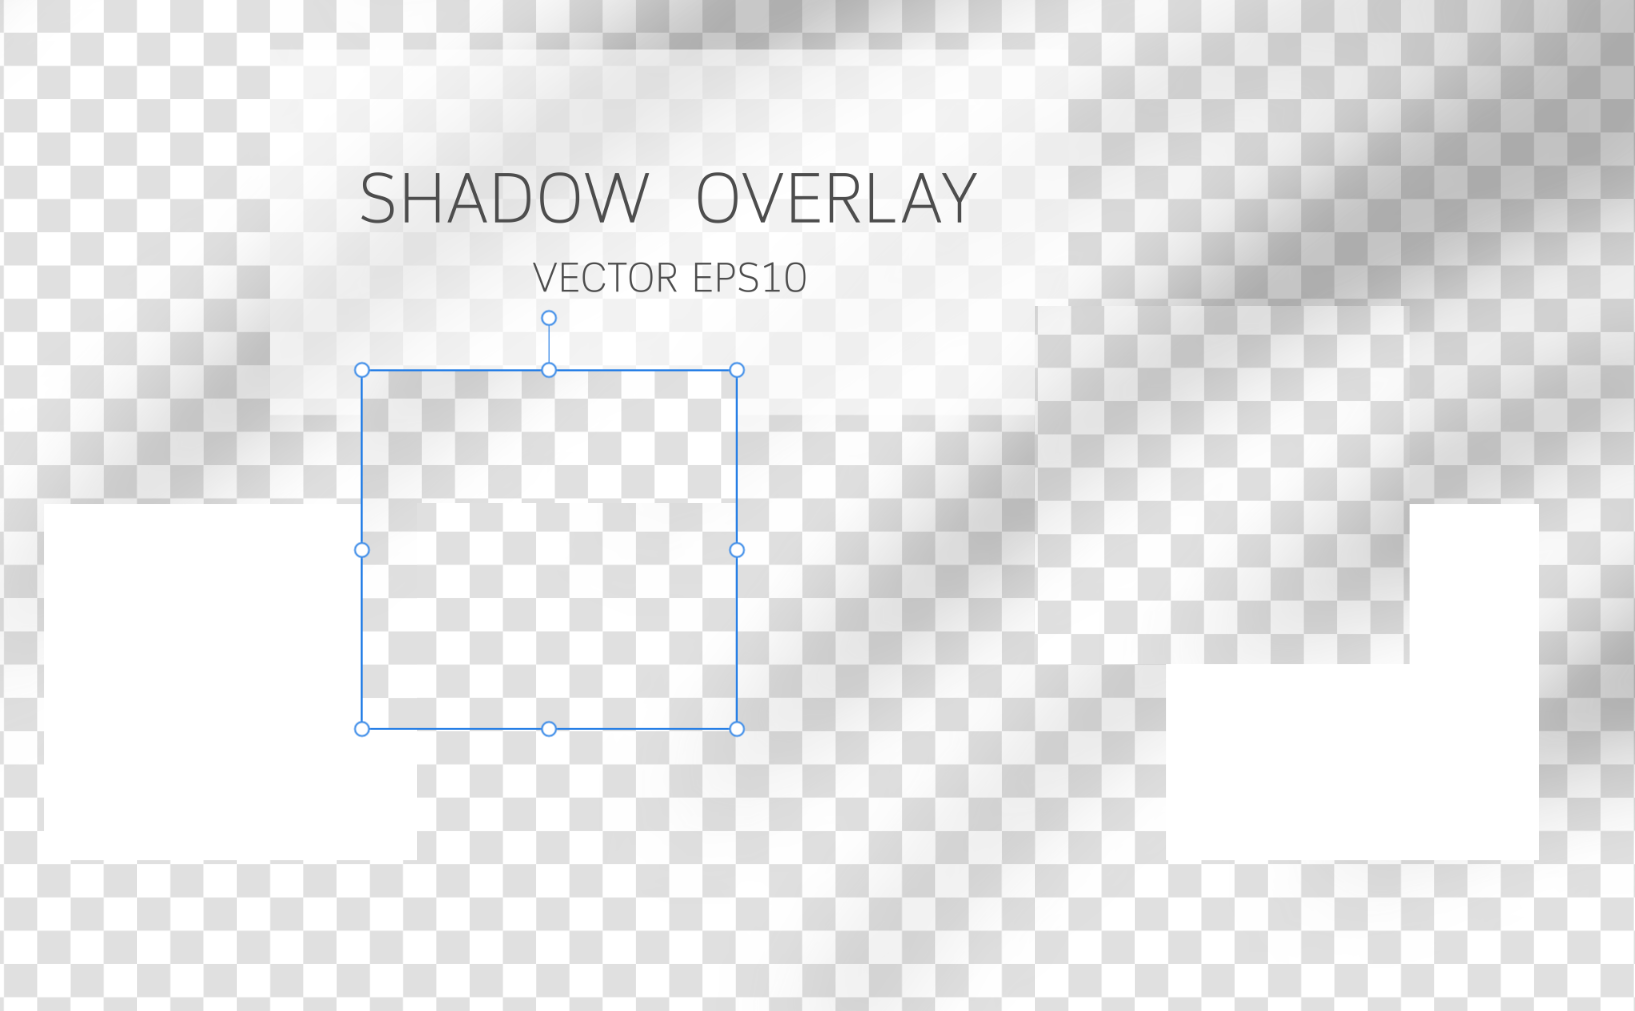
So i just tried this out! Unfortunately didnt work. The shadow didnt show when I opened in Photopea. I exported as SVG anyway to check in Affinity and also no showing of shadow
-
Vector Overlay Shadow Effect opens as squares & images
Beck replied to Beck's topic in V2 Bugs found on Windows
Thank you!! Ill give this a shot -
Vector Overlay Shadow Effect opens as squares & images
Beck replied to Beck's topic in V2 Bugs found on Windows
Oh wow I had no idea! Thanks for the info! If you have any stock companies that provide files that can be opened by Affinity - that would be helpful! I was wondering why some files would open okay and some not! This explains it!! Thank you! -
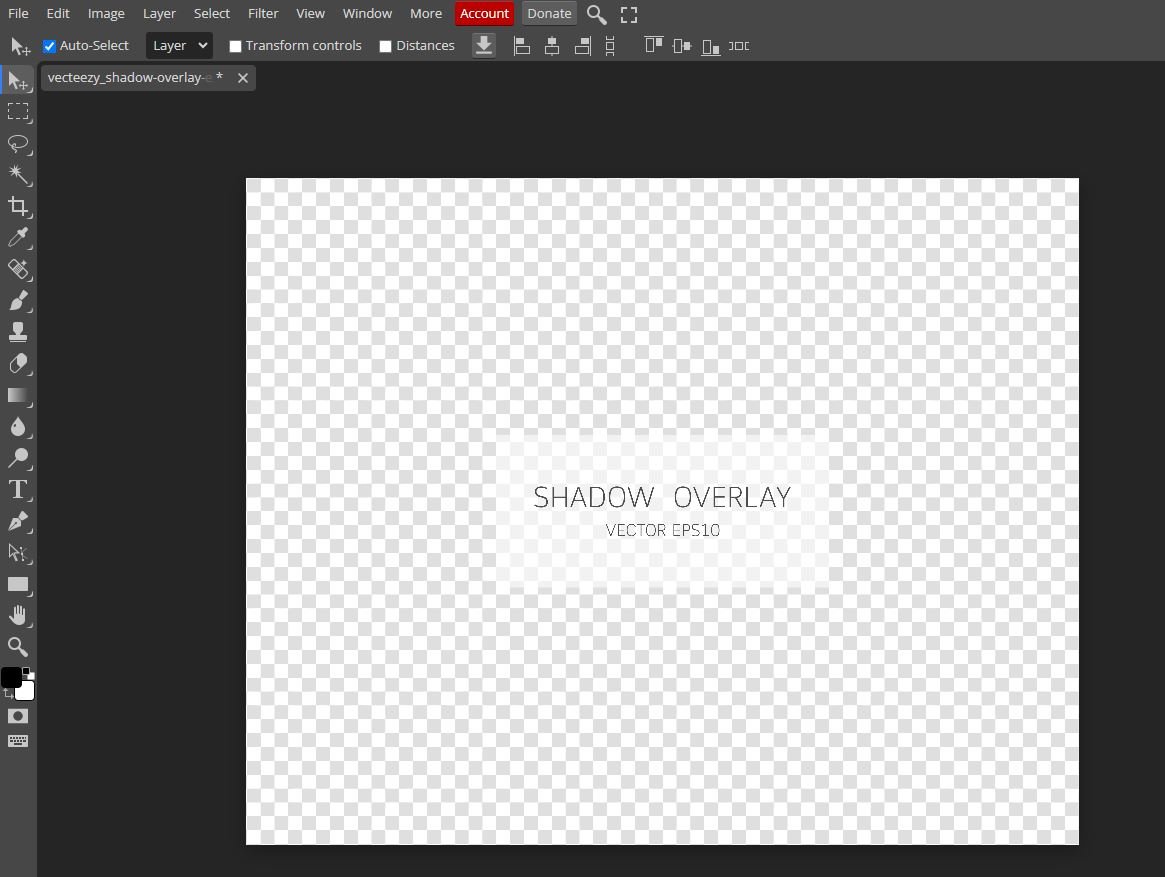
Hey all! I work with a lot of stock files for projects and one issue i've had pop up many times is my Vector Files opening in Affinity Designer as many "images" & squares. I'm not sure if it's the files not being provided the correct way or Affinity not being able to open them properly. Here's an example! This Shadow Overlay i'd like to use - I would assume is a file with a transparent background where I can grab the Shadow and use on my projects: When opening the EPS in Affinity Designer 2 (and also have tried in Affinity Photo) - it opens as many "squares" broken up into images and there's no way i can get the shadow. Looks like this: Maybe i'm looking for the wrong file types? I know .AI files at times work better but many of the stock sites i use only give EPS. Hoping to get some advice/help here! Thanks! Beck vecteezy_shadow-overlay-effect-natural-shadows-isolated-on_6851545.eps