pipet
-
Posts
18 -
Joined
-
Last visited
-
Recover font?
pipet replied to pipet's topic in Pre-V2 Archive of Affinity on Desktop Questions (macOS and Windows)
Thanks for the quick reply. Seems indeed to be Neuropol. I tried FontSquirrel, but that didn't com back with anything remotely close. -
A few years ago I made a logo for our workgroup in Affinity Photo (disclaimer: scientist by profession and a hobby photographer - not a designer!). Recently I wanted to make some edits to the logo, but when loading the file into AP, apparently the font was not recognized or missing, and it was substituted with some other font (which looked awful). Maybe a system update eliminated the font I used two years ago? Now, I'd like to restore the original font, but would need to find out what that font actually was. Hence, I popped the afphoto file into a hex editor in the hopes to find some human-readable reference to a font name in there, but no such luck. I also used the fontsquirrel website to identify the font, but no dice here either. Is there any other way to identify that font or does anyone recognize it (logo attached - btw, the "M" is made off two I's and a stylized antibody in the middle)?

-
 pipet reacted to a post in a topic:
Editing strategy suggestions
pipet reacted to a post in a topic:
Editing strategy suggestions
-
@Andy05: wow, this is fantastic! Thanks!!
-
pipet reacted to a post in a topic:
Editing strategy suggestions
-
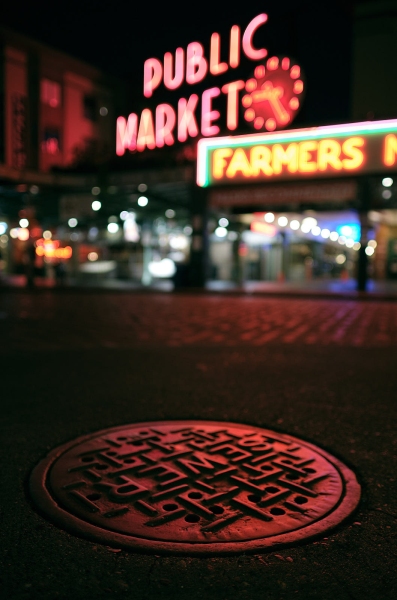
Not looking for a detailed step-by-step guide, but just some input on what the best general editing strategy would be (using Affinity Photo): I took the below image in Seattle; it's a bit touristy, but so be it. To make it a bit more appealing, I'd like to replace the writing on the manhole cover and make 'Sewer' into 'Seattle'. That not something I usually tackle, so what's the best way to do this? I could image just using the font tool, but how do I deal with the relief? Puzzling it together with the clone brush might an option (and first two letters are already in place), but that seems very tedious and error prone. Another way I could image would be to just use a brush and draw it, but that might tax might artistic capabilities.
-
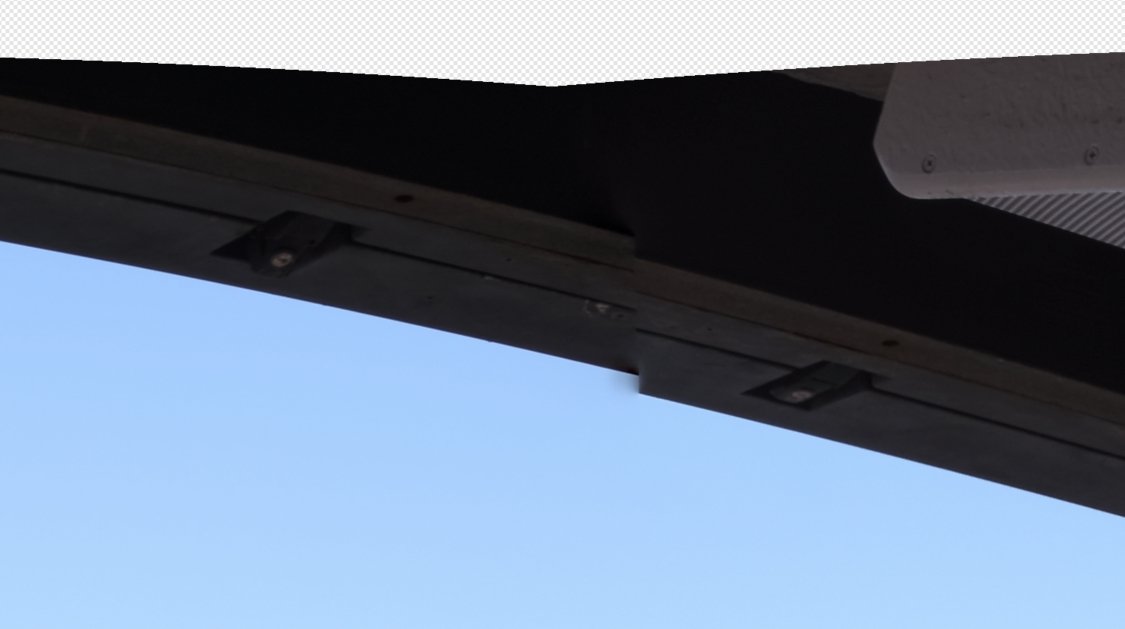
I sometimes do an impromptu handheld panorama, but then inadvertently end up with the occasional stitching error due to parallax, as shown in the image below (either stitched in AP or Autopano Pro). Sometimes this is possible to fix with some creative cloning brush work, but sometimes it's not or it's just too tedious. I was thinking the Liquify tool could be a good option, as the offending parts left and right of the fault line could be bent up or down to eliminate the kink. But I haven't found a way to make the Liquify tool work to this end, since it does the transformations based on the center of the modifying circle, whereas I'd need a sort of ramp from left to right (or vice versa) within that circle to make it work. So, is it possible to coax the Liquify tool into doing this or is there a better/alternative way of dealing with this?
-
Happy to oblige. Below an example from an insect I shot (partial detail). So here's the rough selection with the selection brush: This is the selection after refinement and with the black matte review (including all the fine hair detail as intended): But after clicking apply, I see this, which still includes the fine hair detail, but obliterates some parts of the leg, which was included in the refined selection above:
-
I use selections here and there, but in a haphazard kind of way, as I've been hampered by some odd behavior when refining those selections. I first make a rough selection using e.g. the Selection Brush Tool, then I go into the 'Refine...' dialog and start painting the edges to refine. At this point the selection usually looks very much to my satisfaction, especially when checking with the 'Matte Black' preview. But whenever I then click 'Apply' in the refine dialog, the resulting selection is all messed up and a far cry from what I saw in the refinement dialog. What' am I missing?
-
I started looking more into color grading, and Paletton seems to to be a good site for creating nice palettes. Paletton offers a multitude of export options for those palettes, but the ASE format (what Affinity can import) seems to be missing. The closest thing I could find was an ACO/Photoshop format (which doesn't work). Are any of the other options (HTML, CSS, XML etc.) equivalent to ASE without spelling it out? Is there a site similar to Paletton that generates ASE palettes?
-
nicecap reacted to a post in a topic:
AP and Logitech Craft keyboard?
-
AP and Logitech Craft keyboard?
pipet replied to pipet's topic in Feedback for Affinity Photo V1 on Desktop
I don't have the keyboard (yet), so unfortunately I cannot try this out. It's quite expensive as far as keyboards go, so I wanted to get a feel how useful it might be in combination with AP before jumping on it. But good idea about contacting Logitech. -
I'm eying the Logitech Craft keyboard, which comes with that neat dial on top. While Affinity Photo is not one of the applications that's specifically supported by Logitech and this keyboard, application-specific actions can be assigned to the dial. I was wondering, if anyone has experience with the Craft keyboard in that regard, and specifically, if it's possible to hover over a slider in AP (or any other application for that matter) and then adjust the slider value with the dial?
-
I'm running Affinity Photo1.6.4 and the latest Luminar 2018 version (1.3.0) under Win7. I'm having trouble using Luminar as a plugin under AP - while the image processed in Luminar is returned to AP, the colors are completely messed up. There are some threads about this topic from last year, with some contradictory claims (some say it works with the Windows version, others say it doesn't). I was wondering, what the latest status is, especially with the new Luminar 1.3 version out. Is this actually a Luminar or AP issue? Is there a fix or workaround for the color issue?
-
Thanks for the replies. I'm aware, that RAM is not the only determining factor when it comes to speed, but currently it's my limiting factor. I edit a fair amount of HDR and panos and recently started doing that with raw/16-bit tif files and my 16GB machine constantly runs out of memory (and Affinity crashes regularly under the load), hence the need for 64GB (which I can afford). But I have limited room on my desk and also for aesthetic reasons I don't want a big ugly desktop box, hence my quest for a small form factor PC. But from what I've seen so far, there are really no good options: most mITX systems top out at 32GB, and if they don't, the boards are more geared towards server applications (lacking decent graphics output), hence I was thinking about RDP. @Fixx: why would you not trust running graphics apps over RDP?
-
I need a new PC for photo editing. Looking for something with 64GB of RAM, but there don't seem to be any small-form-factor PCs around with that amount of memory. So I was thinking about putting a big ugly box with lots of RAM in the basement and access that via a remote desktop session from a smaller PC. Does Affinity Photo (and potentially other editing programs, such as Photomatix, AutopanoPro, NeatImage etc.) work well in such a scenario?
-
Thanks for the hint. The RawTherapee result is in fact much better. I'd still be interested in how the OOC jpg could be used to influence the color characteristics of the raw development, either through LUTs or other means.
-
I'm a Fuji camera user and very much like the film simulations that can be applied to the out-of-camera (OOC) jpgs. Usually I shoot raw + jpg. The Fuji jpgs are very good, but once in a while I have to develop from raw and would like to apply these film simulations to the developed raw file. This can be done e.g. in Lightroom that includes profiles for these film simulations. I'm not a Lightroom user, however. As an alternative, there is a series of HALD CLUTs for Fuji film simulations created by Stuart Sowerby. My workflow is to demosaic the Fuji raw files with Iridient X-developer (default settings) and import the resulting DNG file into Affinity. Now I can develop the DNG file in Affinity (not making any color or brightness contrast adjustments, as recommended) and apply Stuart's LUTs. These get me into the right ballpark, but with somewhat challenging images they are not spot on. So I was thinking, that it should be possible to use the OOC jpg with the film simulation already applied in camera as a reference to guide the color adjustment of the raw file. So, naively I developed one of the DNG files (without any adjustments) and exported it to jpg for use as the identity image. I then applied a LUT adjustment with 'Infer LUT' and selecting the exported jpg as identy image and the OOC jpg as target (for lack of a better word) - but nothing happened. So I'm wondering a) why is that not working? Do the LUT files need to confirm to a standard format (I have seen the matrix layout of Stuart's LUT files)? b) If the latter is the case, how can I build a proper LUT file from my identity jpg and the OOC jpg? or c) is there a more straightforward way to apply the color characteristics of the OOC jpg during raw development?