wfolta
-
Posts
12 -
Joined
-
Last visited
Everything posted by wfolta
-
Pinning in multi-column Frame Text oddities
wfolta replied to wfolta's topic in V1 Bugs found on macOS
Thanks for clarifying things for me! Sounds like no way to do exactly what I want. The problem with going back and hand-tweaking floating illustrations when things go wonky is that you really don't have options. You either insert fluff text to push things past the column break, or you pin the float to text other than you intended to pin it to. Which, over time, could lead to confusion of your text at illustrations one-by-one migrate away from where you're actually referring to them. In which case, it's like manually placing things on each page and not using pinning at all. -
Pinning in multi-column Frame Text oddities
wfolta replied to wfolta's topic in V1 Bugs found on macOS
I tried inline, but then you then seemingly lose the ability to drag-n-drop it to position it vertically and horizontally. I end up guessing numbers until I get what I want. In addition, the illustration appears to be treated as a character, so adjusting parameters of your font or grid will move it in odd ways. I'm also not sure if inline would support the flexibility of horizontal positioning, either. I could be misunderstanding how inline works, though. -
Pinning in multi-column Frame Text oddities
wfolta replied to wfolta's topic in V1 Bugs found on macOS
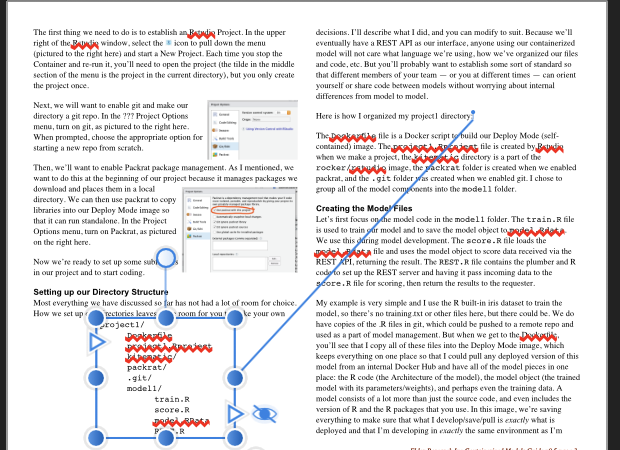
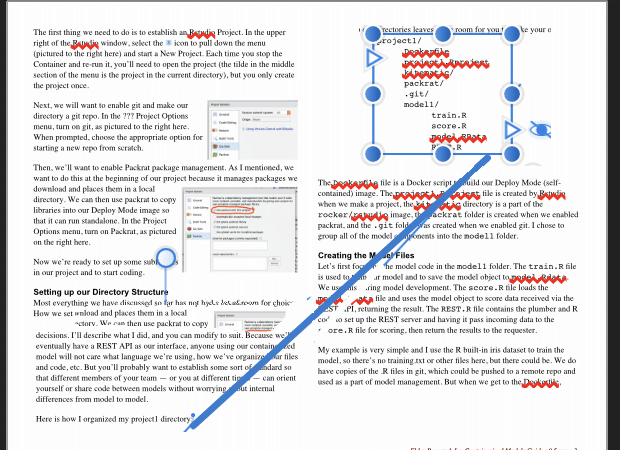
I tried to upload screenshots yesterday and had errors. Finally worked. Below is the screenshot of what happens sometimes: the illustration ends up in the previous column at the bottom. Some settings -- not sure which -- end up placing it in the left column, vertically closer to the pin point. What I would want is for the text to flow in the left column and the illustration to end up at the top of the right column. That is, treat the two columns as if they were one. Anything pinned directly below some text should appear below that text in reading order, and as close below the text as possible while staying in bounds (if that option is checked).. I did a quick-n-dirty edit of the first screenshot to show what I'd like to see happen instead.
-
I'm really having problems achieving my goals of having illustrations in my text move appropriately with the text, in a two-column Frame Text environment. These illustrations may be screen captures or they may be outlined Frame Text that contains computer programming language code. (I'll refer to both of these specific use cases as "illustrations", to keep things simple.) I've tried using Inlining With Text pinning the illustrations, which might be most natural, but it seems you lose the drag-in-the-GUI positioning that you can do with Float With Text pinning. It makes your illustration to font sizes, baseline offsets, etc, rather than letting them fit nicely below (or above) your explanatory text. There may be some trick to this that I've missed, of course. With that in mind, I've taken to using Float With Text pinning, but that has some serious issues when used to pin an illustration to text in a two-column Frame Text. Let me describe: I pin my illustration to the end of the paragraph describing the illustration using Horizontal Inside Center of Column, and Vertical Inside Bottom of Line. I also set the illustration to wrap text, so that if I add another paragraph after the pinned-to paragraph, the text wraps to below the illustration. Does that make sense? So let's recreate my issue: create a two-column Frame Text and insert into it in a paragraph of text. (Which will thus be at the top of the left column.) To the end of the paragraph, pin an independent Frame Text with a few lines of text (R code, in my case) in it and a line around it. Apply a Float with Text pin and wrap to the illustration as mentioned, above. It all works. Now insert additional paragraphs in front of the original paragraph until the bottom of original paragraph (where the pin is) gets closer to the bottom of the left column than will allow the illustration to fit. (I also have widow and orphan line prevention on.) At this point, Publisher has a lot of conflicting priorities and it appears to reason through the problem thus: 1) I have to place this illustration in this column, but there's not enough room, so 2) I'll wrap the text at the end of the column to the next column, but 3) this text is the text to which the illustration is pinned, so now 4) I'll move the illustration vertically so that it's the proper distance below the pin point in the paragraph -- not calculating in column-inches, but in inches on the page. So the illustration ends up wrapping its pin point to the next column. If you try to drag it back to the right column, the text wraps back into the left column and it all happens again. So I think one issue is that the Inside Center of Column horizontal control is to think of the two-column Frame Text as if the right column began immediately after the left column -- as it does when you are reading the text. The second issue is to ignore empty space at the bottom of a column in terms of the distance to the pinned illustration. So in my example, once the bottom paragraph gets so close to the bottom of the left column that the illustration won't fit, the illustration moves to the top of the right column and believes it to be as far below the pin point as it needs to be. Again, I might be missing something, and if so I appreciate any pointers. This problem has cropped up three or four times so far in my 5-page guide and I've basically inserted fluff text to flow text until it all works. (Which is bad in itself, and will fail if I legitimately have to insert or delete other text that throws pin points back into the danger zone.)
-
DELETING because this the real release, not the Beta.
-
Table thinks it's on master, when it's not
wfolta replied to Andy900's topic in V1 Bugs found on macOS
This was a life-saver. I just ended up today with a text box that was stuck like this. Publisher 1.7.1, MacOS Catalina beta. I love Affinity products, but am more and more running into problems where I don't understand what's going on and there's no real documentation. -
No permission to save/export
wfolta replied to wfolta's topic in [ARCHIVE] Photo beta on macOS threads
This really burned me just now. I got enthusiastic on one of my photos and after bringing it in (two NEF files, panorama), I jumped into some detailed masking brush work without having tried to save, and 20+ minutes later when I tried to save it would not. It claims it doesn't have permission to create the file and I tried the folder I'd been using, iCloud, etc, and the actual folder makes no difference. I hit "New Folder" in the Save dialog and it successfully creates a new folder. I can't Save or Export, all the work is lost. I am using Photo 1.5 RC4 and MacOS 10.12.2 Beta (16C53a) on a 15" Touch bar MacBook Pro with the 460 GPU. I also have the latest Default Folder installed, which might make a difference but isn't causing any problems in other applications. No one else is seeing this? It's a showstopper issue for me. -
Beta 1.5 issue with pinpointing on 32-bit
wfolta replied to wfolta's topic in [ARCHIVE] Photo beta on macOS threads
Rasterizing fixes the issue. I duplicated my workflow and had the issue, then Rasterized the layer and then the inpainting worked as expected. (It's really, really nice to be able to inpaint rather than having to crop to opaque. Great feature!) -
Using Beta 1.5 RC4 on MacOS 10.12.2 Beta (16C53a) and a couple of times now I've had it say that I don't have permission to save the file. I tried saving to my desktop, to the folder I wanted, and to Affinity's folder in iCloud Drive. I tried saving and I tried Exporting, and all combinations failed. It's happened twice now, both times with projects where I'd done HDR Merge and tone mapping, but that might be a coincidence. This is on a Touch Bar MacBook Pro with the 460 GPU.
-
I'm reading in three Nikon NEF (raw) files as an HDR stack, tone mapping, with the Assistant set to create a 32-bit result. After this, in the Photo Persona I'm using the Straighten tool in Crop. That leaves some areas at the edges that I then attempt to fill in with the Inpainting tool, which causes a couple of kinds of problems: Once, it filled in with a strange web of black wavy lines. Once it filled in but parts were semi-transparent. Several times, it's gotten up to about 80% Inpainting Brush progress bar and it just gets stuck there. Menus still pull down, etc, but it's frozen. I tries using Color Format to convert to a 16-bit, and I don't get a crash but do end up with odd behavior. Remember that this is transparent area at the edges due to the rotation. In the top right corner, it simply refuses to inpaint. On the left side, it did, but left some partly-transparent parts. On the bottom right, it inpainted perfectly. It's pretty quirky. This is with Beta 1.5 RC4, on a Touchbar MacBook Pro with the 460 GPU, running the latest Sierra Beta (10.12.2 Beta -- 16C53a).
-
I got Photo a couple of days ago and it's pretty much exactly what I've been trying to find for years. Kudos! Two things that have frustrated me: 1. Live filters versus destructive filters. This looks like the typical seam that arises when a program starts with one way of doing things (destructive filters, in this case), then adds a new way of doing things. Seems to me that Photo is too young for this kind of legacy interaction. Especially since it appears that the way of the future is live filters. The ultimate way to fix this is to only have live filters, with a separate option to freeze a filter's results. (Or to rasterize a layer.) I don't think Photos is so old and has so much of a legacy tail to drag that a change can't be made. A much-less satisfying solution would be to have only one way to select a filter, but the filter dialog could have two tabs: Live and Static. That way, it would be possible to have different options available for each -- Static might have more options since they don't have to be performant in real time -- but at least there's only one "Gaussian Blur" in the menus. 2. Applying filters to areas of a layer. Some of this inconsistency is due to item #1: destructive filters don't show up like live filters, so the selection is hidden/baked into the layer. My main concern is when I might decide that I want to restrict a filter to portions of a layer after I've applied the filter. The "Yeah, that makes the whole thing look better and... oh, it does mess up the video screen in the background, so I really want to apply it to the entire layer except that rectangle" issue. I've struggled mightily with this and the Mask to Below helps a bit, but it's a pain. Try using Quick Mask after the fact. Nope. Try turning a pen-tool rectangle into a mask and then invert it to select everything except what's in the rectangle. I couldn't get it to work. Seems that some masking (or selection) works with black/white and other works with the alpha instead. Maybe masking/selection is more consistent than I understand, but it's been the thing that I've spent a lot of time struggling with a program that's otherwise very intuitive. Thanks!
-
- 1
-

-
First, what a marvelous program! Simply magical (powerful and elegant). Just wow! Second, the tutorials on Vimeo are delightful. I'm a sucker for British accents, but to goes way beyond that: they focus on useful features of the program and they person doing them is obviously good at what they do. Thanks!