

Affni
-
Posts
35 -
Joined
-
Last visited
Posts posted by Affni
-
-
In several posts on same subject it is said, that the keyboard shortcut cmd ' does also work when you have created an own grid. This is true - however, whenever a restart Affinity Photo2 I have to go first to grid and achses where an empty selections is shown as default, then I have to scroll down to select MY grid in the firste and only entry, select it ... and after THAT detour, I have to close that dialog can toggle.
Would it be possible, to allow in the overall preferences, to define what should be use with toggling = either the automatic 1 pixel grid or a specific personally defined grid?
The minimum should be, that whenever I open grid and achses, the last gridtyp used shows right away and is ready for selection.
OR
You allow the user to predefine own keyboard shortcuts for functions like this
-
53 minutes ago, Callum said:
Hi Affni,
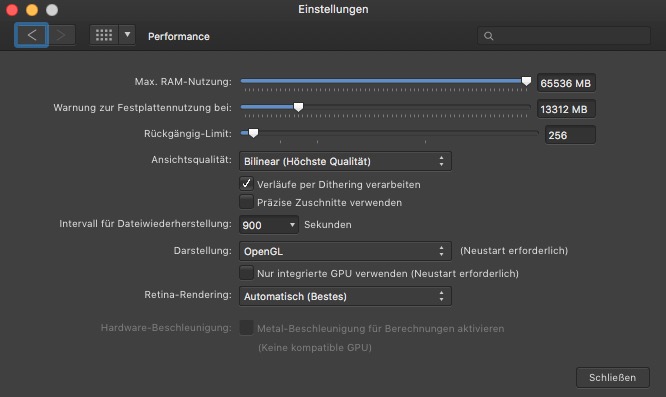
if you disable Metal Compute acceleration in the apps performance preferences does the image start changing? If not please could you provide a screen recording demonstrating this issue?
Thanks
CHi Callum,
that's funny. I disabled Metal Compute ... it works as expected. I re-enabled Metal ... it continues to work as expected. May be, that detour forced a kind of cleanup behind the curtain. By the way in case that it could be helpful for your analysis: I am using a Mac Mini 2018 with a T2-Chip. My be that chip gets in the way when one addresses metal in the "wrong" way.
Thanks for your quick and successful help
-
I have downloaded all YouTube Videos available on this topic. I was not able, to reproduce the results shown in any of those video with my Affinity Photo program. In the meantime I suspect, that either somthing within the program is broken or no longer available.
My understanding of the procedure is:
Select the layer which should be manipulated
Select the source for manipulation - this can either be the same layer as the target layer, another layer, or an image on the harddrive
Select the blend modus and the color space
Enter expressions in the field for the target color - for example
DR = SR/2
DR = SR/SG*0,2Regardless of which combination of the above I choose ... there is no change in the image
By the way: The workaround described here does not work either:
-
For the design of machines I often need to connect 2 rotating parts. In attached example both cranks can be rotated individually. The green connection-piece should move Crank#1 to the right whenever Crank#2 is moved to the right.
It probably goes beyond a little modification.
But rumors say, Serif is working on 3D-modeling program ... would nice to get this function any which way.
-
As of 10/26/2018 it is still not possible to combine the 2 red object in a non-destructive way - I am using OSX 10.12.6 with A Designer 1.6.1. Since it is difficult to select the tear with the knot-tool, I have hidden all layer but those two. Also I have tested if the order of selection makes a difference or if it could work by converting the tear to curves … none was successful. So, as I have noted as comment on the tutorial sit I just duplicate both layers and hide them before combining the two shapes permanently
-
Hi reglico
That looks like what I am looking for.
Guess you created those brushes yourself
Would you mind sending me a copy of those brushes via a post?
-
Seems that this post covers the same need as I have.
The patters should remain the same regardless if you draw lines in a rectangle, diagonal, or a circle. If you bend the line or you stretch an existing line for example to double its length it should still show the original patterns distances and position relative to the path..
If you add a texture like a checkerboard type it does not work for diagonal lines. If you use a texture like on a graph paper it could happen that a vertical or horizontal line picks up just a line (like „Green only“ in my example)- so no „dots“ show anymore. Same applies to textures in form of circles or 45 degree hatched lines.
If you work with a „frozen“ texture this might look fine at first sight. But the moment you need to stretch that patterned line it gets ugly (like “Stretched“ in my example).
So - in a way I am looking for a pattern which follows a given path.
Wonder if the affinity team regards this „nice to have“ feature as doable and feasible.
Your question … who needs that?
In Germany the protective wiring (grounding conductor) consist of a copper lead in a yellow/green sleeve. Usually the drawings for electric wirings are black and white incl. the respective symbols. But the readability could be improved by using color - at least in case of very critical wiring.
In brainstorming layouts one could use those dotted lines to mark a specific type/flow of thoughts.
In advertising one could have „line-effects“ simplified
The attached demo-file was made with affinity photo ... so no real drawing
-
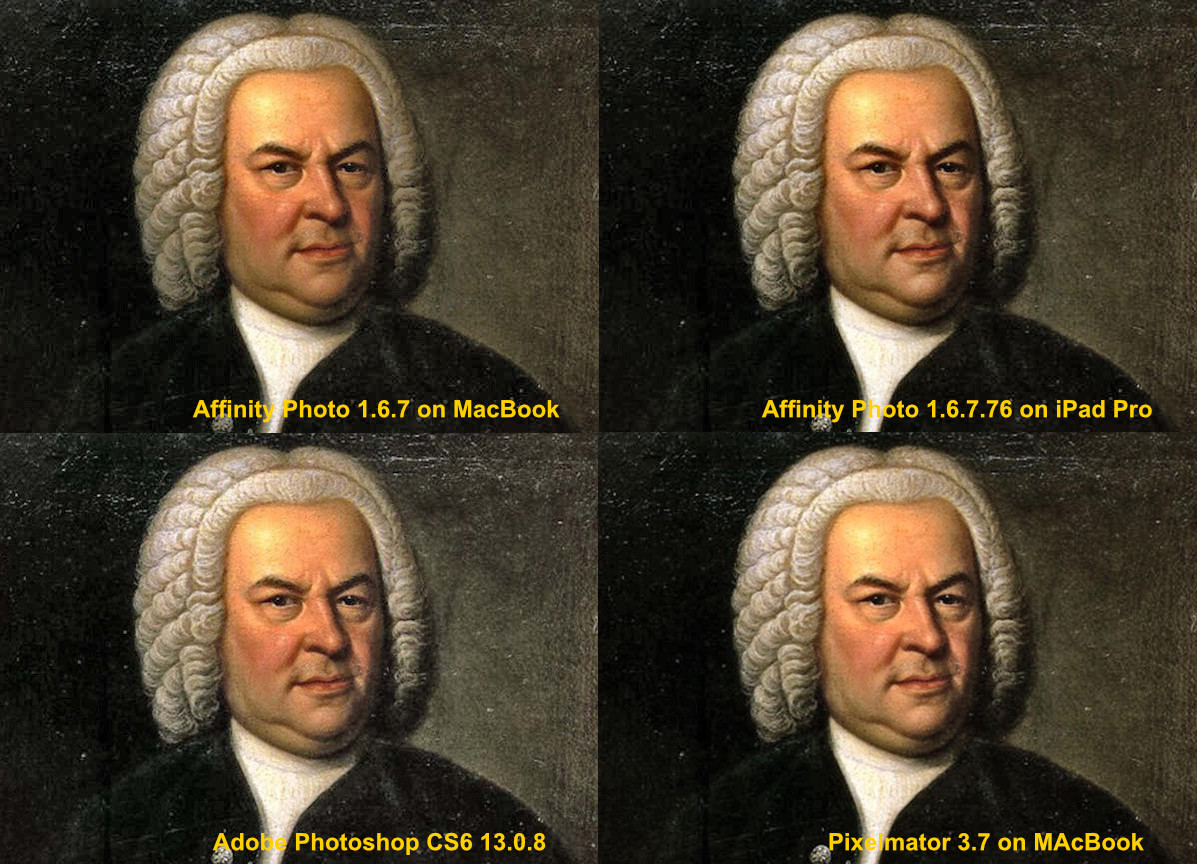
I had to do yet another comparison. Surprise, the folks at Serif have done a great job. Now I'm happy. My feeling is, that you have now a greater flexibility with Affinity Photo's shadow correction as with Photoshop. Pixelmator dos the job too but with just one slider, further fine-tuning is not part of that effect.
The result on the iPad is for me the best. However I have not tried too much on my MacBook to achieve a similar result. So all in all I feel that Affinity Photos has now the best control to correct shadows by not only lighten it but by offering additional sliders to maintain the overall appearance of a picture.

-
8 minutes ago, MEB said:
Hi affni,
Welcome to Affinity Forums
Create a copy of the layer 5 plus the next above it in the Layers panel, move them to the top of all petals then perform a subtract boolean operation between the two. Hide the original layer 5.
See attached file below.
Hi MEB,
thanks for your quick help. I obviously was on the right track with boolean but my logic was confused.
-
Drawing something by rotating is OK as long as nothing is overlapping. I tried a daisy (Daisy.afdesign) and cannot manage that the last leave at 5 o’clock comes on top of the start-leave = 6 o’clock AND remain below the leave at 4 o’clock. It should work using boolean function but what ever I’ve tried … only the wrong portions got cut off.
Is there a way to have TWO boolean relations do the trick? The other optien I could only think of would be to apply boolean (DaisyBoolean.afdesign) and cover the not wanted green line at 5:30 via a hand-drawn orange layer.
-
27 minutes ago, Justin said:
Hi donka
For me it seems to be still broken for jpegs but ok for RAW files. Also, if I convert a jpeg to 32-bit (RGB/HDR) before entering Develop then it works ok. Is that your experience? If not, can you let me have the files you are testing with?
Cheers
Justin
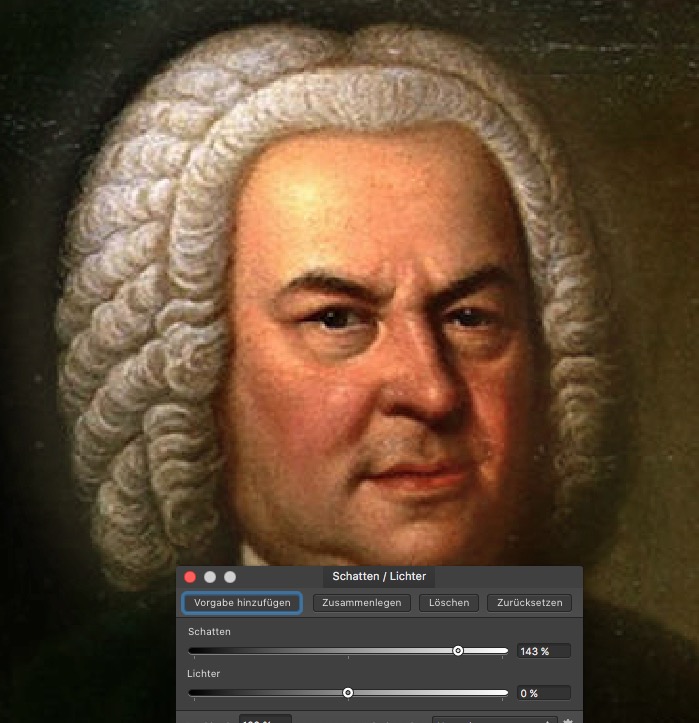
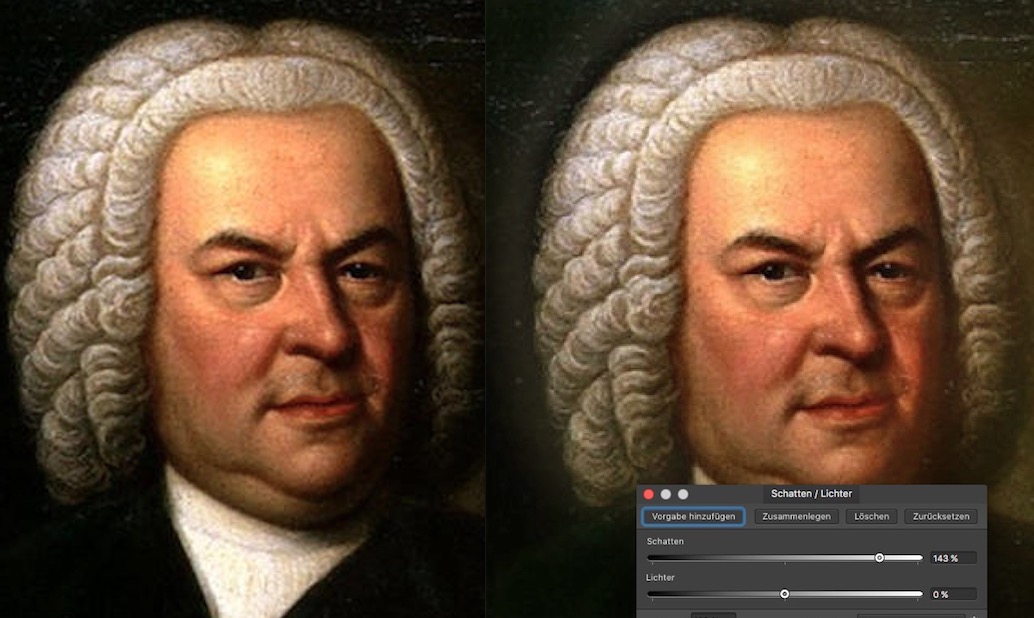
I had posted my finding of doing frequency separation first and then lighten shadows. Strange enough this post is gone. So her is again the result of frequency separation = 20 pixel ... after that I could move up with the shadow to 143.
The results are better than going through the Develop Persona. Also in the Develop Persona the maximum is 100 - hence the results are not as light as by using frequency separation. But at least its a way to lighten it without washing out effects.The second picture is the result via Develop Persona. By the way - there is no difference if you I convert to 32bit HDR. Both look like the second picture
-
So … II tried my luck with the Beta.
Affinity Photo 1.6.7 Beta helps a little … up to 62%. With higher values you get again bad results. With 130% it is the same strange color shift towards red-isch tones. That negative effect is more visible
I tried to simulate those effects in photoshop. Its not really possible. Even if you move the strength and width slider to the maximum you simply get a stronger wash-out effect. But that effect is evenly distributed without overdoing it to a particular color or color-range.
The only time you get an effect in that direction is if you turn the contrast all the way down to minus 100.
THAT brought me to the idea to test the shadow layer tool on a SMOOTH rainbow color-range picture. Surprise!!! it was not possible to produce unattractive results with Affinity Photo. Obviously the contrast is relevant. So - how to reduce contrast in a picture? Frequency separation.
If you set the separation value to 20% you still get a decent low frequency version (see attached comparison with the original). And on the lower frequency level you can apply a shadow-value of more than 140. Therefore, as I said in an earlier post, it might be an option to add one or two sliders to lighten shadows more naturally. One slider could select/narrow a particular or critical color range and the other could control the frequency separation.
-
Hi Lutz,
how should one install the beta? On a separate system/drive or can it exist parallel with the current Version 1.6.6 on my standard Macintosh HD ?
Regards Affni
-
1 hour ago, pixelcoder said:
Hey Affni,
the first one looks like the shadows been processed by the current stable Version. Are those iPad Beta screenshots?
cheers,
lutz
It's actually from the current stable desktop version 1.6.6. But my iPad Pro Affinity Photos version 1.6.5 produces the same unreal shadow effect. ... as does Affinity Designer 1.6.0.
I realize that this post deals with beta-issues. But I felt it makes no sense to open an extra post on one of the a final versions.
I trust the this can be resolved but not with one single slider.
-
Have the same problem.
When I need to lighten the shadows Photoshop offers many options to finetune this process - like selecting the strength and range separately or protect the black.
When I do the same in Affinity Photo I only have ONE slider to lighten the shadows. And the result: I get a washed out picture especially when applying it to faces. But even other pictures like of buildings or furniture looses saturation and the color as such is shifting. And you can not compensate this effect by increasing for example the saturation.
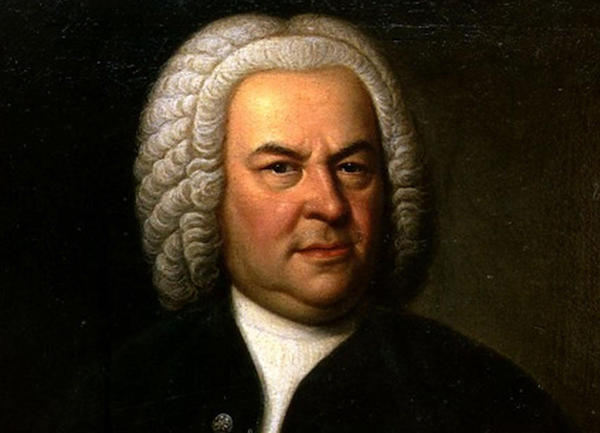
Since I was not sure, what to post without violating any rights I thought Mr. Bach will not mind, being used for demonstration purposes.
First picture ist processed with Affinity Photo, the last with Adobe Photoshop - in the middle is the original.
-
One more comment from my side. I was actually involved in logistic myself. I agree - the concept of having a „basket“ for all purchases does really not make sense for your small line.
If one cooperates with a third party for actual processing and shipment, the communication has to be absolutely clear. Also within the logistics portion of the supply chain it is required for warehouse management as well as selecting the right transport box to differentiate between single- oder multi-books containing parcels. Those who have the fun, to punch in all the stuff to satisfy SAP-based software systems know setting up a new article requires more than only some key strokes. Just google BOM = Bill of Material and you get an idea.
So I agree - by keeping the supply chain lean Serif is keeping cost for its customers best under control.
One more comment: I am into computers since the late 1970s (Apple II). At those early times you almost always received one or several manuals with the purchase of software … which were obviously included in the price calculation (ZBasic came for example with 5 manuals). In many cases one did not really need a manual. So at that times users often said, why don’t they stop to include manuals and lower prices instead. And if someone needs a manual it should be offered separately. And that’s what we have now today.
-
Ok - understood ... so, I ordered the books one after the other.
Thanks for your quick response
-
I like to use your special offer for both workbooks = Affinity Photos and Designer hoping to save on shipping. And I would only have to be ready for ONE delivery.
But the moment I add the Designer book the Photo-version is gone.
So ... I cannot get both books in my shopping basket.
What's the trick?
-
You are probably right - that the max Value of 64 GB includes true RAM and swap. So far I was used (in Photoshop and other programs) to adjust the RAM separately from the cache. Because the RAM setting influences how much "air" ist left for other apps. If you allocate only 8 GB RAM to Affinity Photos you can allocate swap-space separately then you can still open huge file without affecting other apps. In the case of affinity photo you have only the choice. Example: If I want to load 36 GB of files in Affinity Photos fpr no other program is RAM left. If I load 32 GB in programs with separate swap-mangement, I could load 1GB in RAM and 31 GB in swap = leaves 15 GB to other programs. This is surely an exaggerated example. In reality you would probably have no fun to work with such a set-up.
Anyway - I was just looking for a confirmation of my assumption. So far there is no really anything I am missing in Affinity Photos compared to Photoshop (which I had been using since 1982 before I left Adobe software )
-
By accident I have posted an issue twice.
I only found the option to edit my post but nothing to delete it
-
Sometimes I need to affect only a very narrow range. That is impossible with a curve. Here it would be helpful if I could switch from curve-drawing to manual drawing with a pen-tool
-
Sometimes I need to affect only a very narrow range. That is impossible with a curve. Here it would be helpful if I could switch from curve-drawing to manual drawing with a pen-tool
-
Another workaround is to use the older quicktime player 7 to export a picture-sequence. In this case you get jpg-files. I use this method to retouch a range of complicates frames which are not suitable for batch handling. After manual cleanup I import the frames with the quicktime player 7 and have a clean video
But in general I agree that PCT-files should be accessible via Affinity Photo
-
In the preference window it shows 32GB as allocatable RAM though I only have 16GB installed. Would be better if the program limited this option to the maximum actually available


Show own grid has become very cumbersome in Photos 2
in Feedback for the Affinity V2 Suite of Products
Posted
Thanks for the hint, that grids are part of the respective document. Since this is comparable to applying live filters I tested to create macros ... and it works.
So, I created a new category in my Macro-Library and named it "Grids". Depending on my requirements I can now doubleclick 300x300 or cube or whatever. The mainly used grid is also the top - hence I just have to click on Library an select the 300x300 grid.
Important: The program seems to remember the last toggle command. In case you double click such a macro and nothing happens, go to the menu "show grid" or apply the shortcut
cmd ` = that means press cmd and press the grave accent.
Finally - I tried to record a 300x300 grid and clicked on the menu "show grid" before stopping and saving it. Though no changes were shown in the recording window I may be possible, that including the "show grid" action in the recording assures that the grid is shown regardless of the prior status.
Hope the attached macro-example also works on your Mac
Grid.afmacros