Hangman
-
Posts
10,832 -
Joined
-
Last visited
Everything posted by Hangman
-
 Hi @Michaelolo, I'm glad you've been able to resolve the issue with an OS update and that you can print without issue again...
 -
Hi @Dan C, That is correct since a pdf file doesn't have a resolution but it will use the resolution of any embedded raster files when reopened in Affinity apps, so an embedded 300 dpi raster file in an RGB pdf will be reopened at 300 dpi, likewise, an embedded 192 dpi raster file in an RGB pdf will be reopened at 192 dpi... I'm checking this with our development team as I can replicate this behaviour - it's not clear if 'Estimate' when importing a CMYK document would consider that a CMYK PDF is typically used for printing and therefore 300DPI is a sensible estimate, or if this should be imported using the same DPI value as the RGB PDF file. It certainly appears to be the case that Estimate is using 300 dpi for CMYK files, though perhaps one question mark would be, is that correct, i.e., if I create a 1,920 px x 1,080 px Publisher document at 192 dpi and export to pdf, this will reopen in Publisher as a 3,000 px x 1687.5 px, 300 dpi file, so it's not honouring the source dpi the file was exported at and is perhaps not what you would want if you're using a specific dpi for a specific purpose?
-
So here's an interesting observation and what I assume must be a bug but also explains why @thomaso's file behaves differently: An RGB (as you'd expect for slides being displayed on-screen) vector only 1,920 px x 1,080 px, 300 dpi Publisher document exported to pdf opens in Publisher at 460.8 px x 259.2 px @72 dpi which is what I would expect... A CMYK (not what you'd expect for slides being displayed on-screen) vector only 1,920 px x 1,080 px, 300 dpi Publisher document exported to pdf opens in Publisher at 1,920 px x 1,080 px @300 dpi which is not what I would expect... This is true in both v1 and v2 Affinity apps... Note: This has no impact in terms of how the pdf is displayed in Acrobat Reader which displays both correctly at 460.8 pt x 259.2 pt and means the best solution is to simply change the Page Display in the Acrobat Preferences from its default setting to a custom setting that best matches the TV display as demonstrated earlier...
-
Hi @Julien_dedale, This makes perfect sense because, png, jpeg and tiff files are all raster-based file formats that use pixels as their unit of measurement, pdf files don't use pixels but points so there is always going to be a conversion between the two... I'd certainly be interested to see a sample .IDML file along with the pdf exported from it so we can see what is going on there that differs to Publisher...
-
You won't achieve this using PDF files because PDF files are not a pixel-based file format which means that any 'resolution' is determined by the content of the PDF, not the PDF file itself: If exporting a vector file from Publisher that is 1,920 px x 1,080 px at 300 dpi to a pdf file then it will be 460.8 pt x 259.2 pt @ 72 dpi or 460.8 px x 259.2 px @ 72 dpi when reopened in Publisher but will appear at 460.8 pt x 259.2 pt in Acrobat Reader If exporting a 300 dpi raster file from Publisher that is 1,920 px x 1,080 px at 300 dpi to a pdf file then it will be 460.8 pt x 259.2 pt @ 300 dpi or 1,920 px x 1,080 px at 300 dpi when reopened in Publisher but will appear at 460.8 pt x 259.2 pt in Acrobat Reader Slide Size.mp4 So the easiest solution as @thomaso mentioned earlier in the thread would be to simply change the Page Display in the Acrobat Preferences from its default setting to a custom setting that best matches the TV display... Slides.mp4
-
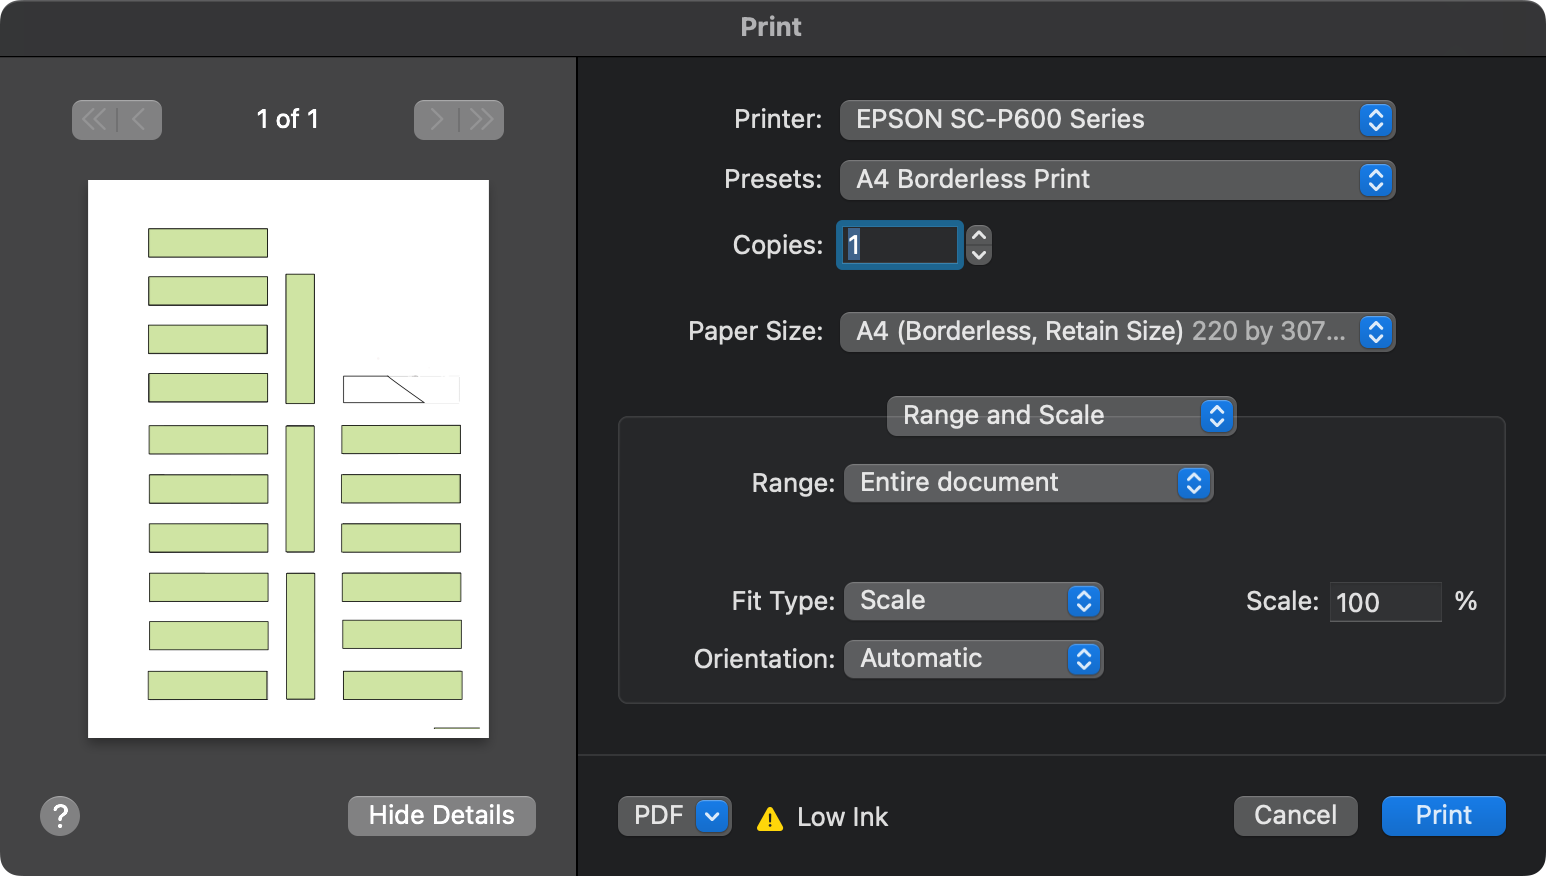
Hi @Michaelolo and another warm welcome to the forums, What do you see in the Print dialogue window for both Affinity Designer and Acrobat Reader, is there any preview at all and if so, does it appear correctly for printing on A4?

-
Are you able to confirm the question regarding how the PDF will be displayed, i.e., on the desktop or via a web browser? If using e.g., Acrobat Reader on Desktop, is there any reason for displaying at 'Actual Size' rather than 'Zoom to Page Level', 'Fit Width' or 'Full Screen'?
-
Could you elaborate a little in terms of how your PDF will be displayed, is it going to be displayed by the user using a PDF Reader like Acrobat or is it designed to be displayed in a web browser? Are you able to provide a couple of typlical sample pages from your digital document so we can get a better understanding of the content as that may play a part here... Generally Windows uses 96 dpi rather than 72 dpi as it's default though that shouldn't impact PDF files...
-
Basic though it is, could you upload your Publisher file as there is clearly something interesting going on here...
-
Bug on Affinity Designer 2.3.1
Hangman replied to Danissryd's topic in Desktop Questions (macOS and Windows)
Minus the URL which I now realise you have to right-click and select Open Link in New Tab (or Copy Link)... I foolishly assumed clicking on a search term would take me to the relevant URL directly but hey now I know... 🙃 -
If opening with an Estimate of 300 dpi then of course the file will open at 1,920 px a 1,080 px since you've specified the document resolution but the PDF itself doesn't have a resolution, you've simply defined a Publisher document resolution...
-
For some reason, you're document is being interpreted as 300 dpi which may be down to a longstanding bug in V1... If Opening your PDF do you have it set to Estimate or 300 dpi? If Placing your PDF then that is an entirely different matter... Note how the Original and Place DPI differs between Publisher 1.10.8 and 2.4.0 (namely v1 and v2) when Placing the same PDF files in identically sized documents using the same document dpi... Publisher v1.10.8 Publisher v2.4.0
-
Bug on Affinity Designer 2.3.1
Hangman replied to Danissryd's topic in Desktop Questions (macOS and Windows)
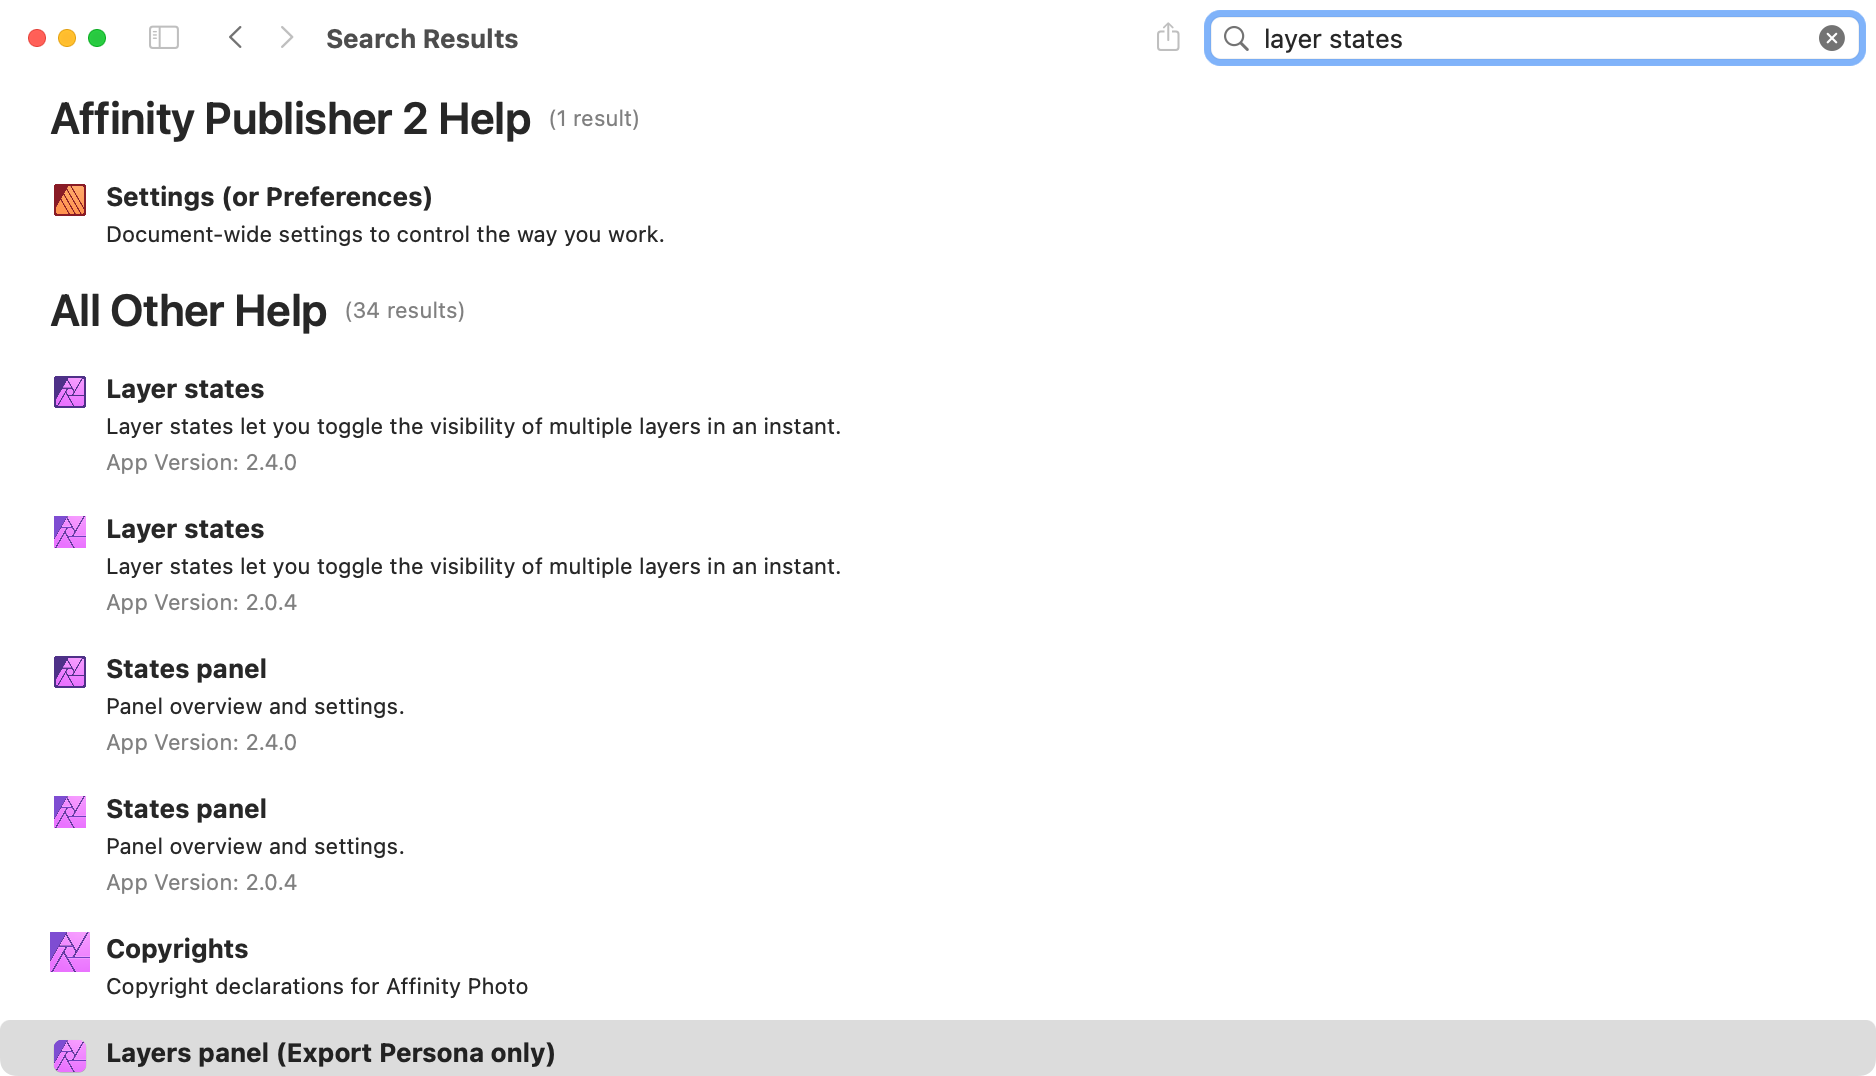
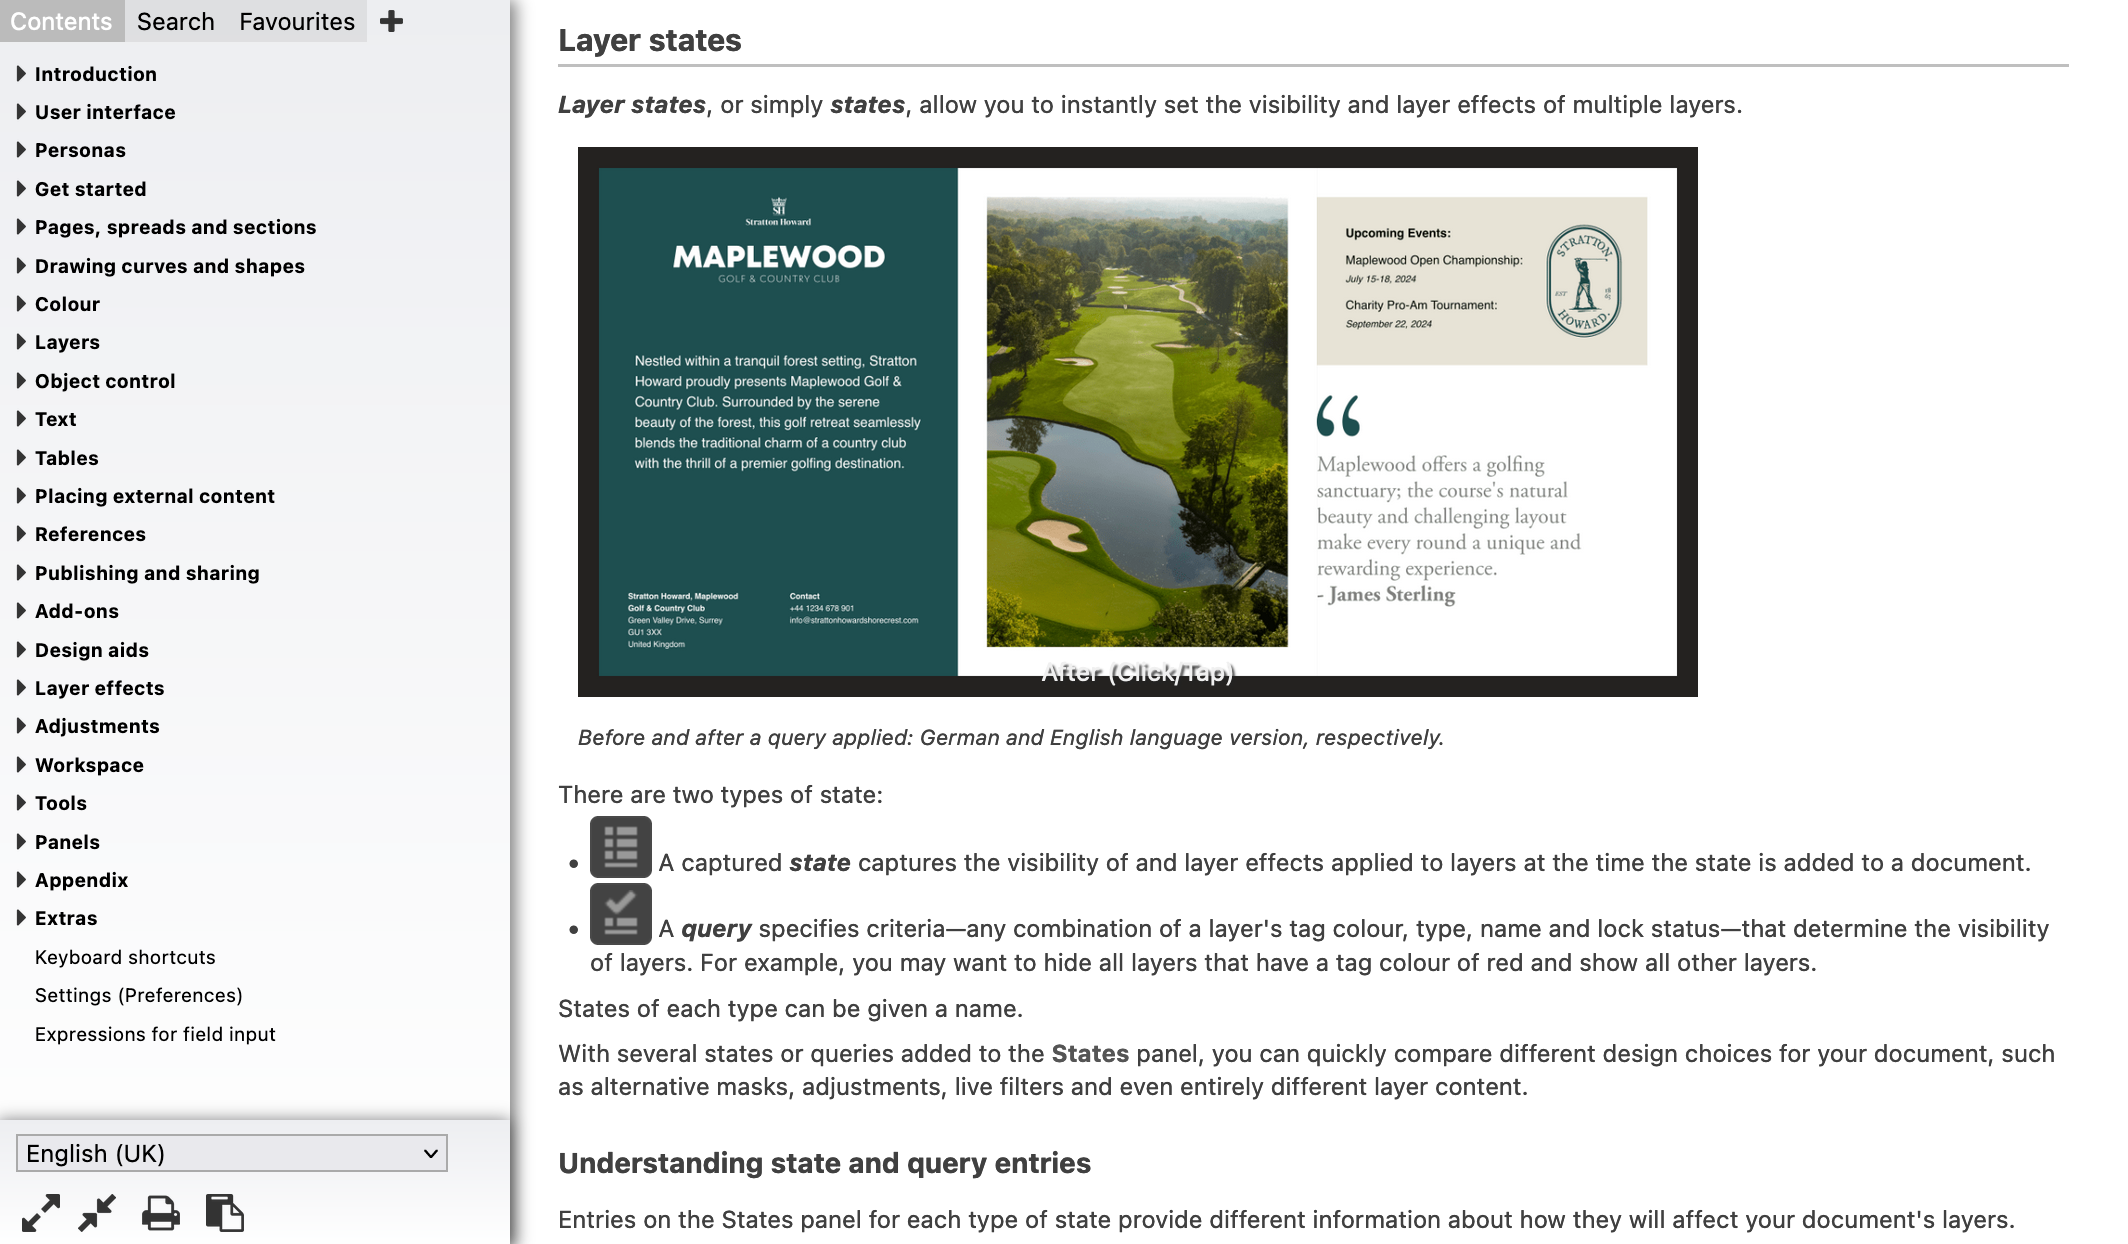
I think I figured out my issue... I have a bookmarked link to what I've always assumed is the Help File... https://affinity.help/ That shows me this page... Clicking on e.g., V2 PC/Mac takes me to this page... Note the lack of a 'Copy Link' icon option at the bottom of the page (on Firefox on macOS) though stupidly I'd not considered right-clicking a topic to take me to the actual URL... If I go to the in-app help for Publisher and search for say 'Layer States', it doesn't find any listing (though I believe this is a known issue)... Note the lack of the sidebar when search results are displayed... If I click on the only result shown in the search results for Publisher, i.e. Settings (or Preferences) I now see the sidebar in the online Help... but I still have to manually try and locate Layer States from the online Help file... When I do manage to locate it which I do under 'Object Control' I can then right-click, select Copy Link and paste the link into a browser where I then see the copy link icon at the bottom of the page and I can quite happily search for Layer States and the search will find it. So it looks as though the original page I'd book marked is of little use as it doesn't appear to work...
-
Bug on Affinity Designer 2.3.1
Hangman replied to Danissryd's topic in Desktop Questions (macOS and Windows)
Again, I don't appear to have that option, what am I missing (apart from the obvious)...
-
Bug on Affinity Designer 2.3.1
Hangman replied to Danissryd's topic in Desktop Questions (macOS and Windows)
That explains a few things, Firefox on macOS doesn't contain the 'Copy Link' unlike Chrome and Safari and of course my default browser is Firefox...
-
Create a Publisher document that is 1,920 px x 1,080 px @ 300 dpi Export to PDF and reopen in Publisher Change the default unit from points to pixels Your file will be 460.8 px x 259.2 px The original question was "How can I export a pdf from Publisher with a precise and predictable size in pixels?"
-
Just to add to what @walt.farrell mentions above, a PDF file per se doesn't have a resolution but any images contained within it will... Because PDF uses points as its default unit of measurement and for all intent and purpose there are 72 pts per inch then 1,920 px x 1,080 px is the same as 1,920 pt x 1,080 pt at 72 dpi so to avoid confusion, working at 72 dpi is a sensible approach. PDF files exported from PowerPoint are actually only 960 pt x 540 pt vs a PDF exported from Keynote (on Mac) which is 1,092 pt x 1,080 pt.
-
I'm unsure if this is already logged... There have been several reports of lens profiles not being automatically recognised despite being supported and listed but I've noticed that the lens correction data isn't updated when switching between RAW Files in Affinity Photo. The Lens Correction Profile for the last opened RAW file is used when switching between opened RAW files. If the Lens isn't supported and subsequently the Lens Profile remains unchecked, when switching to other open RAW files with supported profiles the Lens Profile is now checked but shows None... The only way to force the lens profile to update appears to be to click the dropdown list and then deselect the list without making a new selection. Lens Profiles.mp4
-
Green spots appear after 2.4 update
Hangman replied to Martin Davison's topic in Desktop Questions (macOS and Windows)
That's no problem at all and glad to hear that turning Hardware Acceleration off has helped with the issue... -
Green spots appear after 2.4 update
Hangman replied to Martin Davison's topic in Desktop Questions (macOS and Windows)
You should find it at the bottom of the Performance Settings... -
Green spots appear after 2.4 update
Hangman replied to Martin Davison's topic in Desktop Questions (macOS and Windows)
Hi @Martin Davison and welcome to the forums, There have been several reports of this issue since the v2.4.0 update and it has been logged as a bug under reference AF-2178. Could you upload a screenshot of your performance settings so the Moderation team can see which graphics card you're using as it appears as though the issue may be specific to certain graphics cards. As a possible workaround, try turning Hardware Acceleration off in the same Settings panel, reboot Affinity Photo, and then re-open your RAW file to see if that fixes the issue... -
Hi @Julien_dedale and welcome to the forums, PDF files use Points as their standard unit of measurement with 72 points to the inch, so the measurement you see 460.8 x 259.2 is points rather than pixels... To achieve a PDF which is 1,920 px x 1,080 px at 300 dpi you would need to create a Publisher document at 8,000 px x 4,500 px. If you export this to a PDF you should see it displayed as 1,920 pt x 1,080 pt in Acrobat Reader (assuming you have units set to points)... If you then open the PDF in Publisher it will open as 1,920 pt x 1,080 pt at 300 dpi. If you change the Document resolution to 72 dpi and then change the units to Pixels you will see your file is now 1,920 px x 1,080 px.
-
Hi @stuartbarry, This thread will get picked up by someone in the Serif Moderation team and should be logged as a bug for the Development Team to take a look at... I totally understand, the question was really to assess whether, as a test, you see the same issue when using RAW Layer (Embedded) so we can rule that option in or out of the equation rather than suggesting you use it from a working point of view... In comparison to Affinity Photo, Capture One is expensive, they have annual updates if you purchase a perpetual licence which is always pretty much the cost of the software all over again, though they also always have up to a 50% discount at certain points in the year, though they've now largely moved over to a monthly subscription model where you get the latest updates as they're released. With the perpetual licence, you don't have to upgrade every year, you can decide whether the new features are worthwhile for your workflow. With the subscription version, you are effectively in Adobe territory but you do get year round updates along with Capture One Live and Capture One Mobile which depending on your needs can be great from a collaboration point of view. They do have a superb RAW engine and the feature set has greatly improved over the years but Capture One is certainly not immune from bugs either... Just my two cents worth...
-
Out of interest, do you see the same issue with RAW Layer (Embedded)... For me when using RAW Layer (Linked), the image seems to take ages to fully render but to date, other than switching the RAW Engine between opening RAW files, I'm not seeing any issues after making some adjustments, saving as a .afphoto file, closing and reopening the file and double-clicking to go back into the Develop Persona, i.e., the image remains in colour so I'm unsure what might be causing this for you... I've tested with both Metal and OpenGL and with Hardware Acceleration on and off but I'll keep testing to see if I can replicate the issue... It would perhaps be handy if you could upload a screen recording that shows the problem...
-
It was mentioned by @stuartbarry in the first post, I was just highlighting this is only an option when using the Serif Labs RAW Engine as you'd asked which engine was being used... There is another post relating to the same issue and I've now been able to replicate the problem, it happens when switching engines on the fly...