Announcement
-
Posts
15 -
Joined
-
Last visited
-
V2. And yes, I use the basic brushes to do my masks, and the hardness is adjustable. Brackets would be a great solution if I was in the US and only used English for communication, but my native language and related keyboard layout is different and the brackets are hidden behind alt gr + 8/9. I could change the keyboard layout while working in Affinity, but then I'd have to keep changing back and forth as I am usually in and out of Affinity frequently to respond to emails and other written correspondence while working on my images. As much as forced hardness adjustment annoys me, forgetting that I'm on a different keyboard layout when I need to respond to something would probably annoy me more. 😅 The best solution for me, I think, is going to be to keep hardness adjustment through vertical scrolling in mind when I resize. Now that I'm aware I'm sure I can at least limit the problem considerably, which is going to help a lot. 🙂 Thank you so much for your swift responses and help!
-
 Announcement reacted to a post in a topic:
Brush hardness keeps changing
Announcement reacted to a post in a topic:
Brush hardness keeps changing
-
Oh my god, is that all there is to it? I never put those two together at all, holy crap what an idiot I am. Is there any way to disable hardness adjustment while using ctl alt? I did a bit of testing just now and neither setting seem to be particularly sensitive to vertical movements, but I still keep changing the hardness accidentally and would prefer to disable it altogether if at all possible.
-
Hi all, just a quick question from me. I'm an avid user of the brush to fine paint masks and the like, and resize it frequently according to what I need. However, the brush hardness keeps changing incrementally each time I resize the brush. I've looked in the "more" brush submenu, but I can't find any settings or boxes to tick that forces the hardness to remain constant. Is there a way to do this? The constant changing of hardness is driving me crazy.
-
I just wanted to drop in here and say that I really appreciate the responses that have trickled in in the months since I posted this issue! I've had a relatively long break from shooting concerts (life tends to happen), but I'm jumping back into it now and will test the suggestions that have come in since I last grappled with this stuff! In any case, converting to TIFF in Bridge, then working on the TIFF file in Affinity has worked pretty well for me. It's a workaround rather than a fix, but I'm putting it out there in case it is useful to someone else as well. Thanks again to everyone who's dropped by and made excellent suggestions!
-
 Announcement reacted to a post in a topic:
Information loss when opening in Affinity from Bridge
Announcement reacted to a post in a topic:
Information loss when opening in Affinity from Bridge
-
Hi Lee, thanks so much for responding, I appreciate your input! And I learned something new today - a lot of the under the hood stuff is stuff I have little knowledge of, so I appreciate your clear and understandable explanation. I'll be sure to keep this in mind when I shoot moving forward so that I can mitigate the issue as much as possible on my end, and am looking forward to see what you guys come up with on your side to better deal with the issue in the future! Thanks again to both you and thomaso for your help!
-
Announcement reacted to a post in a topic:
Information loss when opening in Affinity from Bridge
-
Announcement reacted to a post in a topic:
Information loss when opening in Affinity from Bridge
-
Announcement reacted to a post in a topic:
Information loss when opening in Affinity from Bridge
-
Announcement reacted to a post in a topic:
Information loss when opening in Affinity from Bridge
-
Interestingly, DPP also had some issues with clipping (nowhere near as bad as Affinity, but still). The best course of action currently seems to be to convert to TIFF and work from there instead, that seems to be the best way to preserve the gradient lighting/color that Affinity seems to be unable to do. Thank you for your input!
-
Thanks for your response, @thomaso! Yes, I believe Bridge displays a separate JPG preview. It's shot on a Canon R8. Which image details do you require? It's shot in raw format in Adobe RGB color space, please let me know if there are other details that might be pertinent to the question. I read through the threads you linked to. It seems this is indeed connected to the blue light color clipping issue. Calebcudjoe's workaround (significantly shifting white balance, then bring it back later) also work for me, but increase my workload significantly when I frequently shoot concerts and therefore will run into this issue frequently. Am I naive if I hope for a solution to this? I don't really want to go back to Photoshop, but considering the volume of images I edit and the resulting huge increase in workload this issue creates for me, I absolutely need editing software that can more accurately interpret the RAW data. (I don't expect Photoshop to be perfect either, but I have never seen an interpretation as extreme as this, with such a large area essentially lost to clipping.) @Lee_T, sorry to bother you, but I was wondering if perhaps you could shed some light on this issue? Is there anything to try (I checked my settings, they're already set to what you suggested in the other thread) here that might help?
-
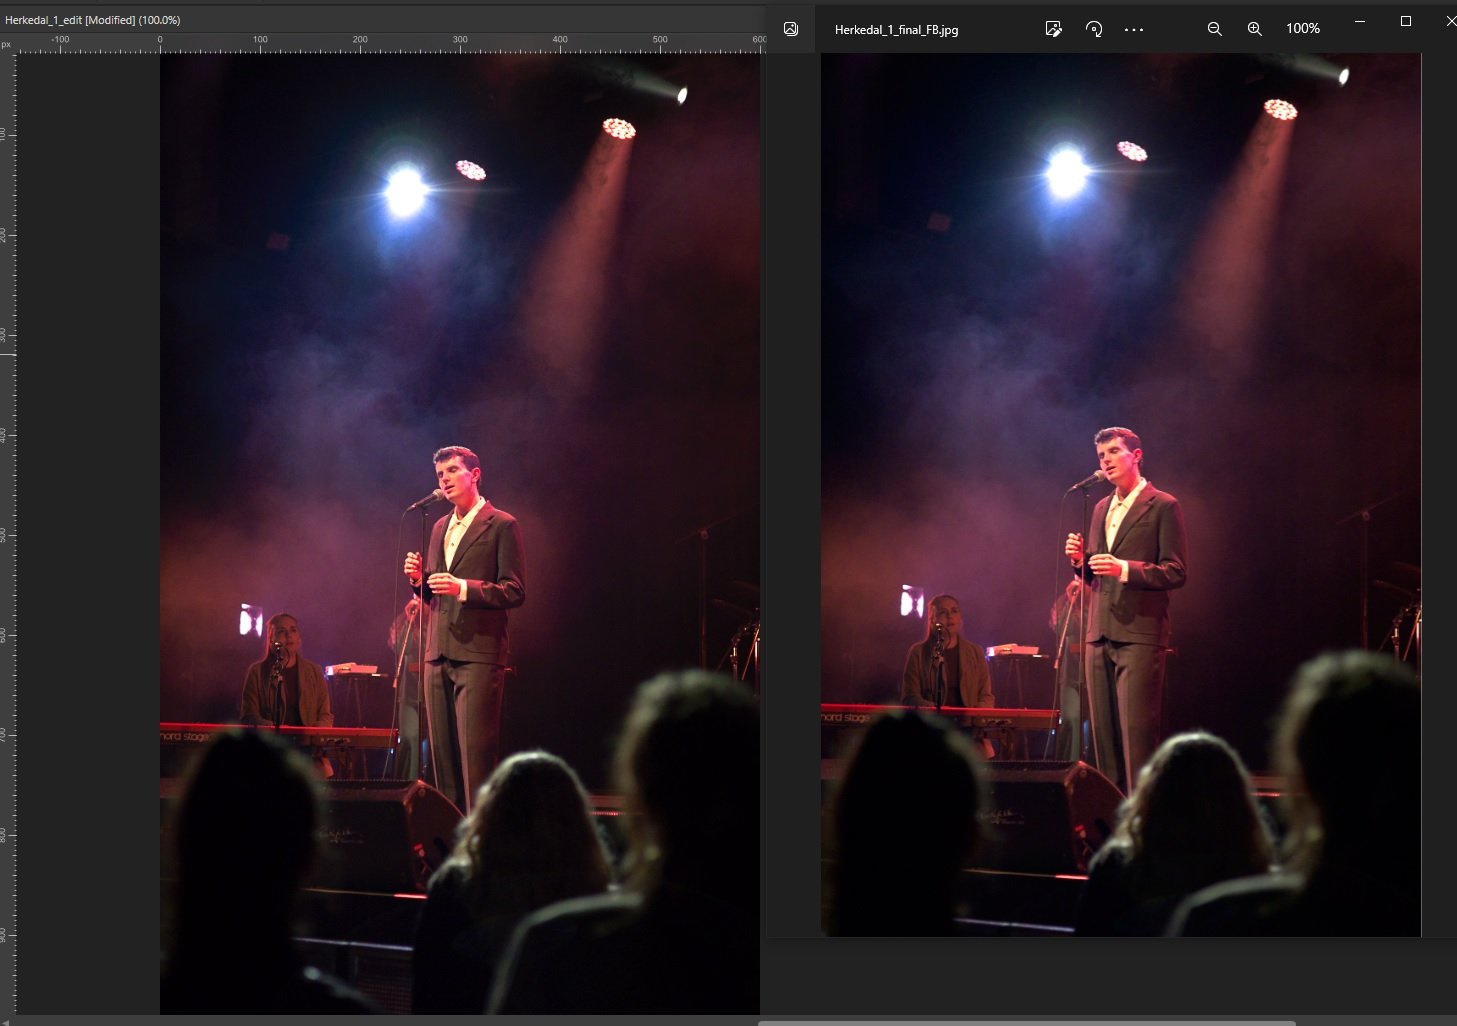
Hi all, I have an issue I absolutely need a solution for. I use Bridge to sort and label my files, and open Affinity Photo through Bridge when I'm ready to edit. I noticed immediately that the Bridge preview was wildly different to what I actually got in Affinity, but for the most part it either wasn't or was only a minor issue. Until now. I shoot concerts and deal with very saturated lighting, and I have an image now where I'm losing significant amounts of information when I open in Affinity. Please have a look at the attached files - file 2 is the Bridge preview, you'll see that the lighting is smooth and that there is no loss of information anywhere. File 1 is what I get when I open the image in Develop Persona - I've lost tons of information throughout the entire image, but the spotlights on the guy on the left side are particularly egregious. Am I right in guessing it's a color profile issue? I'm not sure how to fix it, though, my color profile is set to ProPhoto. If anyone has any idea how I can fix this I would be eternally grateful, I absolutely need Affinity to import the same level of detail that was actually captured at the scene.

-
Old Bruce reacted to a post in a topic:
Final .jpgs are wrong
-
Final .jpgs are wrong
Announcement replied to Announcement's topic in Affinity on Desktop Questions (macOS and Windows)
Good god, I think I figured it out. I think y'all were right about it cropping at a pixel decimal rather than a full pixel, and for whatever reason that also messed with the sharpness of the exported file. Once I unlinked the X and Y pixel sizes in the "resize document" and made sure that both values were decimal free the cropped and resized file exported correctly and gave me a sharp, white line free jpg. Thank you so much for your help and patience, guys. I really appreciate it! -
Announcement reacted to a post in a topic:
Final .jpgs are wrong
-
Announcement reacted to a post in a topic:
Final .jpgs are wrong
-
Announcement reacted to a post in a topic:
Final .jpgs are wrong
-
Final .jpgs are wrong
Announcement replied to Announcement's topic in Affinity on Desktop Questions (macOS and Windows)
Hey, thanks for your response! I use both live filters (high pass) and adjustments. I'm adding a screenshot of my layer stack - no high pass filter there because I add that as the very last step after cropping & resizing the image. And no, the Affinity file and the exported .jpg don't look the same, that's what I've got a screenshot of in the first post. The right image (the exported jpg) is visibly blurry and has that white line on the right-hand side. Hey, appreciate the input! What am I looking for in the Transform panel? I've attached a screenshot, as you can see all the values there are set to zero. Edit: So I tried exporting the uncropped image to see whether that would do it, and it did. The white line is gone and my sharpening adjustments export, so there's clearly something in the cropping that's causing it (even though I've cropped images before without this being a problem, so who knows why it's suddenly a problem now). Any idea what I can do to continue being able to crop my images without these issues happening again? Hey, so I'm looking at the settings panel now - I assume it's the pixel one I'm supposed to set to 4? I tried that, but the Transform panel still shows a value of zero for me.
-
Final .jpgs are wrong
Announcement replied to Announcement's topic in Affinity on Desktop Questions (macOS and Windows)
Here you go, a 100% comparison. The issue here isn't the zoom level of either image, something is happening when I export my images that causes the finished .jpg to be significantly less sharp and to have a white border on one side. This doesn't happen with my square files that go through the exact same editing process, only difference being the ratio of the finished image. My square images look exactly like the image on the left here, except they're square. This also wasn't an issue before - previously, ALL my exported images have looked like the image on the left, so this is a new problem that has appeared in the last two-three days. I open the images as RAW files in Develop Persona, I don't paste them into a premade canvas.
-
Hi all, got an issue I can't figure out. When I export my images, they become a lot less sharp and they export with a white line along one of the edges. This happens to both landscape and portrait oriented images, but curiously, square images seem to export correctly. Have a look at the attached image - the image open in Affinity is (supposed to be) the same as the open .jpg, but they're not. What in the world is happening?
-
Hey! No curve in Bridge since it is a file management program, but if I had Camera RAW access I would assume the curves would be different.
-
Hi, thanks for your response! Yes, the way I edge burn essentially creates a type of vignette. Photo does have a couple of options for the gradient tool that lets me burn all edges at once (elliptical, for example), but that doesn't give me the control I want and need to adjust the gradient size and angle of each edge. I don't have Designer, so that's unfortunately not an option for me. Thank you so much! I was able to remap the "new layer" shortcut to "new fill layer", so that's going to save me quite a bit of time moving forward - much appreciated! Hey, thanks for your input! Yeah, I figured it was something like that. It really is mainly out of curiosity since I prefer the flatter RAW as a baseline to work upon anyway, so it isn't really a problem to me that what Bridge displays and what Photo displays looks different. In any case it's a small price to pay when the alternative is to lock into subscription based software that you will lose access to the second you don't wish to pay anymore.
-
Hi all, I'm settling into Affinity Photo 2 after a decade and a half of working in PS. It's been pretty painless for the most part, but there's one step in my workflow that has become significantly longer in Affinity because I can't figure out a way to do it more efficiently. I'm also using Bridge to sort and label my images, and the preview in Bridge and the Develop Persona image are vastly different. So was wondering if y'all had some help and input for me here, so here are the actual questions: 1) I edge burn nearly every single image I develop by dropping a neutral gray fill layer into overlay and using the gradient tool to burn the edges I need to. In PS I could do this in one layer, but in Affinity it seems I need a layer per edge I wanna burn. I've googled, and it seems it's not possible to do multiple burns using the gradient tool in one layer - is this correct? If yes, is there a way around this that is more efficient than doing one layer per edge? Right now I'm spending unnecessary time fine-tuning opacity and masking edge burn intersections, and I find it frustrating that what was previously about five clicks has become five clicks per edge, plus masking on top of that. 2) Speaking of fill layers, is there a keyboard shortcut to creating new ones? In PS CTRL + Shift + N would open a super handy panel where you could check off "fill with 50% gray" and drop it into overlay before it was ever created. CTRL + Shift + N now just creates an empty layer. Is there an equivalent to the new layer panel from PS that is accessible by keyboard shortcut? 3) A question more out of curiosity than need - I use Bridge to sort and label my images, and open in Develop Persona through Bridge. However, the Bridge preview is much more saturated and has higher contrast - when I open in Affinity, the image is suddenly much more muted and less saturated (check the attached images). Why is this? I assume Bridge is adding some kind of filter to the preview, but is someone privy to the details here? Would love to know exactly what's going on. Thanks for the help!