Paul Creedy
-
Posts
10 -
Joined
-
Last visited
-
 walt.farrell reacted to a post in a topic:
Green stripes when opening raw photos
walt.farrell reacted to a post in a topic:
Green stripes when opening raw photos
-
Paul Creedy reacted to a post in a topic:
[KNOWN ISSUE] RAW files have Artefacts or Green Lines after updating to 2.4 on Windows
-
Brilliant thank you Turning off OpenCL in Settings > Performance did the trick.
-
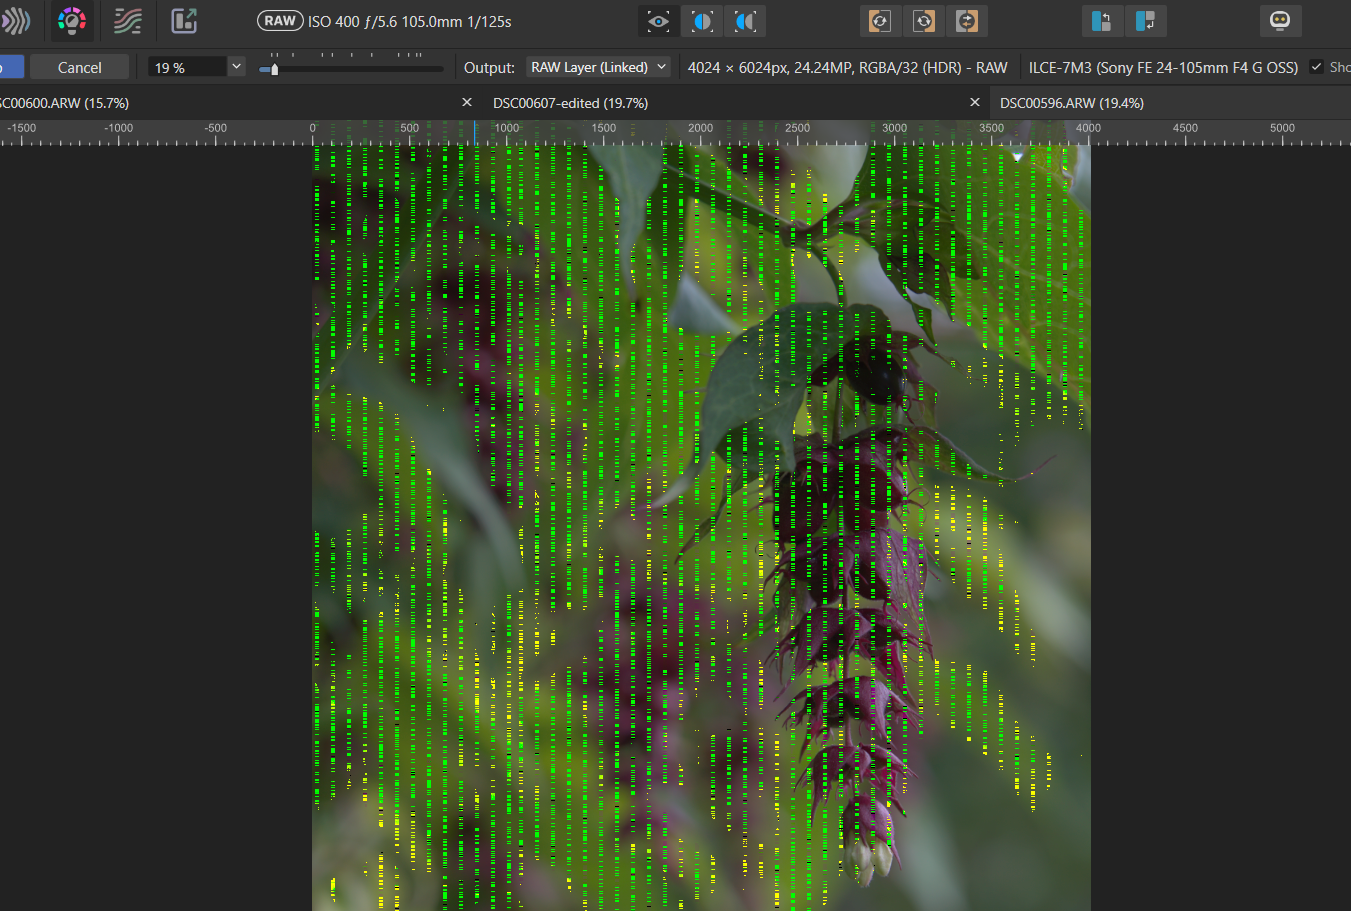
I've got weird green vertical stripes opening RAW photographs. Now these photographs were taken a few months ago and were perfectly fine then. It seems that these have appeared very recently, and the only thing that has changed has been affinity updates since I last edited anything. Happens to every unedited raw image I open. So far I've opened up several images and they are all the same, so I have no clue why affinity is currently doing this or how to correct it. Like I said though, these photographs were fine when taken and I've gone back to these a few times just to try different things out. DSC00596.ARW

-
Paul Creedy reacted to a post in a topic:
HDR Merge leaving red halo around high contrast edged
-
Paul Creedy reacted to a post in a topic:
HDR Merge leaving red halo around high contrast edged
-
Unfortunately not a tripod shot. It was manic there and actually a queue to take the shot from this angle as it's one of the few spots available. I set the camera on auto 3 shop bracketing on one shutter press, but there may have been an ever slight difference in alignment as it was handheld. As suggested above, I've now found that putting it through the tone persona manually (not ticking that box) and being far more subtle that the default 'Normal' option, followed by careful use of the live defringe tool in Photo Persona an acceptable result. There's still a little visible on close inspection but not unless you go looking for it. Paul
-
It does indeed appear to be the tone mapping causing most of the issue and the defringe live filter helps.
-
Thank you. I've just been trying that out and I can't quite get rid of the halo completely but I have been able to reduce it. It seems that maybe the three images weren't perfectly aligned and then when tone mapping happened it made things worse. I'll try different options and see what works best at each stage to try and minimise the effect. Thanks for the pointers again. Paul
-
Hi I'm merging three ARW (Sony) images into a new HDR. All seemed to be going well until I zoomed in and saw a multi line red halo around high contrast edges, particular where the object meets the sky. I've also tried this on another set of 3 images shot from the same location with similar results. I've tried the merge both with and without 'noise reduction' ticked, and with and without 'remove ghosting'. I've also tried the different alignment options. No combination seem to make any difference to the halo effect. Have you come across this before and know what the cause is, or have any hints as to how I can remove it post merge? I'm using the latest version of Affinity Photo v2 DSC01187.ARW DSC01188.ARW DSC01189.ARW
-
Progress - of sorts. Turns out the ICC profile for the printed product provided by the lab is in the CMYK colour space not RGB. They have a either RGB or CMYK ICC profiles for different printed products. If I choose a product where they supply an RGB colour space ICC profile there is only a small gamut adjustment needed to my image. With the product I actually want to purchase from them, the ICC profile is only available to download in CMYK which is why it's probably way to difficult to correct the gamut. They have a selection of products that they only supply ICC profiles in the CMYK colour space. Here is a link to the labs ICC profile page https://www.saal-digital.co.uk/service/professional-zone/softproof-and-icc-profile/ The products I'm trying to be accurate for are the Wall Art ones on this page, which I've now realised are all CMYK https://www.saal-digital.co.uk/service/professional-zone/softproof-and-icc-profile/ That seems to explain the difficulties but not what I can do about getting my images correct because they also say they require images sent to them in RGB.
-
Thanks. I may do that soon. I've think I've found 'something', in that I've downloaded the ICC from a different lab and the amount of correction needed is far less just by using the ICC supplied by a different lab, so their own printing process/ICC is part of the problem, but that doesn't help when I want to use that lab. I'll see if I can share some samples tomorrow. Thanks
-
Thank you for that example, and the welcome. The adjustments I make based on that video and the LensCraft one I've just found make my photos look absolutely terribly washed out and I can't seem to pull it back to anything that looks reasonable without effecting the gamut again. The examples in the video don't seem to require much adjustment compared to mine. Maybe there is a reason that mine are just so far off that there's something else going on. The grey gamut is pretty much most of the photograph not just a small part off it. I've very new to affinity, so at the moment I've almost no clue to what I'm doing to be honest. Paul
-
I've downloaded the ICC profiles from a photographic lab printer that I wish to use, loaded it into Affinity 2 photo and added a soft proof layer for that ICC profile The Gamut Check option shows the parts of the image and colours that won't be printed or converted to a closer colour. I'd like to try and get my photograph as close to perfect as possible without any colour substitution by the printer so I can see what the final result should like like from within Affinity. The original image was photographed on the camera in sRGB I've loaded the ICC profile into Affinity I've added a soft proof adjustment layer and selected the ICC profile from the Photo Lab What I can't work out, or find instructions on the Internet for is how within Affinity to make the necessary adjustments to the image so that there is minimum Gamut colours.