Tonya1026
-
Posts
6 -
Joined
-
Last visited
-
 GarryP reacted to a post in a topic:
Background around images
GarryP reacted to a post in a topic:
Background around images
-
I honestly didn't notice any of that until you pointed it out. Well technically most of my designers are made to be printed and then pressed on items for sublimation. I'm not really sure what the best choice would be but I will try to look into it. Thanks!
-
Ok just to let you know changing the color format and profile to RGB/8 seemed to remove the unwanted background so my issue is fixed I guess. I don't actually remember ever changing it and I don't know much about the different color formats so I'm not sure why its like that. But I appreciate your suggestion. Thanks so much!
-
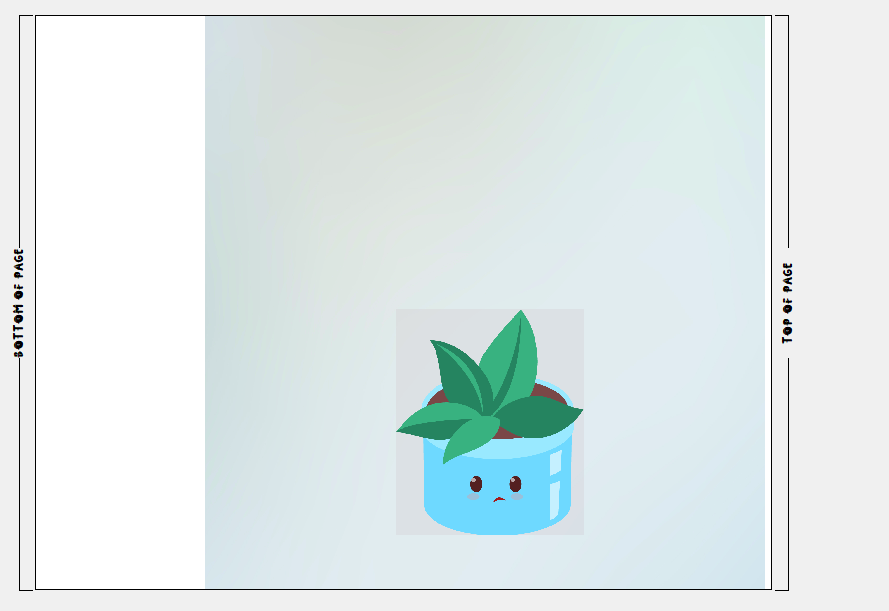
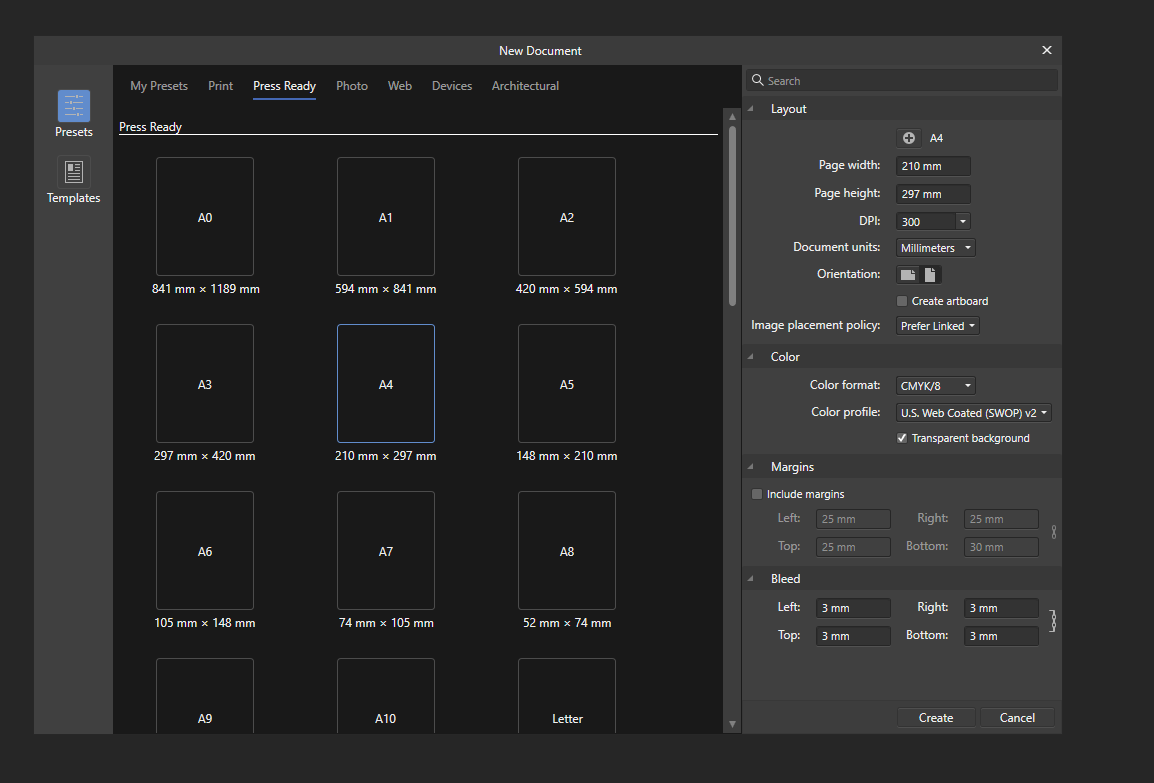
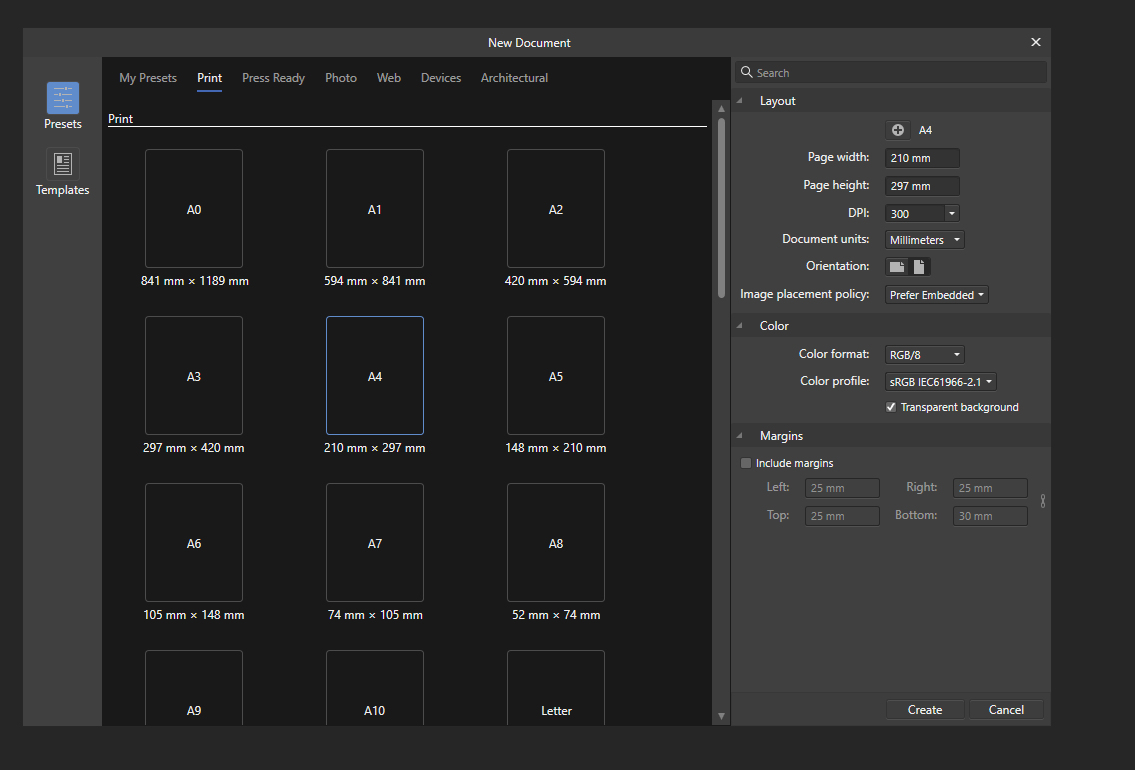
I did try to create in Photo then open in designer, which does seem to work but still isn't really a good solution because I prefer to use AD instead. However, I did notice the color profile was different between the two. I plan to change it but I wanted to send this to you first so you could better understand my issue. I did not switch anything so I'm not sure why they're different. Here is a better picture so you can see exactly what it looks like when its printing. It doesn't show up until you're in the printing stages and its already printed on paper. The next 2 photos are from the "New Document" screen. The first is Designer, the second is Photo. I am also uploading the cactus file from image 1 so you can see what it looks like before its printed. Test Cactus.afdesign

-
Ok I'm going to try again but creating it in Photo then opening it in Designer seems to work, but creating it in designer (which is what I normally use because of the different options, still doesn't work) Also when I just go to create a new file it seems the color format and profile is different between the 2 so I'm going to switch the designer one to see if that fixes it. Thanks!
-
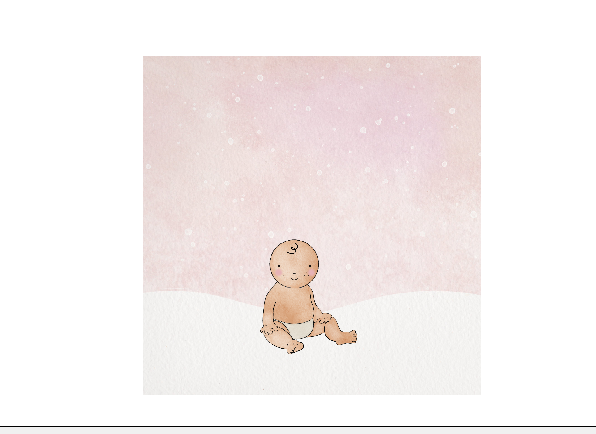
I have both Affinity Designer & Photo. My designer puts a background around images that ARE transparent. This lightly colored background doesn't show up until you go to print the design and after its printed on paper. I'm including the same exact image and background from Affinity Designer (upload 1) and Affinity Photo (upload 2) so you can see that is it not the image that's the issue. The correct way this image is supposed to look is upload 2. This happens with ANY PNG I try to use. I've tested it multiple different ways and AD always makes the final printed image discolored with a weird background. I have even tried rasterizing which does NOT remove the background and makes the image blurry so that is NOT a solution. This happens with PNGs and SVGs that have been uploaded to designer. The only "solution" I have found is exporting the whole finished design, then reimporting it, which does get rid of the background but then I'm unable to make individual changes if needed, without doing the whole process again. This is very frustrating and I have no idea why its happening. It only recently started doing this around the end of October. I prefer using Designer over Photo so I would really like this to be fixed. If anyone has an idea what caused this and what I can do to fix it, please help! As far as I know, I did not change any settings or anything.
-
Tonya1026 joined the community
-
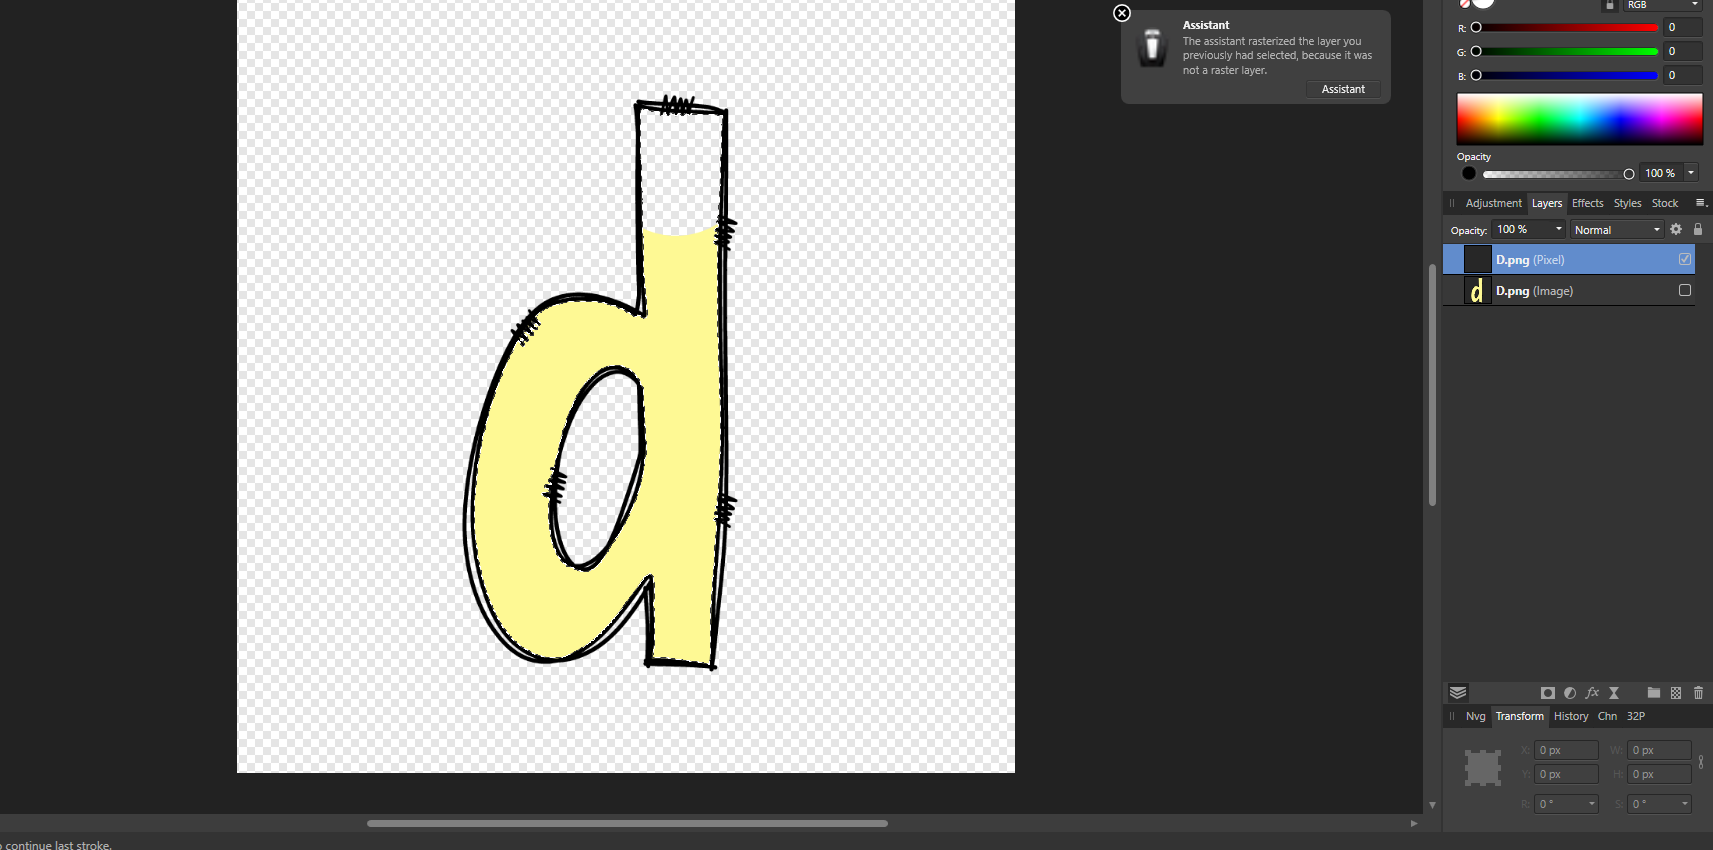
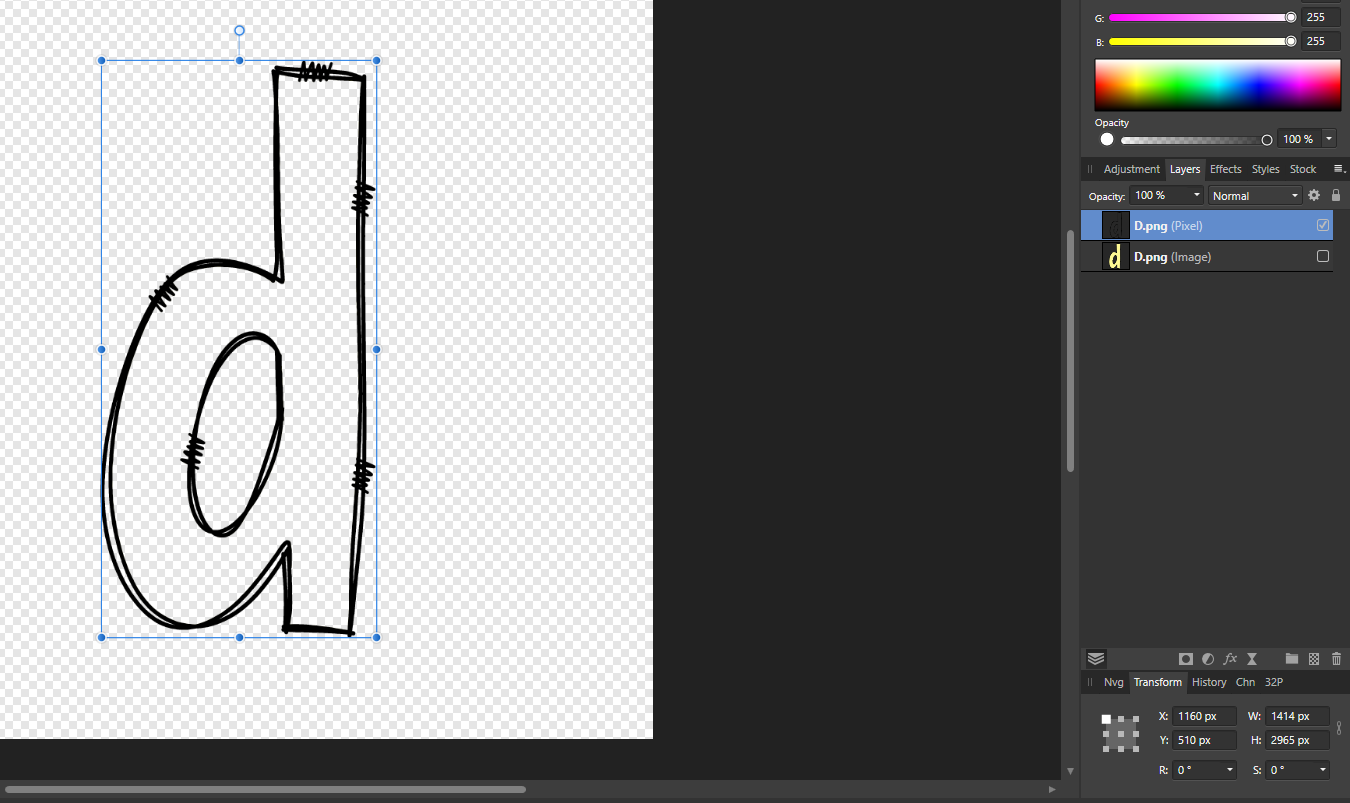
When I right click on a png file and click rasterize (NOT Rasterize & Trim, just basic Raster) the file auto trims. I do NOT know how to keep this from happening. It does this on Affinity Photo & Affinity Designer both, version 1. I have turned Assistant on and off and it still happens. I don't want to change a bunch of settings because I'm still fairly new and I haven't changed them ever. It has done this since I've had the program, and I thought it was normal but apparently it isn't. Here are some pictures I was using to show someone the "auto-resizing" issue I was having and that's how I discovered its not common. The first pic shows my letter starts at 3000px by 3000px. The second shows what happens when I try to use the eraser and the assistant comes on (Its auto-rasterizing). And the third pic shows what happens after I finish erasing and click on my letter again. The new size is now 1414px by 2966px. I tried a fresh new PNG image and just clicked Rasterize, same thing happened and the letter resized to 1414px by 2966px. I used undo to back up then tried Rasterize & Trim. Same thing, image is now resized to 1415px by 2966px. Is my Affinity Designer and Photo bugged or something? Is there a default setting that causes this to happen that I need to go in and uncheck?