AuthorSP
-
Posts
27 -
Joined
-
Last visited
Everything posted by AuthorSP
-
Feature Request: Crop to Selection
AuthorSP replied to AuthorSP's topic in Desktop Questions (macOS and Windows)
Oh, found it, thanks! I'm used to Paint.net, which has a "Crop to Selection" command, rather than a crop tool. Excellent! -
Feature Request: Crop to Selection
AuthorSP replied to AuthorSP's topic in Desktop Questions (macOS and Windows)
Thanks! I looked all over the interface for a "crop to selection" item and couldn't find anything that looked like it. Where is that? -
Please at a "Crop to Selection" option in Affinity Photo 2. This is a pretty basic tool in other programs and we use it a lot to simplify and edit images.
-
That's good to know, thanks!
-
That's good to know. Do you recommend I get the beta, or wait for it's final release? Thanks!
-
This has been an ongoing issue and finally getting to be a problem because it is happening a lot. I am working on a book layout in Publisher 2 and using an afbook file with associated afpub files. For some reason, nearly any time I work in the book file (one afpub file open at a time), one of the afpub files will open in "read-only" mode, and I can't save it without giving it a new name. Sometimes-not always- it tells me that there is a recovery file and asks me if I want to open it. Even if I do, it is still in read-only. When I look at the file that is in read-only mode after I open it, I can't close it without saving, even if I haven't made any changes to it. The only thing that is showing up in the history (for this particular file-I just thought of this) is "Set Section Property", which I can't undo or otherwise get rid of. I'm using Publisher 2 on Windows 10. Thanks for any help.
-
Can't get page numbering to work correctly
AuthorSP replied to AuthorSP's topic in Desktop Questions (macOS and Windows)
That is what I was trying to do. Oddly enough, I just opened the same file in Publisher on a different pc and this time when I did the same steps, it updated the page numbers to be correct. I wonder if there is an issue with my install on my main system? I have also had strange issues where it will tell me that there is a recovery file and opens the chapter in a read only mode, even though there doesn't seem to be any issue. -
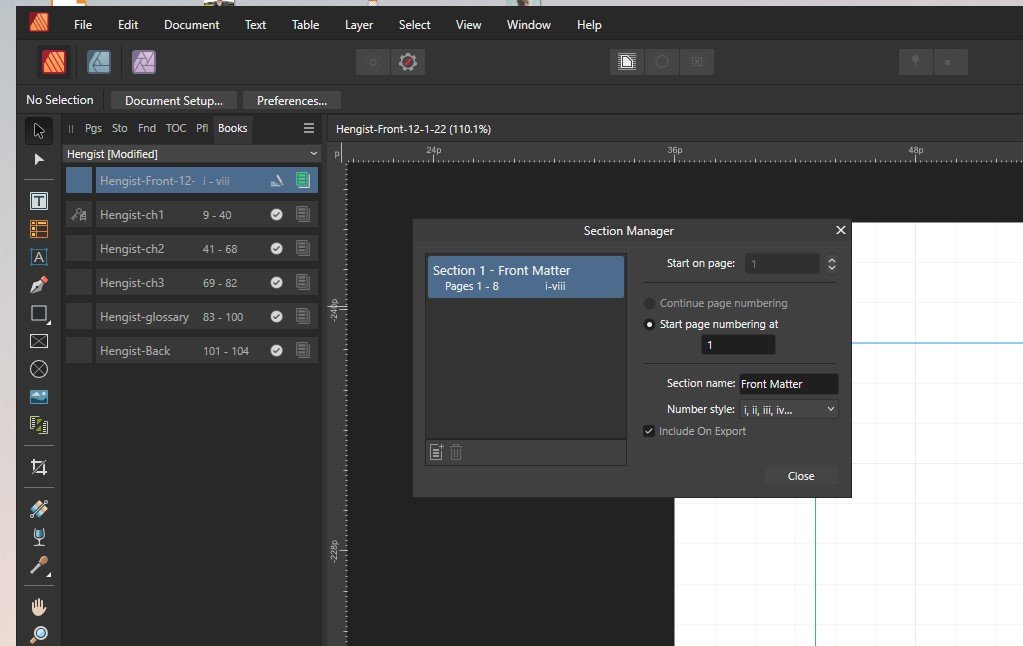
Hello, I am using Publisher v2 on Windows to create a book layout. I have created a "book" in Publisher and added a front matter section followed by chapters. The front matter chapter comes first and is 9 pages long. It won't have any page numbers shown. I want the numbering to start on the first page of chapter 1, which is #9. No matter what I do, I can't seem to get the numbering on the bottom of page 9 to start at 1. I clicked on the Front Matter chapter and opened section manager, made the section "Front Matter" and set it to start on page 1 and use small Roman numerals. Then I went to chapter 1, opened section manager and made a "Story" section and had it start on page 9. It shows 1-32 and 9-40 on the section manager. However, the page numbers at the bottom of the page still start at 9. Images attached. Thanks for any help.

-
Only having one chapter open at a time in the book seems to be working. Occasional crashes still, but not nearly so bad. Thanks!
-
That's great, thanks!
-
That makes sense (thought I really hope they fix this). However, don't I need to have the entire book open with all the chapters in order to make the final pdf file to send to print? Thanks!
-
Publisher v2 has become basically unusable for me due to crashes every time I try to open my book and the associated chapters. It is not a large file, it's a short novella of 5 chapter files. Typically, I open the book, then I open the chapter files. Usually it crashes when I try to open the 3rd or 4th chapter file. I've searched the forums here and not found anything to help. I turned off hardware acceleration and I looked for the updates that need to be removed, but they don't show up in the list of removable updates on my Windows 11 machine. Has anyone found a fix for this?
-
Copied Master Page not behaving as expected
AuthorSP replied to AuthorSP's topic in Desktop Questions (macOS and Windows)
It seems like if I first remove the existing master page, then apply the new master page, it seems to work. Is that the right way to deal with this issue? I'm still not entirely certain, because of all the back and forth things I've done to try and work on this issue. -
Hello, I copied a master page spread that I use for normal pages on my book layout. At the top of the left page there's a page number to the left and the title of the book is centered. Then there is a text frame below for the normal text. On the right side, the page number is to the top right, and the author name is centered, with the text box below. I copied this master spread and gave it a new name. The only changes I made to the master pages are that I removed the text boxes below the page/name sections at the top so I could add other components. However, when I apply the new master pages to a group of pages, for some reason it also removes the author name text from the top right section. It does not alter the page number section, nor does it remove the book title text from the left side page. I tried deleting and recreating the master pages, but I got the exact same result. I can't figure out what is going on here. Any help is appreciated.
-
Problems with vertical justification
AuthorSP replied to AuthorSP's topic in Desktop Questions (macOS and Windows)
Thanks, I had just figured that out. When I went into the master page for the main text pages, I set the vertical justification for the text box, then set the "Flow Options" to prevent orphaned first and last lines. Voila! It now looks like it correctly spaces all the pages and I no longer have one line orphans or gaps at the end of pages! But now I have a new issue. The very last page of text is only about half full. The vertical justification spaces it out too much, of course, so I tried to select the text, or the text frame and set it to "Top Align", but it won't let me. I assume this is because it is set in the master. Is there a way to over-ride the master for this setting? Or do I have to make a master that only applies to the last page and apply it to that one page? I have done that and it seems to work, but I am not sure of how the law of unintended consequences will work out here, since I'm new to this and not sure of all the inter-relations. Thanks! -
Problems with vertical justification
AuthorSP replied to AuthorSP's topic in Desktop Questions (macOS and Windows)
Ok, so it sounds like I have to figure out how to manually line up the individual pages? Any pointers on how to go about that? I've been trying different settings. For instance, on the first page, I selected all the text and looked in the "text frame options", then "vertical position" and chose "justify vertically". That made the text on the first page fill the text box, but when I tried to do that on the next pages, clicking the vertical position options didn't seem to make any changes. Is it a process of going page by page and altering the spacing just enough to make it line up? -
Problems with vertical justification
AuthorSP replied to AuthorSP's topic in Desktop Questions (macOS and Windows)
Thanks. I know some of the options are there, but it seems not all of them are. For instance, in my example above, those settings in Indesign allow the layout of the text from page to page to adjust so that there are no orphan lines at the beginning or end of paragraphs, as well as no gaps at the end of a page if preventing orphans would cause one (as in the example on the first post). So is it possible to make the settings have the same effect in Publisher, or is it just an issue that Publisher does not have the same capabilities as Indesign in this respect? This is sort of a big deal, as a professional book layout will not have those gaps. -
Problems with vertical justification
AuthorSP replied to AuthorSP's topic in Desktop Questions (macOS and Windows)
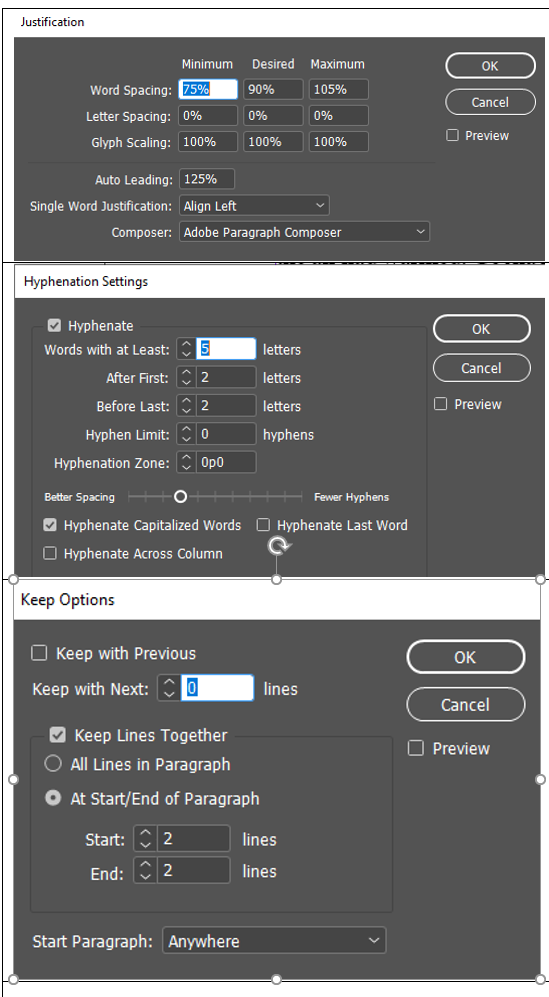
These are the settings I used in inDesign:
-
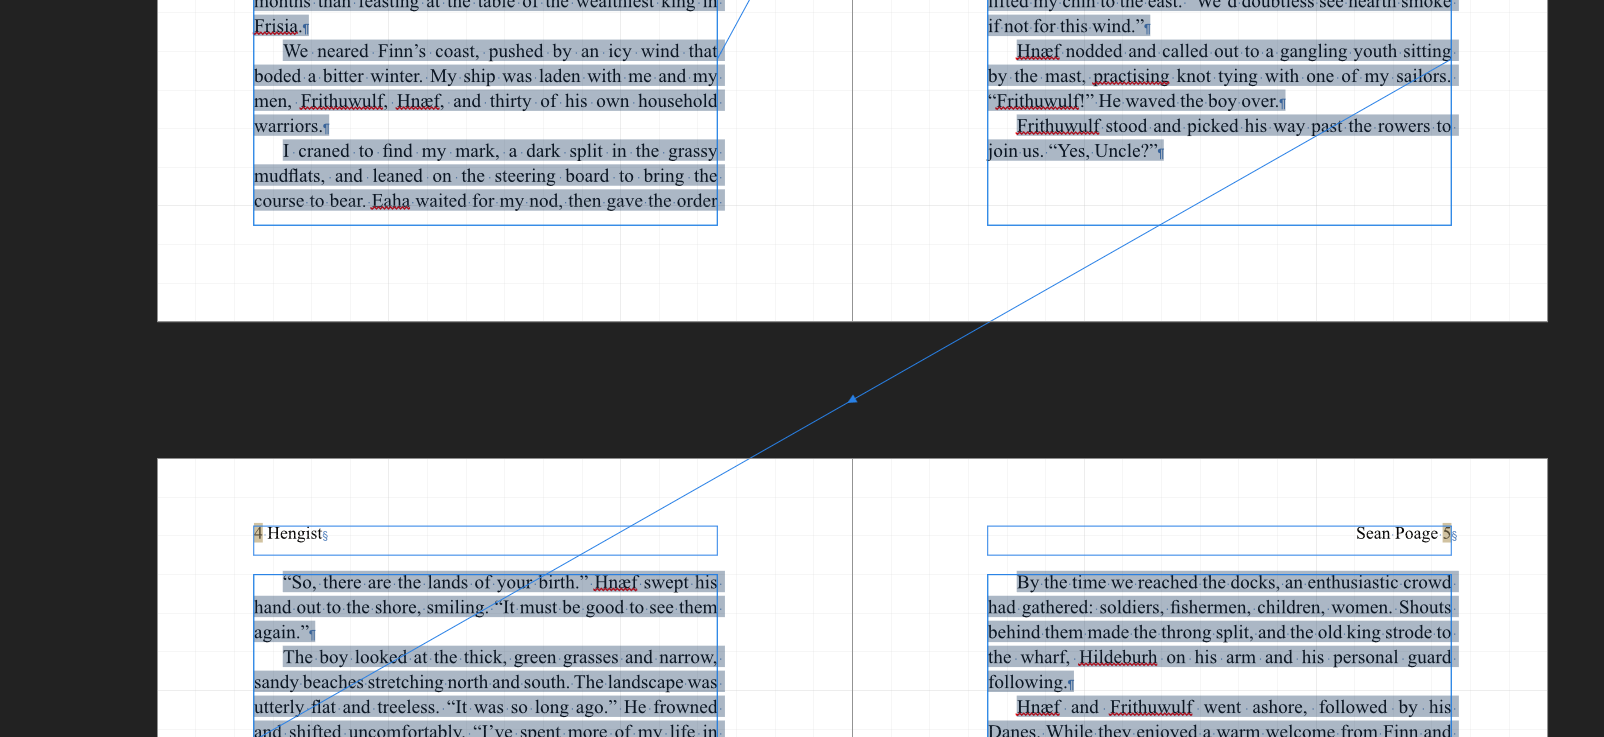
Hello, I'm making some good progress with figuring out Publisher, but having a bit of an issue with even justification from one page to the next. In Indesign, I would have "Keep" and "Justification" options that would make sure the text was justified properly, but I can't seem to find the right settings in Publisher. For instance, I chose to justify all the text and then found the setting for "Vertical Alignment" and chose "Justify". On Indesign, my text flows evenly between pages, staying justified to the left and right and up and down. But in Publisher, I'm having the problem you see on the upper right part of the image, where a paragraph ends. Any suggestions? Thanks for any help!
-
Copying settings from Adobe to Publisher?
AuthorSP replied to AuthorSP's topic in Desktop Questions (macOS and Windows)
Thanks, I will. -
Copying settings from Adobe to Publisher?
AuthorSP replied to AuthorSP's topic in Desktop Questions (macOS and Windows)
I'll try that. Thanks! -
Copying settings from Adobe to Publisher?
AuthorSP replied to AuthorSP's topic in Desktop Questions (macOS and Windows)
I think so, but I'm having a lot of trouble getting them to apply. Also having trouble getting a word document to properly flow across the Publisher pages. For some reason, the first number of pages will paste, then there will be a gap, then the last page will have more of the text, and it will not expand to new pages for the rest of the text. Really weird. Probably something I am doing wrong. Also, a lot of the settings on the original file don't apply to what I need, so I'd like to ID them and get rid of them. -
Copying settings from Adobe to Publisher?
AuthorSP replied to AuthorSP's topic in Desktop Questions (macOS and Windows)
Ok, that is good to know. No merging like in Word, apparently. So the trick now is to identify all the settings in Indesign that I need to apply to Publisher. Is there any sort of 1 to 1 comparison of settings and where to find them? I found some of the settings in Publisher, but not others. -
Hello, I am new to Publisher and a novice with Indesign. I pretty much do my book layouts based on an Indesign chapter file that my publisher gave me. I want to recreate the typeset, leading, spacing, book margins, etc in Publisher and use that going forward. In Indesign I saved the file as a .idml file, then I imported the .idml into Publisher and saved it as a .afpub. The chapter looks great. Just like it did in Indesign. It also includes all the paragraph and text styles that my publisher had in Indesign (most of which I don't use). However, when I try to use the .afpub (or the template I made from it) to recreate a new document and paste in or place the text from a Word document, it does not apply the settings to the new text. After a lot of poking and undoing, I've decided to try to create a brand new, clean template for my book layouts. I need to copy the details from Indesign, like leading, hyphenation, keep, etc. But the settings don't always match up and I end up swapping back and forth trying to eyeball what is different. Is there a way in Indesign to export the settings to a list on a text file, or something like that? And also in Publisher, so I can do a side by side comparison? Thanks for any help.
-
Thanks. How do you do that? I looked around the settings and did not see an option to do that. Part of my difficulty is that I was working from my publisher's version of a document to create books in Indesign. I know just a little about Indesign, but not enough to know what to look for in either program.