Bebebebenny
-
Posts
21 -
Joined
-
Last visited
-
Halftone filter in Photo creates tiles
Bebebebenny replied to Bebebebenny's topic in V2 Bugs found on macOS
That makes us the same age, but intuition alone would have had a very hard time bringing me to 5.657... -
 loukash reacted to a post in a topic:
Halftone filter in Photo creates tiles
loukash reacted to a post in a topic:
Halftone filter in Photo creates tiles
-
Halftone filter in Photo creates tiles
Bebebebenny replied to Bebebebenny's topic in V2 Bugs found on macOS
Although aaactually, for dots in a halftone screen the term should be "LPI" for "lines"... Seriously though, that's a very good point! Pixels can't be rotated — can't argue with that — and while I'm not sure that in itself holds the full answer to the riddle (I spent far too much time thinking about this yesterday) it definitely points us in the right direction. Or perhaps I'm just saying what you're saying but in different words. Here goes: Since the cell size, as you point out, is 6x6 pixels, when rotated, that 6 pixel length becomes the hypothenuse of an imaginary triangle, whose base is the actual width of the x-axis repeition. At 45°, that repetition will happen at √(6^2÷2), because Pythagoras, which is ≈ 4.24. Now, my guess here is that this fact, in itself, wouldn't have to cause any canals if the pattern was drawn in memory first, then rotated, then put on screen. Or at least, in my mushy morning brain, canals would then at least appear diagonally. But unless I'm wrong, the canals we're getting imply that the filter will create and rotate the cells one by one in memory, then repeat those cells on the canvas at their mathematically correct positions in document space. Which presents a problem, because we are now positioning cells at non-integer coordinate points, rounding those anchor points off to the nearest full adressable pixel. I could be wrong about that, but the rest of the reasoning applies anyway: As a result, stacking 4.24 pixels wide cells next to each other, in a non sub-pixel way, will result in a leap-pixel after three drawn cells (the first two will be rounded down to start drawing at 0, 4 and 8 pixels from the left respectively but the fourt will be rounded up to pixel 13) and then at slightly shifting intervals as we keep accumulating cells and find ourselves rounding up and down as we go. This correlates very nicely with the pattern I experience. If I'm right about this, this is not a question about moirée/interference, nor about rounding errors per se, but about an unfortunate combination of non-subpixel rendering and subpixel maths. The solution then, is unintuitive at first glance: Never use perfect integer numbers for the cell size unless at perfectly horizontal or vertical screen angles. Instead, for all other angles, set the cell size to the closest value that, given your screen angle, will be the hypothenuse of a triangle whose x-axis will be an integer. In my case of a 6 pixel cell at 45°, instead chosing 5.657 seems to produce a reliable, gap-less pattern. I fully realize I'm spending far too much thinking about a filter that's probably quite rarely used, but at least I found what I think is an answer. But even so: Might it be good to have the filter let you set the x-axis baseline width for cells rather than the cell size itself? So as to not confuse users like me, who assume that integer pixel numbers will produce the least artefacts and rounding issues? (But if so, what about the y-axis, when using screen angles that are not creating triangle sides with well-behaving relations like 45° or 60°?) I don't know. But at least I now know why. And I know I'll sleep better tonight. -
Halftone filter in Photo creates tiles
Bebebebenny replied to Bebebebenny's topic in V2 Bugs found on macOS
That is an unfortunate choice since you are — in good faith, I'm sure, but nonetheless — providing misleading information here. I have worked with printing and publishing since the end of the photographic reproduction era in the early nineties, and can inform you that you are conflating things. This is nothing to be upset about; rather than dismissing a chance to learn as "heated and endless", continuing this conversation might help us both arrive at some knowledge about why my issue with the halftone filter appears in the first place. First of all, a moirée is the result of two patterns interfering. A lone, evenly distributed pattern cannot produce a moirée. Indeed though, a one-color halftone may still result in interference if the image itself has an inherent pattern with which the screen pattern might interfere. But my provided smooth gradient does not have one, so there is no basis for moirées to happen. The halftone screen has nothing to interfere with. Instead, we need to look at why the canals happen as a result of the dot matrix itself. To even further dismiss any other source of the error, let's take the gradient out of the picture, and apply a 45° (or 90°) halftone screen on top of a completely solid color. If we do, we will still see canals appear repeatedly between dots. Screendump below. The distance between those canals will change depending on the chosen dot size — also, the relative width of canals-compared-to-dots will shrink the bigger the dot size, thus becoming less and less noticable — but there will always be a periodically recurring 1-pixel difference between the centerpoints of dots. This implies that as the filter lays out the pattern of dots, it reaches a point where the accumulated sum of all dot-to-dot distances-so-far has reached a threshold where rounding pushes us a full pixel ahead. (If I'm right about that, my previous suspicion about a floating point error is probably wrong; rather, it is probably simply a case of unfortunate rounding, along the lines of n x 0.51, where n = 4 produces 2.04 ≈ 2.0, but n = 5 results in 2.55 ≈ 2.6, suddenly giving us a delta of 0.6 where previous and subsequent four deltas are 0.5) Looking forward to hearing from the developers about this.
-
Halftone filter in Photo creates tiles
Bebebebenny replied to Bebebebenny's topic in V2 Bugs found on macOS
I'm sorry but no, not at all — that quote relates to 4-color separation, where the angle of screen dots are positioned so as to not create interference with one another. It has nothing to do with the single matrix of dots that the halftone filter applies to the page; a single pattern of dots cannot create interference with itself. Even so, you are in fact correct that changing the angle to 120° rather than 45° (or any 90° offset thereof) does provide a workaround where the tiles/canals disappear. This leads me even stronger to believe that this is a rounding error where what should be integers are allowed to become computer-error floating numbers of almost, but not quite, something-point-zero. So — Workaround found: Do not use angles that produce perfectly horizontal/vertical lines (nor perfectly diagonal, as it happens) as this will introduce canals between dots. Bug found: See workaround. Also: Arguably, this bug does not go away at larger dot sizes — the 1px canals are just comparatively smaller and less visually noticable. -
Halftone filter in Photo creates tiles
Bebebebenny replied to Bebebebenny's topic in V2 Bugs found on macOS
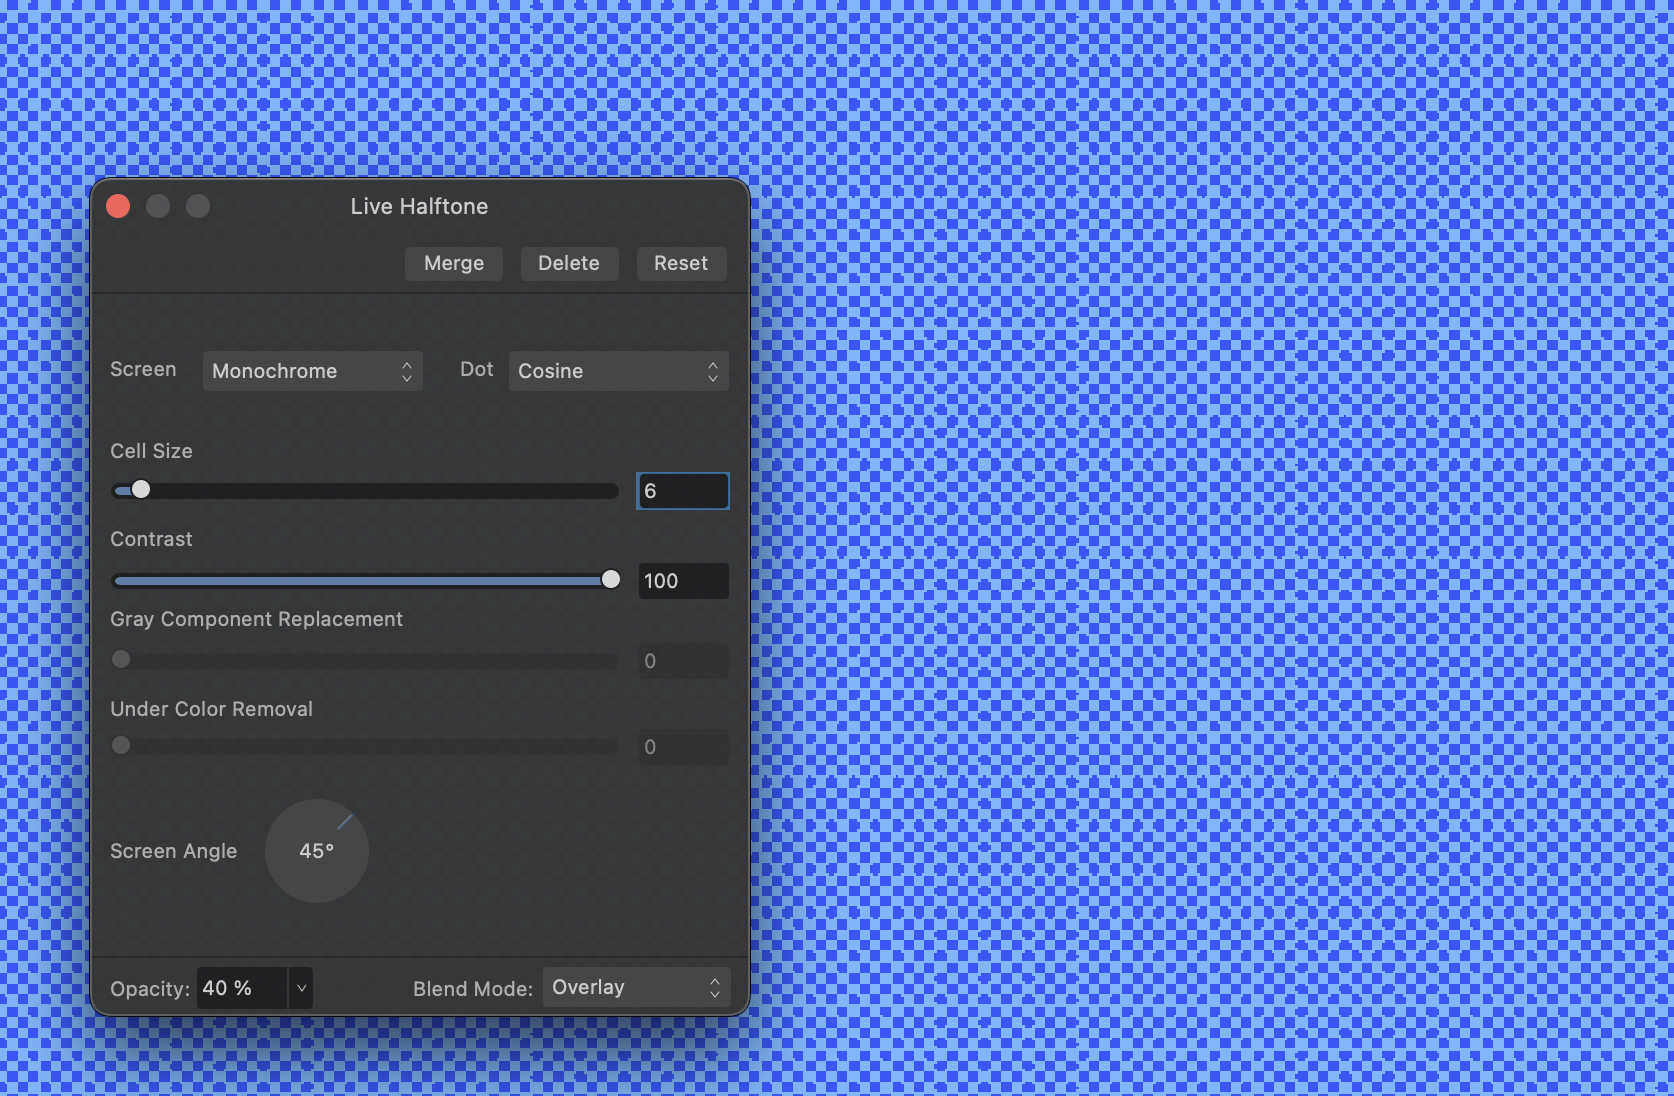
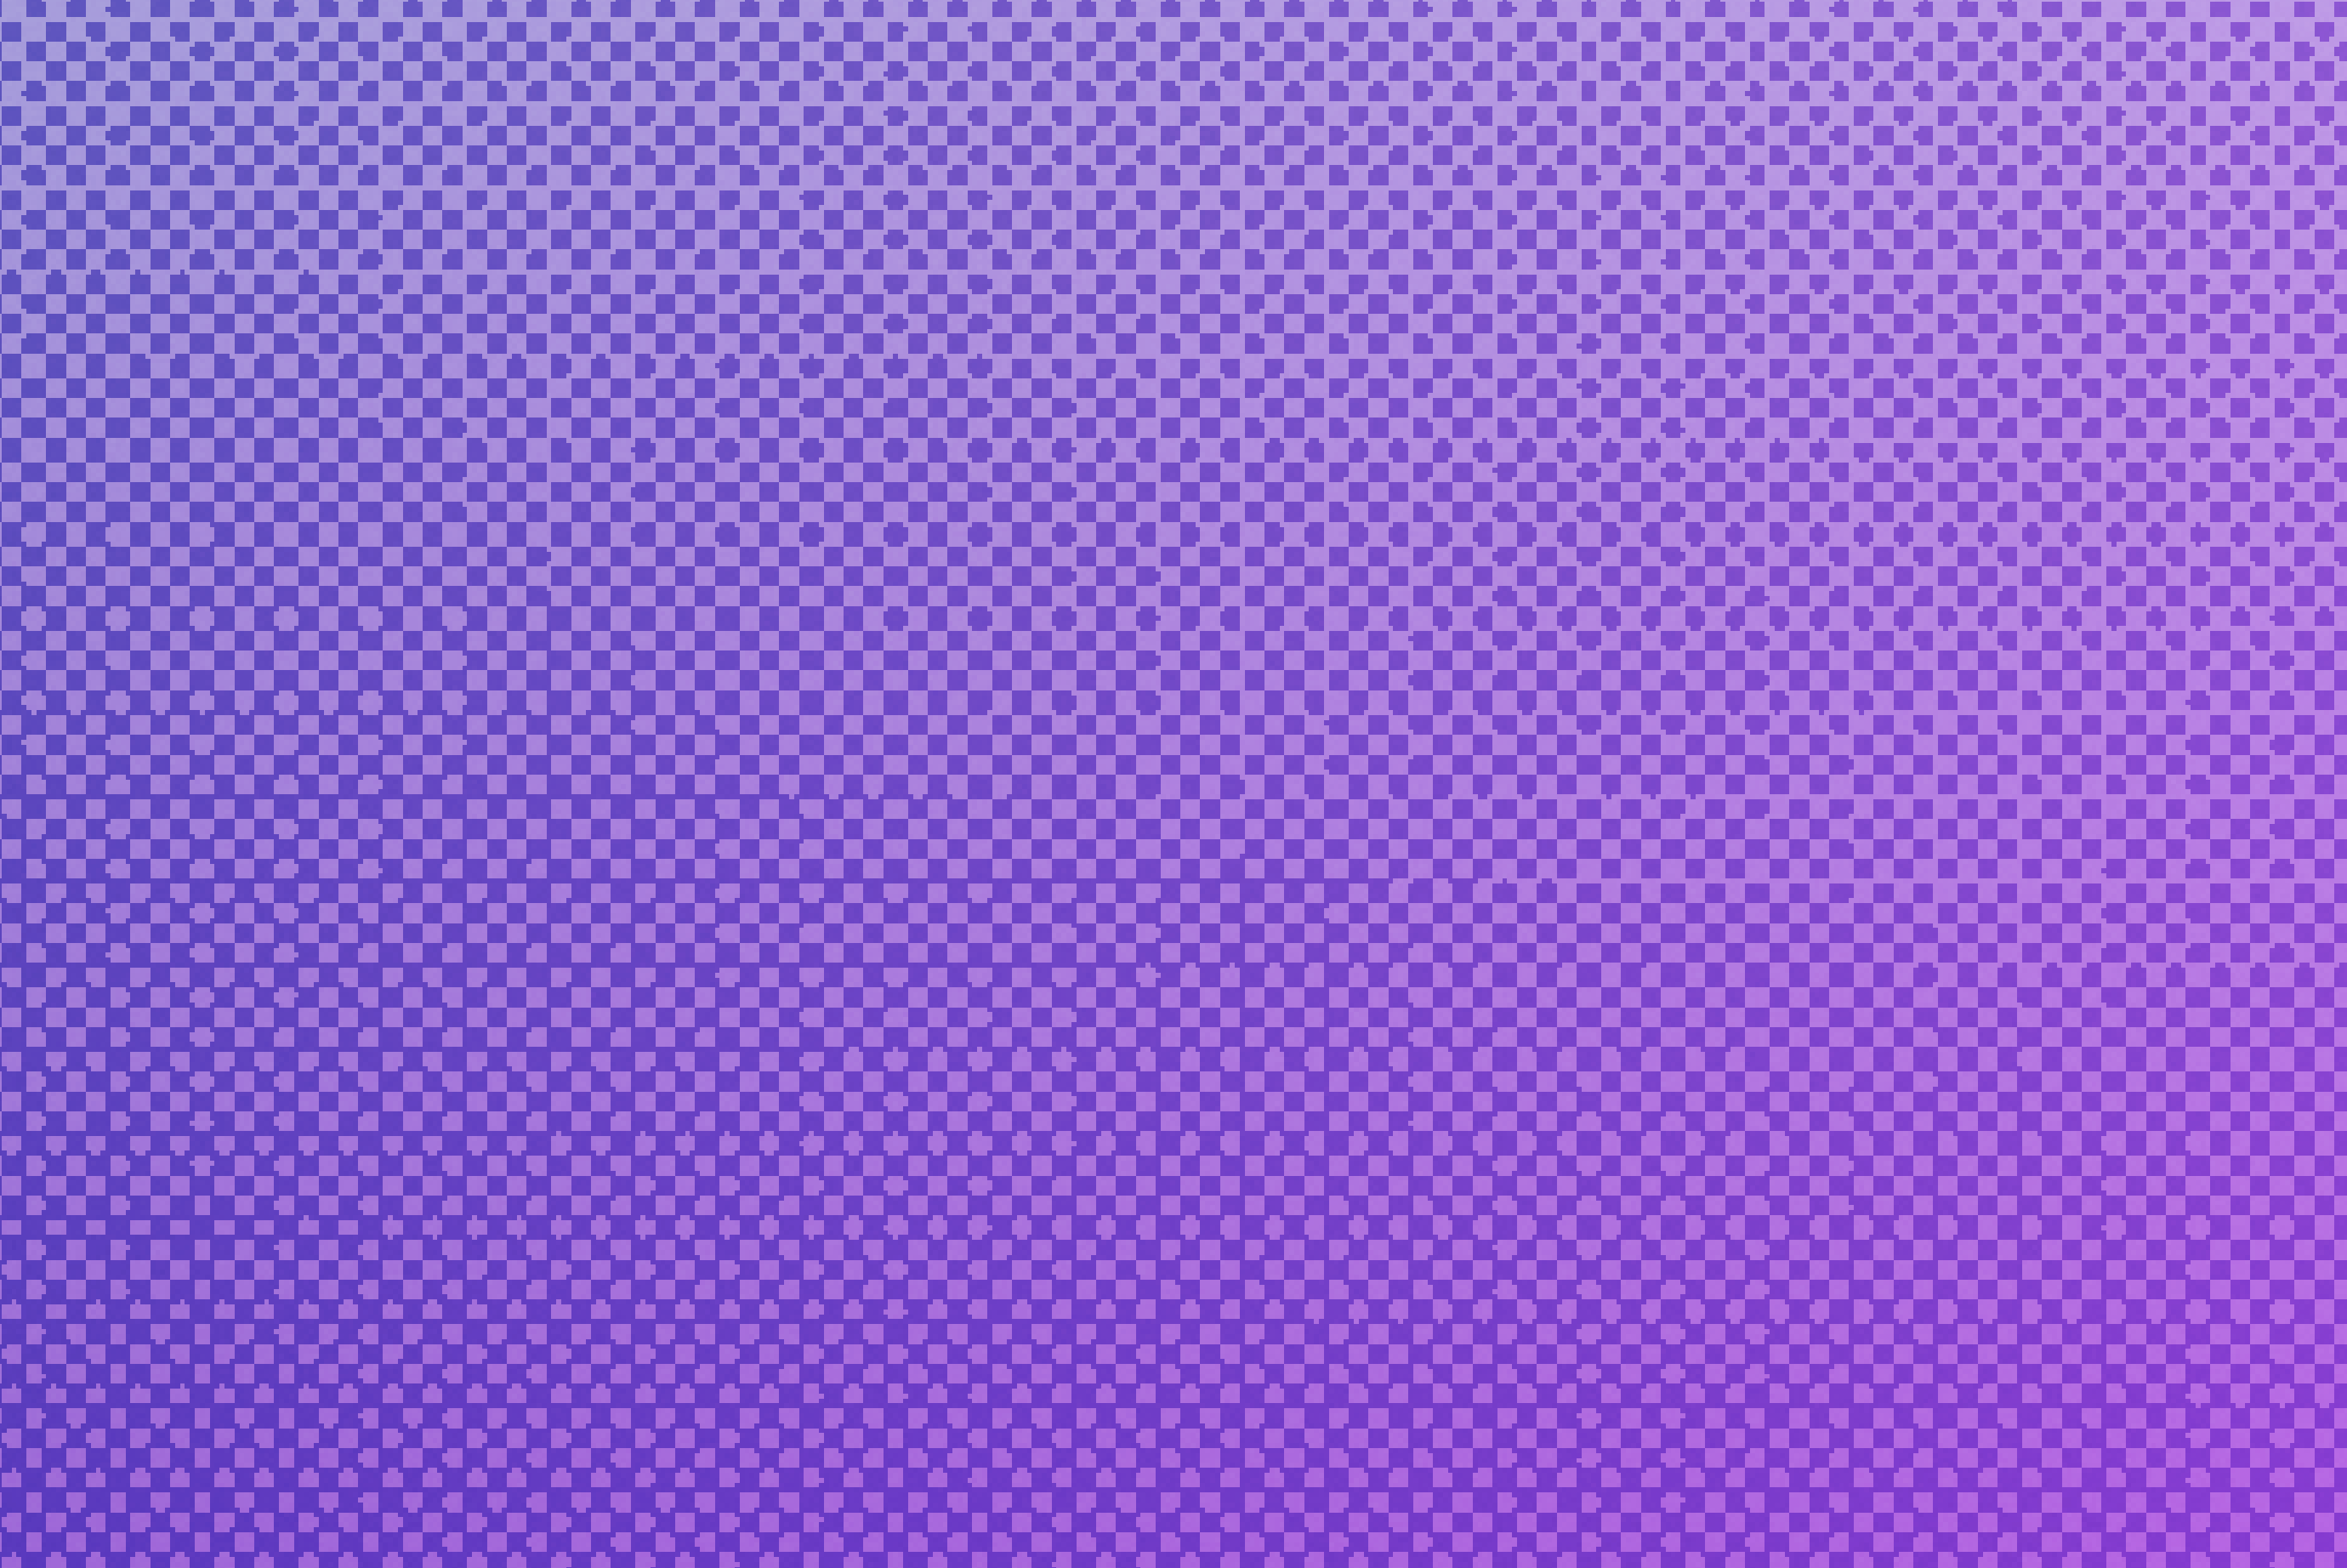
Warning: Potential motion-sickness-inducing image below I can't upload that very file for client/work-related reasons, but I can create a new one (this is highly reproducible to me) with just a gradient that shows the same issue. Detail in screenshot, entire file below. As far as I can tell, this is probably a rounding error in the filter, that semi-regularly makes it position the next screen dot a full pixel too far away from its sibling. I say semi, because in the screenshot below, about a third from the right, there are two columns that are just one screen dot wide until the next "grout" between tiles. raster-filter-creates-tiling.afphoto
-
What the subject says — adding a halftone filter in Photo creates an ugly repetitive tiling pattern that is clearly visible and draws attention from the image as a whole and to the effect instead. I first assumed this was on-screen only, because zooming on screen removes the tiling on some zoom levels. However, exporting it (or copy-pasting) will reintroduce the tiles, regardless of screen zoom level at time of export. In a jpg or similar, the tiling pattern will be ingrained in the saved image. This takes place on an M2 Mac with Sonoma, Affinity 2.4 Example screenshot (detail): /B.
-
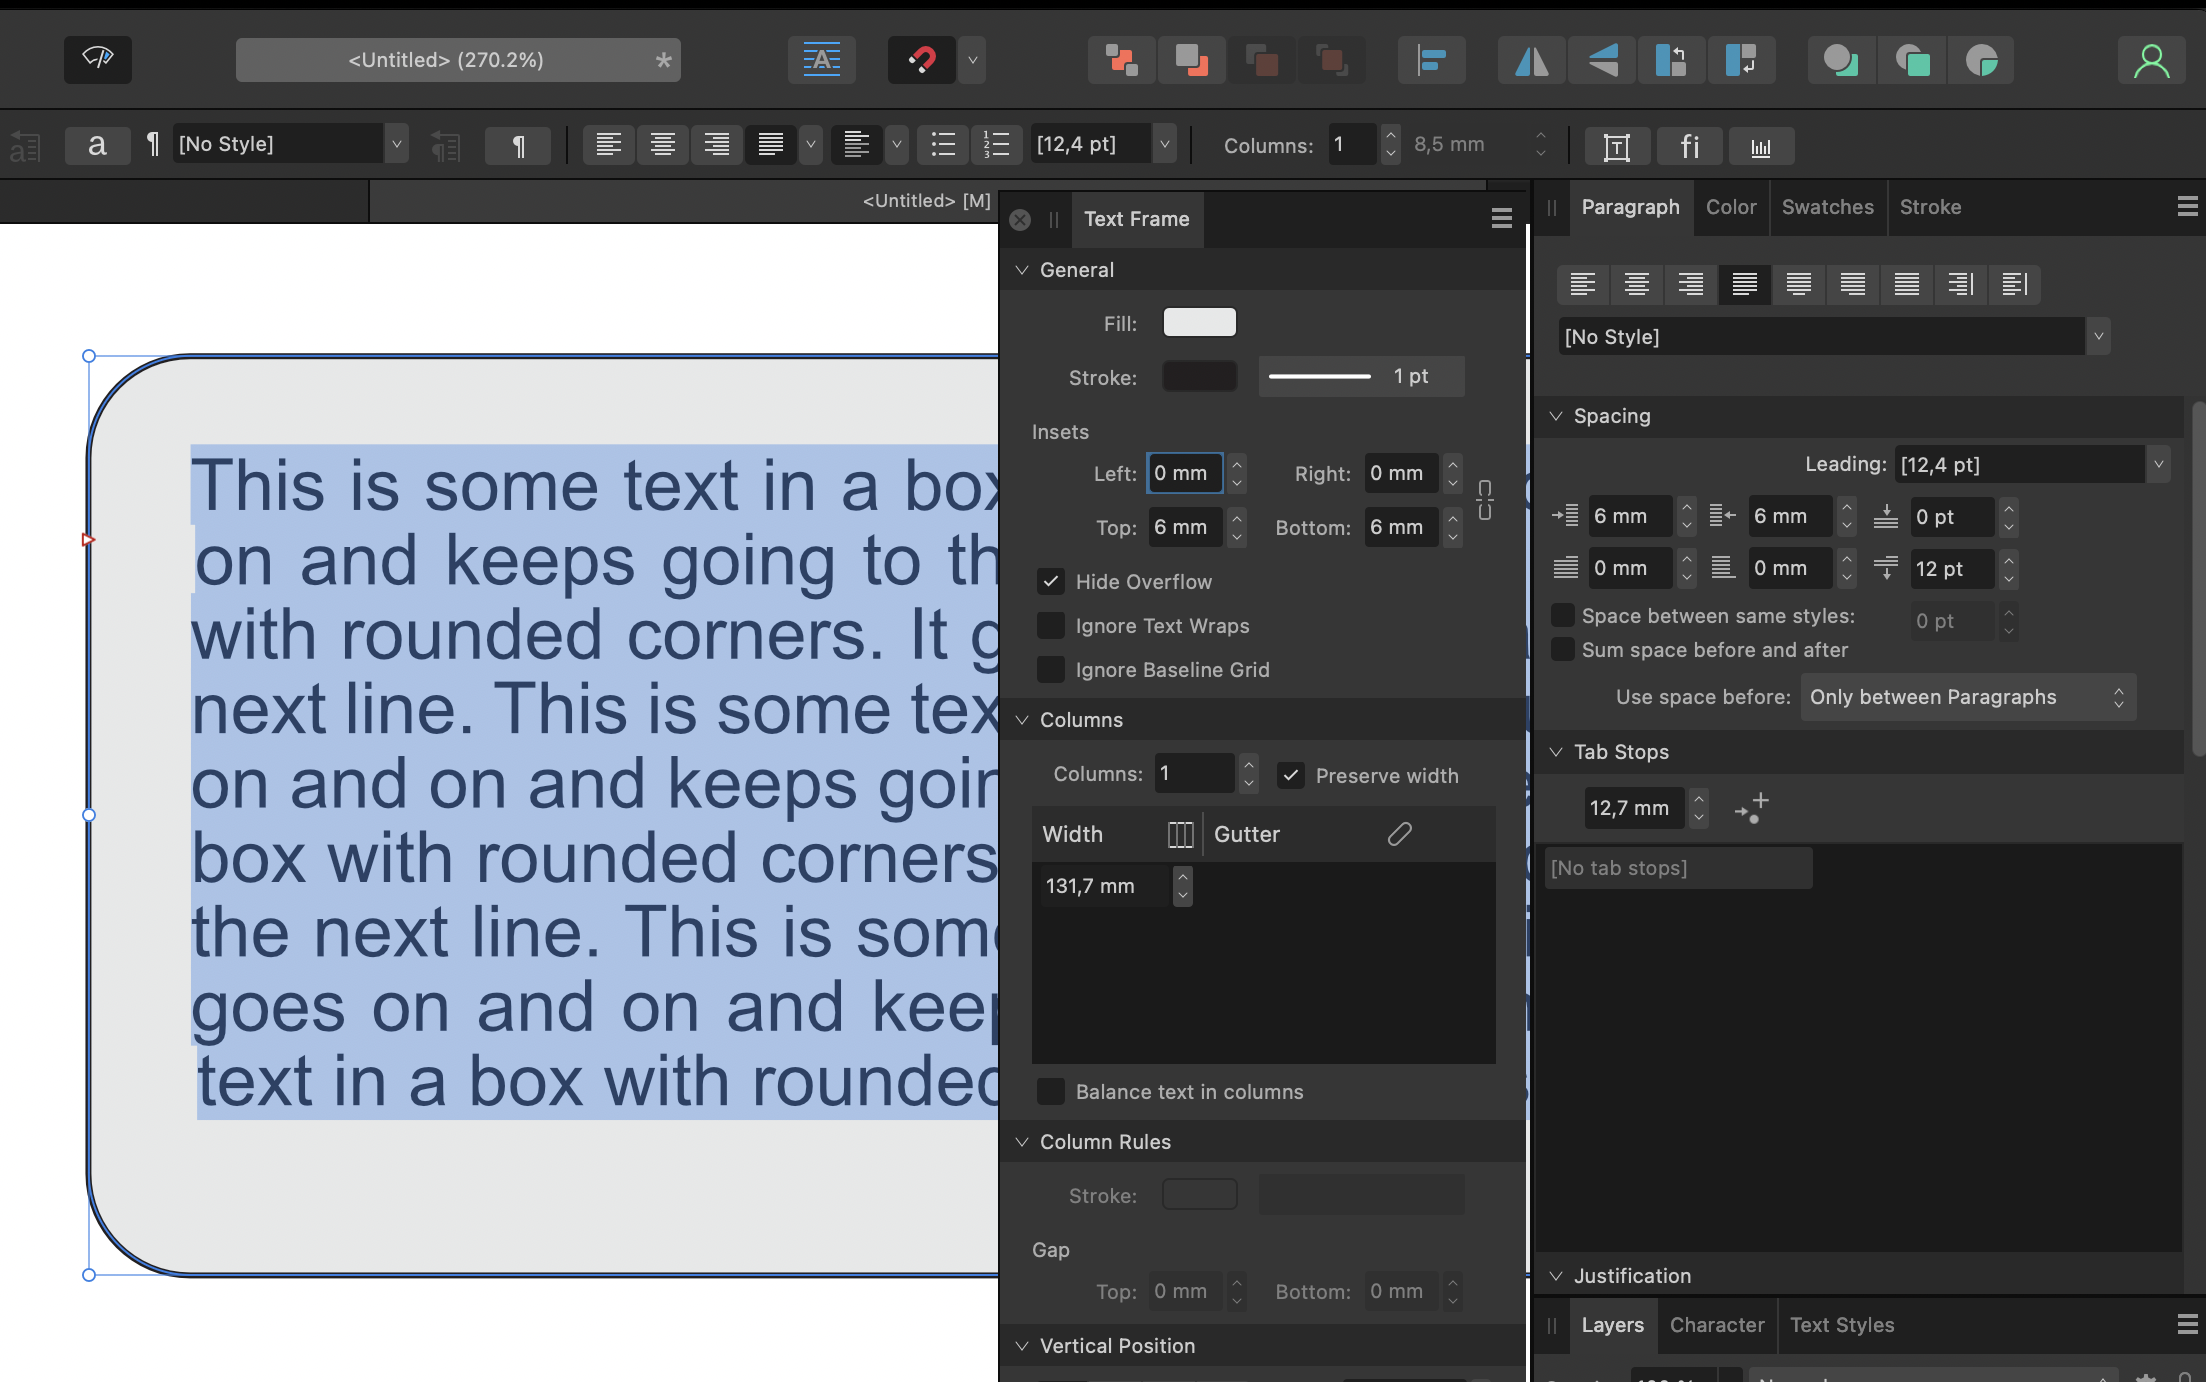
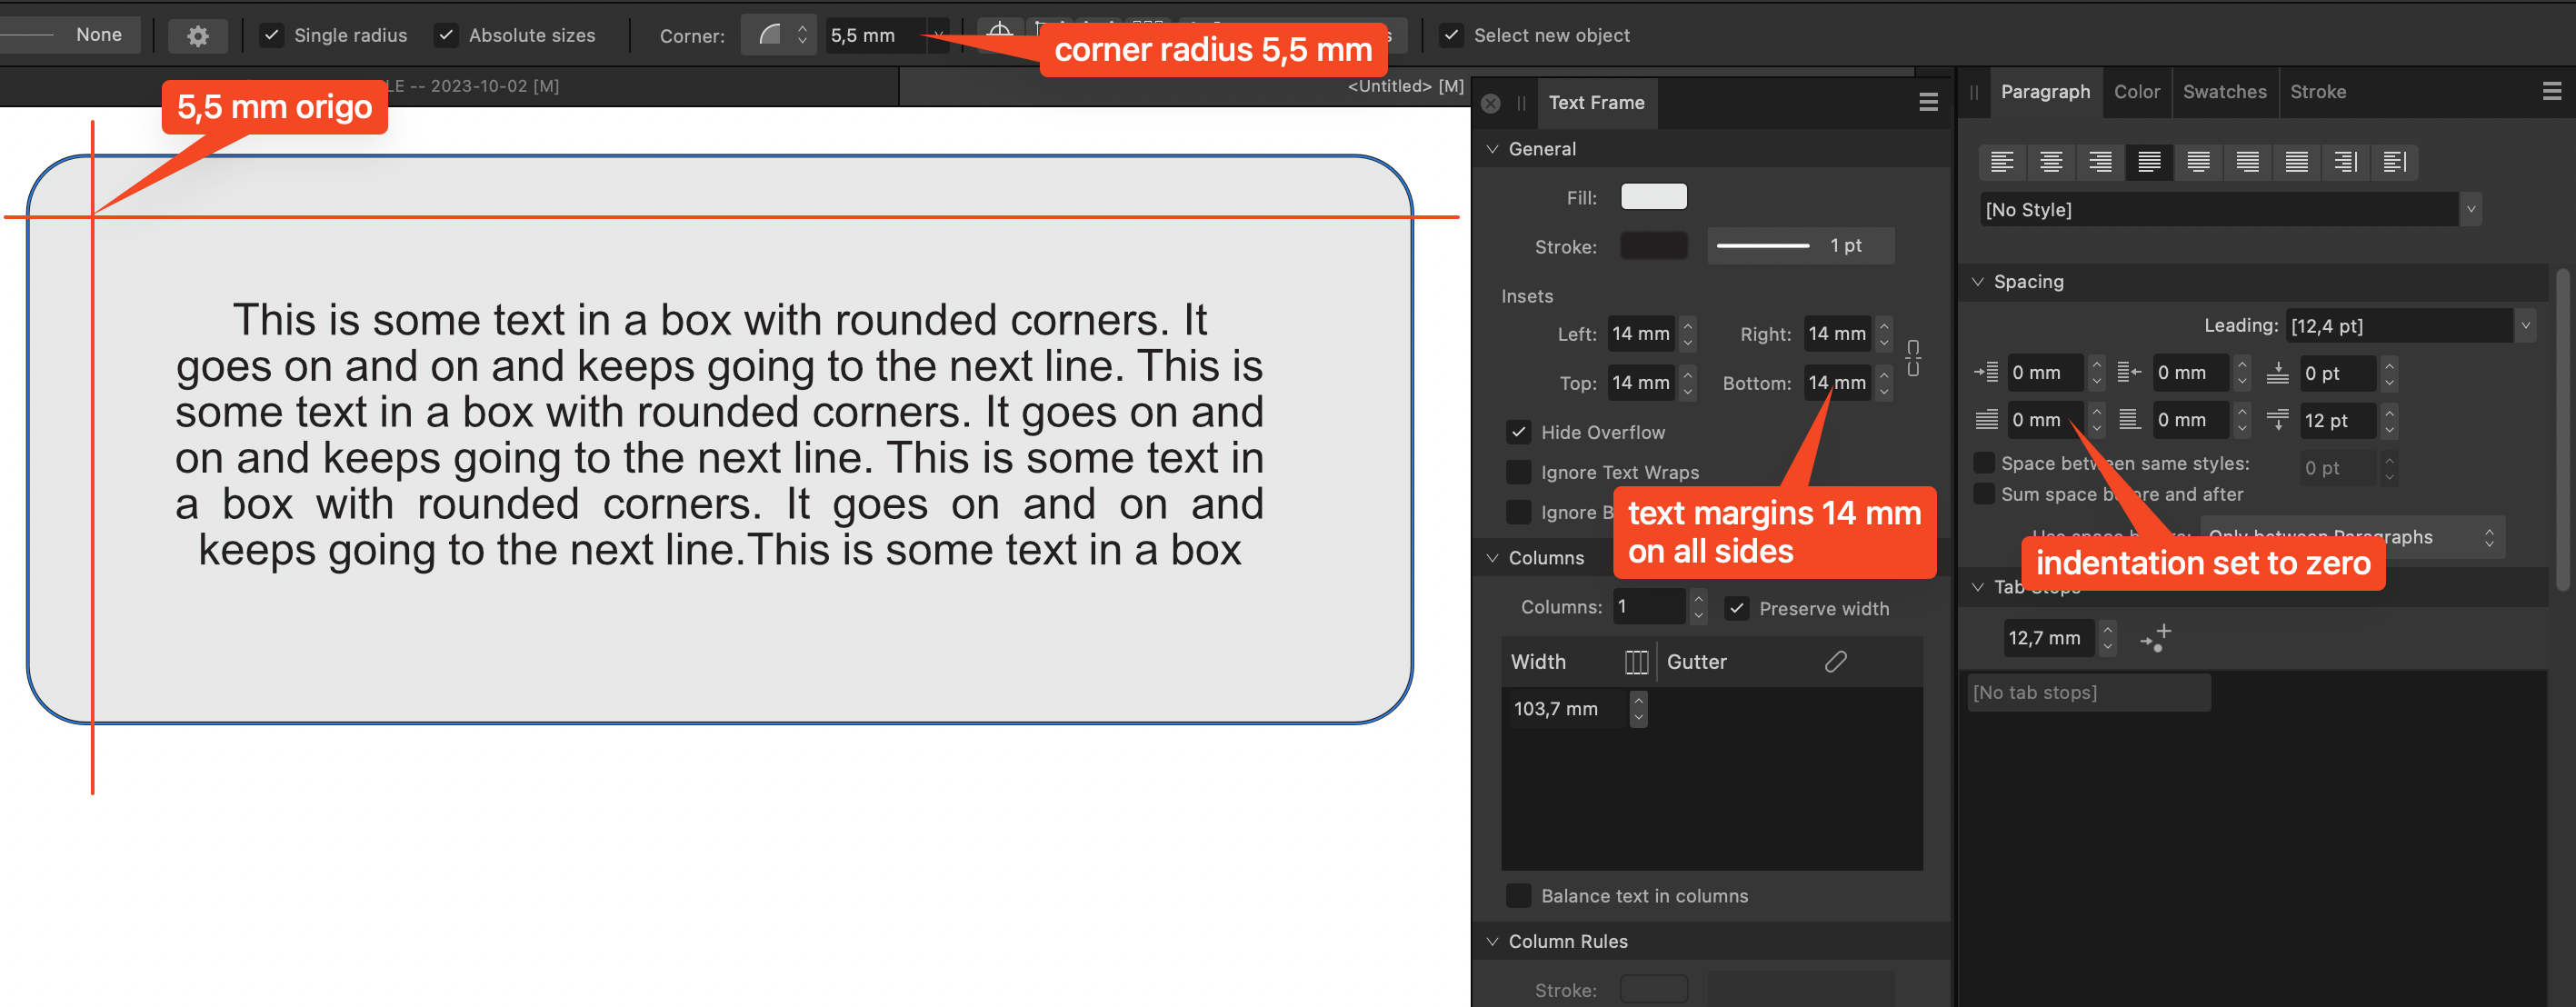
Ah. You may be right that it is not a bug, and thanks for showing me how to do it. But may I be so bold as to still call it a workaround? What I find odd (and unintutive) is this: To have a straight text with equal margins from the edge in a rounded box, this means I have to 1. set a top and bottom margin in the text frame, but NOT a left and right 2. set a left and right indentation in the paragraph settings (but not top and bottom because there is none). In the screenshot below, the border is set to 6mm, as are the top and bottom margins, and the left and right indentation. Even so: while on a pixel-peeping level for sure, do take a look at the left margin selection/horisontal placement of the line. For whatever reason, the second (!) and last visible lines are indented with a fraction more than the others. This does lead me to believe that this is not the prescribed way to do this — especially since if using NO rounded corners, and 6mm insets in all four directions, the edges are exactly even. So something here is not behaving as intended. Again, thanks for the workaround! But given the current penchant for designing textboxes with rounded edges, I would find it reasonable to not have the rounding affect the content when outside of the reach of the roundness.
-
I think you are reproducing it just fine. When the text is hugging the border as per your example, it seems reasonable to adjust its outline to fit the box. But when the text is further in, far away from any chance to be cropped by the border, adjusting it along the box edges makes no sense. Example below: Small radius. Large margins (insets) between text and edge. Literal request to have zero indent on first (or any) line, and text justified to margins. Even so, there is no way for me to have even edges on the text -- just because the box is rounded.
-
Just experiencing this now, and came here searching for an answer. Zero values for everything in the paragraph/spacing palette, but even so the first (and just the first) line of my text was indented. None of the tips above helped me, but I finally got rid of the first line indent by... drum roll... removing the rounded corner of the text box. It seems that no matter the distance from the corner to the text, a round courner will affect the text bounding box so that the first line is pushed to the side — even if the the text margin to the box edge is so big they have no business affecting each other. As far as I've been able to figure out now, the only way to have multi-line text in a box with rounded corners is to have to separate objects, i.e. a text on top of an unrelated box. Surely this must be a bug? /B.
-
Well, for potential future reference, I can tell you that: * panels could be dragged. * layers could be click-to-selected (and they would change colors to reflect it, so the panel was not dead) * hiding layers with the dot worked, as did clicking FX for layers with effects, and also expanding/collapsing The only thing I could not do was to GRAB a layer. I see now in my current, well-behaving session that there is never an actual response from the cursor at grab-time (suggestion: display the grab cursor when initiating a grab, so as to know that we have entered grab state) so whether a grab-start was in fact invisibly performed I can't say for sure. But: The ghost layer that's supposed to appear and travel with the cursor (and does so now that everything is working) did not appear while the problem persisted. (Nor did an insertion point appear between layers, so I was not dragging an invisible/ghost-less layer either — indicating quite clearly to me that the layers did not move when trying to drag them.) I'll make video if it happens again, but that's about what you'll be able to see. 😄
-
In reverse order: It happened both with a mouse and a trackpad. I'm on Ventura, on a formerly top-spec, now outdated, 2019 MacBook Pro. I only experienced it in Publisher but it was the same for all currently open documents. Restarting the app solved the issue, so it's about something locking up something when doing something. Those things always reappear, so we'll probably see it again, either on my machine or someone else's. But for now, it's working well again. PS. I did consider creating a video but realized it wouldn't really show anything — the mouse hovers stuff in the layers panel, then moves without anything happening. So... the visual help to see the problem would be quite slim... 😆
-
Well, the subject says it. Since upgrading to 2.0.4, I have experienced the layer panel suddenly not responding to drags -- I can't rearrange layers by dragging but must use move back/move forward buttons. (Which also excludes me from dragging stuff into groups or into clipping groups) Is this a known problem and how do I get out of it? Thanks, /B.
-
hi, So this is driving me crazy right now: hovering close to & outside any center of the edge of an object, I get the shear cursor. But the second I press the mouse to start shearing/skewing/slanting, the object will start resizing instead. There seems to be no other way to skew things interactively — am I right about that? Is there a designated tool, or a modifier key, so that I can get around this behavior? All help appreciated, I must currently use numeric values which is not at all ideal and interactive... Thanks, b. cant slant.mov
-
Wow @stokerg, thank you so much! That doesn't sound like a solution you just stumbled over... So thanks for the research! About the different PDF subformats, is there a concise (and not too tech-y) compilation of the differences? I realize that just from this brief thread, I've learned more than I even knew I didn't know... Thanks again, /B.
-
That's really interesting. It shouldn't be -- it was created from scratch (and in fact, the text above is not from the original document b/c it contains customer stuff, but a parallel, new document that I created just to show the problem). So now the interesting question is probably if/how my default blank document settings differs from yours...? Hm...