OKernel
-
Posts
4 -
Joined
-
Last visited
Everything posted by OKernel
-
How to mask veil ?
OKernel replied to Darek K's topic in Pre-V2 Archive of Desktop Questions (macOS and Windows)
I have just tried that and for my purposes it works very well. Problem solved. Thank you NotMyFault for the response. -
How to mask veil ?
OKernel replied to Darek K's topic in Pre-V2 Archive of Desktop Questions (macOS and Windows)
I am new to Affinity, so can an old hand have a look at my Photoshop process to see if it can be translated? -
How to mask veil ?
OKernel replied to Darek K's topic in Pre-V2 Archive of Desktop Questions (macOS and Windows)
As an example:
-
How to mask veil ?
OKernel replied to Darek K's topic in Pre-V2 Archive of Desktop Questions (macOS and Windows)
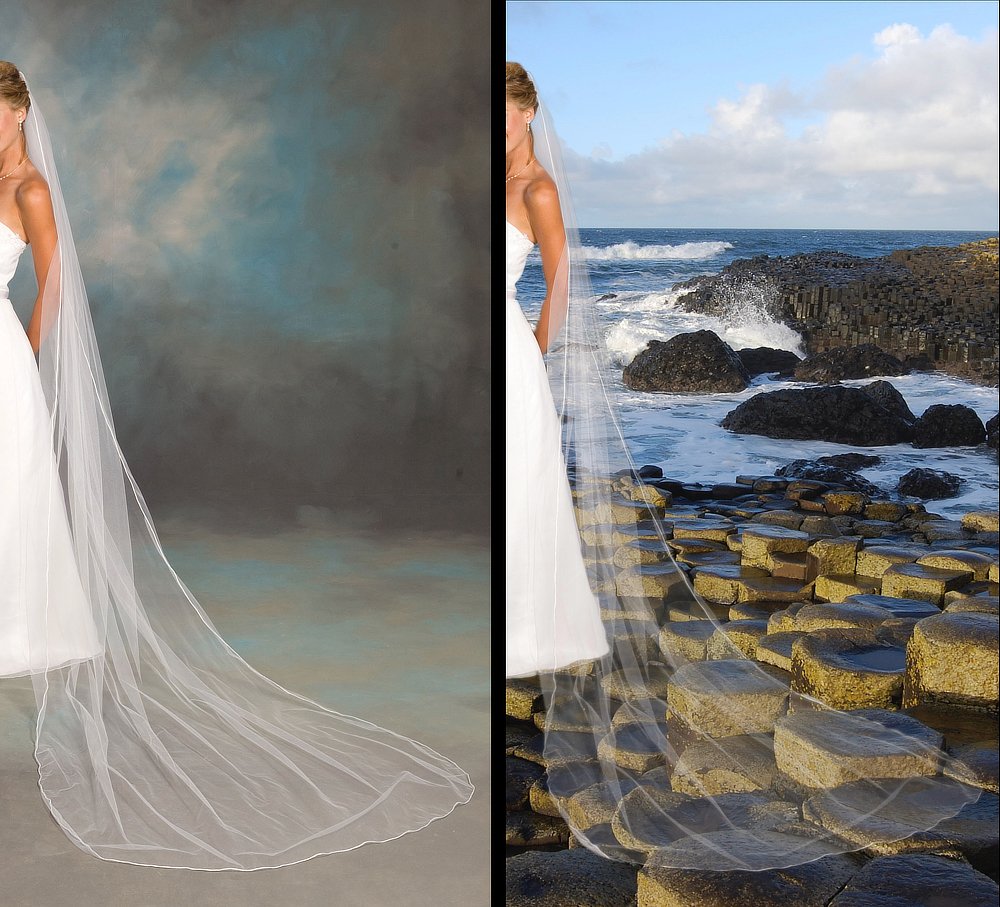
This process in Photoshop achieves the desired effect, can it be translated to Affinity? To Extract Bride With “See-Through” Veil Copy the background onto a new layer, click the mask icon, lower the transparency to about 60%. Bring in your new background and place it below the Background Copy layer. Free transform and move it as necessary to get the desired effect. Bring the Background Copy layer back to 100%. On the background copy layer, make a selection of the bride, including the veil. Right click and make it into a work path. Rename it “Full Bride”. Cmd-click to select. In the Channels window, make a new channel. Fill with white. Rename it “Full Bride”. Select All. Copy the channel to the clipboard. Opt-click the background layer mask. Paste. Deselect. Select the Background Copy layer. Carefully select an area of the veil that needs to be transparent to the background. Right click and make it into a work path. Rename the path “Veil 1 ”. Cmd-click to select. In the Channels window, look at the separate channels and select the one that has the best detail in this part of the veil. From the main menu, select Image >Calculations. Set Source 1 Layer to “Merged” and the Channel to your selected one. Set Source 2 Layer to “Background Copy” and Channel to “Full Bride”. Set Blending mode to “Multiply”, place a check mark in the Mask checkbox. Under Mask set Layer to “Merged” and set Channel to “Selection”. For Result select “New Channel”. Click OK. Name it “Veil 1”. Deselect. Repeat this with new names if there is more than one transparent area. Select “Veil 1” path, make it a selection, feather 1, anti-alias, click on the corresponding channel, copy it. In the Layers window, select the background copy layer, then opt-click on the mask, then paste. Deselect. Repeat for each “Veil” path. In the Layers window, select the background copy layer, then opt-click on the mask. Go to the Paths window, cmd-click “Veil 1” path to make a selection. In the Image->Adjustments window, select Levels and adjust the sliders to suit. In the Layer Mask window, feather a few pixels if necessary. Deselect. Repeat for each “Veil” path. Select layers and merge as required.