Freixas
-
Posts
21 -
Joined
-
Last visited
-
I re-checked and it does seem to be working. I'm not sure what I did wrong the last time, but I have another resizing macro and I suspect I ran the wrong one.
-
 KLE-France reacted to a post in a topic:
All potentially long operations should display a dialog with a cancel button.
KLE-France reacted to a post in a topic:
All potentially long operations should display a dialog with a cancel button.
-
Bound by Beans reacted to a post in a topic:
All potentially long operations should display a dialog with a cancel button.
-
PaoloT reacted to a post in a topic:
All potentially long operations should display a dialog with a cancel button.
-
All potentially long operations should display a dialog with a cancel button. This should be part of your products' specification: when a potentially long operation occurs, the user should be informed by displaying a dialog (this seems to be what you do already) and the dialog should have a cancel button (this behavior is missing in at least one case). Specifically, I noticed that the new Select Subject feature displayed a dialog letting me know it was working, so it's clear that you know this operation might take a while. However, the dialog has no cancel button. I realize that there could be cases where a cancel button is not appropriate. In those case, a message that the operation cannot be cancelled should be displayed. Presumably, these cases would be the exception and not the norm. I am suggesting that this feature be made part of your products' specification so that users don't have to explicitly request it for each slow operation. If a cancel button is left out, it could be reported as a bug, rather than requesting it as a feature.
- 1 reply
-
- 3
-
-
The bug is still present when I create a new macro. I've attached the macro that I just defined. When a long operation begins (presumably, more than a few seconds), you post a dialog to let the user know. This dialog should always come with a cancel button. The omission of the cancel button should be a bug in every case; users shouldn't have to request this every time you implement a slow operation. The fact that the dialog appears means that you already know this is a potentially long operation. In any case, I'll follow up in the feedback section. MSIX. In any case, I noticed just now that the Help/About dialog displayed normally and that the icon was normal. The problems I noted earlier occurred after the app updated and restarted. Macros.afmacro
-
I've just updated to V2.6 on Windows 11 and ran into a number of problems: I had a macro for resizing a document. I believe it was a simple 1 step procedure in which I resize by setting the width to 1500px. The macro has one step, Document Properties, which appears to do nothing. I had a macro for inserting a watermark. The steps all appear to be there, but the first step, placing the watermark file, appears to do nothing. Some macros still work. I haven't tried testing each one or trying to figure out if there is any commonality in the broken ones. I tried using Select Subject without having any images loaded. The app crashed. Select Subject can take some time to operate. The dialog that appears ought to have a cancel button. Help > About flashes the dialog for a second and then disappears. In the taskbar, the Affinity Photo icon looks like just a blue line.
-
Color Profiles and Soft Proofing
Freixas replied to Freixas's topic in Desktop Questions (macOS and Windows)
Understood. After dealing with a lot more images using my new flow, I think your luck with lack of color shifts depends a lot on the image you start with. Most of the images I've tried have few problems. Sometimes there are tiny color shifts in a few areas. I took a photo of a very red fall leaf, though, and it was tough to get anything close to the master image. I also had some very green leaves that became slightly but noticeably less saturated—that was the image that started my post. The color space for most papers is even more limited than sRGB (I think), so it's great if you're having so few problems. Some images drive me to tears. One can calibrate a printer all day, but in the end, if you put it in a room with variable lighting, the image can go from bright to muddy over the course of a day. But that's the way it is with prints... -
 Freixas reacted to a post in a topic:
Color Profiles and Soft Proofing
Freixas reacted to a post in a topic:
Color Profiles and Soft Proofing
-
Color Profiles and Soft Proofing
Freixas replied to Freixas's topic in Desktop Questions (macOS and Windows)
Thanks for the correction. Yes, I'm using Wide Gamut. Yes, I'm exporting as ProPhoto. PhotoLab 7 just added a soft-proofing feature. I haven't done much with it. My quick tests seem to say that it works. But my question was about optimal workflow. My original image is RAW, which has no color space (or maybe it has an intrinsic color space defined by the hardware). As I work with the image, I'd like to have the widest range of color possible, which I believe is effectively limited to what my monitor can display. Once I have my "ideal" reference image, then I can worry about how to adapt it to sRGB or to a print profile. So the revised workflow I am considering is: RAW image -> DxO PhotoLab 7 with Wide Gamut color space -> export to TIFF with ProPhoto color profile -> import to Affinity Photo with ProPhoto color profile -> convert to target profile -> do the best I can to match the reference TIFF image -> export or print with target profile -
Color Profiles and Soft Proofing
Freixas replied to Freixas's topic in Desktop Questions (macOS and Windows)
Yes, I am re-thinking my workflow. The original images stay in ProPhoto, but when an image is intended for Facebook (which seems to always convert images to sRGB), I might as well start with sRGB. I also think I might be wrong in saying my monitor's color space is smaller than sRGB. It's rated for 100% of the sRGB color space. Someone claimed that it covers 90.7% of the Adobe RGB color space. It's possible the colors I can see on the monitor cannot be reproduced in sRGB. I ran through a series of photos. Most images survived the conversion to sRGB reasonably well. One deeply red image was pretty far off. The Soft Proofing adjustment is buggy. The gamut warning fails to update as I make changes to the image. And the conversion to sRGB, even when it seems to work initially when using the sRGB2014.icc profile, gets off track as I make adjustments. The adjusted image, with Soft Proofing on doesn't look like the converted exported image. Switching to the sRGB color space might be the best approach. -
Color Profiles and Soft Proofing
Freixas replied to Freixas's topic in Desktop Questions (macOS and Windows)
Thanks. Using the sRGB2014.icc profile for soft proofing shows the same result as saving with the sRGB IEC61966-2.1 and thus makes soft proofing possible. The process is not ideal although this gives me a fighting chance. The sRGB space is perfectly capable of representing the colors I want. This is easy to see by converting the image to sRGB and then increasing the saturation a bit. Affinity is already mapping the ProPhoto space down to the monitor's color space. It still seems as though converting to sRGB shouldn't change what I see on the screen. Since sRGB has been the default for images without profiles and for programs that don't pay attention to color profiles, I use sRGB for JPGs intended to be shared with others. My workflow seems more complicated than it should be: get the image looking the way I want, the soft proof it in sRGB and correct any color shifts. And the corrections have to be guesses—once I change the soft proof, the original image will now be incorrect. This just doesn't seem right. -
My work flow is this: RAW image -> DxO PhotoLab 7 with ProPhoto color profile -> export to TIFF with ProPhoto color profile -> import to Affinity Photo with ProPhoto color profile -> export to JPG with sRGB IEC61966-2.1 profile -> view with IrfanView or MS Photo. There is a small but noticeable color shift when I compare the image in Affinity with the image in IrfanView. If I save the JPG using the ProPhoto color profile and then view with IrfanView, the images look identical. My assumption is that the sRGB color space cannot display all the colors in the ProPhoto color space. Fine. But let's keep in mind that neither can my monitor. I would think that a color in the ProPhoto color space outside of my monitor's color space would be converted to my monitor's color space, which shouldn't be much different than the result of converting it to sRGB. I wouldn't think the image colors would appear different. Of course, there is intent. My working color space is RGB/16, ProPhoto Perceptual with no Black Point compensation. When I export to a JPG with an embedded sRGB IEC61966-2.1 profile, I'm not seeing any place to declare the intent. In any case, I thought I would enable soft proofing using the sRGB IEC61966-2.1 profile—then I could at least preview what would happen. I added a Soft Proof adjustment with the sRGB IEC61966-2.1 profile and Perceptual intent. The image didn't change. If I enable the Gamut Check, it shows that there are gamut problems, but that's about all it does. I tried various other intents as well—the image remains unchanged. To preview the color shift from ProPhoto to sRGB, I seem to have to convert the document's color profile. Do I misunderstand the Soft Proof adjustment?
-
The problem occurs with Affinity Photo, v2.00, the latest version at this moment. It is easy to reproduce: import the attached watermark macros into Photo V2 and attempt to edit or use one of them. These macros still work with Photo V1. It happens with any document. The problem occurs on Windows 10. Hardware acceleration is ON, but probably irrelevant. I find Affinity macros a bit opaque to edit. The first macro step is "Set text stylesheet". I can't see what the text stylesheet is set to. Presumably, it points to my watermark file. You won't have an equivalent file, but whether the file is present or not, the program should not crash, and it should be less likely to crash when editing the macro (as opposed to trying to use it). Clicking on the macro does not cause a crash if no document is open. Create a document, click on the macro, and the program consistently crashes. Watermarks.afmacros
-
Table Woes—Alternative?
Freixas replied to Freixas's topic in Pre-V2 Archive of Desktop Questions (macOS and Windows)
Thanks. I played around with it, though, and it's not quite that easy. It seems to depend on the mode one is in. With the Move tool selected, I can click on a table and it is selected, but I can't enter into it, not with click or Alt-click. Ctrl-C does copy the table. With the Text tool selected, then, yes, a click does nothing useful; an Alt-click displays the row/col headers and allows me to enter into a cell. Once I get the row/col headers, then I can click a cell in another table and have the row/col headers appear there. If I use Ctrl-C, I appear to copy the table unless I've selected some other content, such as the contents of a single cell. And on and on... None of this is intuitive, none of this is documented in the Help except selecting a table with the Table tool, which actually only seems to work when clicking on a table that is not pinned or clicking on the edge of a pinned table, so even that's not very accurate. -
Table Woes—Alternative?
Freixas replied to Freixas's topic in Pre-V2 Archive of Desktop Questions (macOS and Windows)
I managed to get that to work. One of the problems I ran into is that, if I click on a table cell, sometimes it does nothing, sometimes it brings up the row/column headers. If I select the Table Tool first, it sometimes works better although even then, selecting a table can be problematic. I haven't figured out the exact magic I need to make that work predictably. In any case, this is beating a dead horse. I wound up transferring everything to my ancient CS6 InDesign, which allows tables to cross page boundaries and repeats header rows automatically. -
Table Woes—Alternative?
Freixas replied to Freixas's topic in Pre-V2 Archive of Desktop Questions (macOS and Windows)
Thanks, but I don't want to edit text in one file and tables in another. And it's still not clear how I wind up with a document (made in AP) that had tables broken across pages and with the headers repeated across the breaks. As I understand it, AP doesn't support this feature. And if I try to create fake tables (using some sort of styling trickery), I still don't get automatic headers when a "table" breaks across a page. I've concluded there is no way to do this if AP doesn't support it--unless there is some extension mechanism that could add this feature. I used to do some fancy stuff with InDesign coding. Of course, I'd rather not. I'd rather work on my document than on AP. -
Freixas reacted to a post in a topic:
Table Woes—Alternative?
-
Freixas reacted to a post in a topic:
Table Woes—Alternative?
-
Table Woes—Alternative?
Freixas replied to Freixas's topic in Pre-V2 Archive of Desktop Questions (macOS and Windows)
Thanks, anto, but my problem was in copy/pasting within Affinity Publisher. Select the table tools Poke at the table until I get it selected Select all the cells in the table Copy If I select a text position and Paste, the table contents are turned into text As I recall, I have to maybe have the table tool enabled and paste somewhere outside the text flow Then I drag the table into approximately where I want it in the text flow Pin the table It seems like a pain. I am not trying to copy/paste from LibreOffice to Publisher. -
PaoloT reacted to a post in a topic:
Table Woes—Alternative?
-
Table Woes—Alternative?
Freixas replied to Freixas's topic in Pre-V2 Archive of Desktop Questions (macOS and Windows)
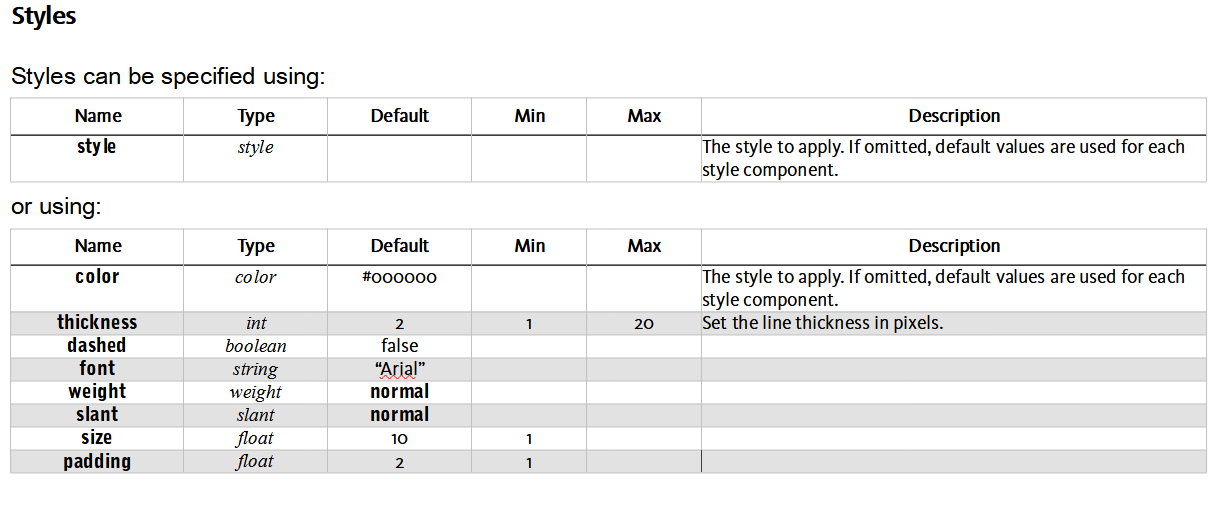
Hmm... I thought I had been pretty detailed. This document is a detailed script language specification. The script contains commands. Each command has one or more properties. Properties have "names, types (float, integer, etc.), min values, max values, default values (if omitted), and explanation of what the property does." So I'm going to have one section per command. Each command will have an explanation of how it's overall function and a list of properties. The most space-efficient way to listing the properties is in a table. Here is an example, with a lot of stuff not yet filled in: This example actually came from LibreOffice—I'm checking it out as an alternative. It doesn't really offer a lot more advantage except in allowing tables to break across pages. Putting the tables in another file and importing them would be a ton of work and would make editing the document a pain in the neck. The text and the table contents need to be edited together. After posting, I decided that there really isn't any good substitute for a table. Tables exist for a reason. Affinity Publisher can't break a table across a page. I don't want to manually have to break the tables. In a "live" document, editing is ongoing and so any edit might cause existing tables to need to be split and split tables to be joined back. The final question for me is whether I can live with the tables being broken. If I need to share the document with someone else at any point, I'd either need to fix the tables or live with the document looking unprofessional. It's disappointing, but I have to figure out how I get the job done with the tools I have today. I realize that Publisher wants to treat tables like another kind of image, rather than as a special kind of text flow. While this works for some layouts, it's not the best model for tables. For example, it doesn't make sense to split an image across pages, but it's common for tables to be split. Changing the way tables are dealt with would require a lot of work, so I won't expect a change anytime soon.