Jim57
-
Posts
29 -
Joined
-
Last visited
Everything posted by Jim57
-
prophet - Perfect👍 Thank you very much ! Regards, Jim
-
BTW - I'm on an iMac running Monterey 12.7.3. For some reason, when trying to edit my initial post to add this information I could not find any way to save the change.
-
Greetings, When adding a new info sample from the info tab, it always appears at the top left corner of of the document and not where I am zoomed into on the document. This leaves me zooming out my view, grabbing the sampler from the upper corner corner and then moving it to where I want to sample and zooming back in. Is there a way (keyboard command?) to add the info sampler to where I want it to be - such as where my mouse pointer is in the document? Jim
-
Copy and Paste Part of Curve Objects
Jim57 replied to josbin's topic in Feedback for the Affinity V2 Suite of Products
Sorry I can't post a video right now, but I tried it and I did not think it worked either, but it does - after dragging the middle node of the new curve onto the curve section you want copied, you have to hold it in place (do not release the mouse) for about 5-6 seconds and it will suddenly snap. Hope this helps. -
Is there a way to make a pen stoke that has 2 different end caps? I'm working on a tutorial on making trees. As in the attached picture, the tree starts with square end caps, then adds rounded corners at which point the end caps are still square, but step three shows the end caps on the tips of the branches to be rounded, yet the end cap at the trunk base of the tree is still square. I would like to know if there is a way to accomplish this aside from making all the end cap strokes rounded to start with and covering the bottom stoke with a square white box.

-
My only wish (or 2)
Jim57 replied to Jim57's topic in Feedback for the Affinity V2 Suite of Products
👍 darn right! 😁 -
My only wish (or 2)
Jim57 replied to Jim57's topic in Feedback for the Affinity V2 Suite of Products
It's frustrating when software companies invite user feedback and then seem to not listen to what people want. I'm not even talking about my 2 requests. I and apparently many others were expecting so much more from this upgrade in terms usable features and all we got was mostly a UI redesign. -
My only wish (or 2)
Jim57 replied to Jim57's topic in Feedback for the Affinity V2 Suite of Products
MikeTO, I agree with you, my requests are not urgent and there are more important issues to address at this time. However, I did not state my issues were urgent. I did not insist they be done today, tomorrow or a year from now. I merely was posting what I would like to get. I paid my money for the upgrade and I’m entitled to voice my opinions in this forum just like anyone else. Correct me if I’m wrong about that. -
My only wish (or 2)
Jim57 replied to Jim57's topic in Feedback for the Affinity V2 Suite of Products
Walt - Are you are referring to the Mac system preferences setting General>Recent Items? I have it set to none. So the Affinity app in itself is not honoring it. As for ignoring things, as I stated — I would prefer to have options to control which preferences I want and how I want them, not ignore them. -
I switched to Affinity in 2019 because I new once I left Mac Mojave my Adobe software was going to be abandoned and I refuse to reside and pay "rent" in the Adobe kingdom in the clouds. I'm retired now and use the software as a hobby, and I would like to see the following considered: 1. Permanent (non-disappearing) curves. I do more work with curves than masks. I am so tired of having to continually having to remember to dupe my curve before making a selection out of it in order to have the curve available for future use. There may be other workarounds for this dilemma, but really, should there have to be any workarounds for this? I know I can make a mask after making the curve, but if adjustments are needed, I would rather make them from the curve than refine the mask. I have issues with masking that I won't waste time going into here. 2. I see Photo V2 (haven't opened Designer or Publisher yet) appears to have a more robust Open Recent document retention. I would like to have the option to both limit the number of recent docs shown and/or turn off recent docs altogether. As it is now, I have to remember to go to the file menu and select clear menu. Why wouldn't I want to have quick access to recent files? Because I don't need to and it's just my preference. I'm a control freak on my computer and if I can't control a function I don't like it - plain and simple.
-
I don't like the new UI design
Jim57 replied to Zaxonov's topic in Feedback for the Affinity V2 Suite of Products
I did not have a problem with the old interface especially compared to this new UI. I wish they had focused more on providing additional program features instead. -
Old Bruce- Thank you for solving that for me! I thought it might have been security related, but wouldn't have thought to check there. Best regards, Jim
-
I only noticed this recently, but when using the color picker I can no longer select a color that is anywhere outside the Affinity Photo document window. I can pick a color from anywhere inside the document but when I move the picker to my desktop and hover over anything on my desktop (an open preview document for example) all I get is a swatch of R:122 G:123 B: 128. Model Name: iMac running Monterey 12.6.1 Model Identifier: iMac19,1 Processor Name: 6-Core Intel Core i5 Processor Speed: 3.1 GHz Number of Processors: 1 Total Number of Cores: 6 L2 Cache (per Core): 256 KB L3 Cache: 9 MB Memory: 32 GB Screen Recording 2022-11-01 at 2.27.57 PM.mov
-
Walt- The instructor is Jeremy Hazel. Section 7 Lesson 95. The class is on Udemy.com.
-
Walt - Thanks for responding. The course is called Affinity Designer: The Complete Guide to Affinity Designer. As my post mentioned, I did inquire with the instructor. I have not heard back yet and decided to post here in the meantime. Old Bruce was able to give me a solution that works. Thank you for your input.
-
Old Bruce - That solution which works. What puzzles me is that in the video - as in my screen cap, he did it with both stacked directly in line. Anyway - your solution works and I'm grateful. Thanks again.
-
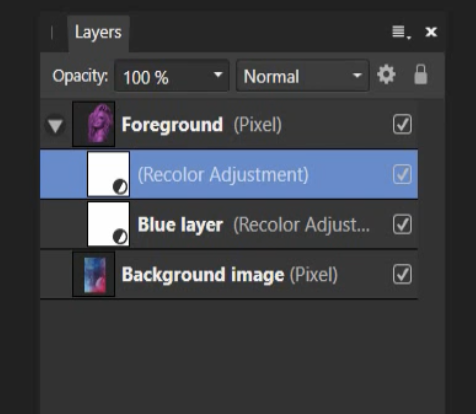
I was watching a video from an Affinity Designer course, where a section of the course touches on the Pixel persona and we are shown how to recolor parts of a photo. I believe the course was shot around version 1.8 or 1.9 of the software. I am on version 1.10.5. 1. A section of the base layer is copied and pasted onto a second layer. A recolor adjustment is made to the layer (blue). 2. He then adds a second recolor adjustment layer on top of the first one and makes that recolor purple. While he is adjusting the color of the purple with the sliders, you can see the color change taking place. Note he has both recolor adjustment layers checked on - see screen cap. When I am attempting to do this, I cannot see my adjustments to the purple recolor layer unless I uncheck the blue layer below it. Then when I check the blue layer back on, I cannot see the purple layer. I am on running Mac Monterey 12.6 and using Designer 1.10.5. I tried doing this in Affinity Photo 1.10.5 and cannot do it there either. I submitted this query to the course instructor but have not gotten a response. Wondering if this may be because of either updates to the software since the video was shot, or because of changes to the Mac OS, as I believe I was able to follow what he was doing back when I was running Mojave ( and also on version 1.8 or 1.9 of Designer).
-
Affinity Photo 1.10.5 When attempting to move a point on the mesh warp, if the point is selected before the cursor turns into a solid black arrow (it will look like a white arrow with a squiggle under it) this will cause the program to lock up and the spinning beach ball will appear. Force quitting is the only option. IMac 27-inc 2019 Processor Name: 6-Core Intel Core i5 Processor Speed: 3.1 GHz Memory: 32 GB OS: Monterey 12.3.1
-
1.9 Assets panel GUI issue
Jim57 replied to Jim57's topic in Pre-V2 Archive of Desktop Questions (macOS and Windows)
Hi Ian- I'm glad I was able to help. Jim -
1.9 Assets panel GUI issue
Jim57 replied to Jim57's topic in Pre-V2 Archive of Desktop Questions (macOS and Windows)
Hi Ian- That's strange - I was able to download all content. Are you not seeing them? I use Firefox and have the preferences under files and applications set so all my downloads go to a folder I created on my desktop, but sometimes I change that & forget to reset it. Check your web browser's prefs to see where downloads are going. Or create a folder on your desktop and redirect the browser to put the zips there temporarily and see if that works maybe? Jim -
1.9 Assets panel GUI issue
Jim57 replied to Jim57's topic in Pre-V2 Archive of Desktop Questions (macOS and Windows)
Ian - As I mentioned to Walt - I didn't think to go to my account via the Affinity website where those zips are indeed downloadable. Knowing that now, I've downloaded them all for backup on a flash drive. I've opened a number of the PNG & JPEG files in another program and they are 300 dpi. So as long as your document setting is set to 300 dpi I believe they should be fine. Jim -
1.9 Assets panel GUI issue
Jim57 replied to Jim57's topic in Pre-V2 Archive of Desktop Questions (macOS and Windows)
Walt- Thank you for clearing up the fact that there are indeed zips that can be downloaded. When I upgraded the software, I logged in from the my profile in the applications themselves to bring the assets in - never thinking to log in via the "front door" of the website where they are indeed downloadable. I opened a few myself in another program I will not mention here (ph*t*sh*p) and they were 300 dpi as you mentioned. Now I will download those zips for flash drive storage backup. Thanks again! Jim -
1.9 Assets panel GUI issue
Jim57 replied to Jim57's topic in Pre-V2 Archive of Desktop Questions (macOS and Windows)
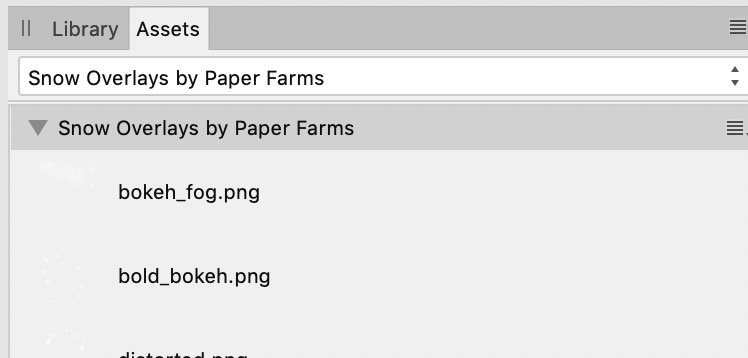
Ian - I'm not the most proficient user of the software and hopefully someone more skilled will follow up, but I think that possibly the PNG files provided by Affinity in the Assets library are somehow stored internally in the software, so there would not be any physical hi-res files available. I was confused about this at first as the instructions of the PDF for snow overlays says that in order to import them you must: Navigate to the Snow Overlays by Paper Farms folder to locate the Snow Overlays. I searched and had no folder by that name on my hard drive ( it would have been in my downloads folder if there was). However, when I went to the Assets panel, they were there already. Loading them thru my account appeared to eliminate the need of a download file. I presume (bad habit 😑 ) that the quality of the PNG will appear either good or bad (or so-so) based on the resolution of the document. I would try creating a few documents (72 dpi & 300 dpi) with a simple color background to contrast the PNG file and place one of the PNG files in them, then export the documents out at those resolutions and see if there is a noticeable quality difference. Hope this helps. Jim -
1.9 Assets panel GUI issue
Jim57 replied to Jim57's topic in Pre-V2 Archive of Desktop Questions (macOS and Windows)
Hi Ian- Here's what I did: 1. With the Affinity app open, go to your user icon (upper right corner of application window) and log in to your account. There should be a list of all the assets available under "My Purchases" (see screenshot). 2. I clicked on each one and downloaded them (green checkmark). This should load them directly into the application. 3. Then I went to the application menu to VIEW > STUDIO> ASSETS and opened the assets panel, and all the assets appeared in the pull down menu. The only "physical" downloads that were put on my computer were the accompanying PDF files that were downloaded . I had to do this for separately for each app: Photo, Publisher & Designer. Then, as per the discussion because I work in Default OS (Light screen) in the assets pulldown menu I selected show as list so I could see the names of the icons to match them against the PDF (thanks to walt.farrell & jmwellborn) Hope this helps
-
1.9 Assets panel GUI issue
Jim57 replied to Jim57's topic in Pre-V2 Archive of Desktop Questions (macOS and Windows)
Sean- Thanks for the response. Your explanation is indeed understandable. I will use Walt's suggestion - I'm embarrassed I did not know that list option was even there 😆 ! -Jim