
rosa cobos
-
Posts
150 -
Joined
-
Last visited
Posts posted by rosa cobos
-
-
Are they fit for Affinity Photo too?
Thank you so much.
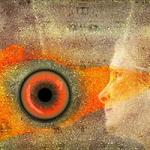
I dównloaded your watery set and is fantasic.
Rosa
-
mmmm...seems so perfect. I think the way I told you is somehow ackward.I did not know you could do this kind geometry actions......with pixel selected layers....I have to try and see....is not my thread but is really interesting, Thanks to all of you,
Rosa
-
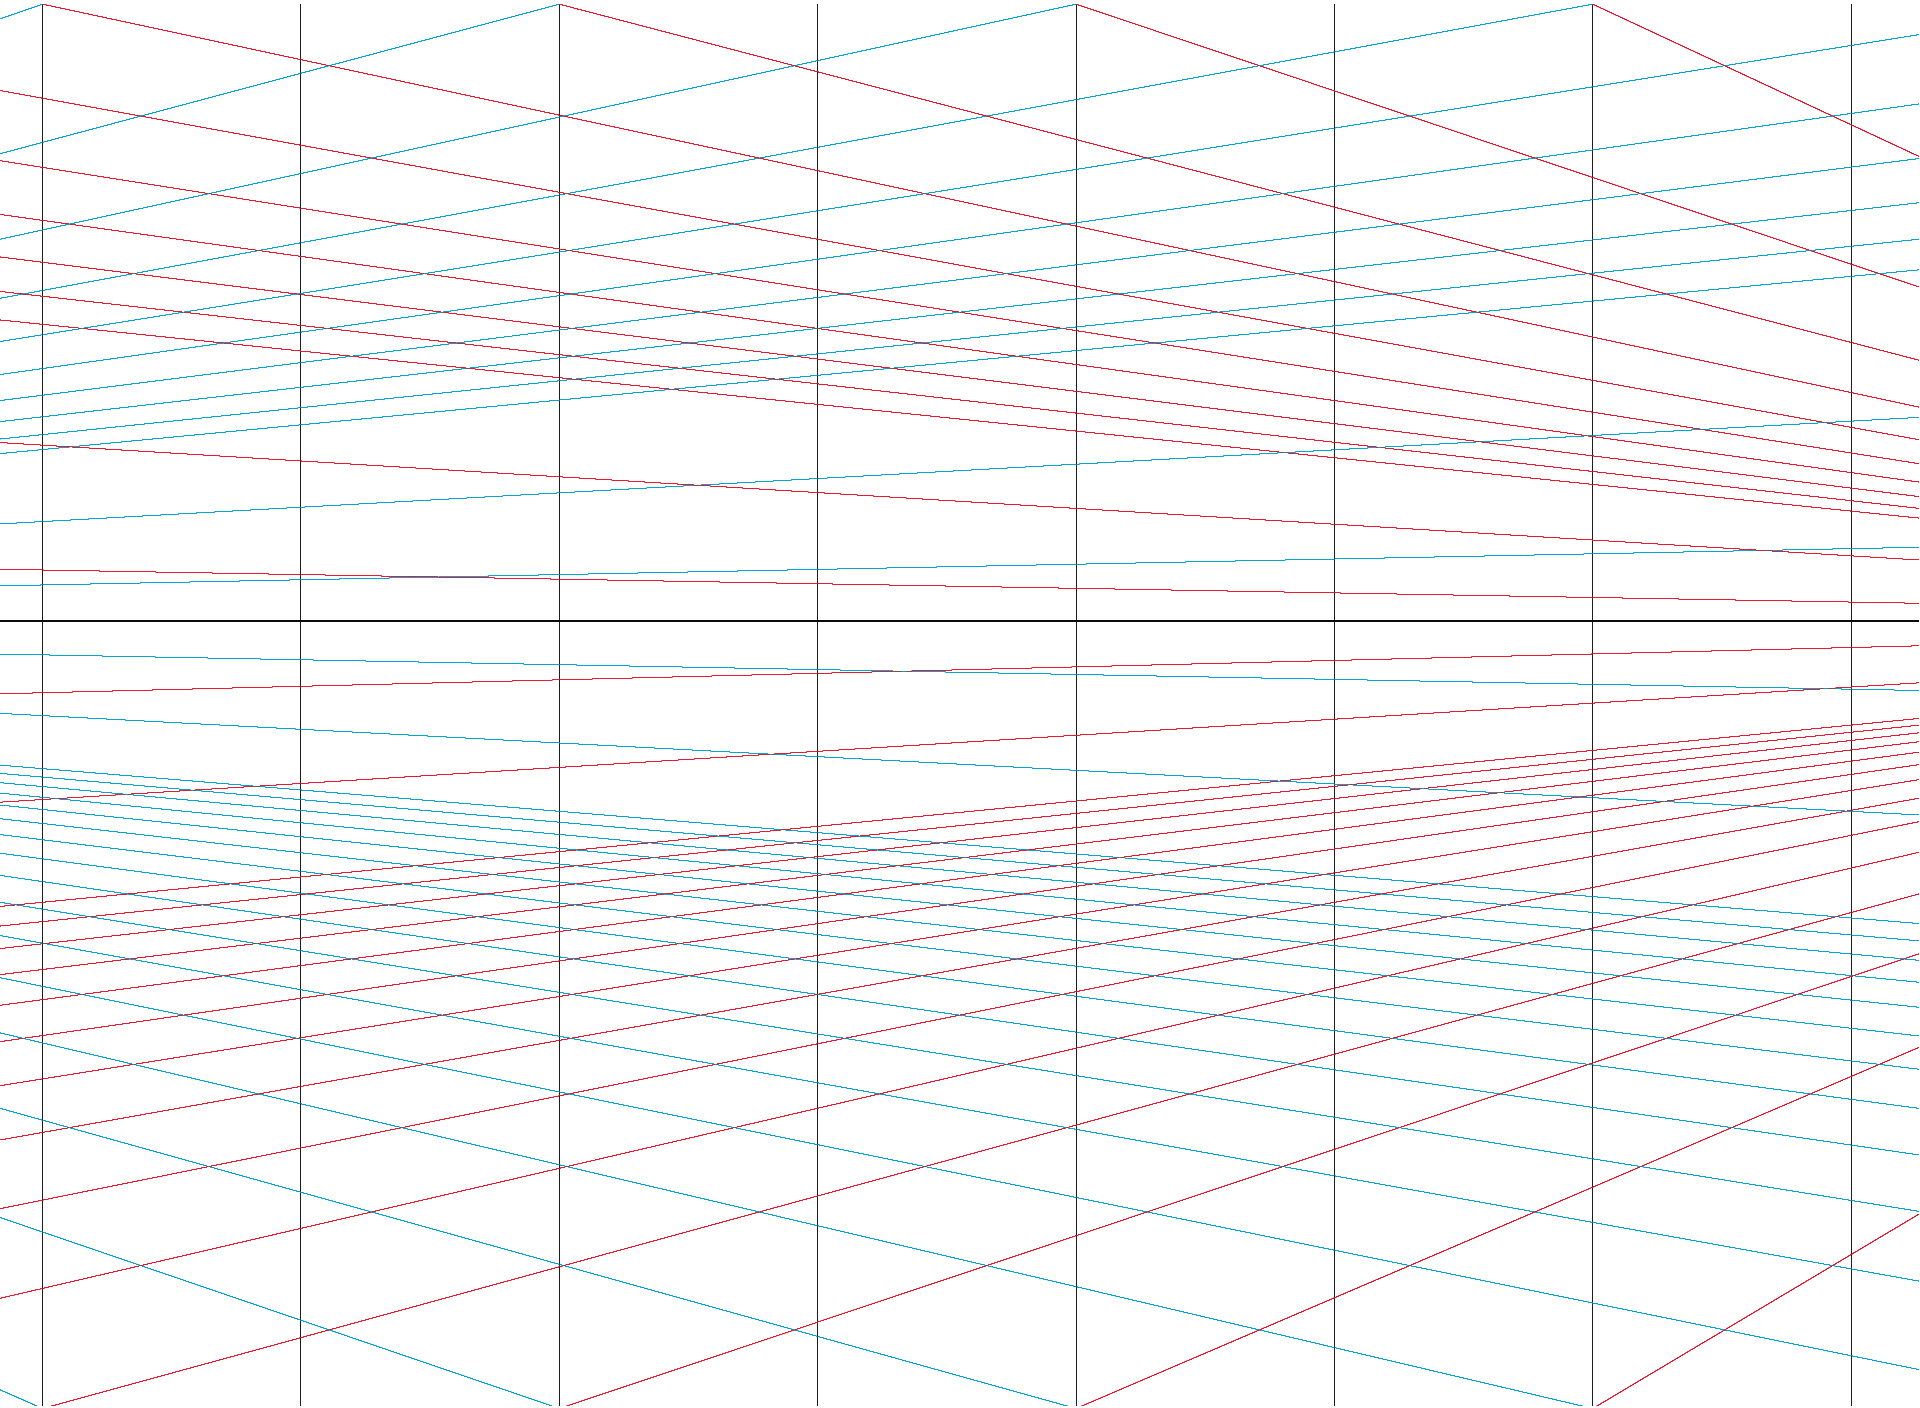
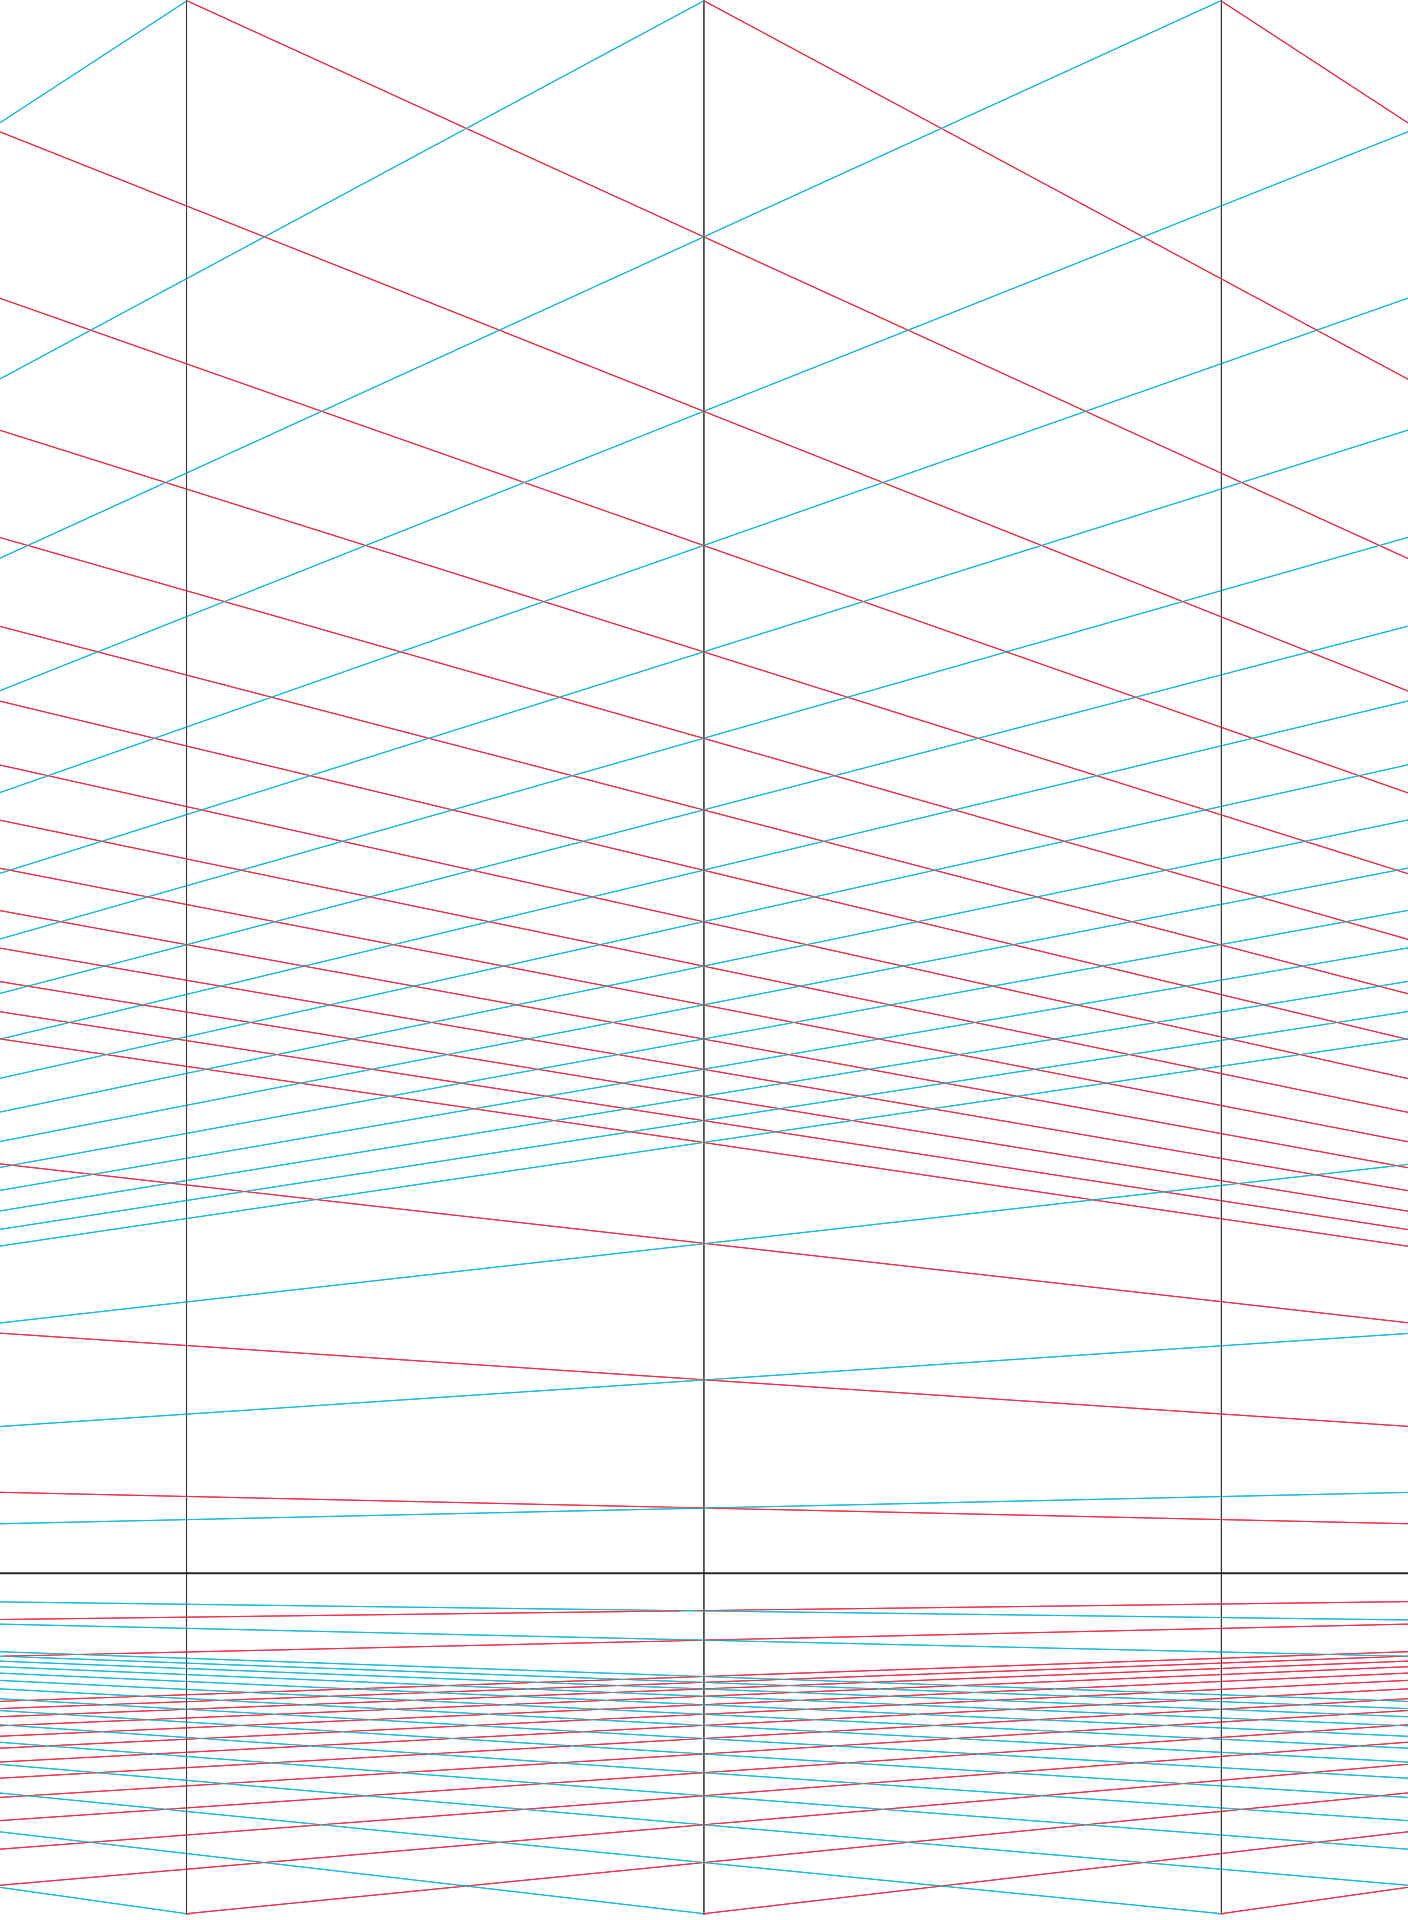
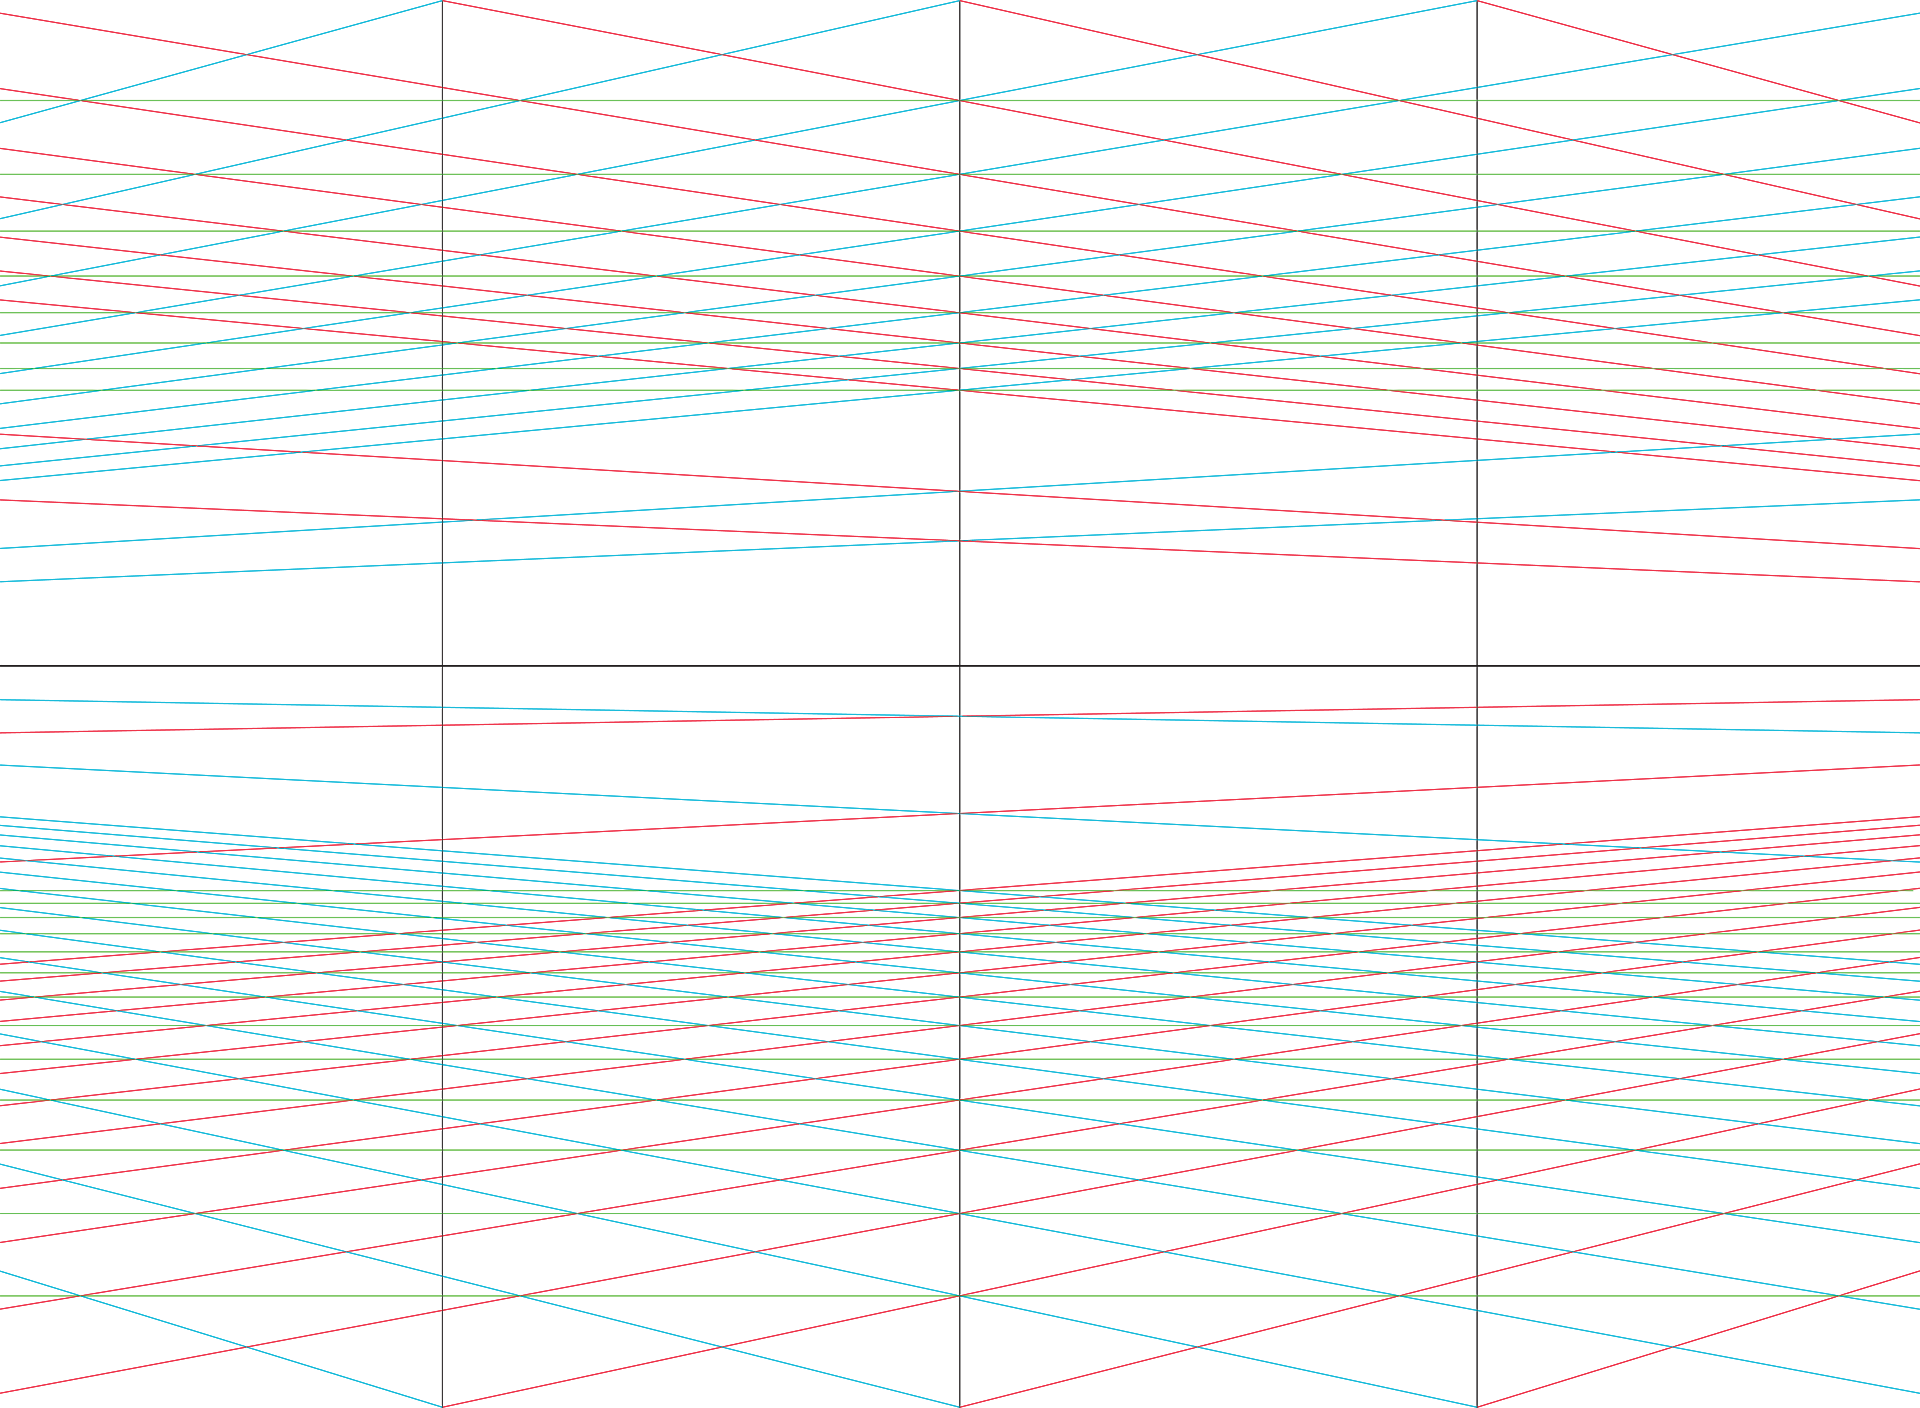
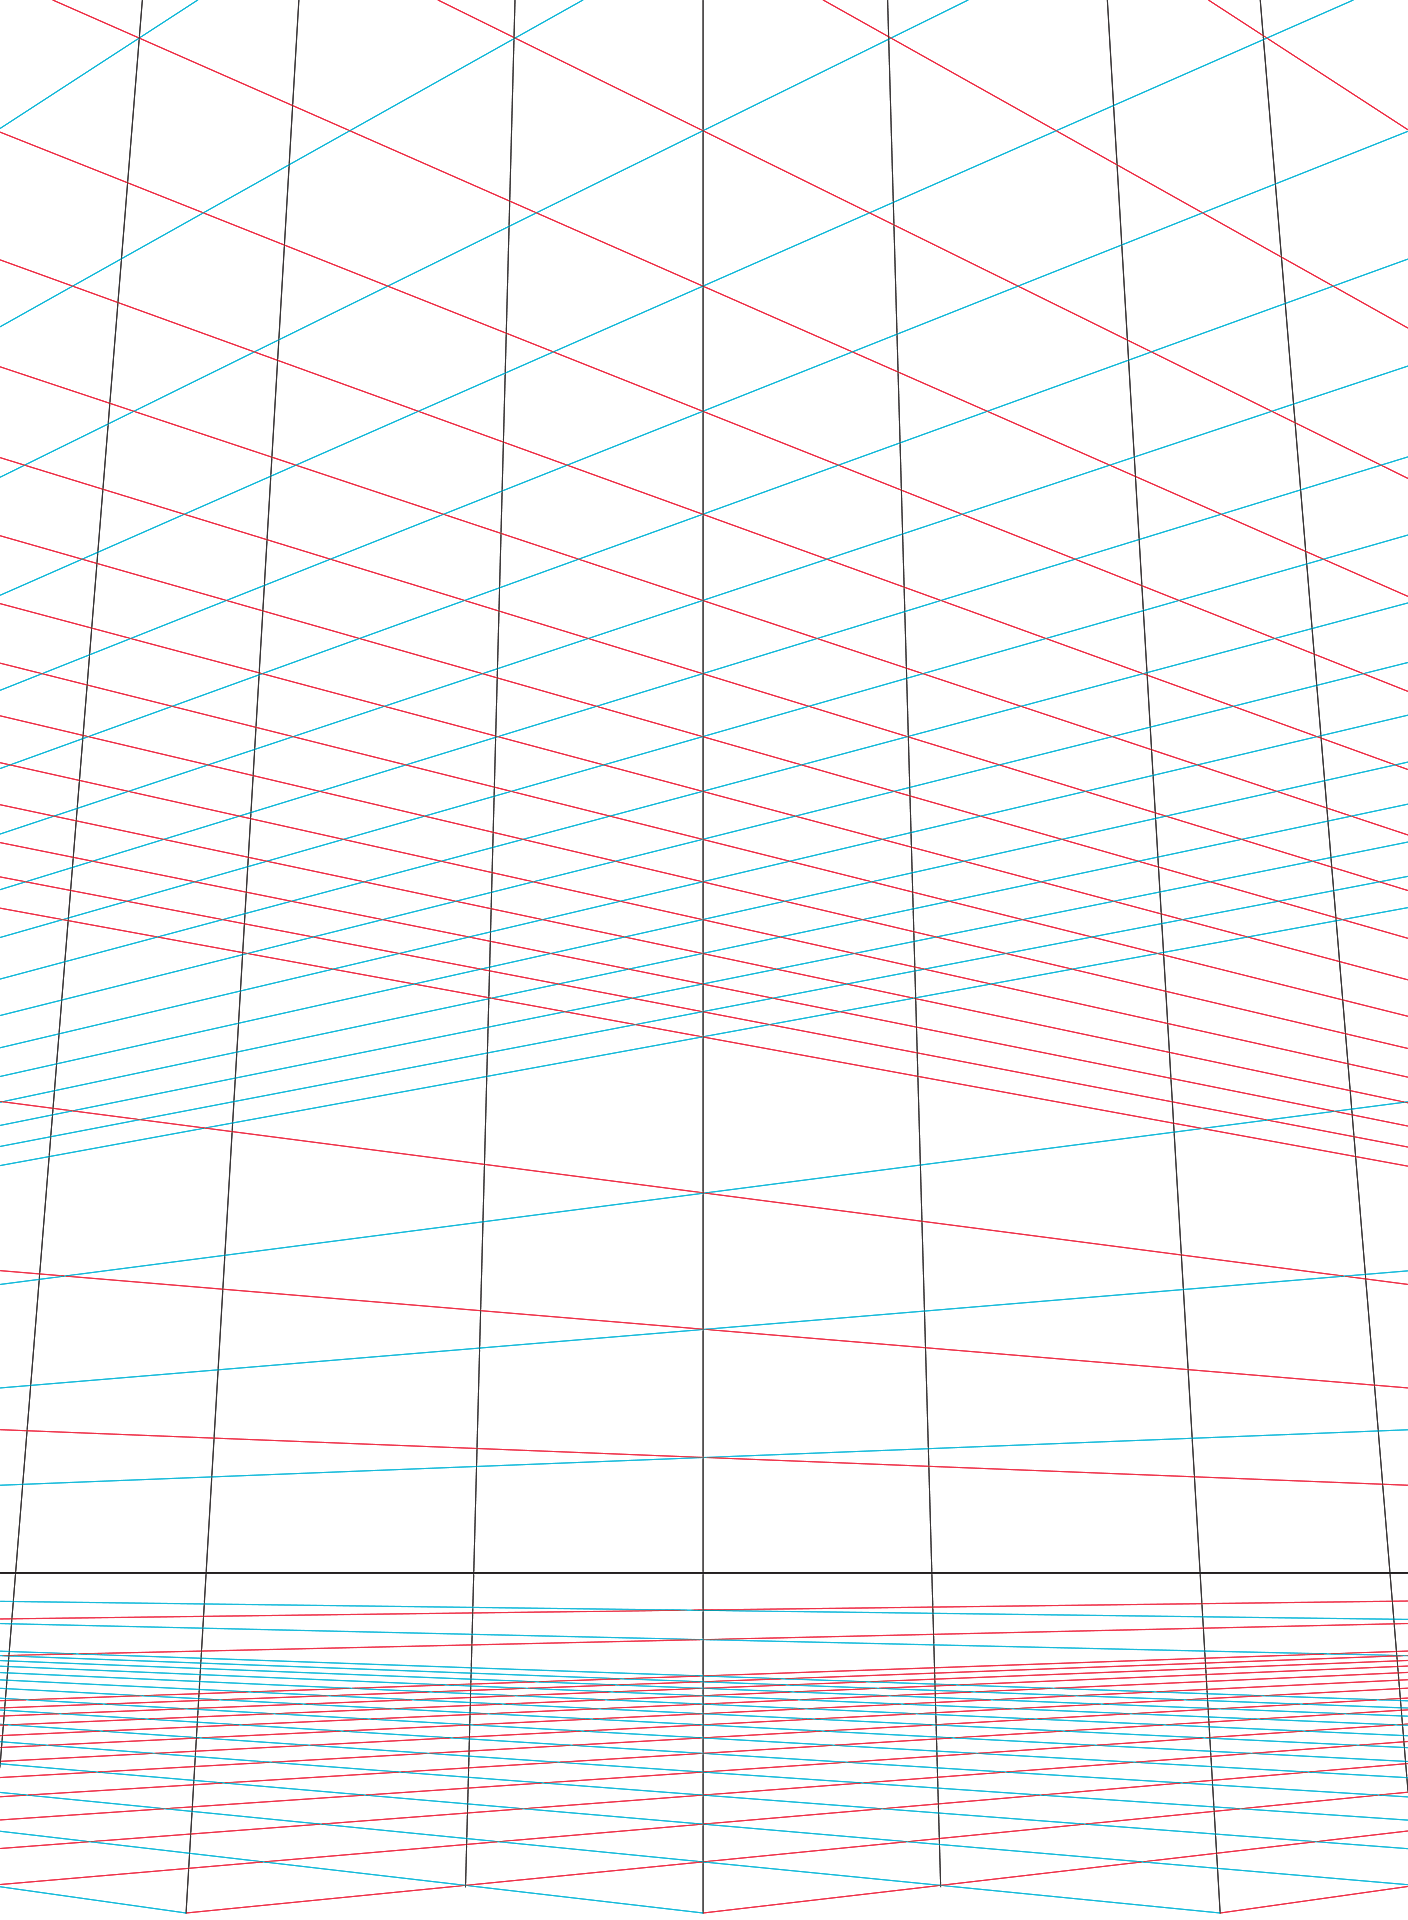
Hi friends,
I have thought that these wonderful png perspective templates would be quite useful for the members.
I did downloaded them from "Sculptingman" in the Procreate forum. They fit wonderfully in the screeen as a "template-layer" and you can then start working on another layer on top, and manzge to create wonderful things using either the pen, the shapes or whatever. The only thing is that when using the shapes, you will have to turn them into curves tro be able to adapt them to the perspective lines.
Hope you will enjoy them and use them!!
Rosa

-
This is the way I did. it I wished to add some stars and heart shapes to a selected head mannequin. Well. I chosed o used vectorial shapes of the left bar tools. They then, get on top of the head. You get then different layers on top of the original shape. In your case you may have just a round shape. Then I made them a child of he shape laye and rasterized them, so that any shape, in your case a round vectorial shape can be turned into a pixel selection with the classical marching ants on it, Well....once you have your shape with the pixel shape on it, you have o click into the oriiginal shape land this will keep the selection on it...you then, using the eraser brush, just take away the contain that is inside the sound selection This will leave a hole or a shaped hole on it, Beware that the selection is on the shape and not on the outside.
I hope to have helped a bitI guess you may do it in other different way. I have used this and it worked Once you have the shaped holes, you can delete the other layers ha contained the rasterized shapes.
Greetingd from Bilbao Sp.ain.
Rosa
-
Hope this will fit the purpose.....
The work is just a trial about a possible composition. There are the layes used and thre shapes I wish to soften in the outlines.
Thanks.
Rosa
-
Thanks a lot..
I am afraid I do nor know how to do it.....I do not know if it has to be with sone special format, using some other special transferring app. or simply uploading a jpeg file,
One of the members told me how to record a screen image but affinity told me that it was too big. i may try to reducing the size of the composition just to see if it does let me do it,,lI am a bit lost,
In fact I know how to do this all blurring thing, you have t old me bfore, but it does not work, It should work as in photoshop for I have dobe it a thousand times...but it may be my fault too,
I should tell you, too, that each time I try to use to selection shrinking controls, they are really so dificult to manage with the mouse that I had to to do ti with ny wacom pencil. But whenever I ty to do it usei the figures and push the apply button, the selection does not move at all, I have to do it with the wacom pencil, again,
Thanks a lot for y our help...It is embarrasing ti ask for help so m any times...and for the same i ssue!!!!!
Warm greetings for you,
Rosa
-
Hi friends,
As I have writen before, I am not able to blurr the shrinked outline of a selcted image, applying the blurring effect.
I do not give up.l I have tried a new way.....and that is using the blurring brush on the outside of the previously, shrinked selection. The effect that I have got is the same, though seems to be a longer action doing it, the brush does affect only in the way that I wish as prime goal,
Meanwhile...the developpers can see if what I am in need can be worked out,
I must day that I keep on working with the app, being now a proud customer of it,
Thanks a lot. You are a good team.
Rosa.
-
-
I have found this tutorial really great. I think that is possible to "translate it" into Affinity Photo language so far as you may understand the concepts of layers, and so far. Try to do it and follow the steps not intimidating yourself with the words, but rather "visuallizing" what is it that you are really doing. The effect at last will depend much on what kind of "brush" shape you are using. So you may experiment with the brushes, their shape and way of changing then and editing the way they act. They are versatil in this way.
You will tell how how it has been going with the expeeriment!!!
Good luck!
Rosa
(glup...sorry....I have tried to post down the link and it seem not to work here) I paste it and...nothing appears. How is it supposed to be linked this message with YouTube then?...can you guess?
-
What do you mean by "desintegration effect.? A sort of a broken glass, with the surface spoitted away in many pieces?
I find that it is a really advanced effect for someone that has not worked with photoshop. Ignore where you understand the way this apps are working specially with layers, masking and selections, If you do not know these basis then, you may try to learn from scratch, just to get the basical knowledge,
I have done some composition with this splitting off images, and I did "broke" the shape 8nwanted with the pen tool. Each piece then, created a new layer so you can move them around and place then with the right perspective, shadow effect, drop shadowing, or even a movement blurring, Once you have edited a piece of the splitting, you can copy of the effects or styles and copy then down into the other ones. A strong blurred movement will give you a sort of. explossion effect and a nice use of overlayed gradients will increase the dramatic effect. You must be sure about choosing some special slice of the overall image or wether you wish to split the whole one, So always reserve the original image as a background layer and work. on copied ones that will be on top of it.
then you can make the original invisible clicking on the right button and work with the one on top. If you do not suceed...well..you can send it to the paper basket and re.copy again the background one,
Hope I may have been a little useful for you. Is good to learn and good to wish to do things that at first are a bit out of your "wits" with the tool, but I am sure you will learn soon,
Greetings from Bilbao, Spain.
Rosa
-
Hi friends,
Now that I have purchased the Affiniy Photo Inhad dreamed that this one of my former questions would be answered by the working of the app. ut I am desappointed for is not.
I am longing to get the selection outline being softened by a slight blurring, but as much as I repeat the action, select-shrink-invert selection-apply blurring....the result is that the blurring does affect the whole shape and. not the outline that is outside of the "marching ants"
I have followed a moderator's instructions or tips and the hing does happen again and again,
Can anyone have tried to do this action and succeed?
I would appreciiate, again a bit of. help in this, Is important for my conpositions and though I coulld refine the outlines with Photoshop...mmmm....the thing is to get ride of it as much as possible...you see.
Thank you so much in advance.
Rosa
-
Hi friends,
Just announcing that I have purchased Affinity Photo and hope to have made the best investment with it. I wrote some question yesterday about me no being able to use the "edit in AD or in APH" tool. As I figured out, once that the purchase has been effective, the tool is ready to be used, right now.
I will be in contact as I will investigate and practice with the app and have the same confidense that you have granted me when any help is needed from you all,
I wish myself a "bon voyage"!!!! in this Affinity Photo adventure.
Greetings from Bilbao, Spain.
Rosa
-
Hi friends,
I have tried to edit a APH composition in AD and the button is simply not working either in the app or in the bea. . I thought it eas quite simple for that is what I had seen in one of the Vimeo tutorials, but I wonder why it is not working in the Beta. Could that being the reason that it is a beta anf not the definitive app.?
Am I doing something wrong, or I just do not know how must be done?
Thanks in afvance for your aleays great help.
Rosa
-
Thanks a lot.
I think I understand it though not absolutely. I belive that the best way to get the real point of it is using is and trying to follow your explanation as it is happening. There are some specifications to make clear, When you are saying about a path of 20 points are you meaning pixels? I get a bit confused by this word or using of word, "point". Otherways I think you have given me a good explanation of everything, I will try it, for I understand the thing of turning a shape into curves pretty well and use it mostly all the time, so I do not see any problem in trying this "expanding function" with the paths. Now made clear that when you draw a path, is almost the same as a shape with a potential for being "Expanded", that is using the nodes for changing its aspect....is that it?
Thanks a lot for your so valuable help.
Greetings from Bilbao,Spain.
Rosa
-
Hi friends,
The question is a simple one,
¿what is the exact meaning and function of the tool "expand stroke" and its capabilities?
I have never understood it though Inhave received some bold explanations about it.
It must be a challenge to make menunderstand!!!!
Thanks a lot for your valuable help.
Rosa
-
Thanks a lot,
You mean a jpeg file exported out from the aph composition?
Will do it, Though if you wish I may wait until you get back from Spain, for tomorrow is already Saturday...Meanwhile I can work with more compositions and study the app beta with more detail It is well probable that a new update will come for the next week, as things are going now,..so it may be that nothing wrong will happen in the next ones. Each updating seems to have its own "soul"
Have a real good time and we will "see" after your vacations.
You have done a real greate job as a moderator, It has been very nice to have met you,
Rosa
-
Thank you so, so much.
I hope you will have the best of your time at Mazarrón. . A bit hot is there I guess....but, well...soaked into the Mediterranean Sea...nothing is really hot.
I will wait for your checking out!
Greetings..
Rosa
-
Hi.
I have had not problems in recording the screen with Quick Time Player, but I am not been able to post it in here because it is huge in size. Is there any way to low the weight of the screening? I could not see it in Quick Time anyway. Well...I may try the loading service but just in case you won´t be able to see what is happening.
Thank you so much. You cannot imagine how much I have learnt with your help, today.
Rosa
-
Thank you so much.
This is what I have done.
I have exported my Affinity Photo composition as a psd file, in order to see if those problems that I had seen were still there. They are still there.
So I am sending you two files. One has been corrected into the right image the one I had created...and this is of course the named "mandgoreducide psd"...and the other is the one that has been exported directly from Affinity.
You can see there, the errors I have found and the way the things are showing.
I thank you very much for your help.
I may try the screen recorder, specially for you chek what the problems I do find now in my Affinity PHoto composition after having exported it to psa file.mangoreducido.psd
Rosa
(should I record the screen of the Affinity PHhoto composition?)mangopruebaaffinity.psd
-
Thank you so much
I would not mind linking the file but the problem is that I do not know how to do it. What kind of file should I link. ? and how would the link be donein order you could get all the actions in the image? I have seen that some people do screen their works in here,mbut I do not know how to do it. Could you help me with thqt, please?
Thank you in advqnce for your attention and help.
I will keep on awaiting for your news.
Rossa
-
Hi friends.
I have just updated the my APH beta. Well..it seems that this is being done almost every week now.
Then, I have decided to see how my composition done in Affinity Photo would result in Photoshop.
It has received admittance as a multilayered composition, but I had to change the place of some of them, and looked for the blending modes again for in some layers they had lost the original one. Somehow the image , properly re-organized in its layers, was more or less the same as in Affinity. Hope that if I wish to do some extra re-touching in the same one I will not have problems.
But then, as I returned to my Affinity Photo image, I tried to add something. Let´s say, an extra square form that was to appear behind some object as a "particular" shadow effect...and all the think simply was corrupted. It broke the image in white rectangular shapes and could not do it at all. Besides I became aware that some layers had lost their effects little icons, and though the effect, (bevel) was still in the image I could not longer edited to change it or delete it.....Bug!!!!!!
For your acknowledgement....I had already done two more compositions, and I guess had been done with the previous Betas. They have not been admitted as separate layers by the Photoshop edition....for the system simple has told me that "something strange and alien was going on in the layers". I suppose that the last updated, has fixed that.
Meanwhile I am a it puzzled by the problems that has come out in my composition.
May be you could inform me about it a bit more...wether someone has reported something likely..or well..what is happening.
Thank you so much
Rosa
-
Really elegant and an efficient graphism...too. Love it.
Rosa
-
So......!!!!
The result is incredibly bautiful, realistic, intimate....and eatable! Amazing result. I love it, The next could be the conplete friednegg and with "lace" on it ,(sorry that is the way we fry eggs in Spain...je, je)
Rosa
-
Sorry MEB.
I am not able to obtain any good result following your instructions. When I have my selected object and get to end of it, the whole one is blurrred instead of the outline. Besides I have found that it is extrremely difficult to manage the shriking tool. And that if I write the figure I wish to do it typing it, nothing happens.
I hope that this will be mended in a while, for I am really interested in purchasing the tool, but as I have been working for years with this action in my Photoshop compositions, it is somehow disappointing. Read that you have deleted the feathering tool of the "perfectioning selection tool" in the last be AP update. So I am not been able to test that either. Is it going to be rejected in the final one..or aqre you looking for something better?
Please...what kind of image would you need for cheking it out? Is is a jpej or so, and what size would I post?
Thank you so very much.
Rosa
Thanks a lot in advance.


Affinity Designer Free Resource Pack
in Resources
Posted
Thank you very much for your generous shaering. I have downloaded the whole pack and find it is really useful and really nice to have them.
Rosa