Rolbrecht
-
Posts
47 -
Joined
-
Last visited
Everything posted by Rolbrecht
-
Problem with images without color profile
Rolbrecht replied to Verso Fab's topic in V1 Bugs found on Windows
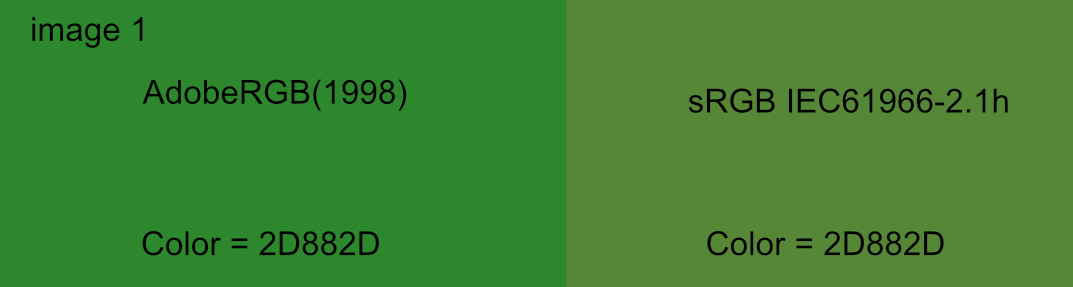
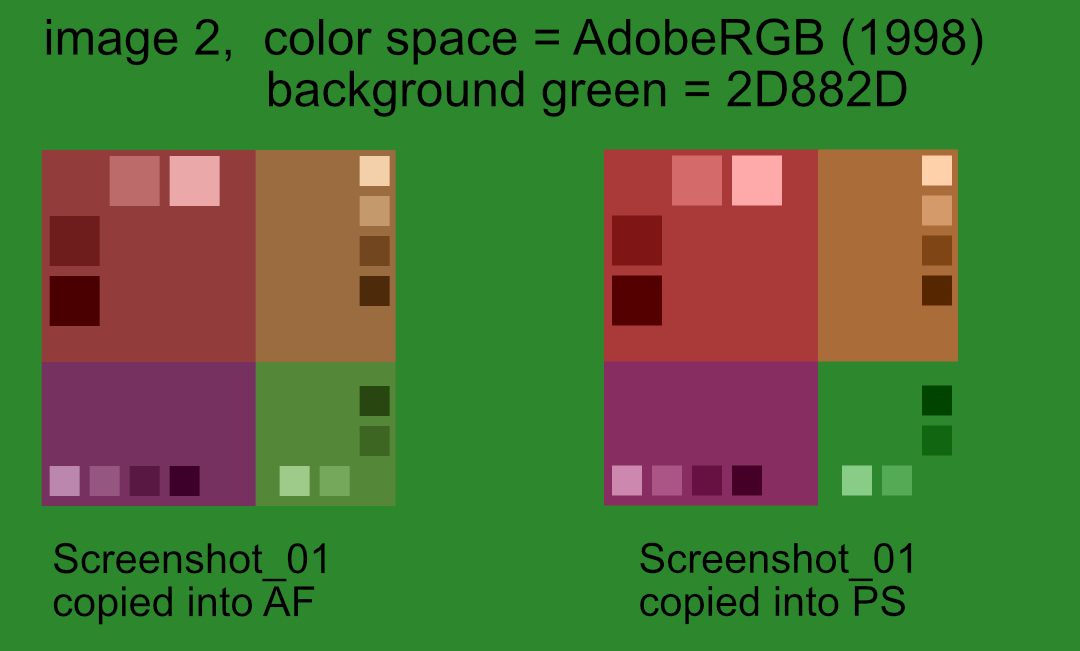
I guess I found the explanation what is happening with un-tagged (un-profiled) images: - AF assigns only colors of the sRGB IEC61966-2.1 color space to un-tagged images. - PS and other programs, e.g. Xnview assign colors of a wider color space, I guess AdobeRGB(1998) to un-tagged images. Reasoning: A. Image 1 shows the same color 2d882d in sRGB61966-2.1 (right) and AdobeRGB(81998) (left). Obviously, 2d882d is outside the gamut of sRGB. Changes in AF's Color Preferences, “Rendering intend” have no effect. B. An image with AdobeRGB(1998) color space was created in AF and PS and filled with color 2d882d. C. A copy was made from the Internet www.paletton.com color theme and was pasted into the AF and PS files (image 2). D. Image 2 shows the summarized result. AF only considers the sRGB color space for un-tagged files. Otherwise, the green should melt with the background color, like PS does. Proposal If this is not a bug, I definitely propose that AF assigns at least the working color space to un-tagged files. Or even better, AF allows to assign a selectable color space to un-tagged images as PS does. By the way, AF closed unexpectedly three times when creating the demo-images.
-
Problem with images without color profile
Rolbrecht replied to Verso Fab's topic in V1 Bugs found on Windows
The calibration/ICC profile I just generated newly with the x-rite device and I guess it is OK. Intrestingly, when I save the "desaturated" image with AF, AF attaches a profile and this image looks then in Xnview just the same. Also "desaturated". Maybe there is a problem with the graphics card (RTX2060S). I changed the driver without any effect. Anyhow, thank's for your feedback. -
Problem with images without color profile
Rolbrecht replied to Verso Fab's topic in V1 Bugs found on Windows
Thank you for your feedback. I checked the link and read the information carefully, but couldn’t find a difference to what I am doing to calibrate my system. Maybe I still overlook something. Attached are two pictures showing what I stated above. (Verso Fab, April 16 demonstrates a similar color difference.) To produce the pictures, the Internet Paletton.com color theme was copied, saved as un-profiled file and opened in AF. In the first picture, the calibrated ICC-Profile (CW243W…) is enabled (box “Eigene Einstellungen….” is checked) -> AF displays the color theme differently than the Browser (left) or Xnview (right). In the picture underneath, the Standard Window profile is used (box “Eigene Einstellungen….” is un-checked). -> The color theme is shown on all programs the same. Obviously, Xnview can handle un-profiled files in a way, so that they appear like the original (left) even if the system uses a calibrated ICC-profile (first picture).
-
Problem with images without color profile
Rolbrecht replied to Verso Fab's topic in V1 Bugs found on Windows
Hi everyone, I found the topic with un-profiled pictures, e.g. from mobile phones or copies from the internet, is bigger than expected. A problem arises when calibrated monitors are used. I am a Windows user and just address the situation there: In Windows under Color Management it can be checked “use my settings for this device”. When this box is checked Windows uses the custom calibrated color profile. Unchecked, Windows uses its own profile (WCS). 1. When WCS profile is used (“use my settings for this device” = unchecked) un-profiled pictures look the same with all programs, e.g. AF, Browsers, Xnview, … 2. When “use my settings for this device” = checked (WCS = OFF and calibrated profiles are used) un-profiled pictures look OK on Browsers and Xnview, but flat (insufficient saturation, contrast, color shift) in AF or Photoshop. Consequences: A customer wants an un-profiled photo, e.g. from a mobile phone, to be enhanced. Of cause I use a calibrated monitor and load the photo into AF, where it appears flat. Colors, saturation, … are adjusted and while saving the photo a profile is attached. As long as the customer uses a calibrated monitor its fine. However, if he uses a non-calibrated monitor (mostly the case) the photo appears, e.g. too saturated. The photo will also appear too saturated on the Internet, independent, if the monitor is calibrated or not. Solution: I don’t know what color management Microsoft is using so that un-profiled pictures appear the same with all kinds of programs, like AF, PS, Xnview, Browsers. Would it be possible to provide some kind of LUT that could be enabled or disabled when an un-profiled picture is introduced into AF? Or the LUT could be automatically added as a separate layer? -
23.12.2020 After switching back to Win10 2004 (see below), reinstalling the latest graphic drivers I found that AP 1.8.5.703 was running stable again. At least the tests of opening 2 tiffs, copying, editing them and making some editings on a big file (5.2 GB) went through well. Thus, currently I hesitate to install Win10 20H2 again.
-
Hi in the meantime I was also following the post "Crashing constantly" and it looks that is the same problem. I implemented the proposed change to the studio driver version 442.92. After that I couldn't get AP to crash anymore. However, a message that the Nvidia System Control can't be found appears after starting up the PC. Until now I didn't install that control. Hopefully, it has no effect on my PC performance. The 2 files I mentioned above didn't lead to a crash either. Keeping an old driver version can't be the long term answer. So I checked the release notes of the 1.9 Beta. It looks promising. When I find time, I will install that version and go back to the latest Nvidia driver. I will let you know.
-
Hi, 1. on opening 2 files AP closes automatically. AP can be relaunched without rebooting the PC. -> see video "AP_Crash_on_file_open.mp4". AP closes unexpectedly on editing work as well. That happens randomly, so I have no video. It could be that these effects occur with the last Windows update. (see picture). 2. After trying again to open the files, it works. However, when copying the background layer from one file and pasting it into the other, the copying process takes about 27 s. -> video "AP_Crash_on_file_open_02.mp4". PC data: CPU: Ryzen R9 3900X RAM: 64 GB C:\ : SSD Samsung 980 Pro, 1 TB AP_Crash_on_file_open.mp4 AP_Crash_on_File_open_02.jpg.mp4
-
I am sorry, for not responding earlier. I was heavily working on none-Affinity related topics and missed your questions. Now my answers. - When using save as the file size varied between 3.2 GB and 5.8 GB. Depending on the number of levels kept. - I relaunched the .aphoto file added a Stamp (ctrl+alt+shft+e) and saved it. At the beginning the file size was 5.2 GB. After the save it is 6.7 GB. Picture ..._05 showes the %appdata%\Affinity\Photo\1.0\temp folder. - Picture ..._04 shows the RAM limit. Hint: I experience little problems, when I open a large file, make little changes and save it. The problem seem to occur after a lot of editing work (creating, deleting, merging,... layers) before saving. The first indication is, that the icons of the layers remain black.
-
Yes, I have Win 10, 2004 and had no issues with it. When I work on lower file sizes I never experienced save problems. In the meantime I finished the job and using only Save as... So I could go back to a successfully saved version and not losing all work. Currently, I rather tend to installing Win 10 20H2 instead of a rollback. My impression is, that the way AP creates and manages its history could cause the problem. Is there a possibility to switch the "History Cycle Feature" off? With large files >= 1.5 GB the update of the histogram or the layer icons stops relatively fast after several editings without saving in-between. And after that, saving may become critical. Thanks for your caring.
-
During testing certain AP behavior I found the following: When editing the file Panno_03.afphoto for a certain time, AP stopps updating the Histogram or the Scopes or the Layer icons. A save will revive AP. I added several layer to the picture and could save the file successfully. It gained a size of 11 GB. After that I deleted the additional layers and did some Levels / Curves editing. Then I saved the file again and it was truncated (damaged, as I stated at the beginning). The attached video shows the process. Interestingly, the HDD was accessed a short period of time as well. I don't understand that because the Panno_03.afphoto is only on V:\. Directly after the Save I could do a Save as.. successfully. AP_truncates_file_on_save.mp4
-
@Alain: During the save process my screen showed the sharp part of the image (zoomed in). After the save process (no data written on any disk) AP was partially frozen. However I could zoom out, revealing the blurred part of the picture. I don't see that there is a rendering issue. @Dan: - All disk are internally. Actually, now I am using two SSDs (C:\ and V:\), both on the mainboard via M.2 slots. - I moved the Panno_03.afphoto file from D:\ to V:\. D:\ is idle. (In that constellation the partial freeze occurred) I don't dare to use the Save command and just always use Save as.. - I didn't try to store the Panno_03.afphoto on C:\. C:\ is reserved for programms only. Do you want me to try it anyway?
-
Now it happened again. I did a Save as... The file was saved at least correctly but then AP partially froze. No activity on any drive anymore. After several minutes I closed AP and couldn't relaunched it again. I had to restart the PC. See the attached movie file that shows the partial freeze. AP_freezing_on_save_as.mp4
-
Thanks for responding. - I am using only NTFS (GPT) on all disks. - Free space on C:\ is 320 GB. I also replaced D:\ with an SSD with 200 GB free space (both SSDs use NVMe protocoll). When only using SSDs I experienced a freeze of AP during saving (I used "Save as..."). I had to kill it. However, the file was saved correctly. I also reduced the number of Undo Limit to 30. I have the suspicion it has something to do with the "Cycle Feature" of the history. So I try to avoid it, what is not easy. Since then (today) the save process went through, meaning, I use only save as.
-
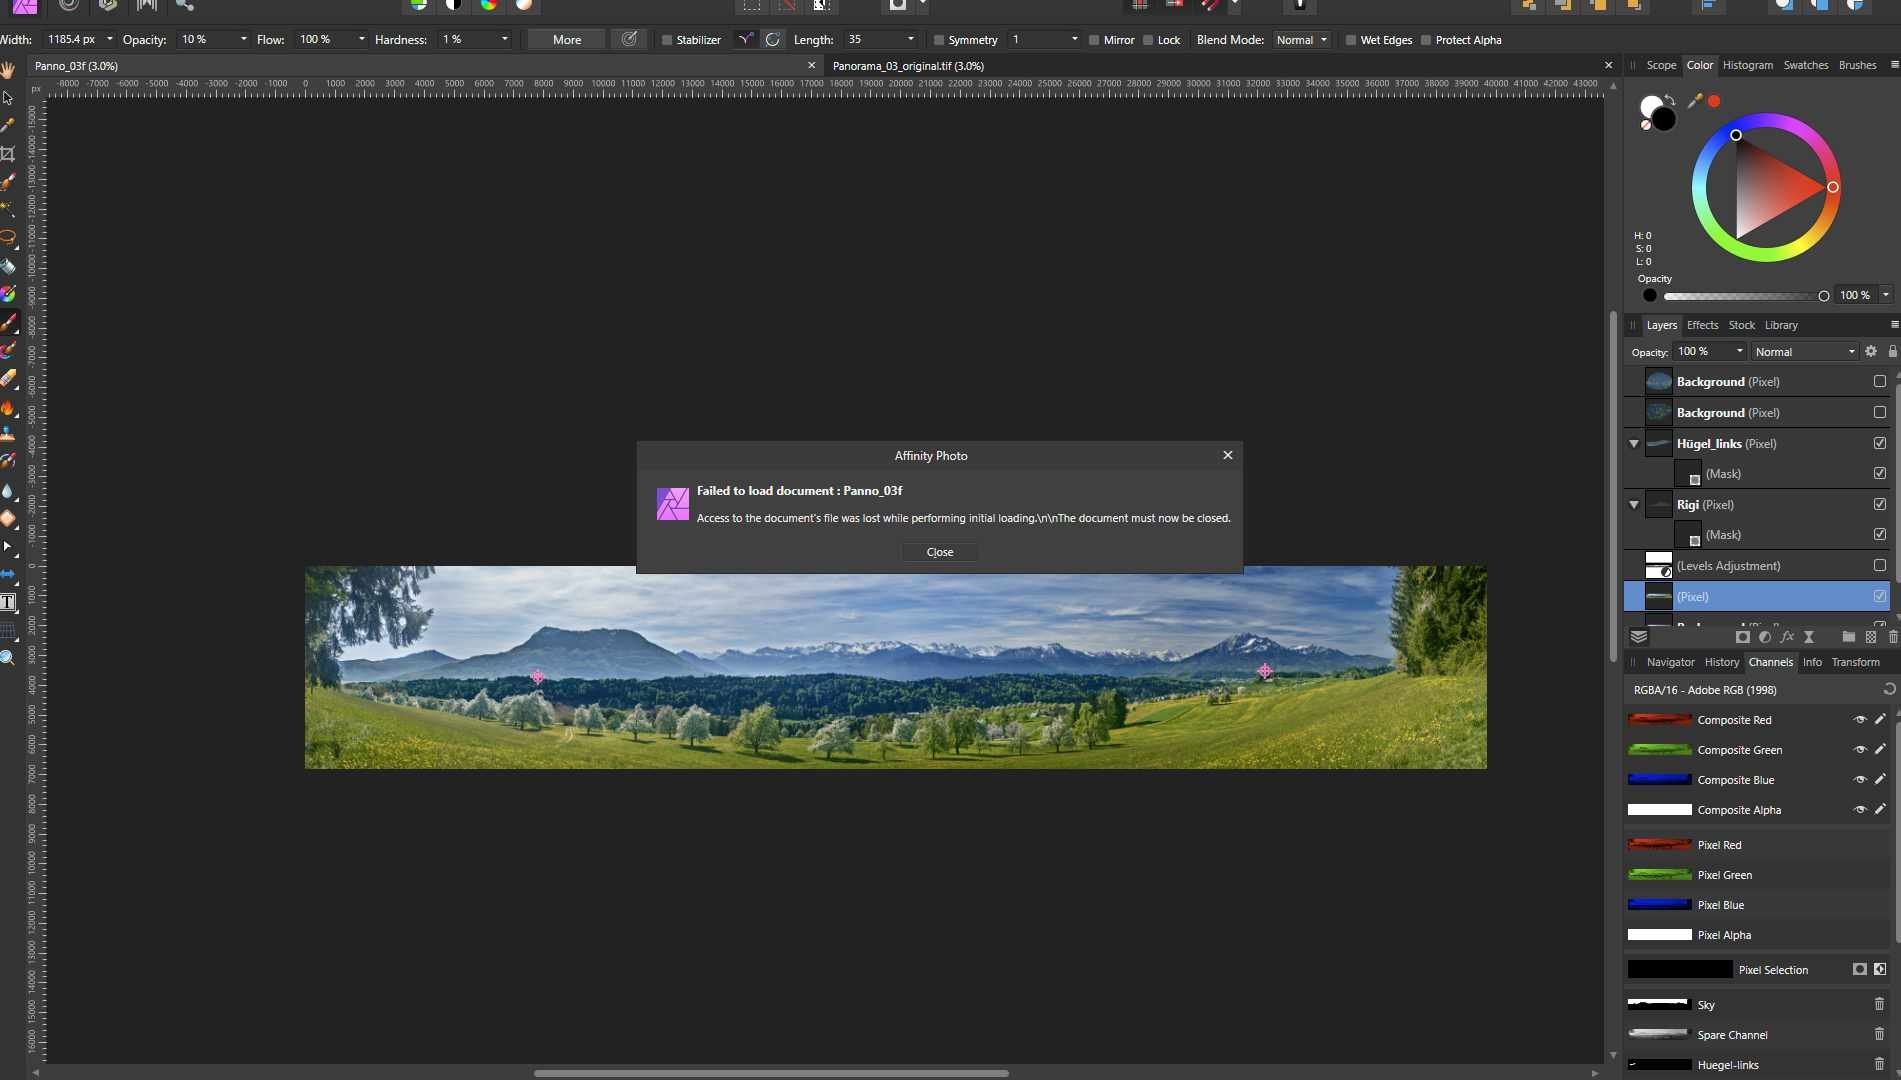
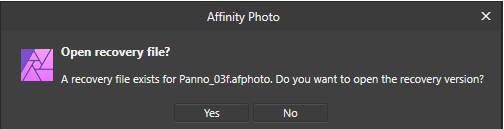
Hello, I am working on large files (40’000 px x 6’800 px, 5.8 GB) and during the safe process an error message is created and the file can’t be saved. Actually, the file is destroyed and not only the last working session is lost but all work of the days before!! And this happened now the third time!! Details: - Computer: CPU: R9 3900X, RAM: 64 GB, C:\: fast SSD 500 GB, D:\: HDD 1 TB, Graphic: RTX2060S - AP: version 1.8.5.783 - File location on D:\ - Windows 10, 2004 During the save process AP writes first to D:\, then to C:\ and again to D:\. During the last write process something seems to go wrong. The error message "Failed to load ..." occurs. After trying to load the file that is now on D:\, AP asks to open a recovery file, but fails to do so -> message 3. Any advice?
-
@R C-RHm – the principle with both methods is to increase the contrast so that the selection tools can work better. Roughly we discuss these two methods: A) To increase the contrast on the image (copy) first and make than the selection. B) or to make first the selection and increase than the contrast and repeat the selection. In both methods a separate layer is created to work on. In A) it is a copy of the image, in B) it is a black and white created pixel layer. (A few steps are needed to create it.) For me, the Levels Adjustment Layer is the main tool to increase the contrast by pulling in the Black and White Levels and adjust Gamma. Good for method A) and B). With the Black & White Adjustment Layer the Red, Green and Blue channels can be addressed more individually. However, it looks as if noise is added. Alternatively, only the best (with the most even contrast) Composite Channel is selected and only Level Adjustments are applied. OK. It makes a difference what type of selection tool is used. When one color is dominant and there are high contrast edges in an image the Flood Selection tool is good, e.g. the sky in the attached image (Test_picture). When the forest in the middle section shall be selected, the Selection Brush tool with the Refine tool work better for me. Usually, I use method B) because the black & white pixel layer shows directly the quality of the final selection. Test_picture.tiff
-
@firstdefence Ok. Thanks.
-
Have fun and good luck!
-
I never used that brush before. Interesting. I can imagine using that brush on certain sections of an image, where fine details have a low variance. Thanks. As you seem to be familiar with brushes, allow me a different question: When I am working with an .e.g 30% white brush on a fully black mask, with any new brush stroke going over a previous brush stroke the intensity increases over 30 % within the intersection. Is there a type of brush where the maximum intensity remains at 30% no matter how often a new stroke is applied to the same area? (Shall I open a new post for that question?)
-
Yes, that is a similar approach with the difference that I make the selection first and create from that selection a black & white pixel layer (matte) where I can fine tune this matte with the available tools. This way around I can see how my fine tuning is affecting the matte. I tried both ways and didn’t find a major difference. Actually, I had the impression that the Refine tool works better on the original image. I guess that is, because any change to an image is reducing details. The black & white adjustment layer is a good hint. Thanks.
-
Separating blond hair from a white background is even more challenging because a soft transition is needed to nicely blend the hair into a different background. I know of no tool (also not in Photoshop) that can do that separation in one step. My recommendation: 1. Select the hair with the Selection Brush and refine it with the Refine Tool. Use the black and white matte to show the mask. Ensure to keep sufficient detail (selection is not perfect). 2. Create a Spare Channel from that selection -> delete the selection. 3. Create a new Pixel layer -> fill it with black 4. Load the selection from the spare channel -> fill the selection on the pixel layer with white -> deselect the selection. (Now a matte is available, where Level Adjustment layers, dodge and burn and blur tools can be used to further improve the matte. 5. When satisfied -> Merge down all used adjustment layers (if any) -> Ctrl+Alt+LMB on the pixel layer (to make a pixel selection). 6. Copy the hair on a new layer (Ctrl+j) -> move it above the desired background. (The hair transition areas may not look satisfying.) 7. Protect the background (transparent) pixels of the new hair layer (switch off Composite Alpha). 8. Use Clone tool with Current Layer & below to copy from the hair and / or background into the transition area to achieve an optimal transition. 9. Delete unwanted layers, spare channel and swith on composite alpha. I hope I covered all steps.
-
Yes I did. It works to a certain extent. However, I found, it is necessary to select areas and work on them separately. Doing all these selections and cleaning them up is a time consuming work. I am familiar with doing this in Photoshop, and I found a way doing it in AP as well, but much more complex. So I tried to ease the workflow with Macros. But I can't get the workflow to run with Macros. (Macros are too restricted.) As I learned the hard way, that AP works differently than Photoshop, and I am not an expert on AP, I started this post.
-
Yes, I agree. And the workflow I am using includes many steps, also "hiding" the hard edges. How would you propose to create the ragged edged brush in picture one (top) for the lower forest, section 4 (lowest picture)?
-
The approach with the pen tool or the polygonal lasso tool I am familiar with. However, the shown picture is just a fraction of the real panorama and using these tools would take to much time. The approach with the textured brush, I don't fully understand. What kind of texture would it be? Would that be a fixed texture? How is that texture linked to the edge of the forest in the picture? The edge may not only be a forest. Another edge is the mountain tops to the sky (It is a panorama of the Alpes).
-
I checked it out. Thank you very much.
-
Oh. Actually, with the "Clean selection" search I find now even more posts. But with "Rolbrecht" search only one. Thanks for your support. Rolbrecht