Search the Community
Showing results for tags 'rmap-27'.
Found 2 results
-
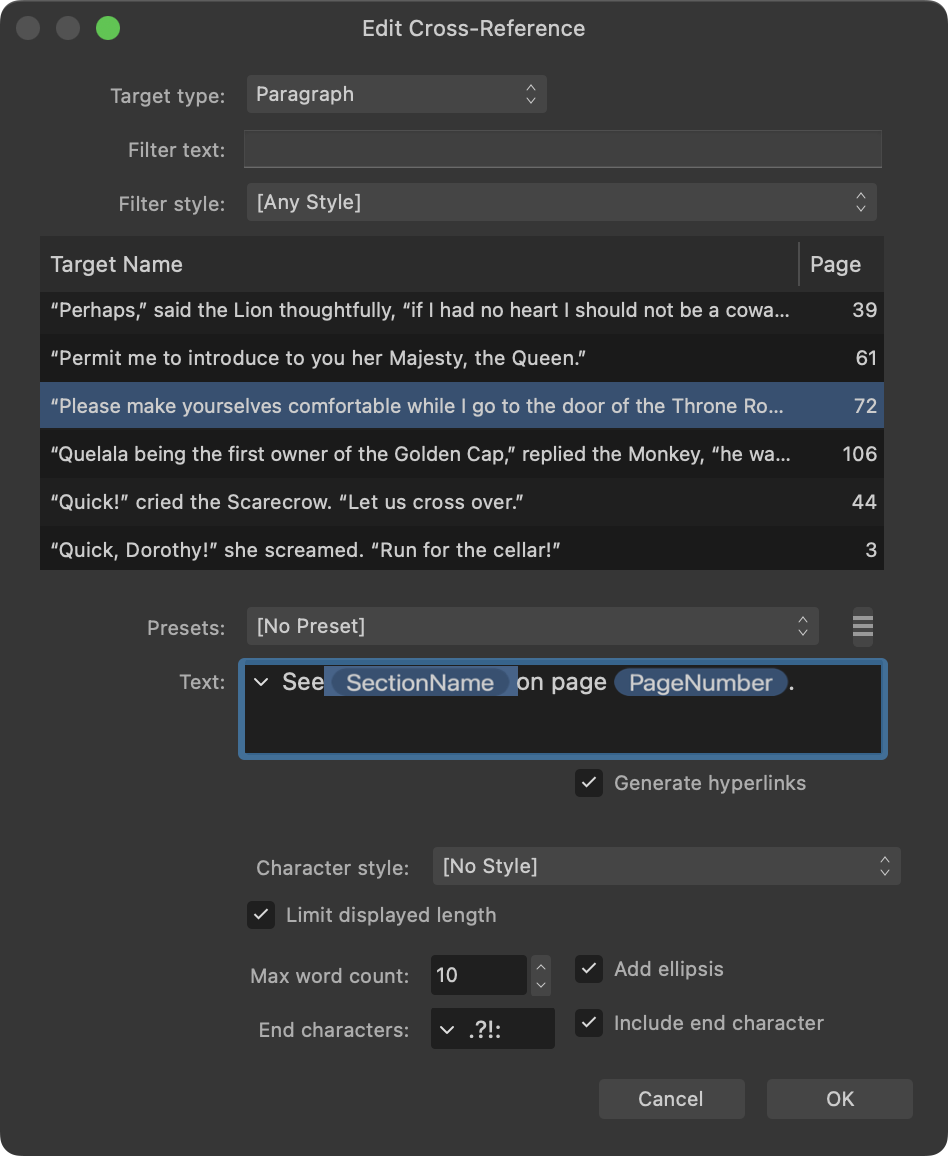
Apps: Affinity Publisher Platforms: All The ability to insert cross-references from one part of a document to another—for example, "For more information, see page 24"—has been added to Affinity Publisher. Cross-references are managed on the Cross-References Panel (Window > References > Cross-References). To insert a cross-reference, create an insertion point in a text object, and then click 'Insert Cross-Reference' (the circled plus symbol) at the lower-right of the panel. Inserting a cross-reference is also available from the right click menu when you are editing text. On the resulting dialog: - Select the cross-reference's target, which can be an existing anchor, paragraph or index marker. - Specify the text to be displayed by the cross-reference. - Optionally, apply formatting and limit the amount of quoted text displayed by any field you've inserted into the display text. Selecting a target Use the upper part of the dialog to select a target. Choose the target's type (Anchor, Paragraph, or Index Marker) and then select the required target in the list below. If too many targets are listed, use the Filter text and Filter style options to limit what's listed based on target text and/or paragraph style. Specifying what a cross-reference displays The Text option specifies what your cross-reference will display This can be a simple attribute of the target, such as its page number or quoted text, or you can enter complete phrasing into the box, e.g. "For further information, see 'Deciduous varieties' on page 264". Click the downward-pointing arrow at the field's upper-left corner to insert an attribute of the target or a commonly used special character. Using presets Phrases can be saved as presets for use across all your documents. Presets also ensure your cross-references adhere to a publication's style guides. Fields in cross-references are automatically hyperlinked to their target when you export to PDF. Limiting quoted text Character style and other formatting options in the lower part of the dialog become available when the insertion point is immediately before or after a field, or when a text selection encompasses a field. (If more than one field is selected, the formatting options affect only the first one.) The Page Number, Above/Below and List/Note Number fields display the corresponding attribute's value in full. All other fields display text that might be lengthy, such as a full paragraph. Use the 'Limit displayed length' option to restrict them to a sensible amount of text. Quoted text can be limited to a number of words or the first instance of an 'end character', whichever occurs soonest. You can also choose whether to include an ellipsis or encountered end character in your cross-reference. More about the Cross-References panel When you insert a cross-reference to a paragraph, Affinity Publisher creates an anchor at the paragraph's start and uses that as the target. You can rename the anchor, if you wish, via the Anchors Panel. The Source Spread option allows you to narrow the scope of cross-references listed on the panel, e.g. to the current spread or a specific spread. With the insertion point at a cross-reference or target in document text, options at the foot of the panel allow you to instantly focus the document view on its counterpart. Finally, changes to a document may result in out-of-date values in cross-references. For example, changing pagination, section names, or paragraph text at a target. The foot of the panel also includes options to update them individually or all at once. We would love you to try out this new feature. Let us know what you think of it, or if you encounter any bugs or unexpected results.

-
Apps: Affinity PublisherPlatforms: Windows and macOS Cross-references are a field inserted into text that refers to another object or piece of text. If the current document is a chapter of a book, cross-references can refer to objects or text from other chapters. You can insert a cross-reference by using Text > Cross References > Insert Cross-Reference, or by using the right-click menu on text. If a cross-reference is already selected, these options change to Edit Cross-Reference instead. Either way brings up a panel to set the cross-reference properties. The first group of properties are about the target of the cross-reference. This can either be an existing anchor, or a text paragraph. (If you cross-reference to a paragraph, it will automatically create an anchor at the start of the paragraph.) The second group of properties are about how the cross-reference will be displayed. These include as the target page number, section name, and the content of paragraphs. By using several cross-reference fields you can build up text like, “See footnote 2 on page 12, below”. The Window > References > Cross-References menu option will display a Studio panel that lists the cross-references from the current document. From here you can go to the cross-reference itself, or its target. (This will open other book chapters if necessary.) You can also update cross-reference text from here — they don’t update automatically. Settings > Cross-References has options for controlling the text used for showing relative positions “above” and “below” (these will use the language of the text they are in rather than the UI, for support of bilingual documents).
- 66 replies
-
- 21
-

-

-
- rmap-27
- cross references
- (and 1 more)