Our response time is longer than usual currently. We're working to answer users as quickly as possible and thank you for your continued patience.
Search the Community
Showing results for tags 'python3'.
Found 5 results
-
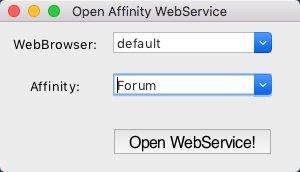
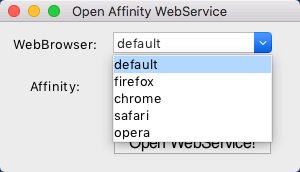
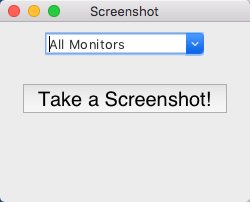
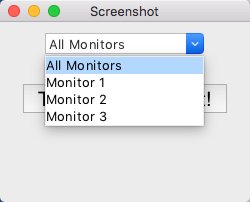
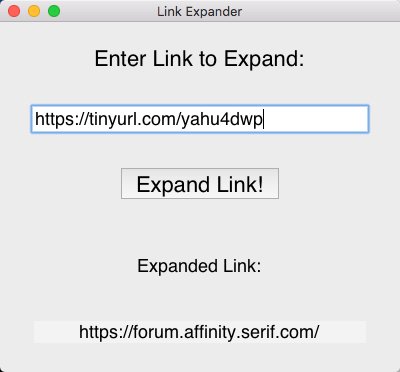
The "Forum helper tools" is a collection of little Python scripts for different tasks, which maybe useful here for the one or other forum user. -------------------- affwebservice -------------------- Let's start with a little script I've called affwebservice.py which can open some of the common Affinity WebServices, like this Forum, the Affinity Online Help system, or Affinity YouTube channel etc. inside your web browser. Usage & Download: > python3 affwebservice.py affwebservice.py ------------------ screenshot ---------------------- Next here's a little script for making screenshots of your desktop monitors, as default it takes a screenshot from over all your connected monitors, but you can also explicitely select from which monitor (supports 3 monitors so far) to take a screenshot from. A taken screenshot will be placed in your users home directory with a filename of "~/screenshot.png". If there's already a previous screencapture file, that one will be renamed to "~/screenshot.png.old". I've called this one simply screenshot.py, NOTE that this script makes use of the python "mss" module, which you have to install into your python distro in order to make use of it. Usage & Download: > pip install mss > python3 screenshot.py screenshot.py ------------------ shortlink & expandlink ---------------------- Next we have shortlink.py and it's counterpart expandlink.py, which can be used to generate and/or expand TinyUrl links for usage in the forum here. Usage & Download: > pip install pyshorteners > python3 shortlink.py > python3 expandlink.py shortlink.py expandlink.py ------------------ wiki - wikipedia ---------------------- Next we have wiki.py which can be used to search for some explanations on wikipedia. Usage & Download: > pip install wikipedia > python3 wiki.py wiki.py ------------------ spell checker ---------------------- Then we have spell.py a very simple spell checker for correcting maybe wrong written (spelled) words. Usage & Download: > pip install textblob > python3 spell.py spell.py -------------------- translator ---------------------- Next there is translator.py which uses the Google Translate engine for performing language translations. Usage & Download: > pip install textblob > pip install googletrans > python3 spell.py translator.py ------------------ TO BE CONTINUED ----------------------

- 29 replies
-
- 2
-

-
- forum
- helper tools
- (and 2 more)
-
 Here's the afthumbsGUI.py Python3 script which can be used to extract PNG thumbnail images out of Affinity files. This afthumbsGUI.py script is a slightly enhanced GUI version of my CLI based afthumbs.py script. In this GUI version one has to specify (open) a supported Affinity file (see below) and an output directory path, afterwards to press the "EXTRACT THUMB IMAGES!" button in order to extract any possible thumb images (PNGs) from the given Affinity file. When a thumb image is found and written out, it will be then displayed in a popup window, as a sort of visual indication of a written out thumb image. Here's a little screencast of how the GUI of afthumbsGUI.py looks like and how it is intended to be used ... afthumbsgui_video.mp4 In it's actual state afthumbsGUI.py can open and extract PNG thumb images out of Affinity Designer-/Photo-/Publisher- & Affinity Template files. The script is written in an OS crossplatform manner and thus should run under MacOS/Linux/Windows, as far as Python 3 environment is installed and available on the specific platform. This script doesn't use any third party Python modules and uses just what does already come along as default with a common Python 3 installment. afthumbsGUI.py can be started the common via Python way from a cmd shell/terminal ... MacOS/Linux: Windows: Alternatively afthumbsGUI.py can also be renamed and provided with execution rights, so it can be startet like a program/application on a certain OS ... MacOS/Linux: Windows: Here's the afthumbsGUI.py Python3 script for download: afthumbsGUI.py Have fun!
 -
Here's another Python3 script whatFileType.py which can be helpful in situations, where some files don't have file extensions, or where you maybe can't trust a files initial shown file extension (...like an binary image file download without extension etc.). So this little whatFileType.py Python 3 script does basically here what the Unix file cmd, or some services like what file is do, it tells you what sort of file it is. BTW this script can also tell if some binary file is an Affinity file. The actual supported and recognized file signatures are: BMP, JPG, GIF, PNG, TIFF, PSD, PDF, WEBP, AFFINITY, EPS, RTF, HDR, EXR ... which are mostly those file formats Affinity apps export or save to. The whatFileType.py script can be called either by passing over some file as an argument directly ... ... or in an interacting mode just like this ... In cases where some file type is unrecognized (thus not supported yet) the script tells you ... Here's the whatFileType.py Python3 script for download: whatFileType.py Have fun!
- 9 replies
-
- 2
-

-
-
- affinity file check
- what file type is it
- (and 3 more)
-
Here's a afthumbs.py Python3 script which can be used to extract PNG thumbnail images out of Affinity files. The afthumbs.py script can be called either by passing over a Affinity file as argument directly ... ... or in an interacting mode just like this ... If the script does find a PNG thumb image it will extract it and write it into a pngs/ directory! Here's the afthumbs.py Python3 script for download: afthumbs.py Have fun!
-
- 4
-
-
-
- affinity
- thumbnails
- (and 3 more)
-
The following thinapp.py Python 3 script can be used on macOS systems to thin the multi-architecture Affinity apps (the FAT binaries, containing "x86_64" and "arm64" architectures) to the one only specific architecture just required by the particular Mac platform ("x86_64" or "arm64"). This will reclaim some disk space. Important prerequisites in order to make use of the thinapp.py Python script: Python 3 is installed on your MacOS system MacOS lipo from the Xcode development CLI tools is installed and can be find under /usr/bin/lipo ...or... an alternative GO based lipo from https://github.com/konoui/lipo/ A working file command is available and can be find under /usr/bin/file In order to check for the needed prerequisites, you can perform a corresponding which command execution in Terminal.app: > which python3 /Library/Frameworks/Python.framework/Versions/3.10/bin/python3 > which lipo /usr/bin/lipo > which file /usr/bin/file If all of the above prerequisites are met, you can execute the thinapp.py Python 3 script in Terminal.app like this to get a short help overview... If you apply execution rights to the thinapp.py Python 3 script, via "chmod +x thinapp.py" in Terminal.app, then you can also execute the script via it's filename directly just by calling it, aka thinapp.py or thinapp.py -h . For the -arch option argument supported architectures are x86_64 or arm64, in order to thin an app to an just Intel or Arm platform specific app only here! Now in order to thin let's say Affinity Designer.app to contain just the Intel "x86_64" architecture and thus to strip out the "arm64" architecture from it's FAT binary app, you would call thinapp.py this way ... ... which in turn would then create a duplicate copy of "Affinity Designer.app" under the by the -o option as argument given file path "/Users/<yourusername>/tmp" and then process to thin it there under the "/Users/<yourusername>/tmp/Affinity Designer.app" file path. The as -arch option given x86_64 argument tells thinapp.py to keep just that x86_64 architecture, meaning that the arm64 architecture will be stripped out of the FAT binary app. After the script has finished it's work, you can compare the ADe sizes under "/Applications/Affinity Designer.app" and "/Users/<yourusername>/tmp/Affinity Designer.app" in order to see how much space has been reclaimed due to the architecture thinning process. Next you can start the thinned app from "/Users/<yourusername>/tmp/Affinity Designer.app" in order to see if it operates well. - If all is fine, you can remove the initial "/Applications/Affinity Designer.app" and replace it with the thinned one from "/Users/<yourusername>/tmp/Affinity Designer.app" (... so exchanging the initial with the thinned app). What you can expect from thinning the V1 apps of ADe, APh and APub size wise is ... ADe v1 = initially ~2.59 GB after thinning to x86_64 it has then ~1.69 GB APh v1 = initially ~2.65 GB after thinning to x86_64 it has then ~1.71 GB APub v1 = initially ~2.60 GB after thinning to x86_64 it has then ~1.65 GB Here's the thinapp.py Python 3 script: thinapp.py <-- has been updated! And as always, have fun!
- 4 replies
-
- 3
-
-
-
- macos
- affinity apps
- (and 7 more)