Search the Community
Showing results for tags '2.3.1.2217'.
Found 5 results
-
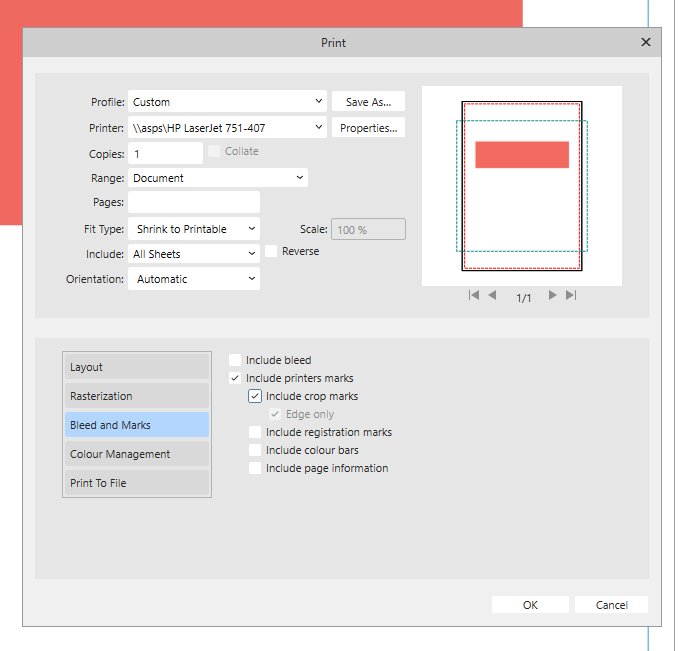
 Maybe already reported, can't find it. 1. Create A3 document. 2. Print on A4 paper with Fit Type "Shrink to Printable". 3. Add "Include crop marks". Result: The preview indicates, that the crop marks are outside the paper and they are indeed not on the paper when printed. If something does not fit to a paper this will be normally shown with a red area. Printer was Color Laserjet M751. See attached image.
-
APu crashes while learning or ignoring words. But there seems to be a difference. If I jump to the word from Preflight to a "misspelled" word and try to learn / ignore with a rightclick I don't get the options and the app crashes. If I rightclick the word directly - without Preflight - I get the options for learning and ignoring. Crash report attached. a927335d-3f92-433d-8469-e2ec9e2277fe.dmp
-
At work I open a lot of PDF files having tables inside. Unfortunately these tables are not really tables when you open them and here is Serif not to blame. Maybe Serif proves me wrong, but here is what I strongly believe: 1) Open a PDF with 300 dpi (you can test this with the attached one) with options as you like. 2) Create a table in this document. 3) Select a word with the text cursor and drag it into a table cell. Result: The dragged word in the table cell is now with a factor of about 4,17 smaller than the orginal word. Divide 300 by 4,17 and the result would be about 72. MY conclusion: The opened PDF is somewhere "flagged" by APu to be treated as a 300 dpi, but the content is still 72 dpi. This could be the explanation why linking text frames in opened PDF lead to different font sizes in different text frames. wotever.pdf
-
Strange title ... 1) Create a red rectangle. 2) Add a B&W adjustment with Red -75%, which turns the red rectangle black. 3) Create a new Layer and move the adjustment into it and keep it selected. 4) Add this Layer to Assets from selection. 5) Delete the already existing Layer on the page and drag the new asset onto the document. Result: The red rectangle is not turned black. Workaround: Move the adjustment out of the Layer. EDIT: A dummy icon for such an asset would be nice, right now it is blank, shown as list you see at least the name otherwise you have to hover the blank for the name of the asset.
-
I guess this has been discussed en detail, but I cannot find a solution ... if there is any. Makes me wonder why it is inconsistent anyway. 1) Add a BW adjustment (top) to a "normal" page with a coloured box covering page and bleed. Result: The BW adjustment is applied to the complete box including bleed area. 2) Add a BW adjustment (top) to a Master Page. Add to the normal page a coloured box covering page and bleed. Result: Nothing happens on the normal page. To make it "work" with an adjustment on a Master Page: 3) Add a Layer on the Master Page and the adjustment inside. Add to the normal page a coloured box covering page and bleed. Result: Now the adjustment is applied to the coloured box covering the page but NOT the bleed.