Don - NZ
-
Posts
31 -
Joined
-
Last visited
Everything posted by Don - NZ
-
Hi Walt OK and thanks Walt. Blocking duplicates would explain it. I was trying to recreate my Photoshop Bevels style sets and hadn't noticed that the rejected styles were duplicates except for the Photoshop "Technique" options (of Smooth, Chisel Hard & Chisel Soft) that Affinity doesn't offer.
-
1) Currently appears to be limited to five user styles per category. Suggest removing the limit. 2) Also suggest allowing Style Categories to be listed in an expanding/collapsing tree structure. Allow dragging categories into a folder tree structure (PS Example) Eg: Don's Styles Bevels Drop Shadows Rather than being all mixed up on the same level with whatever defaults Affinity offers (Affinity Sample) Eg: Bevels Default (Offered as standard by Affinity) Don's Styles Drop Shadows.

-
Very impressed with demo videos on Luminar4 especially the new features like AI Skin Enhancer, AI Portrait Enhancer, AI Sky replacement and AI Structure. I live in hope that Affinity V2 will include similar interfaces, especially the AI Skin Enhancer and AI Portrait Enhancer. Keep up the good work guys. https://skylum.com/luminar-l4?utm_expid=.rdtPQvZ1R1SU5G6kNcdS-A.0&utm_referrer=
-
psd stroked layer misaligned in Beta V1.7
Don - NZ replied to Don - NZ's topic in [ARCHIVE] Photo beta on Windows threads
Hi Sean Sorry for the delay, but the computer room suffered a water leak in the ceiling yesterday. I have played around with this some more and it seems to me that it arises when a program has to decide how to map an image pixels to that of the screen dpi. If you push the magnification high enough, then all three programs start to introduce a gray line of pixels somewhere on a stroke or outline - usually on the inside of the stroke/outline (but not always) as they make a decision about how to handle an image pixel to screen dpi relationship (that is not an exact match). Even PS starts to show this around the 1400% magnification. Just when and where this appears, appears to depend partly on the screen resolution (mine is 2560x1400), the on-screen magnification and someone's decision on how to map image pixels to screen dpi. I doubt we will ever get to the bottom of this, it is just unfortunate that whilst Ver1.6 doesn't exhibit it at my combination of settings and normal viewing levels, Beta 1.7 does. I guess the real answer is to simply create any stroking or outlining again in the final program and just be thankful that Affinity has done such a good job otherwise in opening psds. Please consider it closed and we will see what the final release does. (PS How did you get the yellow and magenta chequering up)? -
Hello Chris Embarrassed - I can't repeat it today - everything is now behaving as it does in Ver1.6 (being able to nominate the layer required), yet the other day, I was getting blocked every time I tried to record a macro and select the top layer and the one below it. They are the same two images, so there must have been something unusual that occurred to trigger the behaviour but so far I can't think what. Please consider the issue closed until I come across it again.
-
The attached psd file opens correctly in Affinity Ver 1.6, but in Beta V1.7, the second layer (black stroked) is shifted one pixel to the right and one pixel down. (None of the other layers in the original were visibly affected). Interestingly, if even just this one layer is consolidated (Shift,Ctrl,Alt & E) into a new top layer in Photoshop, then Affinity Beta V1.7 displays it correctly aligned. I have attached the Birthday Card consolidated.psd file. If you open this in Ver1.7 and switch the top (consolidated) layer on and off, you will see the affect of the incorrect shift in the stroked layer. If Ver 1.6 can handle this correctly, then so should Ver 1.7. Birthday Card consolidated.psd
-
Hi Steday The problem with a batch job is that it only exports, it does not work the photos over as well. PS allows me to write a macro that: Put a new layer at the top Compress everything into it (Shift, Ctrl, Alt & E) Stroke it with a red border Expand the background slightly (to stop Apple from over-zooming image on iPad) Nominate the expansion background colour Save the file to a specific folder, nominating jpg & quality Close the original psd without saving the changes I then run the macro as a batch job in Adobe Bridge and only have to load the photos once. Affinity 1.6 does 1,2,3,4 &7. It does allow me to add an extra layer immediately below the compressed layer and fill that with black (as a workaround to point 5). Affinity 1.7 Beta appears to no longer allows me to do even point 1, nor the Ver 1.6 workaround to point 5. Completely stymied at this stage, unless I have missed something. In Affinity1.6, at best, I would have to load the images twice, once for tweaking the appearance and size (1,2,3,4,5 &7) with a macro and once more as a batch to export them. You can do anything when there are only a few pictures, but with a thousand to do.... I should perhaps add that the photos have to be selected, not every photo in a folder qualifies for the same macro. I do in fact have several macros, a landscape orientated picture, a portrait orientated picture, a no stroking required option and one where no resizing is required as they fall into Apple's recognised photo ratios and are not over-zoomed.
-
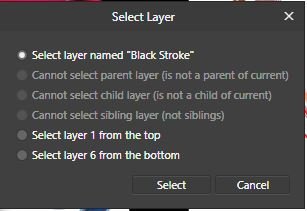
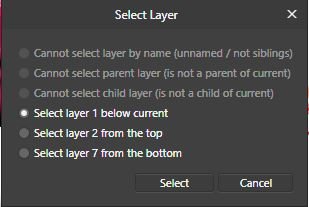
In Ver1.6, I could select the top layer and Affinity would seek confirmation that I wanted to "Select layer 1from top" [1st jpg]. I could then add a pixel layer above that, consolidate all the layers, then outline it by 5 pixels and fill that inwards (creating a red stroked edge). I could then expand the canvas (which unfortunately left a white expansion instead of the required black - another required enhancement). However I could get around that by then adding a new pixel layer directly below the top (consolidated and stroked) layer using "Select layer 1 below current" [2nd jpg] and fill that with black. In Ver1.7 , I am blocked from accessing the top layer [3rd jpg]. After clicking on the various layers, the best I can finally find is an option that allows me to select the parent layer - but that doesn't seem to allow me to achieve what I could above. Not sure what you are trying to achieve, but you have completely blocked my requirements and what is currently working just fine for me in Ver 1.6.
-
Please allow us to set the canvas extension colour - with defaults for black, white, foreground, background and custom colours. I was able to work around this even in a macro, but it would have been so much simpler just to be able to tick, say, black in a dialogue box.
-
Hi Chris - I also ran up against this and downloaded 1.7 to no avail, in case more work had been done. Your Macros did what I needed until I came up against the fact that they can't record an export. With a thousand pictures to run through the macro and out to export/save as, I was forced to revert to using that other program. Please extend macros to include export/save/save as functionality.
-
Add Smart Guides to Affinity Photo
Don - NZ replied to Don - NZ's topic in Feedback for Affinity Photo V1 on Desktop
Hello Walt I have had a play with the snapping manager and the arrange button and neither comes even close to what PS is doing. The snap manager is the equivalent tool but I couldn't get any combination to do anything even close to what PS 2019 is doing by default. I guess you really need to see PS smart guides in action - it is almost uncanny how they got it exactly right (for me anyway). Snap manager simply needs to be reworked - (it is like version 1.6 versus version 20) - which is surprising as when Affinity Photo include functionality, they invariably seem to do things better. ------------------------------- Hello Walt - bit of an update... I now realise that these are called Dynamic guides in Affinity and whilst they are quite crude in Ver 1.6, after playing around with Ver 1.7, I have found that they have already been extensively reworked in the beta and are now the equivalent of what is in PS 2019. My only suggestion now would be that the green and red lines (indicating alignment with something on either the x or the Y axis) can be somewhat hard to see. PS uses a very easily seen colour and I would like to be able to define the colour in Affinity, perhaps to something like R255,G0,B255 - which does not normally exist in one's photos! -
Just came across these in PS CC2019 and they are particularly brilliant for aligning text labels on several photos within a canvas (and, indeed, even tweaking the alignment of various sub-pictures and shapes). Yes, I drag out guidelines to align several pictures on a canvas, but these take it a (big) step further and appear only when required.
-
Stacks
Don - NZ replied to Don - NZ's topic in Pre-V2 Archive of Affinity on Desktop Questions (macOS and Windows)
Yes, I see that and thanks, but I wanted something that used, and, if necessary, created thumbnails as soon as you introduced it to a folder, not after opening and saving each photo. All sorted now. -
Stacks
Don - NZ replied to Don - NZ's topic in Pre-V2 Archive of Affinity on Desktop Questions (macOS and Windows)
Thanks for that and I have bookmarked it. However SageThumbs has settled down after a reinstall. -
Stacks
Don - NZ replied to Don - NZ's topic in Pre-V2 Archive of Affinity on Desktop Questions (macOS and Windows)
Hi Walt Unfortunately, I couldn't find any other up to date codecs. Microsoft appears to have last updated (my) rw2 type in 2014 and no longer updates them. I tried some, like XnView shell extensions to no avail and took them off again. However, even better, after all my testing this morning I reinstated SageThumbs and for some strange reason, the portrait orientated jpgs now have the correct ratio and all these programs that make use of SageThumbs efforts now also display them correctly. I am now a very happy camper! -
Stacks
Don - NZ replied to Don - NZ's topic in Pre-V2 Archive of Affinity on Desktop Questions (macOS and Windows)
Truncated portrait jpgs I have now got to the bottom of this and the cause of the truncated jpgs lies outside of Affinity and with a program called SageThumbs that generates thumbnails for Windows Explorer in all sorts of formats that Microsoft can no longer be bothered generating, such as the various Raws (in my case, rw2), psd and afphoto. That is really great except that portrait orientated jpgs are shown with an incorrect 1:1 ratio even though the associated raw has the correct proportions. A few notes on my investigation follow: Programs such as Affinity Photo, Photoshop CC 2019, and Photoshop CS6 that do not bother to generate their own thumbnails, but use SageThumbs efforts, when using "File open" also display a thumbnail jpg with the incorrect proportions. If SageThumbs is not installed, they show thumbnails for jpgs, but can only show the program icon associated with the file type for Raw files - great effort Microsoft. Worst of all, programs like Adobe Lightroom Classic 2019 simply ignore these (wrong ratio 1:1) portrait orientated jpgs and display only the raw version. This can be corrected by going into preferences and making jpgs files to be separate from raw files (no sidecars) OR by removing SageThumbs. Photo Browser software (DAMS) like Adobe Bridge 2019 and XnViewMP that generate their own thumbnails show a jpg with the correct proportions and ignore SageThumbs's efforts. It would help if Microsoft had not stopped updating the Codec for Raws (in this case, RW2) - it was last done in 2014. On balance, I decided to “Untick jpg & raw file associations” in Lightroom classic 2019 and reinstate SageThumbs and hope that it gets fixed - it seems to be a simple fix for the developer. It also means that Affinity Photo "File open" will now display thumbnails of both jpgs AND raws - particularly important if you are not using something like the free Adobe Bridge 2019 or the free XnViewMP as photo browsers.
-
Gradients
Don - NZ replied to Don - NZ's topic in Pre-V2 Archive of Affinity on Desktop Questions (macOS and Windows)
Thanks RC-R The two column trick, the double click to bring up the colour chooser and the preference>keyboard shortcut were all useful new information. I have set alt+B to reset the colour panel to B&W. IMO, that shortcut, combined with the hard-coded transparency option puts this tool ahead of PS. :-) -
Gradients
Don - NZ replied to Don - NZ's topic in Pre-V2 Archive of Affinity on Desktop Questions (macOS and Windows)
TRC-R Thanks for the heads-up - I will play around with this some more tomorrow. I have since noticed the little icon offering an easy switch between transparency and a defaulted black - with another colour available from the colour picker tool. The icon only appears when colour or swatches studios are active and I was probably looking for it when these were not active. Duh! I still think that same icon should: Have a permanent little black option and a white option, each equivalent in size to the transparent dot option - Doing so would allow you to quickly switch between black, white, transparent and a custom colour. Better than PS. Be on display somewhere all the time. be able to activate the colour picker directly from this area - instead of going over to the far left of the screen to pick up the colour picker tool. -
Stacks
Don - NZ replied to Don - NZ's topic in Pre-V2 Archive of Affinity on Desktop Questions (macOS and Windows)
Hi firstdefence My Windows10 Explorer uses the third party product, SageThumbs to display an actual thumbnail (rather than just an icon of PS and IF files) and no, that particular program is also truncating the image. -
Stacks
Don - NZ replied to Don - NZ's topic in Pre-V2 Archive of Affinity on Desktop Questions (macOS and Windows)
Hi Firstdefence Thanks for the heads up. There are old posts that indicate that AF does not auto-blend. Is that still the case? These shots were handheld and not aligned that well, that may account for why the first two blend modes were terrible. Does the Blend If option work on a stack? - I couldn't see any effect no matter what layer I was on. -
Stacks
Don - NZ replied to Don - NZ's topic in Pre-V2 Archive of Affinity on Desktop Questions (macOS and Windows)
Hi Carl123 As far as I can see, this is just for the very first images from my new camera, a Lumix Gx9. Older portrait orientated images from a very old Olympus C770 and composited portrait orientated pictures made in PS all display correctly. Have a look at my other replies - there are quite a few inconsistencies with other programs, some display them okay, some truncate them and one even ignores them. Might well be a camera issue.... will investigate further tomorrow -
Stacks
Don - NZ replied to Don - NZ's topic in Pre-V2 Archive of Affinity on Desktop Questions (macOS and Windows)
Hello firstdefence Interesting question, not quite sure what to make of it yet - above my pay grade, but an Affinity program might know what data these programs have to choose from in order to display. Folder Browsing with: Adobe Bridge CC 2019 & XnViewMP - both display these portrait jpgs thumbnails correctly Folder Browsing with: Adobe Lightroom Classic 2019 - No display of these truncated portrait jpgs at all Folder Browsing with: SageThumbs, Adobe Lightroom CC 2019, Microsoft Paint 3D - All truncate these portrait jpgs File open with: AFPhotos, Adobe Photoshop CS6, Adobe Photoshop CC 2019 - All display a truncated portrait jpg To further confuse matters these are the first shots coming out of a new camera - A Lumix Gx9. I can see I need to investigate some further tomorrow, shooting with and without the JPG + Raw option. Will look over the EXIF data tomorrow as well. Thanks -
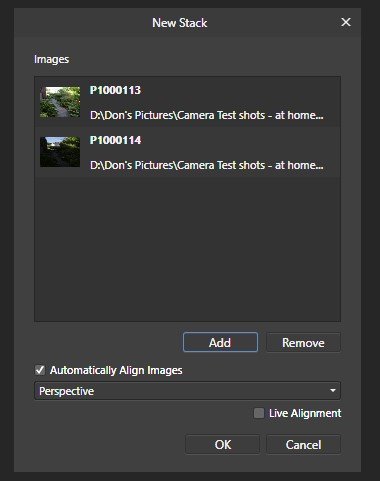
Stacks The window that opens up to select pictures is not showing portrait orientated JPGs correctly. They are clipped and are shown as landscape orientated photos. By contrast, the matching RW2 file is displayed correctly. (By the way, a nice touch to slightly grey out the raw files). See the ringed examples in the following screenshot compared to their raw version. Is this a bug or have I missed a trick? Portrait orientated photos also display incorrectly in the following window as well (Another bug?) They then open in a live stack group displayed on the layers studio - but rotated 90 degrees to the right (i.e. on their edge). Yet another bug? Or how do I fix this? The blend mode is set to “Passthrough” and if taken off that, that particular mode is not in the dropdown list of blend modes and can't be stepped back to. Not yet sure what Passthrough is nor how to actual blend the images together. What is Passthrough mode? Why is it not the "Normal" mode? I was then expecting to be able to blend the images together either automatically as in PS (or perhaps manually using the AF "blend ranges" function. However, although the “blend ranges” function is available it does not seem to work no matter which layer I am on). What have I missed? How do I stack and blend images automatically?
-
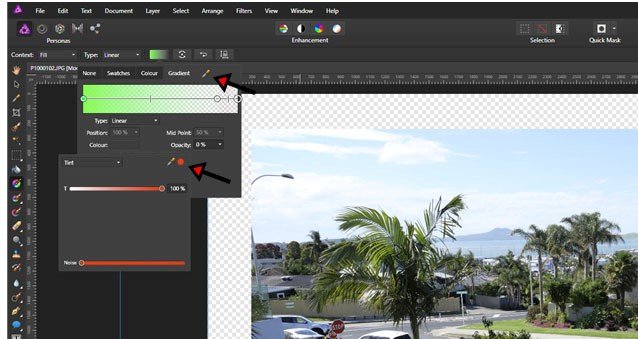
Gradients Very confusing area and not intuitive I solved a number of things eventually, but it is not intuitive, have I missed any other tricks? Saving Gradients You appear to have to save with the move tool active (not the gradient tool) or you will save a solid block of just one of the colours in the gradient. Thumbnail size Defaults to small – and the likely effect is all but impossible to see. I finally found where to adjust this and I suggest the default size should be large and possibly have one more even larger size. Thumbnail spacing Gradients and user gradients thumbnails also run together with no space between – which makes it even harder to evaluate what their effect will be just by looking at them. Colour Picker not intuitive In PS I often match the gradient to the photo by colour picking several colours from the photo. However with Affinity I can’t seem to do this because two of the colour pickers don’t seem to respond. Colour picked not displayed immediately When I pick a colour using the colour picker from the side bar, the colour chosen does not display anywhere and it is not until I go into the gradient, do I see what colour has been chosen, Affinity appears to need: Spacing between gradients & user gradients – let user define gap. Names are meaningless – let user turn off in studio settings. Save should be available from the gradient tool not the move tool. Colour pickers need to actually work – AND intuitively. Neither colour picker displayed here seems to work. Display the colour picked immediately and somewhere that is on display all the time – suggest on the side bar like PS. Offer an icon like PS that can flick between Black and White and a picked colour as follows. In this example, green is chosen, but white is easily available by clicking on it and black is obtained by clicking on the smaller black square and the black & white can be swapped by clicking on the double arrowhead. Background layer PS protects the background layer unless it has been reclassified. However Affinity is quite happy to plaster a gradient over the background layer (even when locked) and sooner or later a file is going to be saved before I realise that the original image has been destroyed. Nothing should touch the background layer (especially when it is locked). Is this a bug or have I missed something?