

lama555
-
Posts
14 -
Joined
-
Last visited
Posts posted by lama555
-
-
21 hours ago, R C-R said:
It is not clear what you mean by "the transparent layer." There is no transparent layer as such -- the checkerboard pattern is just how the Affinity (& several other apps) show empty parts of the document, like where on a pixel layer you have erased something & there is no layer behind it with anything that would be visible.
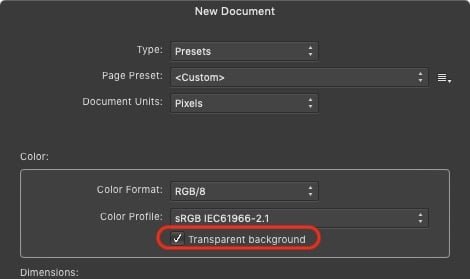
For example, if in AP you create a new document with the Transparent background option enabled, you will get an empty document with no layers & a checkerboard pattern showing you the width & height of the document.

So the only way to 'convert' a pixel layer to a completely transparent one would be to erase everything in it.
The above demonstration was exactly what I wanted to do, so thank you! Thanks for the selection tips as well.
I was able to get the image isolated by making a selection of the opaque only from the first doc and then starting a new doc with the transparent background and copying and pasting it. (Initially, I had used to background erase brush and that didn't do the trick to remove all the pixels when I tested the image against a black background) but its good now.
By the way, does Affinity happen to have a brush option that enhances colors or contrast. Kind of like Snapseed's option with the brush where you can apply it to change the exposure/temp/saturation in specific parts of the photo/image? If so, please let me know the name of the tool and I will look it up in help center.
Cheers
-
23 hours ago, h_d said:
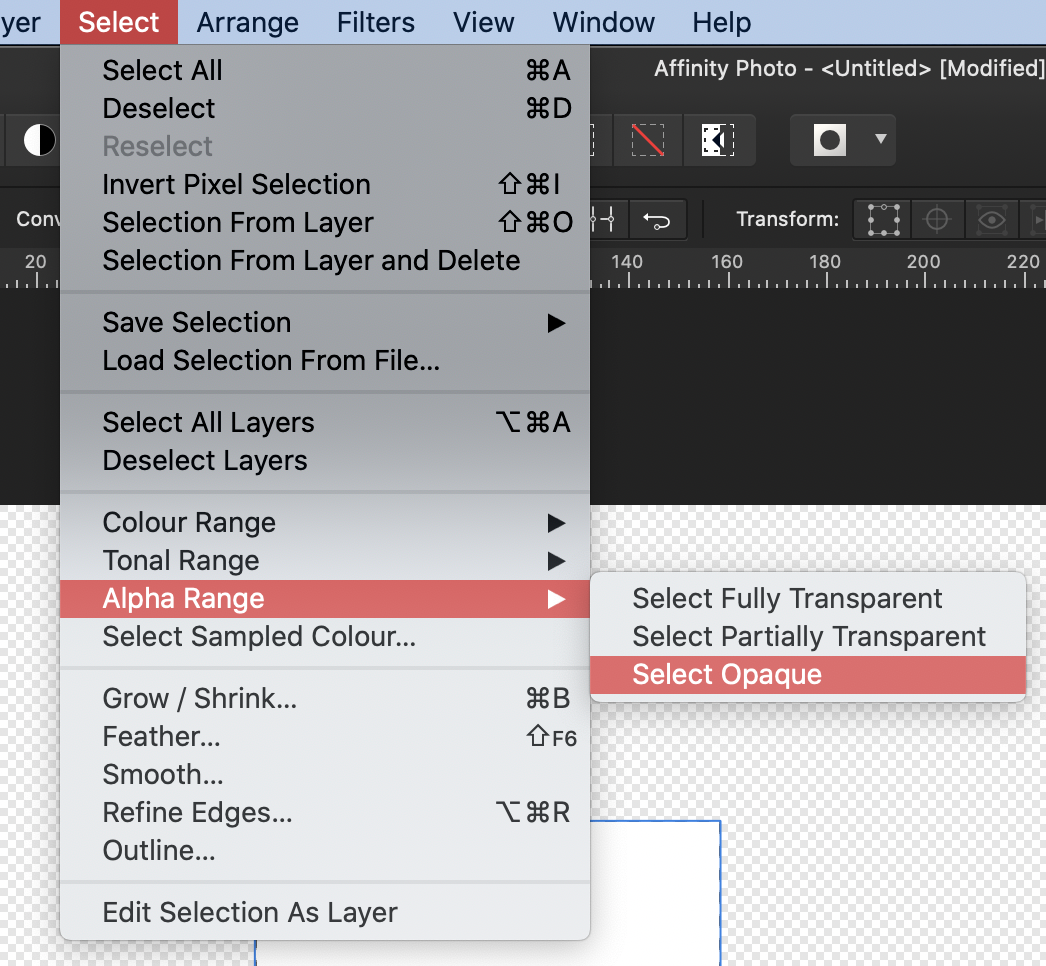
Pull down the Select menu, choose Alpha Range, then Select Opaque:
Alternatively you can Cmd+click (Ctrl+click on a PC, I believe) on the layer thumbnail in the Layers panel. This may be a bit hit and miss with an image like yours, as you have to click precisely on an opaque area of the thumbnail.
I don't understand this - can you be a bit more specific?
Cheers,
H
As far as the selection of the image, that was very helpful. thank you.
I know there was some confusion about the non pixel layer so what I meant was the transparent layer. I had used the background erase brush but unfortunately after saving my image, I saw very trace amounts of color where the pixels were supposed to be erased.
What I want is a completely clean transparent background behind the colorful image. How can I accomplish this?
1.)is there any way to just open up a transparent layer in a new doc or how do I convert an entire layer to be transparent?
2.) I would prefer this method-- how do I just get the background perfectly transparent in the existing page without affecting the colorful image?
Thanks!
-
Hi, this isn't a particularly great question. so excuse me but. haven't been on affinity in a blue moon.
So, I have a fairly complex image and I intentionally erased the background. What would be an easy way to select the image only with the non pixel background it has now. Or conversely, (selection seems to not be my thing) what is another way to save the image itself without messing around with selections, because the image is a little complicated.
Also, how do you open a non pixel layer as a new doc in affinity?
Any help would be much appreciated!
-
6 hours ago, toltec said:
Er, what extra steps ?
I just selected the speedboat from the first image using the selection brush, pressed Copy (Ctrl + C) and pasted (Ctrl + V) it into the second image, selected it with the move tool then I can drag the handles to resize it however I want or just move it.
What happens when you do that ?
Well, when I did that it worked
Not sure what I was doing to it earlier today
in my defense, I definitely didn't highlight the move tool for the selection the first few times and the selection somehow had the move box already on it right after I pasted. Not sure why.
But anyways, thank you so much!!
Larissa
-
Ok just update, yeah I'm looking into the move tool and everything here https://affinity.help/photo/en-US.lproj/index.html?page=pages/Selections/selections_transform.html?title=Moving and transforming pixel selections
I know this is kind of granular, but still wondering if there is a way to paste/copy selection and have it be ready to be moved without going through this additional steps in the new layer with the option around it...really wishing I saved those docs with the history haha
Cheers!
-
On 12/4/2018 at 12:13 PM, toltec said:
I never responded, but thanks that video was right on the money
-
Gabe,
Hi, yeah it is on a new layer. Last time it also went on a new layer. Do you mean I can move and rescale by performing additional actions on the new selection copied on the new layer. And if so how would I rescale? Make the selection again and do what?
Because what happened last time was that the newly pasted selection layer already had the rescale/move option around it with arrows without having to perform any additional steps except for dragging with the cursor. I can't seem to get it to appear that way again...
Thanks!
-
Ok, so I'll try to phrase this question as clearly as possible
I am experimenting with cutting selection of one photo layer (background) into another that is a new tab in Affinity. With beginners luck I was able to get it how I wanted it to look, the selection that is, in the second photo (in the second tab) with the ability to RESIZE and MOVE.
This is what I want, to be able to cut, copy and resize the selection from the first photo to the second one.
But now I can't cut and copy a selection in such a fashion that it would be resizable in the second image like before. I think I played around with something in "refine" dropdown when selection brush tool was clicked.
Please advise. Getting a bit frustrated trying to cut, copy, and resize the selection. Can only cut and copy it into the photo without ability to move it or make it smaller.
Thank you!
-
On 11/30/2018 at 2:35 AM, HVDB Photography said:
Yes, invert(CTRL+I) the adjustment layer and paint the areas to be effect back in using a white brush.
1.) I couldn't find invert option with that shortcut but I found under layers dropdown. I painted the details white but I don't think my end-product was what was intended
Would you have any extra steps or videos re: this topic?
2.) Also, do you or anybody else have any thoughts on the blur and sharpen brush tools. These sound like they would work for this too but I can't seem to see any results from either of them unless it's an extremely subtle effect
-
I used the clone brush tool and that one did the trick with a little finagling.
I, too, don't understand the color replacement tool and I couldn't find any good user-made videos on it.
So you're saying the purpose of it is to replace certain colors with others already on the photograph?
-
thanks, ill look into both of those
-
I played around with clarity and unsharp mask filters. Are there ways to increase detail in one specific part of the photo, for example one person's face with some kind of brush/sweeping tool similar to what camera + has on mobile?
Thank you!
Larissa
-
which tool to use to change color of parts of background to color of something else in photo? For example, there are streetlights, I want to paint them the color of the sky behind the lights.
I am very new to the tool. I thought brush tool could do this but it seems like you have to choose a standard color and cannot choose one from photograph. Eraser? Please advise.
Thank you!
Larissa


help with image isolation
in Pre-V2 Archive of Affinity on Desktop Questions (macOS and Windows)
Posted
Thank you!")