inityaff
-
Posts
11 -
Joined
-
Last visited
-
Thanks, all of you. I appreciate the helpful replies.
-
I'm playing with this method now, but am not sure how to make the adjustment in curves>alpha. Can you elaborate or explain how you would manipulate the curve?
-
Thanks guys! So from what I am understanding, doing a selection or clipping path is probably necessary to maintain the product "fidelity" then delete the background, or use blend ranges applied to just the background area. Just out of curiosity, if you were starting with an image like this, and wanted to "drop" the background to pure white, is this how you would do it? What would your workflow be if you had 100 images like this?
-
Here's a file before background removal is attempted. before_background.afphoto
-
I've tried it both ways. Here is one that was done in a batch using Erase White Paper. IMG_5882.afphoto
-
My issue was that I was not expecting any color data - I was expecting it to be fully transparent or empty. There is color there, as the RGB values indicate, and it is visible when exported.
-
Back to my example, if I want a pure white (255,255,255) background, or a purely transparent background (0,0,0) the only way to achieve this is to select and delete?
-
That's correct. That's what I see.
-
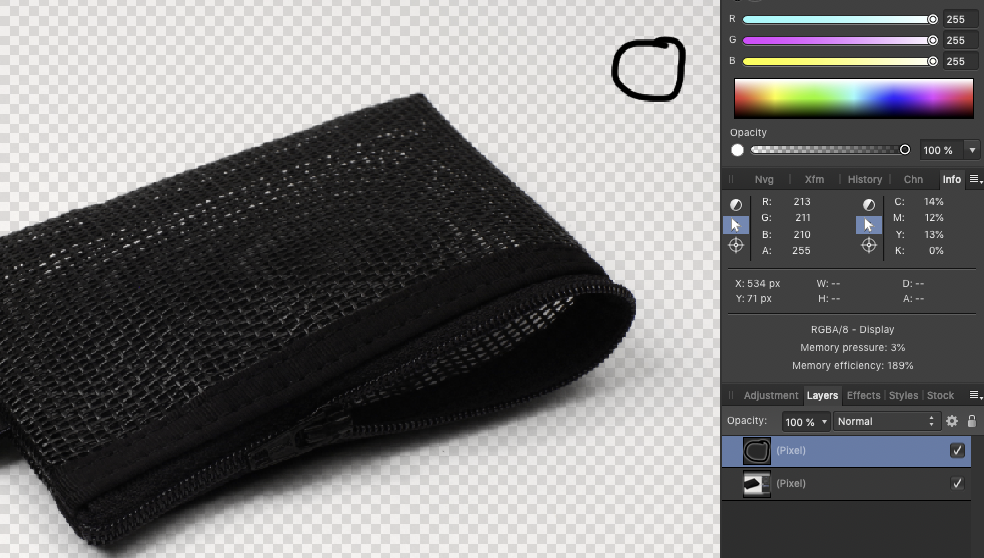
For example, in the sample image, after it is exported as a transparent PNG, if I open it again and look at the RGB/CMYK values in the area that is "transparent" it would appear that they are not in fact devoid of color data. The screen captures don't show the curser, so I have circled the area of the image being measured, and you can see that it has RGBA values of 213,210, 211, 255. To have nothing there it should read 255,255,255,255, right?

-
Hi Lee, Thanks for your reply. I don't think I was clear in my question. What I'm trying to say is that the background is not being removed or made transparent. When I export the file, it looks the same as the original unedited file, or if it is added on top of a white layer, it looks the same as the original. Does that make sense? In other words, the areas that look like they are fully transparent with the white removed actually have "invisible" color (not zero for CMYK/RGBA values) and when placed on a pure white background or exported as JPEG, it looks exactly like the image did before the background was "removed". Does that make sense? What I am really asking is how do I get 0000 values for CMYK for the white areas of the image or true transparency in the sense of no color data for the transparent areas. Is the only way to do this select and delete?
-
I have some products shot on a white background, but I'm having a hard time figuring out the best workflow in Affinity Photo for removing backgrounds. I've tried: Blend Options Filters>Colors>Erase white paper Selection brush (then cut and past selection, or invert selection and delete background) With the first two options, the drop shadow appears to be maintained, which is nice (see example image attached), but when I mouse over the masked area that appears to be transparent and look at the info panel I am seeing that there is color data in the areas that seem to be fully transparent (see CMYK values in sample image). Likewise, if I copy this layer, or attempt to export, I get the full background, as if the Filter or Blend Options have not been applied. How do I "apply" the Filter/Blend to get an image with transparent background? I think I am not understanding something about how masking works in Affinity. Also, if I have Levels and Color Balance layers, should I merge these down to get a single, corrected layer before dropping the background? Thank you.