snizl
-
Posts
20 -
Joined
-
Last visited
-
Text line breaks when pasting
snizl replied to snizl's topic in Pre-V2 Archive of Desktop Questions (macOS and Windows)
It appears that both are on the same hotkey for me, and which one gets selected needs to be chosen on the left hand panel. But choosing text frame indeed works for me. Thanks! I really appreciate the support on this forum! -
Affinity Designer on Mac: When pasting text from a word document into a text field in affinity designer, it does keep most of the formatting. However, when line breaks in the word document are not denoted by "enter", but instead by the size of the page, they are seen in affinity as an infinitely long line and will be pasted as such. Is there any way to paste text into a text field, in such a way that either, the original formatting is completely kept, or such that the horizontal size of the textfield is respected, and not just extended into infinity? Or is the easiest way to achieve this for me, by manually assigning line breaks by "enter" in the original file? Cheers.
-
Thanks alot!
-
 snizl reacted to a post in a topic:
Affinity designer strokes around grouped objects
snizl reacted to a post in a topic:
Affinity designer strokes around grouped objects
-
Thanks a lot! That works.
-
snizl reacted to a post in a topic:
How to control stroke/font size change when changing a selection?
-
Lets say I am creating a shape by multiple objects. For example adding a triangle on top of a square and I group the two together. It now looks like one object, but when I am adding a stroke to it, it creates this around each of the individual objects. Is there any way I can merge two objects together to one, so that the stroke only goes around the whole thing, not the individual sub parts?
-
There you go. The stroke size remains 1, no matter how i change the size. Of course it is not a big deal, I can change the size and then manually change the stroke to what is looking good but it would just be useful to be able to control this behaviour. In general with stroke size usually it is the best if it changes size, but with text for example often I would not want it to change size. test.afdesign
-
Sorry I meant I have to press either 'shift' or 'option'. Edited it.
-
So in Affinity Designer on Mac, when you want to isometrically change the size of a selection (keeping the ration between the axes the same) you have to press either shift or option while dragging the outer borders. Why is it either one of those keys? Why does it not stay the same and what does this even depend on? It is not the type of selection. I literally have two different image objects in one file, and to isometrically change the size of one of them I have to press option and for the other shift. I don't understand the point of this, and it is to be frank quite annoying to always have to test which key to use, unable to know it...
-
So this happens seemingly randomly for me in affinity designer on mac right now. Sometimes when I select several items together, and change their size strokes and fonts don't change their size. Sometimes they do. Depending on context I might want either one of them, but I currently have no idea how to control this behaviour.
-
 snizl reacted to a post in a topic:
Affinity Designer colour picker giving wrong colour
snizl reacted to a post in a topic:
Affinity Designer colour picker giving wrong colour
-
Thanks a lot for the effort! , that makes sense. The graphs were automatically created by a library I use for some analysis software, and I did not actually ungroup the adjacent dots from the graph, so I did not notice the opacity difference (if the grouped object is selected it hows 100% opacity). Alright, now I know what to look out for if I run into a similar problem again.
-
Hi MEB, thanks for the quick reply. I am clicking on the graph on the right, having the fill selected on the righthand colourpane press i has the hotkey for the "Color Picker Tool" and then click on the fill of the graph on the left. Interestingly, I now tested it and it does work if I select the stroke instead, or if I select the fill of a graph where the fill is selected as completely black. I now have the feeling that there is some automatic adjustmend between stroke and fill is going on. Untitled.afdesign
-
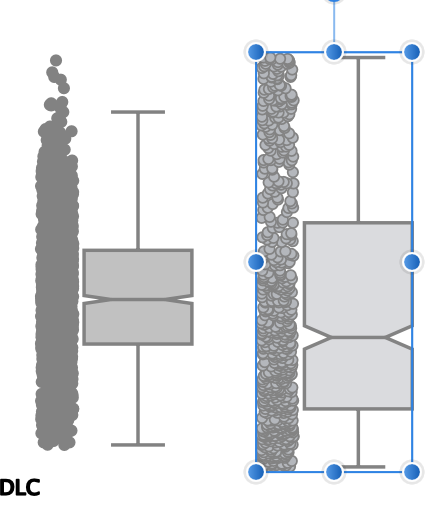
I am using affinity designer on Mac and the colour picker does not do what it should. See graph below. For the fill of the marked graph on the right I clicked on the fill of the graph on the left. The result is obviously not what I want. What is going on here, and how can I fix it?

-
Ah, sorry. I am using the MacOs version of Affinity Designer, current version 1.8.3. Edit: I figured it out with the help of this video: https://www.youtube.com/watch?time_continue=876&v=5mB2ta6zEOo&feature=emb_logo I have to export my object as a png and then can create a new textured image brush with the png as a template. Simply have to use the "repeat" option for the body and need to adjust what part should be repeated and it works perfectly.
-
Thanks for your answer, but I could not really figure out how to use either of those tools for what I want. Let's say I have an object like this. And I want to make a longer structure from it. Like this: How would I do that without painstakingly copy the elements and put them back together? I just want to kind of draw the with the object, if possible.
-
Probably this is not possible, but if not this would be a nice feature request: Anyways I made a small simple object and want to use it as the outline of a bigger object. The way I would do that usually is by copying and rotating it till it outlines the shape I want to. However, this gets very tricky with more complex shapes, and making corners of different angles is very time consuming. So I was wondering, can I use an object to draw with? i.e. replace the black line that is usually used with the pencil tool with my object, so that it automatically gets rotated around corners etc.? Maybe an alternative way to describe this would be contiously by copypasting a selected object while dragging your mouse.