modiophile
-
Posts
15 -
Joined
-
Last visited
Everything posted by modiophile
-
So I have a simple business card artboard that is 2.25" x 3.75" with a margin and bleed of 0.125" on all sides. This means that after the printer, prints my business card they will cut it down to 2" x 3.5" What I don't understand about Affinity Designer, is that when I goto Export PDF with Printer Marks > Crop Marks, the Crop Marks correspond to the edges of the artboard. Shouldn't the Crop Marks correspond to the margin & bleed I setup in my document? In other words, the resulting PDF should show the entire 2.25" x 3.75" artboard but the Crop Marks should be set at 2" x 3.5" How can I achieve this? I've attached the difference between AD vs. AI (desired output).

-
How is it possible to cut out a shape from another in a non-destructive manner? I see that the "Subtract" shape in the toolbar does what I want it to do, but the result is not a compound or a mask, it becomes an edited shape. One work around I was thinking, is it possible to draw a shape with the pen tool, make it an active selection and perform an inverse selection and apply a mask to the shape?
-
I actually do have something like that its called Flycut however I quit the application, restarted AD and the problem still persists
-
Affinity Designer 1.6.1, Mac 10.13.3 Updated thanks.
-
I type out text using the Artistic Text or Text Frame tools, then double (or triple) click and proceed to highlight the text that I want to make adjustments to. The only problem is, I can't see what I've selected because the text doesn't become highlighted! I could still make edits, but it takes alot more time if I am moving quickly and don't put my cursor where I think it should be. Any help? Affinity Designer 1.6.1, Mac 10.13.3
-
Zeplin.io integration/cooperation
modiophile replied to evilclay's topic in Feedback for Affinity Designer V1 on Desktop
+1 Zeplin is integral to our workflow -
That's true, I didn't account for the width of the bullet itself.
-
Thanks for the file! For proper formatting of bulleted lists, the bullet should be closer to the text than the left margin. You'll actually want the First Line Inedent to be more than half the Left Indent in order to achieve that. My assertion that the First Line Indent must be half or less of the Left Indent position was wrong. Here are my updated steps: NOTE: IF you set the First Line Indent first, AD will automatically specify the Left Indent for you! If anybody from Affinity is reading this thread, it shouldn't be this difficult to properly format bulleted lists! I read somewhere that a Bulleted List text style is a feature that has been noted.
-
Ok, so after realizing that I want the bulleted list indented (not just what comes after the bullet), I see that the Left indent and Tab Stop becomes necessary. @owenr Would you please tell me how in the world you got the tab space after the first bullet in your example to be so small? By default the very first tab performed, is huge, regardless if I add a Tab Stop or specify it in the Tab Stop field.
-
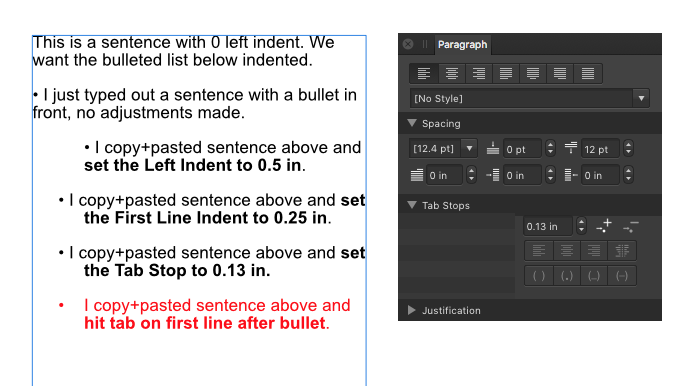
I see whats happening, as long as the First Line Indent is at least half the amount of the Left Indent, than it works. In my example it is not being utilized, as it is unnecessary to get the same result. Also just specifying a measurement (or not) in the Tab Stop field does absolutely nothing. I created a new document to avoid copying text styles, here are my steps:
-
See screenshot in your quoted post.
-
@R C-R I am using the 1.5.5 on Mac and yes the First Line Indent is automatically set to the same value that you enter for the Left Indent. Good catch! After I set it to 0 and followed @toltec instructions, it looks fine! The automatic First Line Indent actually prevents the user from having neatly aligned bulleted or numbered lists.
-
Thanks for the response! I seem to be messing up somewhere. This is what I have so far... Set Left Indent to 0.118" Set Tab stop for 0.02" Pasted the bullet, then pressed Tab for the first line. ??? If I press Return for the second line, any spacing whether with Tab or the space bar gets ignored. ??? Alternatively, if I use a soft Return (shift + Return), then I can line up the spacing by tabbing several times on the second line. The issue with this approach is that the top line of text and bottom line of text become two independent pieces and the leading between them is off.
-
How can I indent the text in a bulleted list so that the text all aligns. Desired result: This is what I am trying to achieve, with a bulleted list. Default result: This is how a bulleted list looks, on Affinity designer by default. I know where to access the Paragraph > Left Indent tool, but unfortunately it only affects the first line! Has anybody been able to figure this out? I do know its possible with tabs on Illustrator, see https://forums.adobe.com/thread/2265154 Unfortunately, tabs don't work the same way on Designer.
-
+1 for this feature request Any suggestions on 3rd party apps that accomplish this besides AI.