Reisender
-
Posts
16 -
Joined
-
Last visited
-
 Reisender reacted to a post in a topic:
Recreate colours of manufacturer's raw developer in the develop persona?
Reisender reacted to a post in a topic:
Recreate colours of manufacturer's raw developer in the develop persona?
-
Reisender reacted to a post in a topic:
Recreate colours of manufacturer's raw developer in the develop persona?
-
Reisender reacted to a post in a topic:
Recreate colours of manufacturer's raw developer in the develop persona?
-
I just recreated your steps, Gabe, and I can now achieve the same results! Thank you so much, I don't know where I went wrong earlier. Incidentally, is there a way to change the default presets for the different developing riders so that I have a different baseline to work with whenever I open a raw?
-
Files should be uploaded now. Thanks again!
-
Hi @GabrielM, Thanks for taking the time, I appreciate it. The Olympus model is the Olympus O-MD 10 Mk 2. The Olympus programme is Olympus Viewer 3. I do use the default camera settings with the "natural" profile. The only thing I changed from the standard settings is that I reduced the amount of sharpening to "low". I am currently uploading the files. The affinity jpegs contain some of my further editing attempts. If it helps, I can also upload files directly as they are put out by the OV3 and the Photo develop engine. I have also uploaded the raw files just in case. I don't think there is any specific fault with the develop persona, as I get similar results with DXO Optics Pro 11. It's just that the Olympus software, both in-camera and in OV3 seems to apply a very pleasing colour profile that I can't recreate in other raw developers. Which means that I usually have to use the extremely clumsy Olympus Viewer 3 to create a tiff before further editing in Affinity. Which is just a very impractical solution. Cheers!
-
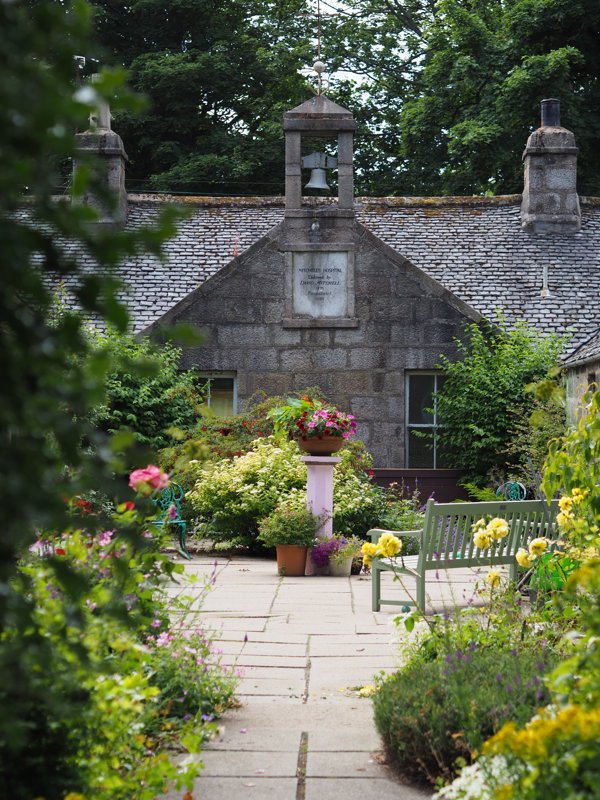
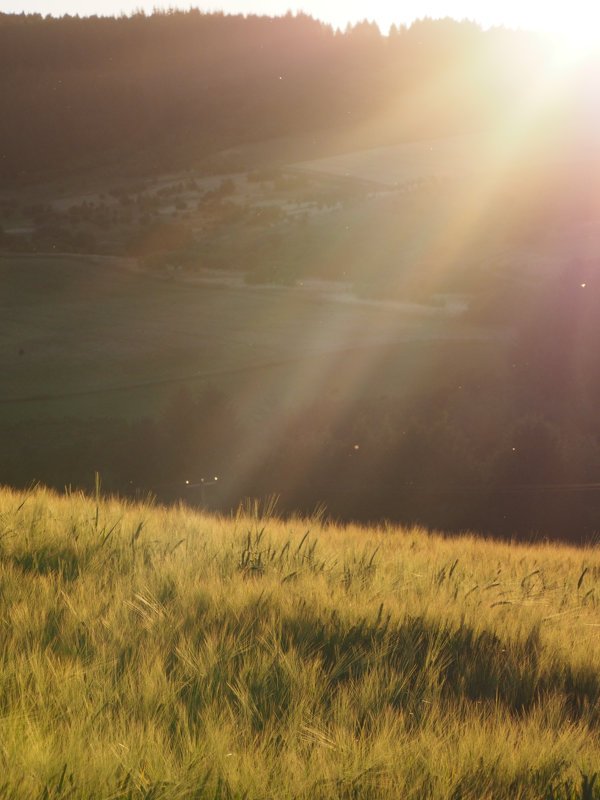
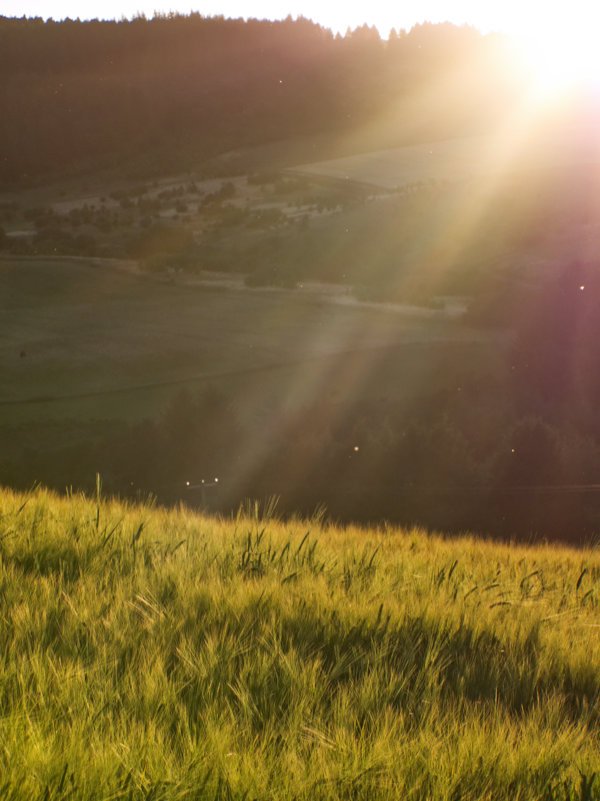
Hello everyone! I am not quite sure how to describe my issue. I will most likely mix up the terminology, but I’ll try to gesture at what I mean and use some pictures to illustrate it. Basically, I find that the way in which colours in my developed pictures relate to each other varies very much from the raw developer of my camera’s manufacturer (Olympus) to the develop persona in photo. I believe the process that produces this relationship is called colour grading? In any case, I find the colour grading of the Olympus raw developer to be consistently more pleasing than either that of photo or any other developer I have tried. I am looking for a way to recreate the colours I get via the Olympus developer in Affinity’s develop persona. I am wondering if there’s an automated process that could help me. I have an example of how I would like the colour grading to look like in the pictures produced by the Olympus program. Is there any way for Affinity to read out this information and apply it to the development of the raw file? I know some developers use colour profiles to achieve different looks. Does such a profile already exist for Olympus files or can I recreate it? But let me describe my problem a little bit more so you know what I am on about. There are a couple of particular characteristics I noticed where Affinity differs from Olympus. Some I have been able to address, others not. 1) The sky consistently displays too much cyan and is too bright. I have been able to address this by shifting the hue shift slider in the HSL adjustment panel to the left as well as slightly decreasing the luminosity of blues and cyans. Can I somehow automate this? 2) The blackpoint is usually a bit higher on the Olympus files. I think this means that a larger proportion of the shadows will be displayed as true black? Can I automate a higher black point in develop? Also, is there a way to have a more pleasing, well, blackpoint rolloff so to speak, where more of the shadows fade into true black but you still get a glimpse of what there is in the shadows? Sorry, not quite sure how to explain this one. I want more blacks in the shadows without a harsh transition, basically. 3) The most important issue: yellows look consistently too green, greens too yellow, and reds not saturated enough in Affinity’s develop persona. I have tried experimenting with HSL, White Balance, Saturation and Vibrance, Curves, etc., but to no avail. Here are some examples hopefully showing what I mean. First the Olympus file: I especially like how the yellows in the foreground are displayed. Here's my attempt at developing the picture in Photo: I have played around quite a bit here, but I find the foreground much to green and the yellows not as pleasing. Another example, first the Olympus file: Please pay close attention to the flower pot on the pedestal and to the green watering can just below the right side of the bench. Here's my attempt at developing the file in Photo: Yes, I have played around quite a bit in this one, and I should have saturated the reds more, but the green of the leafs in the flower pot are way too pale, as are the pedals of the flowers itself. The green of the watering can is washed out and shifted towards yellow. No matter how much I played around with HSL, I could not get the can’s colour to match the Olympus file without making everything else look extremely weird. Obviously, my preferred solution would be if I could just feed photo the colours I like about the Olympus file and then start developing from there. If that's not a possibility, does anyone have any idea how I can manually recreate the colours I see in the Olympus file? Thanks so much in advance!

-
Alternative cropping mode?
Reisender replied to Reisender's topic in Older Feedback & Suggestion Posts
This thread has been moved from the questions forum to the feature requests forum. Does this mean that the feature doesn't currently exist? -
The current default cropping mode in Photo has me drawing a frame over my image, with the option to grey out the cropped out parts. I'd much rather only see a window of my chosen aspect ratio, with click-dragging inside the boundaries changing which part of the image I see, click-dragging outside the window allowing me to rotate the image, and scrolling changing the size of the cropped area. It is a bit hard to describe what I mean, but I think Adobe products offer this option. Is there any way to use it in Photo?
-
 Reisender reacted to a post in a topic:
Astro landscapes: aligning the star background stack
Reisender reacted to a post in a topic:
Astro landscapes: aligning the star background stack
-
Thank you! That is helpful. It looks like the process is a bit time consuming, though. I'll give it a shot anyway!
-
Thanks for your answer, I appreciate it. I am rather new to all of this. How would I go about this? I guess I can erase the foreground and clouds on all layers, save them, then run the alignment algorithm again? I am also not sure how I would manually align the layers. The stars rotate around polaris, which is somewhere to the north west of the picture. How would I rotate my files consistently and accurately?
-
Hello everyone! This is one of my first forays into astro landscape photography. I took a stack of five 20" exposures on a tripod and would like to align them for noise reduction. This works pretty well for the foreground with a mean stack, but since the stars have shifted quite a bit over the course of the exposures, it does not work for the background. So what I probably have to do is process the foreground and background layers separately and then merge them later. But how do I get the stars in the background to align rather than the foreground? I have attached a work in progress, with the brightness adjusted for the foreground. Thanks!
-
Reisender reacted to a post in a topic:
"Crop to opaque" in Develop Persona
-
Reisender reacted to a post in a topic:
Crop to Opaque
-
Reisender reacted to a post in a topic:
Selecting and editing a mask layer
-
OK, but with the live filter, I don't have access to split view, on which I rely quite heavily as a newbie.
-
Sorry, but your video doesn't seem to have any sound apart from a notification message half-way through?
-
Reisender reacted to a post in a topic:
Selecting and editing a mask layer
-
Reisender reacted to a post in a topic:
Selecting and editing a mask layer
-
Ah, very sorry. It looks like I didn't explain what I wanted to do very well. I am not talking about a sub-layer. I am talking about a new layer to which I want to apply a mask layer. Here's a screenshot of how my layer window looks like after I succeeded. As you can see, there's a little bit of white in the black. But maybe toltec's method is actually better?
-
I am going crazy here. I have a sharpening layer, and want to apply it selectively. So I select the sharpening layer in the layers panel, click on the "mask layer" button, click on the mask layer, select invert layer and... nothing happens. I select a brush to paint the mask layer in... nothing happens. I try to select the mask layer by clicking the preview button, again nothing. I rasterize the sharpening layer, apply a new layer, invert... the preview layer window for the mask layer goes black. At some point in the clicking marathon, it actually works. But can someone please, please, please tell me the correct way to select and edit a mask layer (I already watched the Vimeo tutorial). Thanks!
-
I just tested it with my original, unrasterised file. Expanded the canvas to the bottom, and the fill function worked.
-
Reisender reacted to a post in a topic:
Inpaint fill-in expanded canvas
-
Works like a charm! Thank you! There was still a visible border where the original canvas ended, but I managed to work around that with a feathered selection. I'll probably blur out the background anyway, so it won't be noticeable. Now, can anyone explain to me why I have to rasterize the layer?