LenC
-
Posts
116 -
Joined
-
Last visited
Everything posted by LenC
-
Thanks. I have achieved the most consistent results by using Merge Visible plus Rasterise to Mask. There still seems to be some inconsistency with how the layers behave for me; for example I found that just selecting a layer changed the displayed image appearance even though the check boxes were not touched (the change was sometimes irreversible if I remember correctly).
-
I want to mask some overexposed sky behind trees in order to replace the sky from another layer. (I will hand retouch the mask when I get it.) After selecting the image, I add a threshold adjustment layer and set the threshold to differentiate the sky. The image looks like what I want my mask to be - sky white, rest black. But with the same layer selected, invoking the menu Layer..Rasterise to mask or plain Rasterise apparently does nothing - there is no change in the threshold image image. If I option-click on the adjustment layer thumbnail, the display is all white, not the thresholded image. Threshold layer is above the pixel layer on which it is based. Moving or nesting it does not change much. Can provide screen grabs of studio if you think it will be helpful.
-
Accessing from Lightroom
LenC replied to Sudique's topic in Tutorials (Staff and Customer Created Tutorials)
This is only a step, but the following video is by someone who has LR and AP integrated. You might be able to reach the maker. https://www.youtube.com/watch?v=JyfZHa8E0Xg -
I’m beginning to realize that healing and cloning (also mask painting) require different settings. I recently viewed some PS videos on brush behavior and found that, beyond the size and hardness, there are a bunch of settings including opacity, flow, and blend mode that affect the new pixels. Could someone suggest the principal useful settings for a few common situations? And related mouse brushing technique: single, overlaid (back and forth continuous), or repeated strokes. Help discusses the options but not much about how to use them. If this has been discussed here, please provide link.
-
Wonderful, exactly what I was hoping for! I didn't think to look for this since it wasn't mentioned in the PDF help I was looking at. Rotation is behaving correctly now. Will post a note elsewhere if issues recur.
-
Transform is almost the answer. Mousing the slider to rotate the image is too coarse; needs a modifier key to reduce the rotation to (say) one tenth the default. Also on first tries the panel behaves unexpectedly: does not always rotate around the selected point; canvas drifts rather than rotates; selected (duplicate) layer twice disappeared.
-
Could one set up a macro to rotate a small amount, say half a degree, and then run it on the enlarged image that doesn't show the handles?
-
That is, the control handles are not visible. I'm trying for a precise rotation.
-
I feel a need for writing that includes a level of principles underlying the details of how you do it. What one is trying to achieve using BW or gray masks, blending and combining separate images, modulating color selectively, many principles that would apply to a variety of situations.
-
Red Eye Tool
LenC replied to MontanaMove's topic in Pre-V2 Archive of Desktop Questions (macOS and Windows)
It's supposed to work thus: select tool, drag the square so it covers the red eye and a little more, and release. -
Thanks for your answer. I hadn't thought of that since I assumed a pixel layer was already rasterized. On the second question, I'm just trying to increase my understanding of how the app operates on the layers. I often find myself stuck and unable to fix something because I haven't grasped these basic digital operations.
-
Surely there's a simple way to do this? And what about other conversions allowed or prohibited? I think I understand image to pixels and algorithm rasterized to pixels. Could someone provide a quick summary of useful conversions and how to do them? What's the same in Photoshop and anything different.
-
I thought I saw this link once but can't find it now.
-
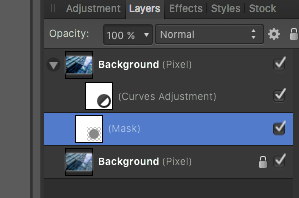
I am learning how to use nesting to mask adjustments to selected parts of an image. I can nest a mask and an adjustment layer with either above the other. But in the process of nesting (using vertical blue line guide), sometimes the layer diagram shows the adjustment more indented than the mask (see screen grab), sometimes the same. Does this represent a different image-processing behavior of AP or is it maybe just a graphic glitch? All configurations seem to behave the same: painting the mask reveals or conceals the adjustment.

-
A video tutorial says that new adjustment layers come with their own mask. I would like to be able to paint the mask while watching the composite image to reveal the adjustment where I want, but have not succeeded. How do I access the mask (or is it simpler just to add another?)? I can get a blank mask using R-click .. Edit adjustment, but what I see then is the mask, which I can paint, but not the composite image. If I R-click .. Refine mask the Refine selection window appears, and I can paint in red, but sometimes it processes (the red disappears, but what is happening?), and sometimes it seems to sit there until I click Apply. Can't seem to display the resulting mask, either.
-
Cutouts in layers
LenC replied to Manoj Sudhakaran's topic in Pre-V2 Archive of Desktop Questions (macOS and Windows)
MEB, please provide some more detail on clipping, nesting, child layers. Are these all synonymous? What is the significance of the two different levels of indented layers? What types of layers can these operations be used with? Experimenting, I found I could nest a mask in a pixel layer. When I nested the pixel layer in the mask, a cropping icon appeared in the pixel layer and I could not reverse the nesting. The effect of these operations is not clear, even trying to visualize them one at a time.. I have read and will read again your suggested Help topics, but I find they lack detail I need at my (near novice) level. Are there commonalities between AP and Photoshop that would allow one to draw on the extensive written PS literature? I prefer it to videos. Sorry this is so long, but I am frequently getting stuck and have difficulty progressing. -
16-bit processing from JPEG?
LenC replied to LenC's topic in Pre-V2 Archive of Desktop Questions (macOS and Windows)
Thanks, good to know. -
Having read about the virtues of higher-precision processing, I am wondering if there are any situations where increasing the nominal precision of an 8-bit file can provide any practical benefits?
-
Paste Selection to New Layer
LenC replied to Pedro Antonio's topic in Pre-V2 Archive of Desktop Questions (macOS and Windows)
Your comments are always clear; thanks. So the nesting via the vertical blue line is different from the operation with the horizontal blue line! Other words I have seen might be clipping to and making a child of. Please say a few words about these operations and the order and way to assemble, say, an image with a mask and its inversion and two different adjustment or other layers. This is where I get stuck, and can't find any good instruction, even for Photoshop. -
Paste Selection to New Layer
LenC replied to Pedro Antonio's topic in Pre-V2 Archive of Desktop Questions (macOS and Windows)
I should have included in the above that Pedro Antonio's suggestion about demonstrating basic techniques would be invaluable for a novice like me who has never used Photoshop or other such editor. -
Paste Selection to New Layer
LenC replied to Pedro Antonio's topic in Pre-V2 Archive of Desktop Questions (macOS and Windows)
I was about to ask about a similar problem. I have a BW image created by a Threshold Adjustment layer that I had been trying unsuccessfully to make into a mask. Applying MEB's instuctions, I right-click on the layer and choose Rasterise. Nothing happens. Shouldn't the label change from (Threshold Adjust) to (Pixel)? If I choose from the menu Layer .. Rasterise or Rasterise to Mask, again nothing happens. Help! -
Selecting sky behind trees (AP)
LenC replied to LenC's topic in Pre-V2 Archive of Desktop Questions (macOS and Windows)
Thanks for feedback. Will explore all suggestions this evening and let you know how they work out. m3photo: AP failure to create threshold adjustment layer was solved by rebooting computer. -
Selecting sky behind trees (AP)
LenC replied to LenC's topic in Pre-V2 Archive of Desktop Questions (macOS and Windows)
m3photo: Have tried to create a threshold adjustment layer via menu and icon, but no new layer appears (or change in the grayscale layer). Another frustrating odd behavior by this program. Closed AP and reopened: no change. Maybe reboot is needed. Madame: The red color was because I had used the quickmask (like PS rubylith) option to try to visualize the selection. Pressing Q should return to marquee/ants display. I will try the option you suggested. -
Selecting sky behind trees (AP)
LenC replied to LenC's topic in Pre-V2 Archive of Desktop Questions (macOS and Windows)
Thanks, I have tried that, but results are mixed. After painting (dragging brush) over an area with no selection, a blue progress line appears. I can repeat this. (Is anything happening?) Clicking Apply makes the refine window disappear, and I can see some changes by displaying as a quickmask, but result is disappointing; selection of light area vs. dark trees is incomplete. There are few hints in AP Help as to how changing parameters in the Refine window might help improve the selection. Maybe the tree branches are just too faint for this to work. -
I am trying to apply the directions of the tutorial Channels: Creating/Storing Selections to the file attached*. I wish to replace the whitish strip of sky along the bottom with blue, and am trying to create a mask that matches it. The tutorial file is 16-bit; mine is 8-bit from a JPEG. As in the tutorial, the blue channel has the highest contrast between the sky and the surroundings. I think I understand the Composite RGBA channels but not the Pixel ones. In any case, I created a greyscale image from the Pixel Blue options and then a Flood Select on a clear area of the white sky strip. This selection is crudely what I need, but the silhouetted trees are sometimes selected, sometimes not. The tolerance slider seems to have no effect on the areas selected. Bottom line: What do I do to refine the selection? The selection brush refine option is confusing – something seems to be working after painting and releasing (blue progress line), but then other things happen when I click Apply in the refine options window. The selection has improved, but I don’t understand how. And can any of these refine options help out? * File includes my unfinished selection. I am using AP 1.4.2 under OS 10.11.5. Sunset Waves 2.afphoto