Pedro Antonio
-
Posts
19 -
Joined
-
Last visited
-
 rpaul reacted to a post in a topic:
[Designer] Change default unit
rpaul reacted to a post in a topic:
[Designer] Change default unit
-
 Affinity Rat reacted to a post in a topic:
Pixel-Incremented Move Tool
Affinity Rat reacted to a post in a topic:
Pixel-Incremented Move Tool
-
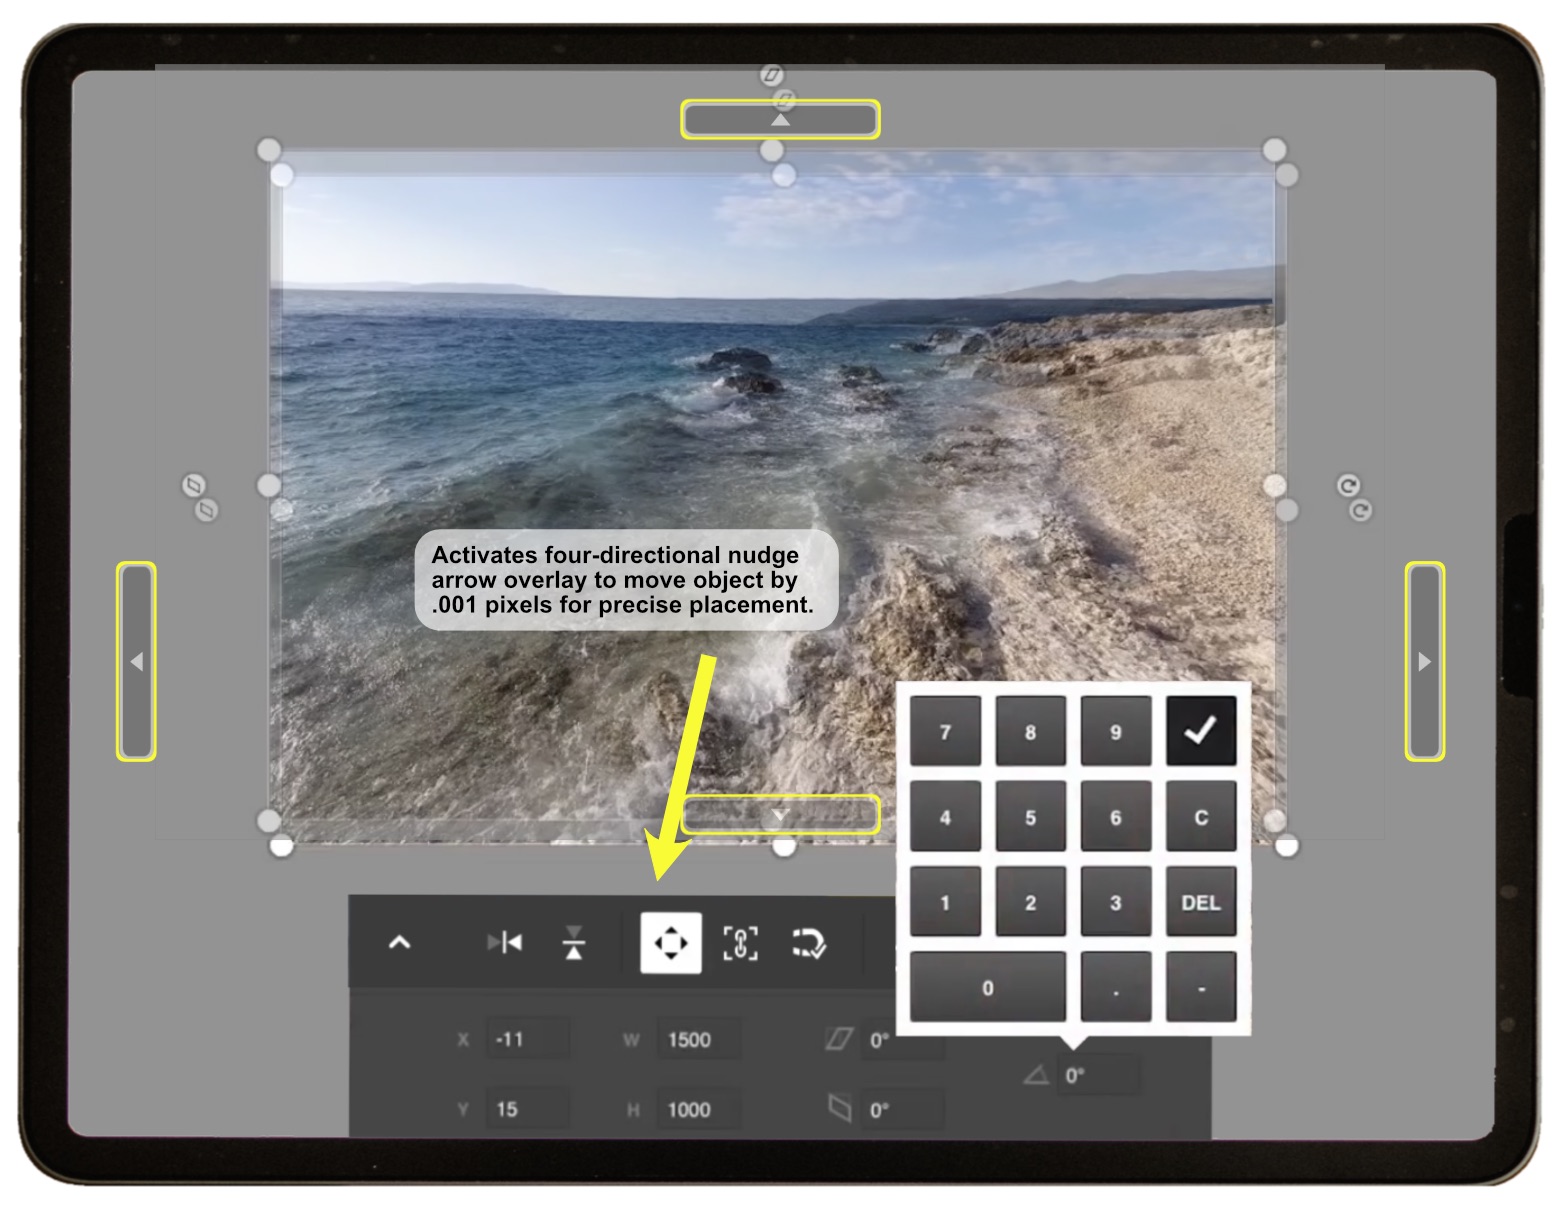
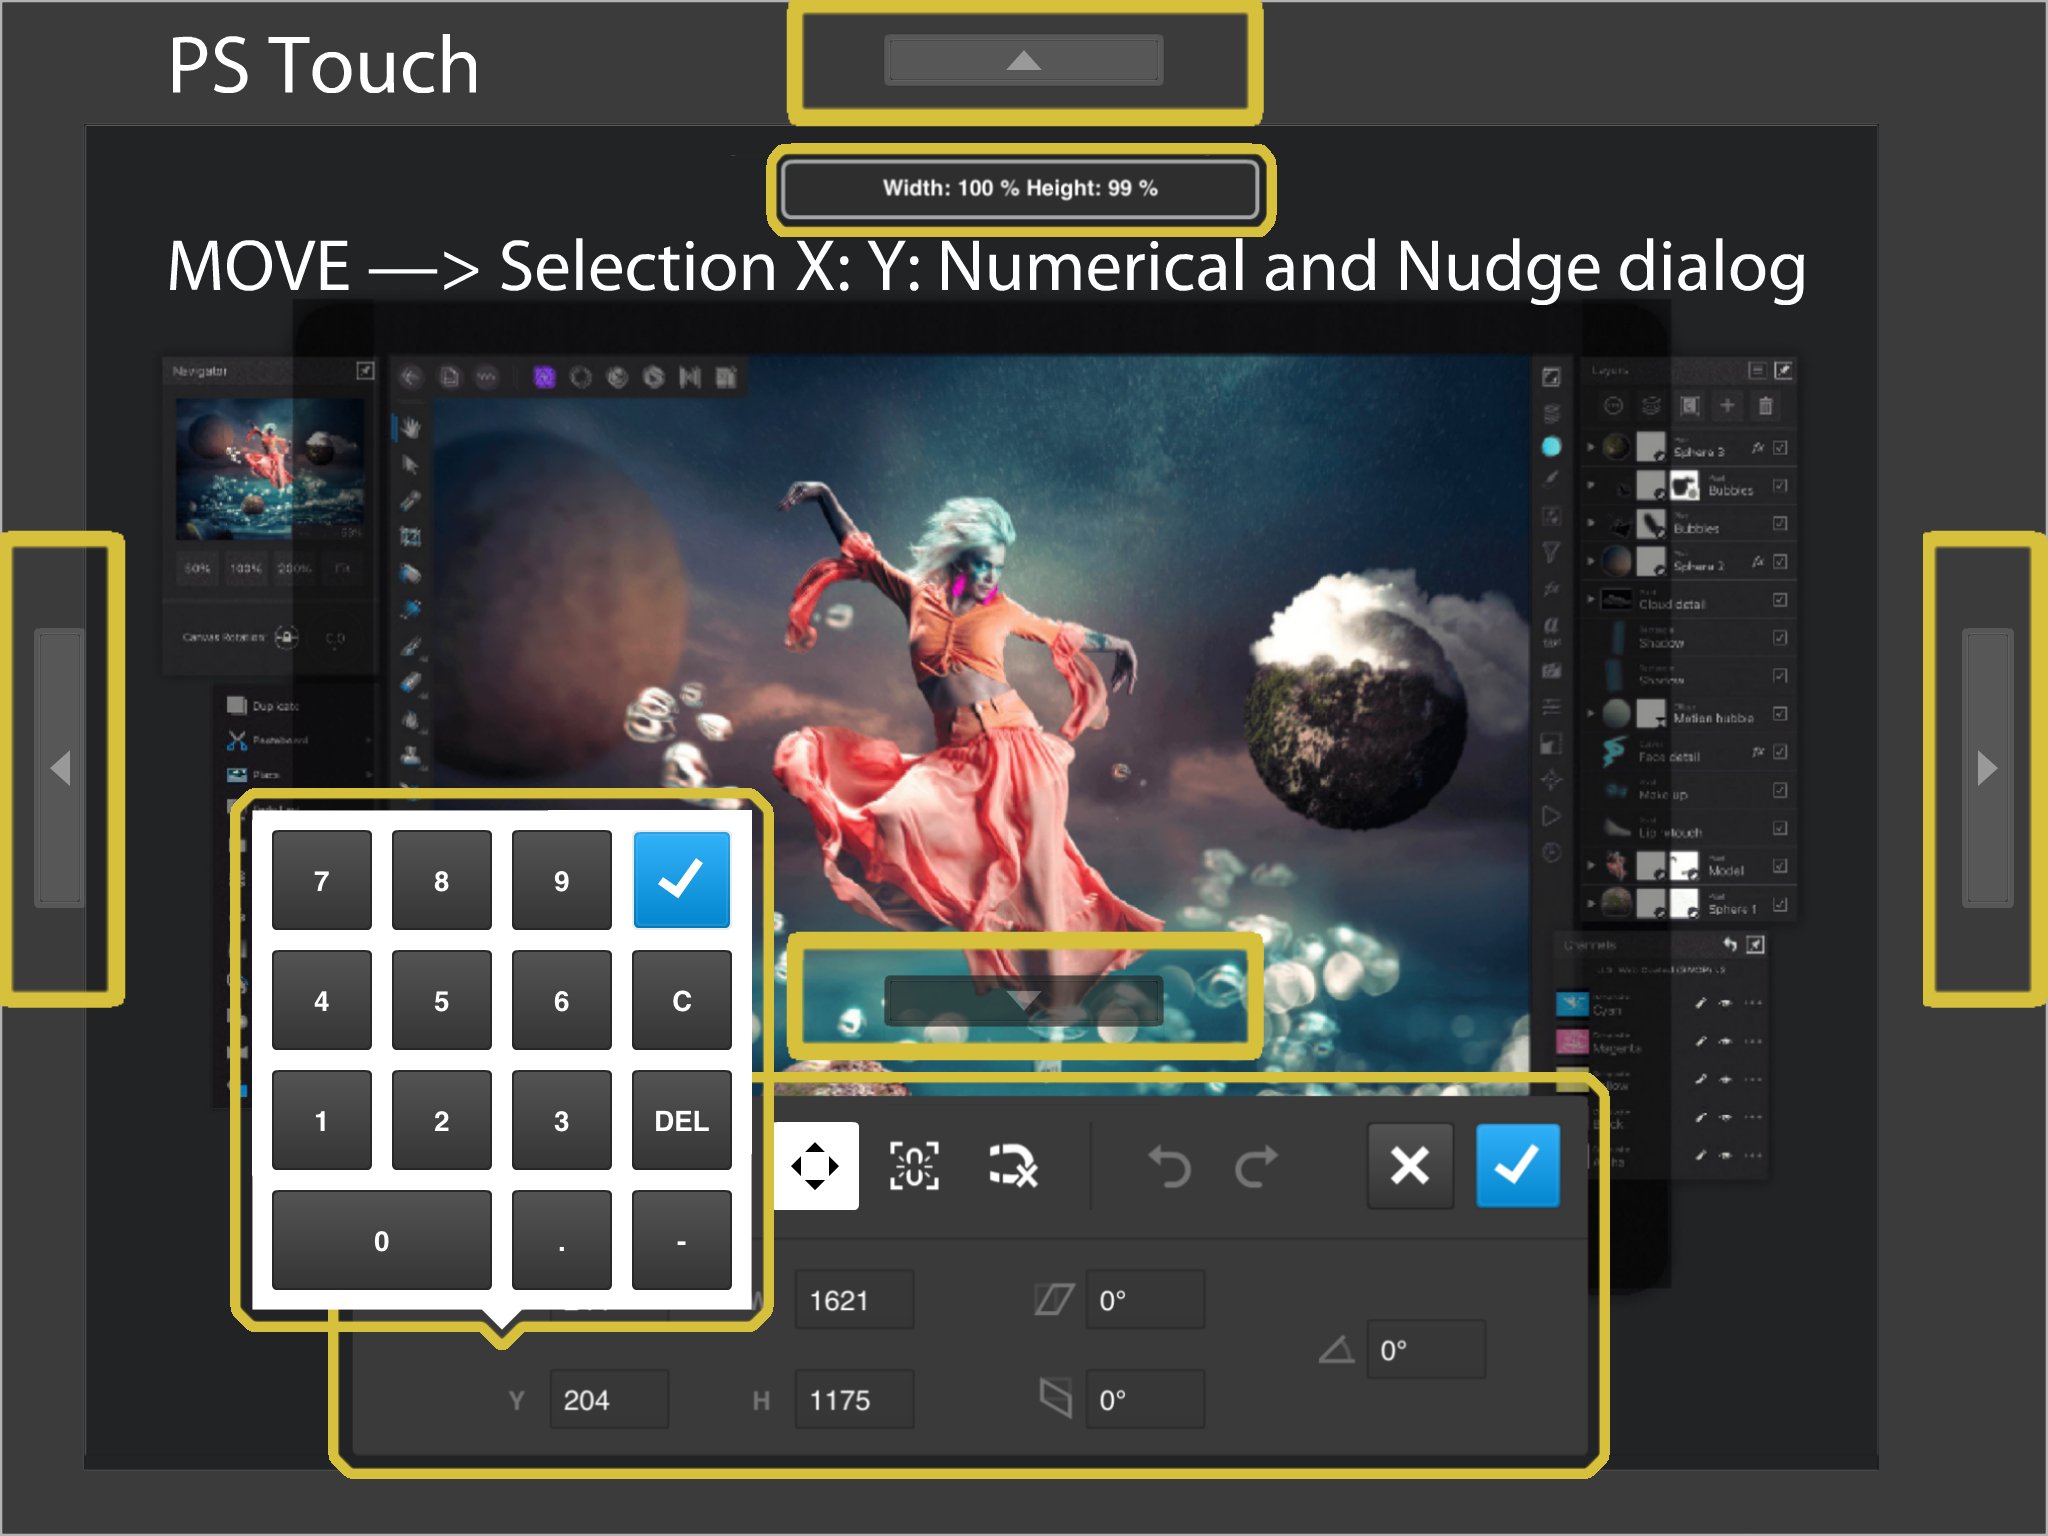
Considering all of Serif's incredible attention to detail regarding the multitude of amazing features in both its desktop and mobile platform apps—with particular note to the amazing degree of feature control throughout the complexity within Affinity Designer for iPad —the one glaring gap in all of Affinity's applications ( soon to be six with Publisher for iPad ) has been in providing users with a tool to facilitate pixel-accurate positioning of objects on the canvas. The measurement readouts in the Transform Studio for iPad only display a 2 decimal point positions. Even though one can actually enter a 3- or 4 decimal digit figure and see a clear result, an object's EXACT positioning remains "in the dark" as far as the numerical display is currently able to show for those fields. Numerical positioning capability is certainly a boon in achieving the accurate positioning and movement of an object, but when faced with numerous objects that all require precise placement, continually entering numbers in a field can become exhausting and very time consuming. Adding a tool that allows for pixel-based X/Y MOVEMENT would be a HUGE improvement to all Affinity's apps—especially on the iPad. Adobe had a great one in their now-abandoned Photoshop PS Touch app—please see the screenshot below that illustrates the potential design and functionality for this badly-needed tool, and how Affinity could incorporate this feature into its Transform Studios. The screenshot illustrates two layers, one with lowered opacity for visual lineup, that have slightly different features on the horizon. I'm attempting to precisely align the pixels that are common to both and then mask a section out on the top layer to blend it into the layer below for integrating, compositing, and rasterzing them into a single photo. Selecting the circular four-arrowed tool would activate a temporary overlay of large arrow buttons, positioned at the outer corners of the screen, to allow for easily moving the selected layer or object ( the top layer in this example ) into it's pixel-matching position by rapidly tapping on them with a finger or Apple Pencil. This would eliminate the currently frustrating continuous back-and-forth trial-and result process for guessing what numerical entry will achieve that result to position it correctly...no more multitude of attempts using my finger or Apple Pencil to get it into the EXACT needed location. An added bonus would be including a two-finger action for temporarily bumping up the pixle increment using those directional buttons to allow moving an object with them in multiples of 10 pixels. Adding this critically essential would also offset having to redesign and widen Affinity's current iPad numerical fields to display a 4-decimal figure—though that would be a great improvement as well—and make accurate positioning so easy and convenient for both the Desktop and Mobile versions of ALL THREE Affinity applications: PHOTO, DESIGNER and PUBLISHER. And Affinity need not consider the importance for this tool based solely on "user consensus" as to what degree of need or popularity position this "please add this feature" occupies based on its number of requests. It's really a no-brainer, day-in day-out tool whose functionality almost certainly can and will be used and welcomed to speed up the completion of every project for every user throughout ALL of Affinity applications. This is particularly the case in Designer, where cartographers need to manage, handle and precisely position a plethora of objects within a single file.

-
Considering all of Serif's incredible attention to detail regarding the multitude of amazing features in both its desktop and mobile platform apps—with particular note to the amazing degree of feature control throughout the complexity within Affinity Designer for iPad —the one glaring gap in all of Affinity's applications ( soon to be six with Publisher for iPad ) has been in providing users with a tool to facilitate pixel-accurate positioning of objects on the canvas. The measurement readouts in the Transform Studio for iPad only display a 2 decimal point positions. Even though one can actually enter a 3- or 4 decimal digit figure and see a clear result, an object's EXACT positioning remains "in the dark" as far as the numerical display is currently able to show for those fields. Numerical positioning capability is certainly a boon in achieving the accurate positioning and movement of an object, but when faced with numerous objects that all require precise placement, continually entering numbers in a field can become exhausting and very time consuming. Adding a tool that allows for pixel-based X/Y MOVEMENT would be a HUGE improvement to all Affinity's apps—especially on the iPad. Adobe had a great one in their now-abandoned Photoshop PS Touch app—please see the screenshot below that illustrates the potential design and functionality for this badly-needed tool, and how Affinity could incorporate this feature into its Transform Studios. The screenshot illustrates two layers, one with lowered opacity for visual lineup, that have slightly different features on the horizon. I'm attempting to precisely align the pixels that are common to both and then mask a section out on the top layer to blend it into the layer below for integrating, compositing, and rasterzing them into a single photo. Selecting the circular four-arrowed tool would activate a temporary overlay of large arrow buttons, positioned at the outer corners of the screen, to allow for easily moving the selected layer or object ( the top layer in this example ) into it's pixel-matching position by rapidly tapping on them with a finger or Apple Pencil. This would eliminate the currently frustrating continuous back-and-forth trial-and result process for guessing what numerical entry will achieve that result to position it correctly...no more multitude of attempts using my finger or Apple Pencil to get it into the EXACT needed location. An added bonus would be including a two-finger action for temporarily bumping up the pixle increment using those directional buttons to allow moving an object with them in multiples of 10 pixels. Adding this critically essential would also offset having to redesign and widen Affinity's current iPad numerical fields to display a 4-decimal figure—though that would be a great improvement as well—and make accurate positioning so easy and convenient for both the Desktop and Mobile versions of ALL THREE Affinity applications: PHOTO, DESIGNER and PUBLISHER. And Affinity need not consider the importance for this tool based solely on "user consensus" as to what degree of need or popularity position this "please add this feature" occupies based on its number of requests. It's really a no-brainer, day-in day-out tool whose functionality almost certainly can and will be used and welcomed to speed up the completion of every project for every user throughout ALL of Affinity applications. This is particularly the case in Designer, where cartographers need to manage, handle and precisely position a plethora of objects within a single file.
-
- 1
-
-
- pixel
- pixel transformation
- (and 8 more)
-
Moving multiple layers at once
Pedro Antonio replied to bringmedown's topic in Pre-V2 Archive of Affinity on iPad Questions
Not sure what you're doing that won't allow you to select multiple layers. It won't work with any other tool selected than the Photo Personna's topmost Hand Tool. Select the Hand Tool first; Pin your Layers palette so it stays open; Tap on one layer to select it; Press your index and middle fingers together and tap the end of both fingers simultaneously on the last layer you want to group select It may take a little practice to get this action to work everytime—tap lightly and release immediately. It's not about applying pressure. -
AllAppsUser reacted to a post in a topic:
Affinity Photo on iPad – Keeping Layers & Transform Studios Open
-
Duuuhhh…of course! Thanks for your speedy response. There's no mention of that function in any of the AP for iPad static or video tutorials I've looked at. I've also tried all kinds of wording for Google searches, which yielded no related answers. The desktop version's pin function seems to allow for undocking and floating a studio palette. I tried that on my iPad, but couldn't detach any Studio, and I just assumed it was a yet-to-be-implemented feature.
-
The Studio palette ( specifically using Layers and Transform ) keeps collapsing every time I select a new tool or perform an action. Is there a way to make it stay open until I manually close it or choose another studio item?
-
Moving multiple layers at once
Pedro Antonio replied to bringmedown's topic in Pre-V2 Archive of Affinity on iPad Questions
To quickly select multiple layers at once in either Affinity Designer or Photo for iPad, select the VIEW (Hand icon) tool first, then tap on one layer, move to the last layer to be selected and use two fingers to tap on that layer. To deselect any individual layer(s) in between, swipe right. -
Copy-Paste to other apps?
Pedro Antonio replied to biteything's topic in Feedback for Affinity Designer V1 on iPad
I've altered a Bodoni Ornaments font character in Affinity Photo that I've converted to Curves ( after typing the character, selecting the Rectangle tool and tapping on the Curves option in the contextual palette at the bottom of the screen and then using the Pen > Node tool to adjust the points ) and integrated it into my project. I'd like to take advantage of the vector features in Affinity Designer and adjust it further as a vector object, then reintegrate the results into my Affinity Photo project. So I tried selecting this Affinity Photo object in numerous states ( as both points and actively-selected points in the Node tool and just as an object with the Move tool ) and then copying it into the iPad's clipboard, but Designer's clipboard won't acknowledge any copied object being actively present in it's Copy/Paste dialog menu. Of course, I could save my Photo work as a transparent .png file, import it into Designer and THEN create and alter the converted font character there—and, yes, being able to use that same Photo file in Designer for sizing and positioning my font character is helpful—but now I've lost access to my Photo object layers, as they've been flattened in Designer. The prospect of effecting continual changes—making visible and flattening only the layers of my Photo file that lay beneath the font ( which don't allow for seeing in real time how it now looks with the layer objects being visible above…NOR being able to further edit my reimported font directly in Photo anymore) AND more-than-likely having to save-and-import/export my file repeatedly in trying out various possible looks during that stage of my creative development process—veritably drains a fair measure of creative fun. At minimum, not being able to import and export objects between Affinity iPad apps inefficiently lengthens the amount of time it takes to render a result that finally meets my creative sensibilities. Most importantly, these limitations overall effectively throttle both my creative energy and process. It would seem developing something akin to Affinity's desktop StudioLink for its iPad apps should be considered a priority feature that could and should be implemented first, rather than waiting until Affinity Publisher also becomes available on iOS. In addition, being able to import both gradient & color swatch palettes ( especially a color-labeled palette for color-blind and limited color-challenged users ) AND a four-arrowed directional, pixal-length-configurable NUDGE graphic icon, alongside an X & Y dialogue fields display—within a contextual palette that appears at the bottom of the screen whenever using the Move Tool—round out, in my long-time Affinity user experience ( the "newbie" refers to my posts ), as three of the most valuable and useful features that really could and should be added to Affinity Photo for iPad in it's very next update. -
[Designer] Change default unit
Pedro Antonio replied to FrankOverIP's topic in Pre-V2 Archive of Affinity on iPad Questions
I was frustrated importing existing photos into Affinity Photo for iPad in having to deal with the Transform dimensions default set to Pixels with no apparent way to change the overall document import default measurement to inches (or any other preferred measurement system) until I tried… Selecting the DOCUMENT icon at top left, tapping on RESIZE ( checking that the ratio lock was highlighted), changing the UNITS to inches, then tapping on the APPLY circle at bottom right and…voilá!—the TRANSFORM palette now renders all measurements in inches going forward. Although there doesn't seem to be a way to set a universal measurement display for photo imports, it at least does reset the current imported photo to inches in placing any subsequent items and/or continuing to work on that project. It would be great to have that universal default measurement option in SETTINGS…and while I'm on the subject of default settings, also: An option when using PLACE to import a photo or graphic initially as either: 1) Rasterized Original—since having to "draw" their size each time would make it SO much easier to import a set of matching photos without having to use TRANSFORM to set the X/Y and size dimensions for each subsequent photo placement import 2) Smart Object, which would then require selecting an additional SET-as-Smart-Object or SET-as-rasterized once the desired size was reached. This would speed the overall PLACE workflow considerably in not having to select RASTERIZE everytime before being allowed to Cut, Copy or Delete a selectioned area for each placed graphic. And a floating circle Nudge palette with four directional arrows (like in Adobe's discontinued PS Touch app) would complete Affinity Photo as my now #1 default photo editing and graphic design app on my iPad. -
move by increments
Pedro Antonio replied to valcoholic's topic in Feedback for Affinity Designer V1 on iPad
That works if you have a smart keyboard....I’m able to nudge with a tap in ProCreate and PS Touch. Please add ghosted 4-directional screen arrows ( so they don't block workspace canvas) or similar buttons in Transform Studio for next update–I use this feature for BOTH objects and selections all the time... VERY helpful, especially on a keyboard-less iPad. UPDATE - Just realized post refers to Designer...important for BOTH Affinity iPad apps–Photo as well. And SO wish forums had separate Photo and Designer sections...searching for answers very frustrating when Designer comes up in response to a search regarding Photo app! -
I'm transitioning from Photoshop PS Touch for IPad to Affinity Photo for iPad. Given that each app has it's own approach to their interface and functionality, there are general photo editing functions necessary for accurate sizing and placement. I've reviewed all the Affinity Photo tutorials relative to basic editing and compositing tasks and have not been able to find: Is there a 4-directional "nudge" tool to move a selected object a pixel at a time in any direction? I use this ALOT in PS Touch for aligning layers by lowering the opacity for my top layer and then aligning them so that they match exactly. Thank you., Pedro Antonio
-
DM1 reacted to a post in a topic:
Seperate Forums for Affinity for iPad Photo & Designer
-
Can someone please divide questions and posts for your Photo and Designer iPad apps into seperate forums? Its very frustrating slogging through topic headings that either cover Designer or Photo when I'm searching ONLY for those relevant to the app I need help with. PLUS a lot of the headers don't mention the app being asked about.
-
Can anyone help me in outlining ways to replicate my workflow and results when using PS Touch in Affinity Photo for iPad? I'd really love to upgrade my iPad to take advantage of iOS 13 for iPad's new OS. Thanks so much.
-
Now that I've tried working in AP for iPad, I've fallen in love with a number of its really great features...and figured out from my above posted list, how to: Create a layer from a selection (somewhat laborious); Save a project to my Photos app, which requires having it open and active (again, restricts my workflow in being unable to simultaenously save or remove multiple AP files from the AP gallery); Merge layers and related options (also somewhat laborious), Here's what I have yet to replicate from PS Touch that constitute a number of my frequent editing tasks: Saving work — MAJOR issue...if I've been working on a previously saved file for awhile in AP and decided the results have not achieved my intentions. I haven't been able to find a way in AP to disable the auto-save function, so I have to go into History, find where I started the session, select that History stage and perform another action in order to delete any changes I've made for this session. If I've opened a photo from my Photos and decided not to do anything with it, I have to delete it from AP's gallery—again, a time waster if I simply had the option to NOT SAVE or deactivate the auto-save function. — Though PS Touch offers no masks and a limit of 20 undos, it also has a very simple approach to leaving your current project when selecting the top menu left arrow: Save; Save a Copy; DON'T SAVE. Add/subtract from a selection — I find it very frustrating drawing a marquee within or passing over an existing selection to add to or subtract to it...and find my selection being moved instead. I have to start from off the selection (or off the entire canvas!) to do this, which doesn't always yield the intended result. — In PS Touch, I simply draw over an active selection and my area's added to or subtracted from. Its Clear and Extract functions offer instant removal of alternately either a selection or the unselected area. Deselect a selection — Also annoying is having to return to Selections Persona to deselect any selection, which really slows down my workflow. I've also found little to no use for AP's Selection as Layer option, who's functions remains a mystery to me. — In PS Touch, I simply tap anywhere either outside the selection or off the canvas in any tool to deselect...regardless of the tool that's currently being used. In fact, most menu functions are available regardless of the tool I'm using. And creating a layer from my selection is achieved with one menu tap...voila! Skewing a layer or selection — Again, can't find how to manipulate a selected (not selectioned) item using the move selection to change its perspective. — One major advantage PS Touch has is in the quantity of numerical entry features throughout. It offer's directional nudge tools and a numeric entry dialog for repositioning, rotating, reflecting or skewing items—as well as with marquee selections—all presented after selecting an item And though it doesn't offer the individual handle controls of the desktop app, it does have a warp mesh tool, which does a decent job. Making a selection through Replace Color — I'm struggling to find a way to replace a selected color with zero transparency. — In PS Touch the Replace Color feature offers Threshold options to remove a color by replacing it with transparency, which is often a great fast alternative to making a selection of an area in order to clear it. Match Color — I can't seem to affect changing a Placed layer's tonal colors to match my primary background. — PS Touch has a rudimentary function that shadows the superior PS desktop function, but manages to achieve some great results at times. Granted that AF offers a plethora of features missing in PS Touch: Masks; Editable tonal, adjustment and fx layers; History and 3-digit multiple undos; Guides and grids; Inpainting object removal...the comparative list dwarfs PS Touch's many limitations. Yet—and I know any app is experienced as being easy to use after having become very familiar with the way it functions and achieves desired objectives—I find my workflow and intended tasks in PS Touch are far faster and more results-yielding (allowing, of course, for my ignorance in how to achieve the same objectives in AF). Sometimes simple is...faster. And though I may have been focusing on specific tasks here, one needs to have worked for awhile in PS Touch to really experience the comparative points I've outlined. But then again—continuing to use PS Touch comes at a imposing cost in that it leaves my iPad stuck in iOS 10's twilight zone and prevents me from upgrading it to iOS 13. Aaaahhhh...if I could only have that same speed, comfort and satisfaction of workflow and results in Affinity iPad...yes? All my best, Pedro Antonio
-
I want to start being comfortable switching over from PS Touch to Affinity Photo for iPad (stuck using AP v. 1.6.5 in iOS 10 on my iPad Pro, as PST is not supported using subsequent iOS versions). Although your tutorials are somewhat helpful, I find AP for iPad's approach to my usual workflow often makes my attempts to do the edits I can achieve effortlessly in PST very frustrating for me using your app. I understand Affinity is not Adobe—your iPad version has features, options, and capabilities that render PS Touch into a dumbed-down, perfunctory photo editing app at best, though there's a lot to be said for simple when it still competently handles a majority of day-to-day editing tasks. I'm surprised, however that, for those millions of Photoshop users, there aren't tutorials skewed specifically towards taking an array of the most common Photoshop/PS Touch functions and replicating them in AP for iPad to make it far less daunting and more welcoming. Things like: Selections using AP's version of the Polygon and Magic Wand tool Removing selected areas or extracting selections within a layer Adding to or subtracting from exiting selections using AP's version of the various Selection Marquee and Magic Wand tools Saving photos back to the iPad's Photo app Using AP's version of PST's Mesh Tool Achieving similar results in AP to using PST's Fade (mask) feature How to achieve PST's Stroke and Fill functions in AP Achieving PST's Transform and Transform Selection features in AP Achieving the Merging, Merging Down and Flattening Layers into a single layer options in AP Achieving PST's Match Colors between layers feature to simulate a common, more naturally blended look between imported photos and/or selections in AP I really WANT to start regularly using Affinity Photo for iPad and taking advantage of all its advanced features so I can update my iPad Pro to iOS 13 for iPad....and then update my Affinity Photo for iPad to 1.7.3. Please help...thanks. All my best, Peter Donoso
-
Fixx reacted to a post in a topic:
In AP Allow Selection Copy and Paste from Image Layer to New Layer
-
...rather than have to first rasterize (convert to pixel) layer before being allowed to copy selection to new layer.
-
- 1
-
-
- Affinity Photo
- paste
- (and 2 more)