

Anyone2
-
Posts
67 -
Joined
-
Last visited
Posts posted by Anyone2
-
-
5 hours ago, v_kyr said:
Then follow GarryP's advice. - And note that cut out area as you initially stated is term wise not the same as copying an area here.
lol, yes i know. In reality it doesnt matter what i wanted to do with the selection, cut it out, copy it, paint over it, nada. That was not the point! The point was even though the selection was made, it did not select that area, but selected the whole image. Period.
-
2 hours ago, v_kyr said:
If you really wan't to cut out portions, you would have of course use cut & paste and not copy & paste, as the later (copy/paste) will just create a copy of the selected area in a new layer but won't remove the initial selected one.
yes i wanted to copy and paste several of the same one, or duplicate the copies.
-
5 hours ago, GarryP said:
To copy/paste part of an image via a selection the image needs to be a Pixel Layer rather than an Image Layer, otherwise the whole image will be copied/pasted.
You can convert an Image Layer to a Pixel Layer by rasterising it – in Layers Panel, right-click the Image Layer and choose “Rasterise” from the menu.
OH, i didnt rasterize it, i just went into pixel mode, thinking that rasterized it. OK! Thank you so very much.
-
Thats it. I have a png image of several different images on it. I want to cut out each one and put it in a separate layer. How do i do that? I have tried the lasso, to quickly circle one, and then copy and paste it, but it copies the whole image, not just my selection. What is up with that?
Ok thanks.
-
9 minutes ago, lacerto said:
Sorry, I did not realize that you did not have Publisher. You can then use any vector shape as a clipping object and make it basically behave as if it were a Picture Frame, though to scale and position the contained image you would need to use the Layer panel to select the image layer, and might need to toggle the Lock children option on the context toolbar to achieve what you want,
I also realized that you can use the Fill tool to position and resize an image that has directly been converted to curves and then shaped with Boolean operations (which causes the PPI to be changed to one of the document DPI, and typically being enlargened within its containing object) so even if you cannot e.g. see image meta data (like its PPI etc.), you can still resize and reposition the image within its containing object, and manipulate the containing object as you wish. The original image quality is also retained.
have not watched the vid yet, so will after i finish eating. I do have pub, i just never use it, lol. but what you showed was so easy i will use it for this type of construction! THANK YOU SO MUCH!
-
32 minutes ago, lacerto said:
Sorry for not being able to be less confusing: the concept of (Image) and (Pixel) layers are a bit non-intuitive in Affinity apps, but fundamental. I was trying to show ways to encapsulate an image layer (e.g. a photo placed in a Publisher document) within a vector object so that you can perform Boolean operations like interchange on the encompassing vector object rather then on the image layer itself, and without using workarounds that cause rasterization of the shaped photo.
One alternative would also be converting a placed image layer into a Picture Frame layer (Layer > Convert to Picture Frame) and then shaping that (similarly as was done on the video, though there an external photo is placed into an already created Picture Frame) -- and if wanted, convert the resulting Curve layer back to a Picture Frame for easier positioning and resizing of the contained image. This way you would also avoid the kinds of sizing issues that you would typically experience when converting image layers directly to curves (and then performing Boolean operations on the curved image). Converting an image layer to a Picture Frame would reset the PPI (effective pixel per inch value) to the document DPI value (e.g. 300 ppi), but you could easily resize the image within the frame by using the scale control. That is, you can manipulate the frame in any way and yet maintain the control of the contained image size and location, because the image stays encapsulated within the frame.
Whichever way you encapsulate the image layer, the point is that its pixel information stays unchanged so you work non-destructively, without deteriorating the image quality.
Oh i didnt watch the video, to tell the truth at the time i didnt realize it was a video, i thought it was a pic. Yeah, like i said before i was not centered! I just watched it, and realize you are in the publisher, not the designer. So i never use the pub, lol, only the designer and photo if i have to because its not available in the designer. Thank you so much, i get it! Its much easier in the publisher!
-
Ok this is the tut i followed:
and that worked fine yesterday, i went to bed and this afternoon, i did it on the next image. and when i press the delete key it deletes everything! what???? I did it 3 times starting over and yeah now it doesnt work at all. Here is a copy of the file. Its left at the point you hit the delete key.
What am i doing wrong? its not difficult.
-
I think i used the beta and it worked ok, but i cant remember. I got so frustrated i stopped working on my project, iirc. Good luck and thank you.
-
7 hours ago, Dan C said:
Hi @Anyone2,
Thanks for your report!
Your report mentions a 'resized' image, but the steps to reproduce don't include any resizing - so I'm unable to replicate this currently.
Can you please provide a screen recording showing the exact steps you are taking in the app please?
Many thanks in advance!
I use a win 10 computer, how do i do a screen recording? er what app? Seems i investigated this before, but i cant rem now if i found anything, other than using my phone to record the screen lol.
-
Exact workflow?
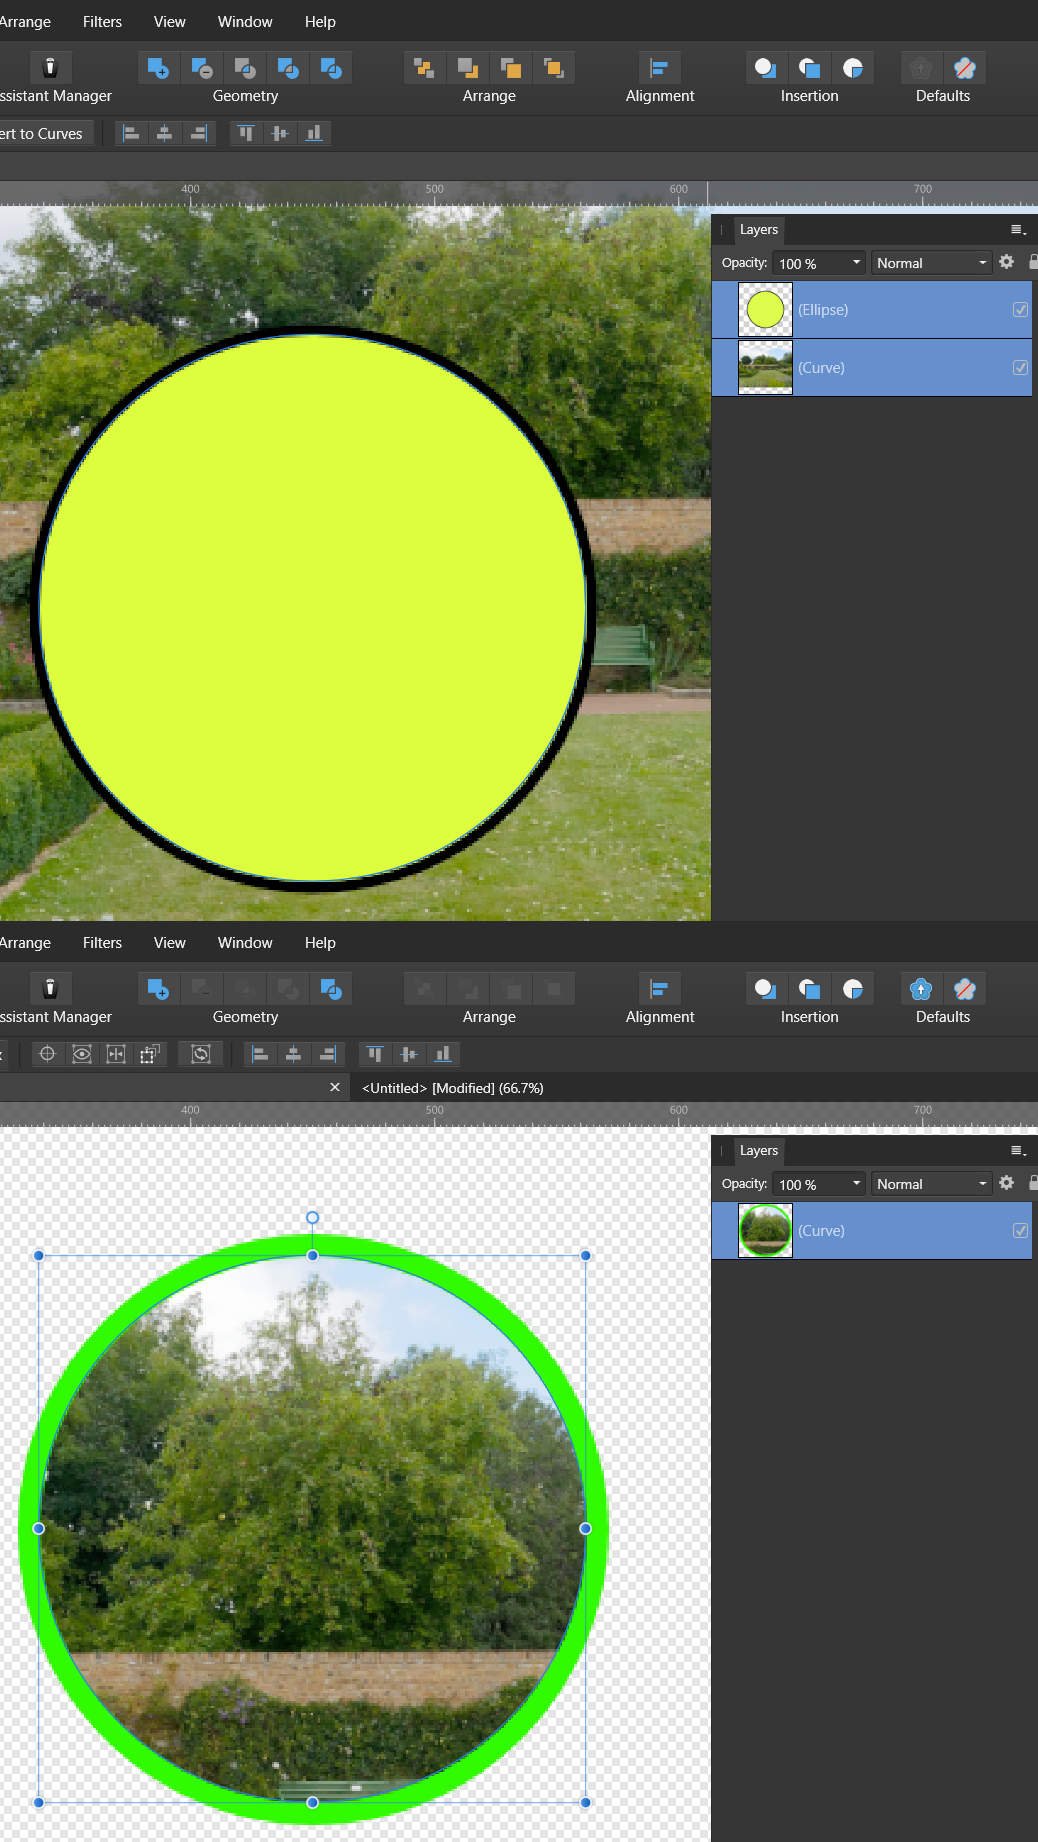
drop an image. Resize it to much smaller size using the select pointer. Now create the circle shape. Now set the image to curves. Now drag the image into the circle, at this moment, what you see is a circle cut from the 'un-sized' image, not from the resized image. The fix is to save the resized image, and use it instead, adding in more steps. Does this help?
Oh wait, lol sorry, above is how i ended up doing it. Later in the forum they explained how to do the intersection. Ok, so after resizing the image and turning to curves, you move the circle over the area you want to see, and hit intersect. At that point, if gives you the 'un-resized' image in the circle, which shows as much larger of course, and in the wrong area. It should be intersecting with the image you see.
So, im guessing it should rasterize the image, and make it a curve again and then intersect with it. Just a new subroutine needs to be added, for resized images. does that help? er is that what you are looking for?
-
5 hours ago, lacerto said:
You can work with an image in non-destructive way, not changing its original resolution, and use Boolean operations (like subtract or intersect) on the encompassing curve (shape). If you convert the curve to a Picture Frame, you can move and resize the contained image easily -- you can do so without using a Picture Frame by using a curve object for masking or clip masking, but then need to toggle the child-parent lock to have similar functionality.
Try to avoid working with pixel layers, or converting images directly into curves, or turning pixel layers to images (using the menu command, or using the Clipboard trick) just to get the ability to shape a photo or other picture type. Note, too, that you can first create the framing shape by using any vector tools available, and once ready to place a contained image convert the object first to a Picture Frame and then just drag the image content into the Picture Frame (you can drag images directly from the file system or Stock Panel, or drag images within the document or Layers panel into a Picture Frame control in the Layers panel).
Whooooooosh! right over my head? a picture frame? I read this twice, perhaps im not awake enough or centered to understand what you are saying, but it sounds like yes convert to curves, then no do not convert to curves. ... the clipboard trick? is that the copy and paste it in? I dont know that either. I would love to understand what you are saying, be in your head so to speak. Thank you very much, i will ponder this more while i await.
-
I followed this from a question i asked here on the forum, it worked, er did the intersection, but it used the original and not the smaller resized image i was looking at. Please fix this? its an important function. It wastes creative time to resize the image, save it, then bring it back in to do the intersection.
Starting with a pixel layer
Copy
Paste special/DIB
Convert to curves
Add shape above
Select shape and image layers
Boolean intersect -
13 hours ago, David in Яuislip said:
Starting with a pixel layer
Copy
Paste special/DIB
Convert to curves
Add shape above
Select shape and image layers
Boolean intersect
Add border if required
Yep i did it and it worked great, thank you. The only thing is, i resized the image to a smaller size, and when i cut out the bit, it was in the wrong area and very large. It cut from the original, not the resized one i was using. Interesting? pain in the neck, lol. so you must resize, then save and bring it in again. poo. But it worked so yeah!
-
13 hours ago, David in Яuislip said:
Starting with a pixel layer
Copy
Paste special/DIB
Convert to curves
Add shape above
Select shape and image layers
Boolean intersect
Add border if required
Thanks, i thought i tried this and it didnt work, ill try it again, as obviously it must work lol
-
15 hours ago, Pšenda said:
Image isn't "shape".
Try clipping.
https://affinity.help/designer2/English.lproj/pages/Layers/layerClip.html
Yes i know the image isnt a shape, thats why i called it a jpg. Ill watch the video, is it the same as the first response?
-
16 hours ago, Poziomka said:
You're doing it wrong.
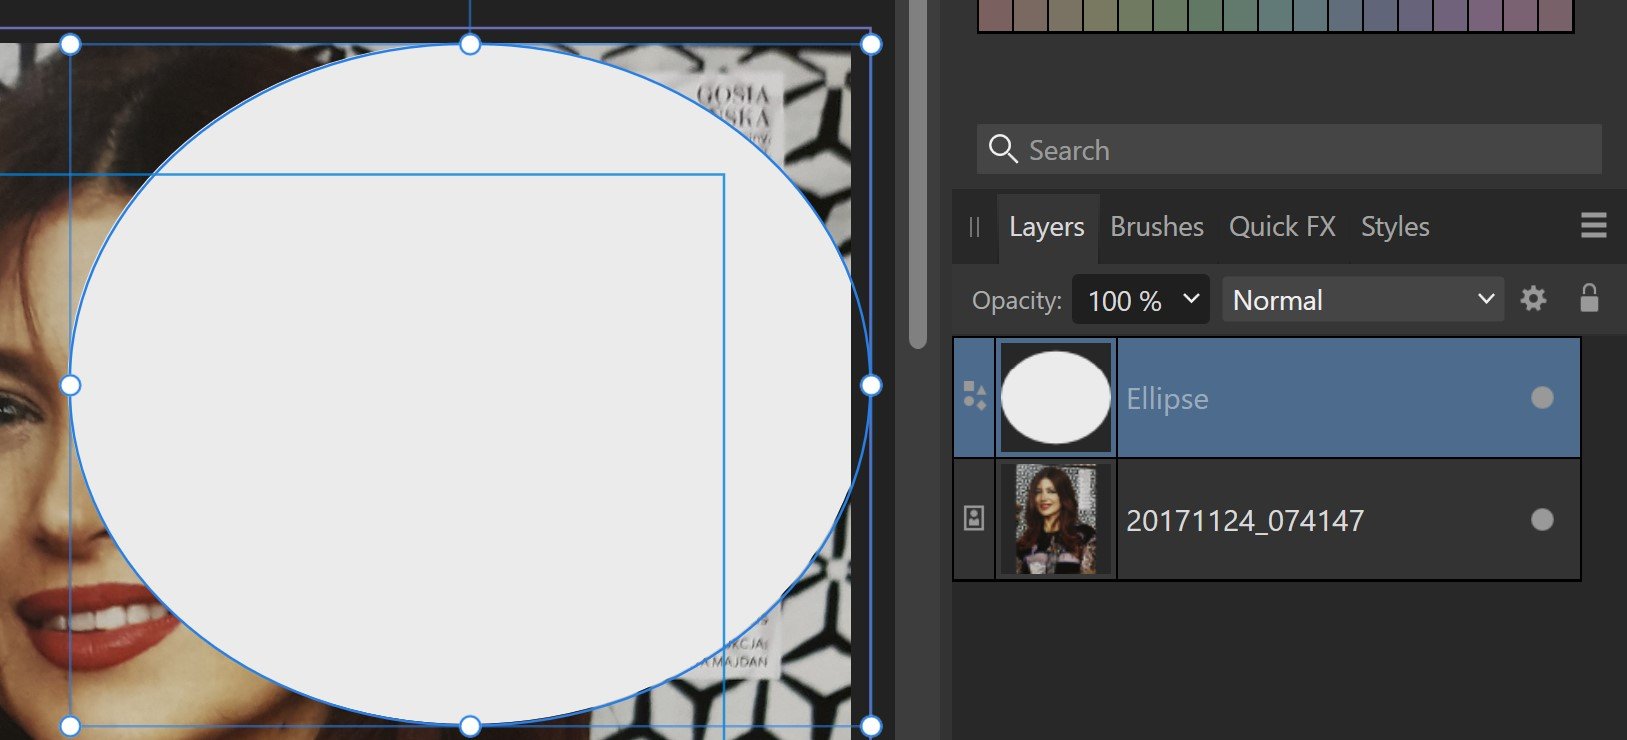
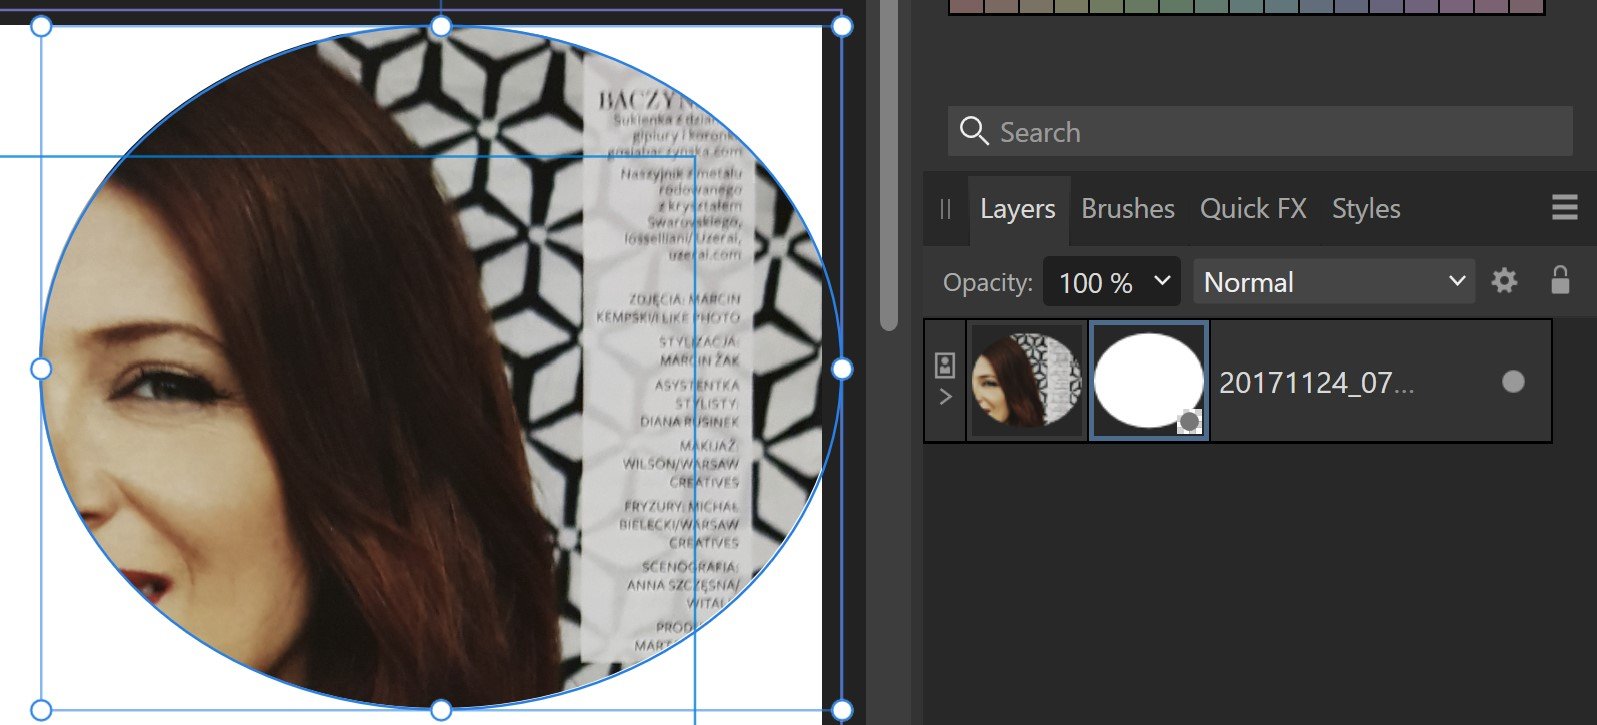
Intersect applies to vector objects. And you want to mask the image (jpg).
You can do this from the layer palette or from the layer menu.
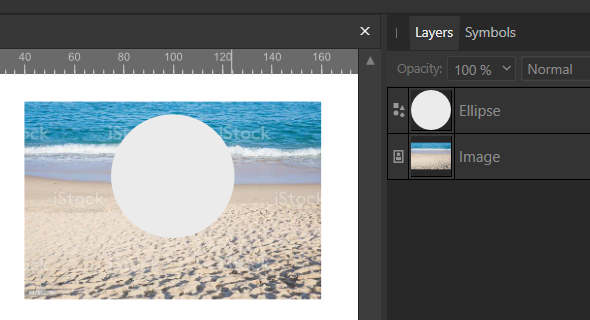
From the layer palette
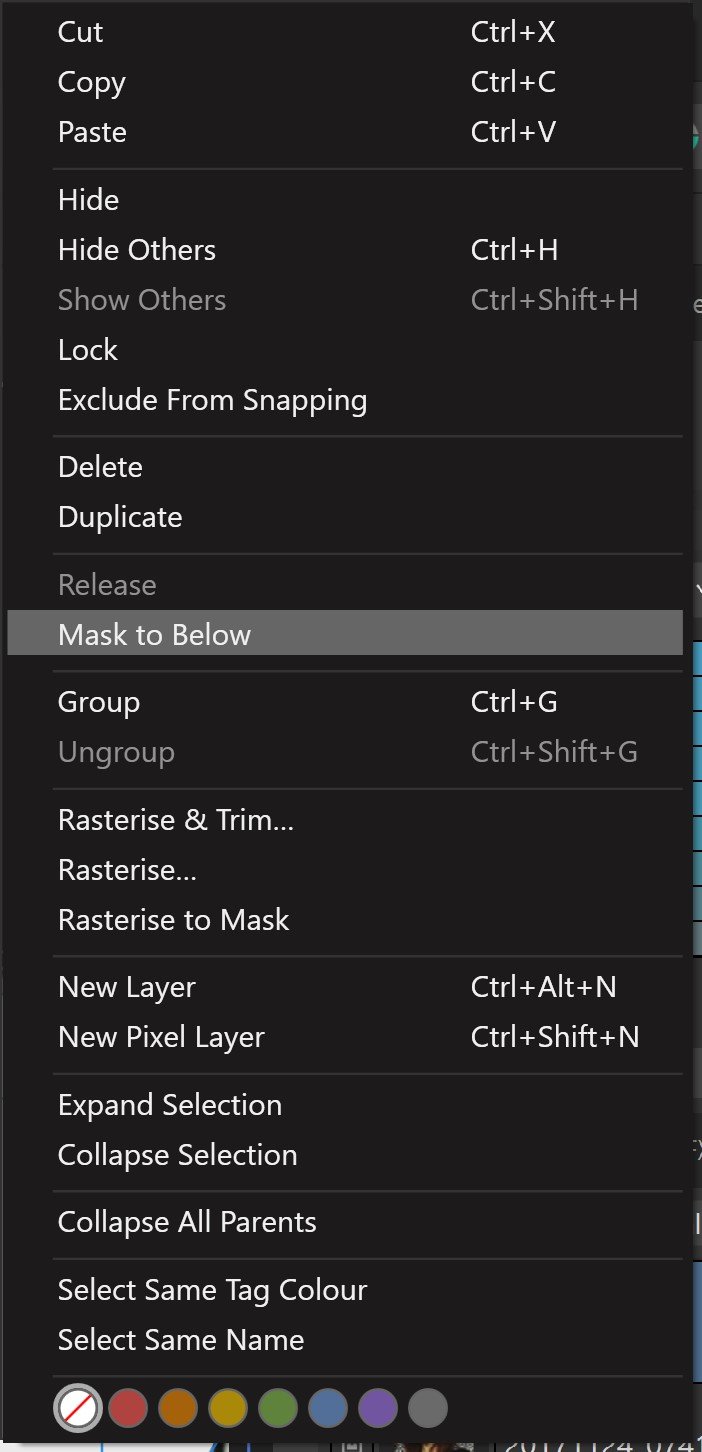
Select an ellipse in the layer palette and right-click. (See mask 1.jpg) From the context menu, select mask to below. (See mask 2.jpg)
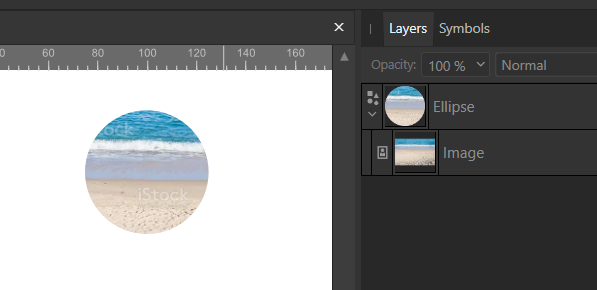
As a result, you will get (see mask 3.jpg)
From the layer menu
Select an ellipse in the layer palette. Go to the top menu Layer click and select Mask to Below (it is at the bottom of the menu).
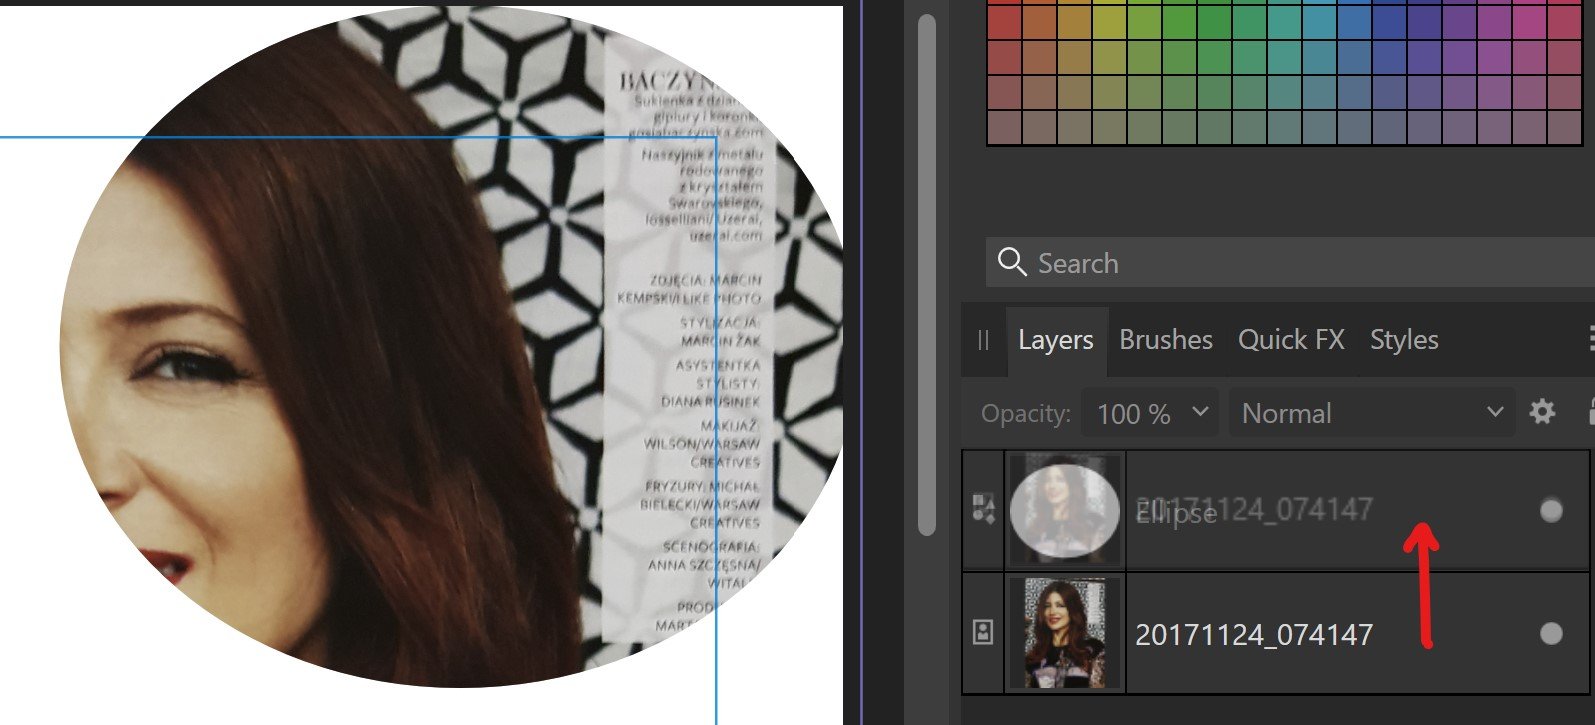
My favorite method is: in the layer palette, press hold the layer with the photo with the left mouse button and drag it to the name of the top layer (ellipse) when you see that it is already inside the ellipse - release the left mouse button. (See mask4.jpg)
That's it
This is what i ended up doing, the last line, your favorite way
-
I dont know what to call it. But, if i take a jpg and then draw a circle over the jpg with no color, and then select both and hit intersect, the full image vanishes, I would hope that what was inside the circle of the jpg below, i would see. But no, nothing just a white circle. So, can anyone tell me how to cut out shapes in this odd software product? Thank you.
-
You would think in 2023 this would be a simple task. yet in this crazy software it is not. Grouping doesnt work. geometrics add doesnt work, no flatten or combine layers in the menu for of the items. Really?
create the error again? sure. drop a jpg on the mat, copy paste it and slide the top one over a bit. now you want to adjust some attributes of both of them at the same time, easy right? wrong. Cant combine them or flatten the two layers into one. Group them and change attributes and it changes only one not both? what? I swear a couple weeks ago i could do this, not not.
-
Um, I may not understand, but if you group them then layer -> new adjustment whatever. It changes all the layers in the group.
-
8 hours ago, PierMax said:
Affinity publisher V2 Beta, problems clicking, no make selections well, Paste Inside no works, the object disappear
They may not see this, maybe post it here in bugs ?
-
I dont know, it seems when i do the ctrl click on the layer that it makes a mask when i delete parts of the image. I dont want a mask i just want to delete. There is something very wrong with this software!
-
9 hours ago, NathanC said:
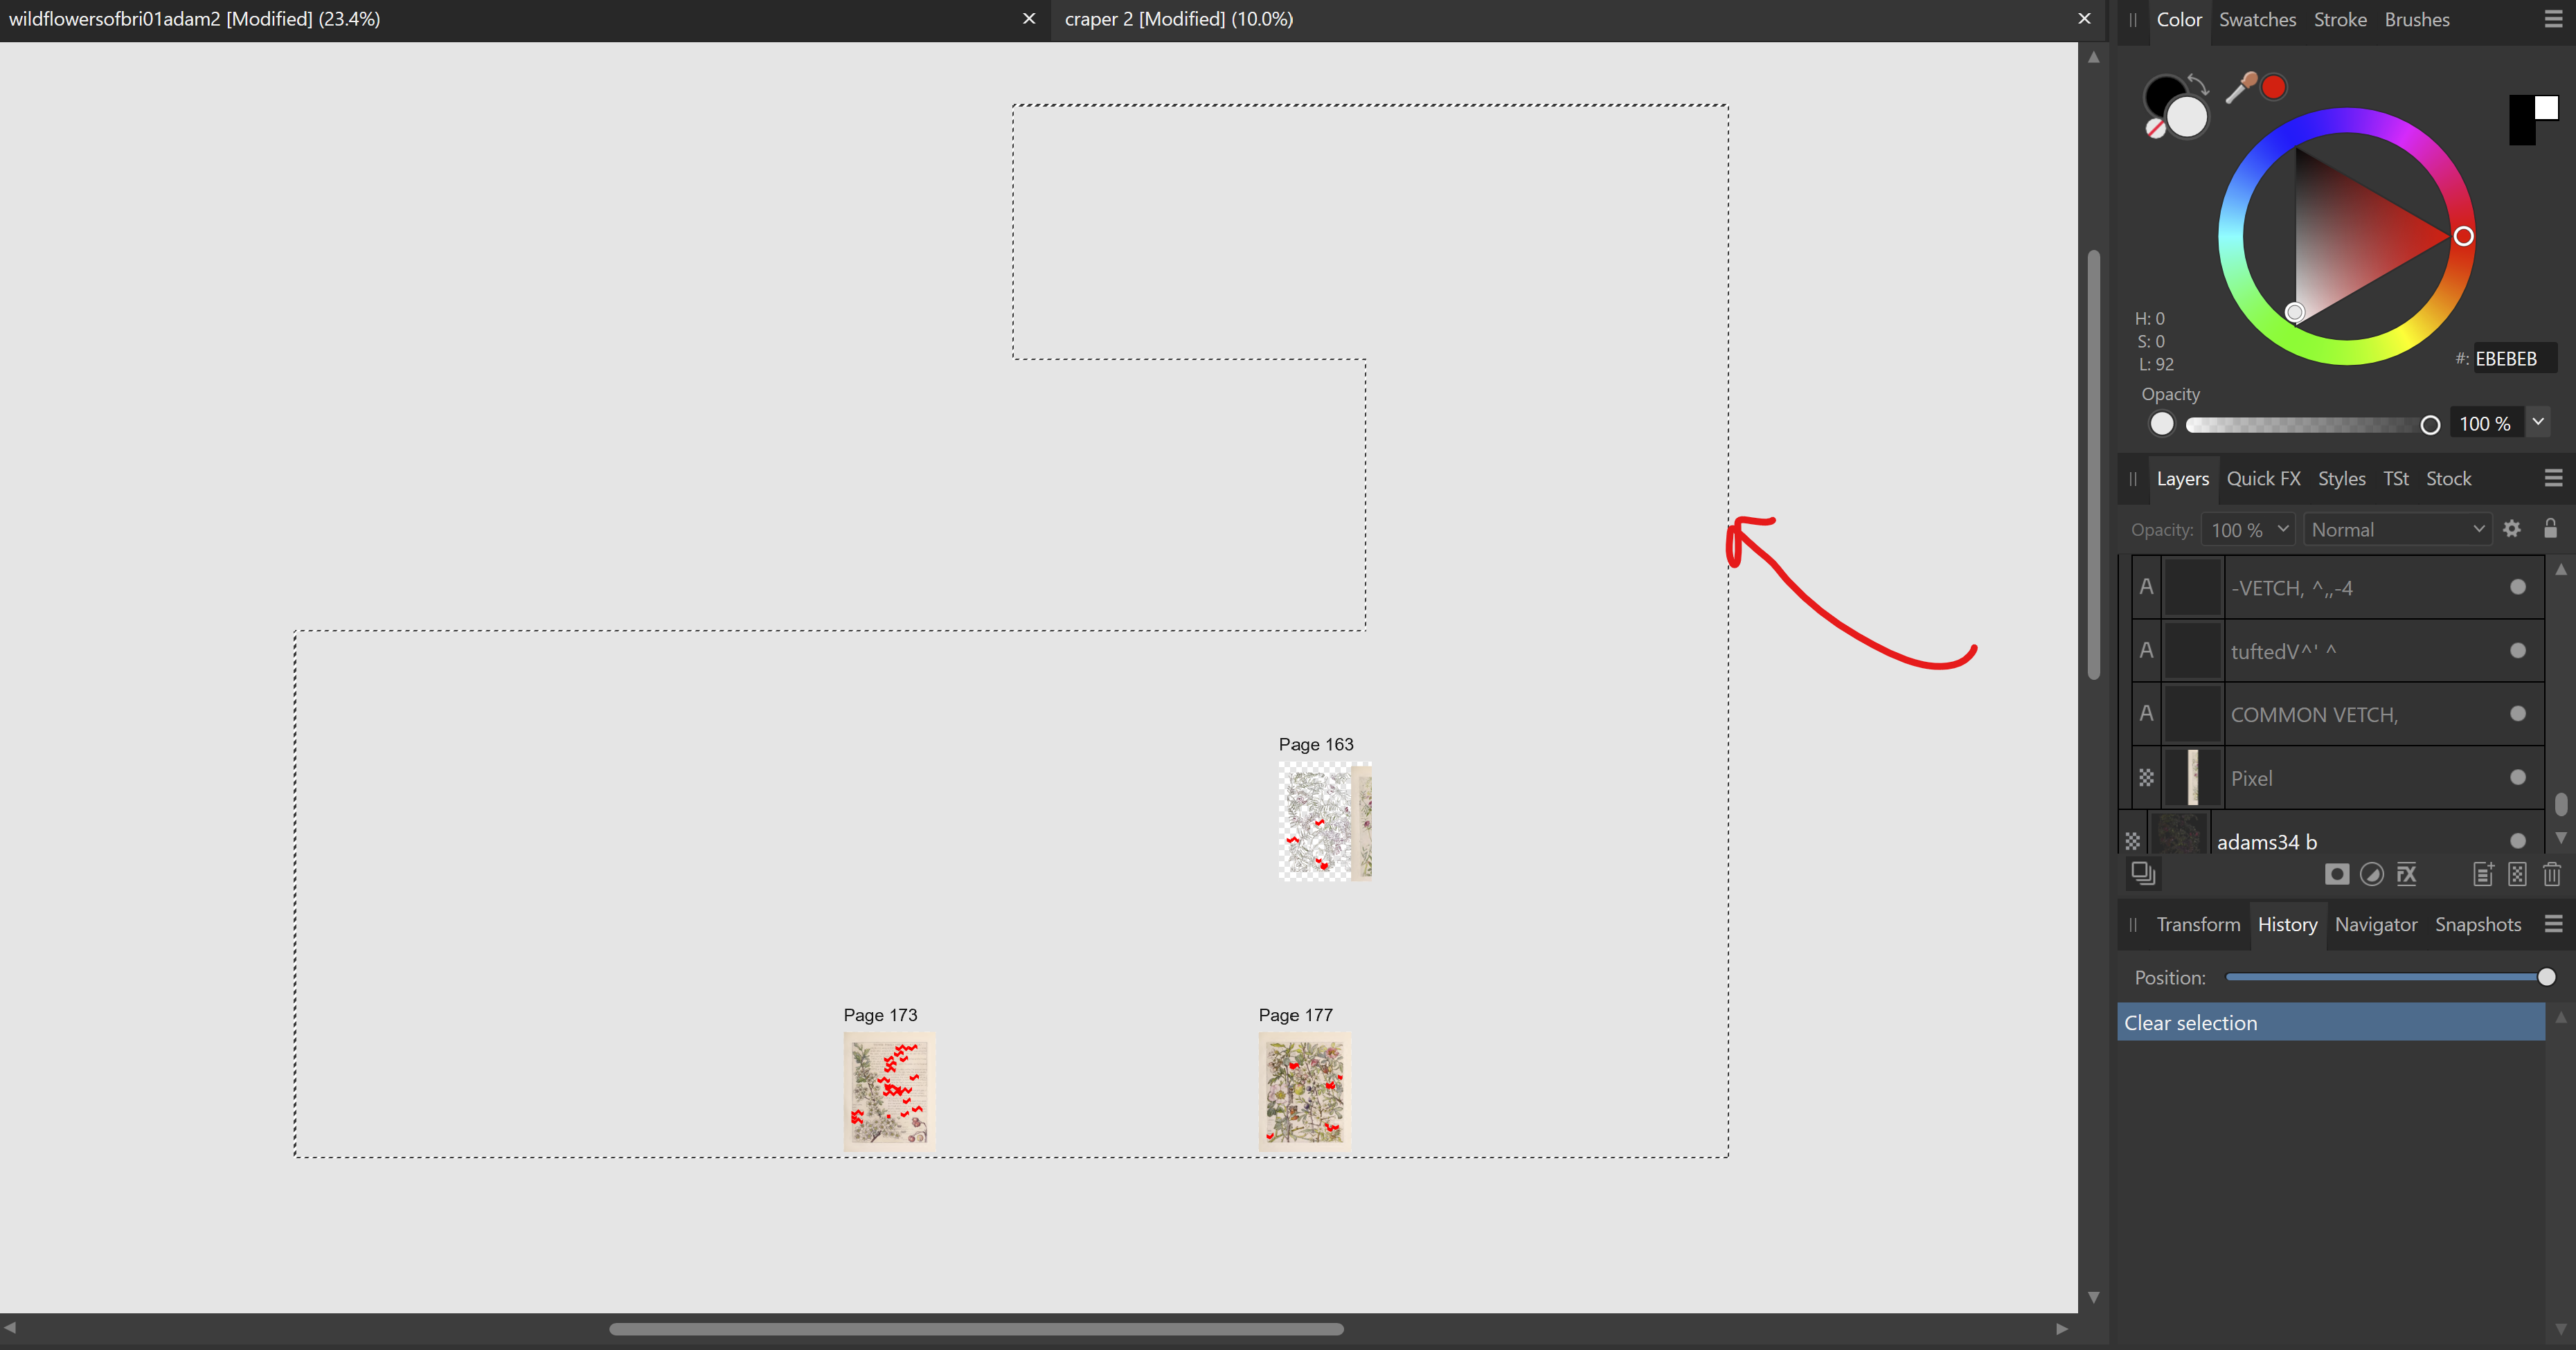
To clarify, after opening your document you have an active Pixel selection on your document as indicated by the marching ants in the screenshot below(Different to a standard layer selection which is indicated by the blue bounding box) which could be causing you problems whilst working on different layers within the file, the quickest way to cancel an active pixel selection is to use the CTRL + D command which cancels all active layer and pixel selections. After cancelling the selection see if you're then running into the same problems.
https://affinity.help/designer2/English.lproj/pages/Selections/selections_create.html
I will look at it, thank you for the info. Yes i did see that area was in the marching ants and wondered why and how that happened. Thats when i just closed it all down and started again. This last time i was editing i just started over, trying to get it done and move on. I have like 150 pages to go though. I looked at the link, and saw this
To create a pixel selection from a layer:
- On the Layers panel, click the chosen layer's thumbnail while pressing the . interesting it cut off 'ctrl key' part. I did not know that how you have to select a layer in the pixel mode. Im sitting here with a dumfounded expression on my face! Never did i expect that!
But you dont say why the software named my exported layer in the layers panel!!! i want it to remain named what i have it. It has no right to do that.
Also while you are there? that bounding line in the image is the art board right? why is it that shape? it was never like that before the last update, it was a square, or rectangle. Now its that goofy shape. its very distracting.
-
0
33 minutes ago, NathanC said:Hi @Anyone2,
After opening your file in the 2.1 beta i'm not having any issues with using the pixel persona erase tool on the pixel layers on your artboad. after ensuring that the pixel layer is selected on your artboard have you checked that your Opacity and Flow values along the context toolbar are set high enough for the erase to be visible? The Erase brush tool will also use your currently selected brush on the brushes panel, so it would be worth checking that you have a standard/basic brush selected on this panel as well.
If you're still having issues, it would be helpful if you could provide additional screenshots/ a screen recording of the app demonstrating the problem.
Also, after opening both your documents they both appear to have a pixel selection active covering all your artboards which might be causing you issues, it would be worth cancelling this active selection (CTRL + D to deselect).
I had selected the image by clicking on it in the layers panel THATS THE POINT, yet it wasnt selected? but all of them? That clearly is a bug. After using this software for doing the same thing over and over, it gets lost and goes off on its own. That is a bug. I dont change anything from working on one page to the next, it does it all by itself. I dont know how to record my screen to show you, hence this file. It got the way it is all by itself.
And why is it naming my layers? I did not tell it to name my layers !!!!
-
you know there is seriously something wrong with this software. Its all over the place. I pulled the top layer off to the side, to edit the layer underneath, then saved that layer then try to pull the layer from the side back over the edited layer. Now to find that layer thats on the side, i notice it has named and moved the layer i just saved to a different layer. WHAT? WHY? I dont want this! now i scan up to select the layer on the side, and find it and select it in the layer panel, then drag it over to its previous position. And what happens? its somehow moved other windows over? or i dont know im zoomed in, there is some long blue line on the left side of it dont have a clue zoom out and all the pages are inside a blue lined box what?, and if i try to send it backwards under the layer i just edited, nothing happens! who knows whats going on now? i dont. You know, this is all wrong, and not what i expected when i purchased it. No thank you.,


Solved AD 2+ How do i cut out areas and create new layers with those cut out areas?
in Affinity on Desktop Questions (macOS and Windows)
Posted
Hence, i came here for help. You must have something better to do with your time then to troll.