

nicola_0826
-
Posts
13 -
Joined
-
Last visited
Posts posted by nicola_0826
-
-
Hello
I sometimes have the problem in Affinity Photo, that my brush tool, by some 'strange' action from my side (mainly when I am trying to change the size of the brush with Alt Gr - Windows 11 - brackets don't work) is suddenly changing its form from circular to elliptical or from one circle to three circles or ellipses. It happens with either the mouse and the pen. I couldn't find an easy way to reset these kind of 'wrong' brush to its original circular form. It's obviously a problem of a beginner...
I would appreciate any help...
Thanks and regards
nicola
-
Hello - Thank you for your tipp...
Regards Klaus
-
Hello
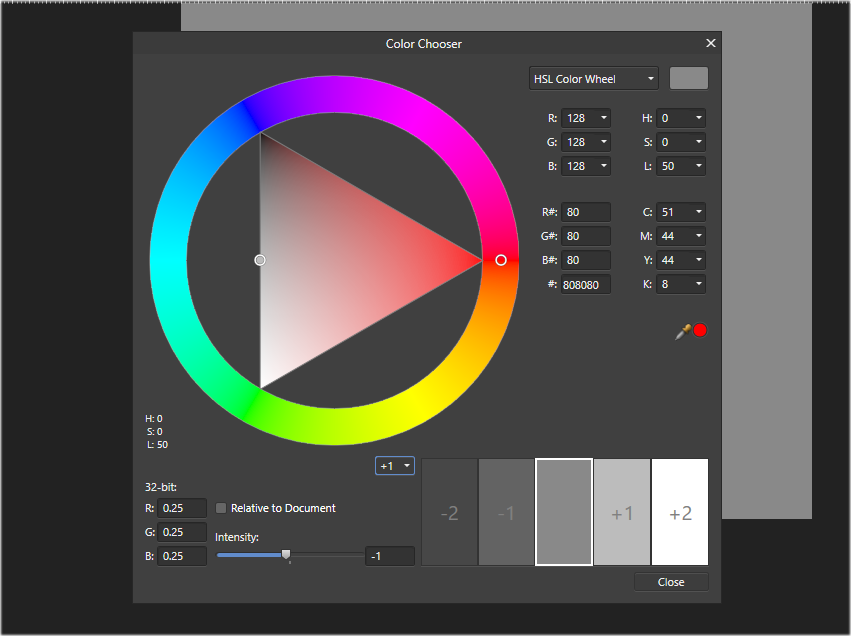
I am currently working with a tutorial with exercise pictures which I am copying from the tutorial source. When I open the copied exercise picture, my Color Wheel in Affinity Photo is lacking intensity (color-wheel_02). Starting up Affinity Photo the Color Wheel is OK (color-wheel_01). The reason seems to be the 'wrong' setting in the source photo which I copied...
For my work I would need a standard photografic Grey Card with H=0, S=0, L=50.
When I am assigning the above values to my 'wrong' Color Wheel I am getting understandably a grey tone which is too bright and does not represent the standard grey of a Grey Card. The easiest way for me to change that would be if I could 'reset' the Color Wheel for that picture to it's original setting, but I don't know how to do that. I found a way do change the intensity in the Color Chooser (color-wheel_03) by choosing an intensity of -1, R=0.25, G=0.25, B=0.25; but I am not sure if this grey represent really the standard grey of a Grey Card...
I would appreciate your feedback and advice.
Thanks and regards
Klaus

-
Hi iconoclast
Thanks for your reply. I found still a 'new' Photo Work Book two weeks ago at Amazon and ordered it right away. I am happy I still got one; it's a great book. According to Affinity there isn't any new edition planned right now...
Regards Klaus
-
Hi Walt
Thank you very much for your advice!
It's OK now...
Regards
Klaus
-
Hello
I lately purchased the Affinity Photo Workbook (which I find is a great book...) and was well able to download the Exercise Images for the various chapters. However, I didn't find any pictures for Chapter 1 - Interface Tour and wasn't able to download the resources mentioned on page 89 Developing RAW Images i.e. exposere_adjustment.ORF, tonal_adjustments.RW2 andadvance-adjustments.RW2.
I would very much appreciate if someone would help me any further.
Thanks and regards
nicola_0826
-
Hello PaulEC
As you proposed, I have now scanned the picture in .png-Format with 600 ppi in three segnents and then produced a panorama. The picture looks much better now and I think the impacts of the magazine fold could be 'corrected' much easier. According to your experience, would cloning be the appropriate method for that or is there a better way and tool?
And a second question: Should I scan the text pages of the magazine as well as .png-Pictures instead of using the .pdf-Format?
Thank you very much for feedback!
Best regards
Klaus
-
Hello PaulEC
Thank you for your feedback; you are certainly right; sorry...
I will make the 3 scans as you suggested within the next days and get back to you.
Best regards
Klaus
-
Hi NotMyFault
Thank you very much for your great feedback and all the useful comments and links. I will study the material in detail and keep it for my future work - hoping that I am capable to apply it properly... To do this thing right it is obviously much more complicated as I thought!
I you would like to spend more time and have another look to the problem I have attached the original scans of the 2 pages (scanning with 600 ppi on a HP Scanjet G4050).
Thank you and best regards
Klaus
-
Hello
I would appreciate if some of you could give me some advise on correction tools...
How would you 'eliminate' best the impact of a fold in a double-page photo in a magazine (see attachment)? I have tried several things; using different brushes (tried also textures), cloning, copying and pasting areas etc. - all with various settings - but the results do not really satisfy me (since I am not an experienced user of Affinity Photo yet). Which tool would you recommend and how would you proceed?
Thank you very much for your help!
Regards
nicola_0826
-
Hi clawjelly
Ich danke dir für deine Hilfe und deine detaillierte Anleitung!
Damit sollte ich nun klar kommen...
Grüsse
Klaus
-
Hallo
Als langjähriger Photoshop-Benutzer habe ich etwas Mühe mit der Definition und Nutzung des Affinity Zuschneidewerkzeugs...
Im Photoshop hatte ich beispielsweise ein Zuschneidewerkzeug mit den Dimensionen 140 mm auf 210 mm und 600 Pixeln definiert, das ich mit diesen Vorgaben beliebig auf ein Foto anwenden konnte und das mir unabhängig vom angewandten Bildausschnitt immer ein konstantes grosses Bild von 140/210 und 600 Pixeln lieferte.
Sicher ist die 'Sache' ganz einfach...
1. Kann ich ein Zuschneidewerkzeug definieren, das mir - ohne vorgängig die Dokumentengrösse auf 600 dpi zu ändern und unabhängig von dem von mir gewählten Ausschnitt - immer ein Bild mit den Abmessungen 140/210 mit 600 dpi liefert?
2. Wie kann ich meine persönlichen Zuschneidewerkzeuge definieren und ein persönliches Werkzeug in meine Auswahlliste (unter dem Zuschneidewerkzeug) speichern?
Besten Dank für die Hilfe
Klaus


Form of Brush Tool
in Pre-V2 Archive of Affinity on Desktop Questions (macOS and Windows)
Posted
Thanks for your feedback and links...