

Arti1
-
Posts
4 -
Joined
-
Last visited
Posts posted by Arti1
-
-
12 hours ago, ianrb said:
To make a dodge and burn macro
New layer >add soft light blending layer >name dodge and burn >done . Optional >fill layer with 50% grey .
Option second macro
Add vibrance/saturation adjustment layer >set both sliders at 25% >invent the adjustment layer (Ctrl +I) >done . Optional >use HSL adjustment layer >set saturation to minis 25% or less (don't forget to invert) . .. To use >set white soft low opacity brush >paint where the saturation is too strong . You may need to adjust the the de-saturation setting to suit the image .
When you have both macros working as you require you can make a third macro used the two macros above .
To add colour to an image >simple paint the dodge + burn layer with a suitable colour > Tip: to help keep things tidy you might consider added a colour dodge and burn macro to the Dodge and Burn/de-saturation macro .
I find it easier to make several smaller macros to combine into a large macro. Making macro can be a bit harder job than should be .
.
Go one step further with a "start" macro like this >Duplicate photo layer >turn off the top one >unlock other.
Options > add the dodge and burn macros ... Add 50% grey fill layer >move to bottom (Ctrl + [ ) >add contrast/brighten and white balance adjustment layer >set C+B to 100% contrast and brightness to around 30% (not important) . Now you have background layer from near black to near white and any colour you wish >you could also add colour balance a-layer .
True; not something you might use a lot, but I do so all done with one click and can be removed with one click")
My main start up macro also includes adjustment layers (as child) I use the most . Again; likely best to make an "add child adjustment layers" then add that the start macro .
So now you open the photo in affinity and click once . Now everything is ready to go with no thought or remembering to do this or that ; AND , there also an original file at the top to compare the editing progress . Not many do/teach that!
Believe me; once macros are understood it's far easier to do than it reads the above .
I have no acquired macros that I use

Wow
") thanks for the detailed instructions, I'll try it
thanks for the detailed instructions, I'll try it
-
1 hour ago, ianrb said:
If you cannot get the macro to work I would suggest you make a macro of the old fashion way .
Happy to explain if need be .That would be nice, please explain it to me!
I'm sure I can do it and I'm happy to try it but I need someone to explain.
Thanks in advance
-
On 1/11/2020 at 6:26 PM, smadell said:
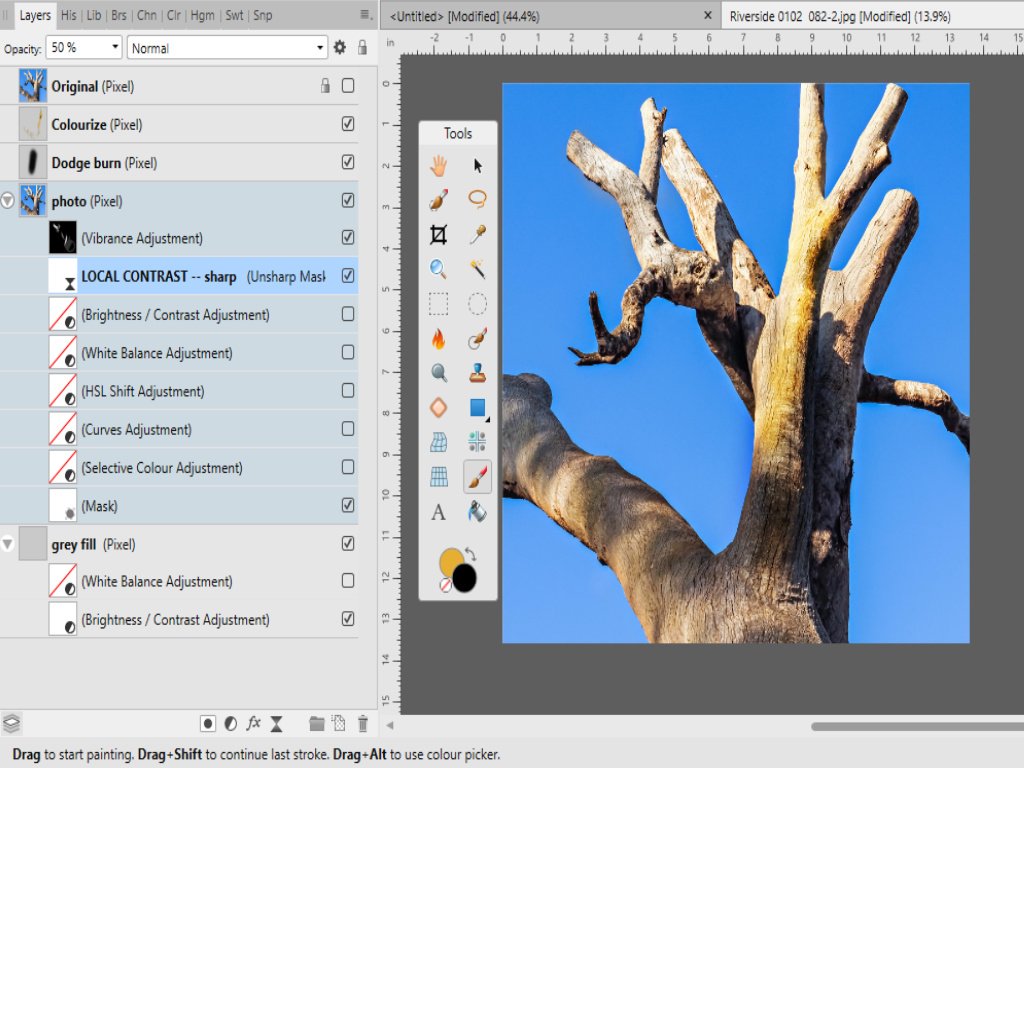
For completeness sake, I'll attach a macro I've used on occasion to do this. Like the macro above, it creates two Curves adjustment layers, one for dodging and one for burning. Three differences here: (i) I have not attached separate Mask layers, since this is redundant – the Curves adjustment layers already have a built in mask, and I don't see where anything is gained by duplicating this; (ii) I have set the Blend Mode of each of the Curves layers to Luminosity – this keeps them from affecting saturation and hue, and limits them to changing the lightness or darkness of the areas being affected; and (iii) I have changed the Blend Options on each of the layers, so that (at least in theory) the Burn adjustment layer should preferentially affect the darker areas, and the Dodge adjustment layer should preferentially affect the lighter areas – this is the technique one might use for dodging and burning portraits, for instance.
One other thing: when using any form of dodge and burn, I typically use a brush that (i) has a soft edge, so 0% hardness; and (ii) has 100% opacity but only about 1-2% Flow. This way, I know I can eventually build up to a 100% effect, but I only do so very slowly because of the low flow rate.
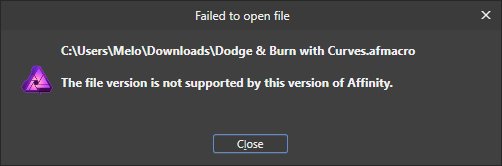
NB - this is an .afmacro file, so import it through the Macro panel, NOT through the Library panel.
Hi! Please help me, I'm trying to import this file into Affinity Photo newest Windows10 version 1.10 and I get an error message that says:
The file version is not supported by this version of Affinity.
I have read several threads here and I am trying to import the proper way (I know the difference between .afmacro and .afmacros ) I've also tried to rename the macros.propcol file but doesn't help.
Could you please check it if it works (imports) for you?
Thanks: Arti1

Dodge and burn
in Tutorials (Staff and Customer Created Tutorials)
Posted
Just a quick feedback")
I managed to recreate the layer structure (it was really hard but it's done now).
Tomorrow I will try to do this again, and record it as a macro")
But now I understand what the macro will do and why, so it worths the time working on it
Thank you, and I'm sure I'll have some questions after it's done