Ade H
Members-
Posts
15 -
Joined
-
Last visited
Everything posted by Ade H
-
Icons virtually hidden while customising toolbar
Ade H replied to Ade H's topic in V2 Bugs found on macOS
"More difficult to see" so I "have a point"? If this was a web UI, it would 100% be an a11y failure by any measure. -
When trying to customise the main toolbar in V2, the darkening effect is so strong that its current buttons/icons are virtually invisible. If I open a file first, any enabled buttons are a little brighter, but it's still not really manageable as the disabled buttons remain invisible. My workaround was to make a screen grab of the default setup before customising and use that as a reference to check what I was clicking on. I've also included a screen grab of my UI settings in case they are relevant.
-
Possibly a slight issue with reading comprehension there (it was not my question), or just being too quick to fly off the handle? I was merely giving my perspective, in the context of your argument with the other respondent, about why linking to help files is not actually very helpful. There is absolutely no need to be snippy about it.
-
Can the zoom value be permanently displayed anywhere* other than next to the file name in the status box in the main toolbar? I have hunted around for some while in preferences and UI customisations, with no success. It always irked me in V1, and seems the same in V2. Very often, the file name is long enough to push the zoom value out of sight until I hover the cursor over it to trigger the tooltip. * Other than the Navigator window. My screen is really too small to keep that open. Designer and Photo 2.0.4; MacOS Monterey; 13" retina screen.
-
Sorry for butting in to your debate, but as someone who asks questions, I think that just copy-pasting a link to documentation is nowhere near as helpful as a properly considered and insightful answer can be. It also seems a bit lazy and may not directly address the query. Speaking only for myself, I will already have checked the docs and very likely found them wanting. If I ask something here, I'm looking for a knowledgeable person's insight, as that's surely the USP of a forum. Those are the answers which I most appreciate.
-
I used the hexagon because I placed it over known points in a photo of the part to be masked. It has six bolt heads holding the part to be painted, which is a very complicated shape to mask neatly by hand. The circles, each joined by concave curves, make the edges of that shape and the bolts happen to pass through what would be the centres of these incomplete circles. It's difficult to explain. Anyway, the mask is cut and fits perfectly, so all good. Thanks for everyone's suggestions.
-
I may have misunderstood, but how would I know where to place the second circle in relation to the first? If it's out even slightly, that error will surely compound as I duplicate them around? I use Designer to make vinyl paint masks, so precision matters a lot. I'm surprised if there's no easy way to align the centre of a shape with a node in another shape/curve.
-
I need to align the centres of six equal circles with the corners of a hexagon. The hexagon will not exist in the finished work; I just created one in the belief that snapping would help me to align the circles. It didn't snap at all. It is important that these circles are precisely evenly spaced so that they effectively ascribe an imaginary circle, with exactly equal spacing between them. They don't touch; otherwise, I may have been able to place them in a larger circle.
-
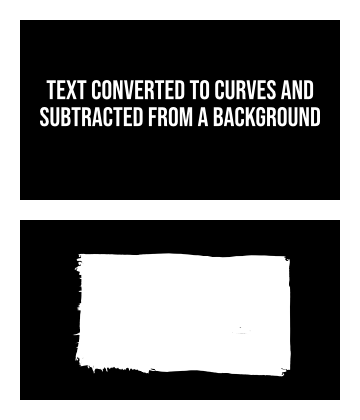
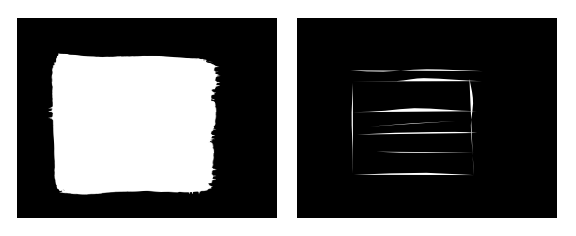
Background info: I use Affinity Designer to make vinyl masks (for airbrushing) via a Cricut vutter. I'm used to placing my design over a rectangle (with all objects converted to curves) and using the subtract button to turn it into a mask. Then it goes off to the Cricut app. Now, I need to make a mask which looks like a hand-painted patch repair (like you see on boat hulls, etc.) Imagine a square of paint, opaque, but with uneven edges and a few brush strokes just showing on the edges. But how can I paint/draw my patch and subtract it from a rectangle below? I have tried using the vector brush with a basic "acrylic" brush type, creating my strokes, selecting all relevant objects, and clicking the subtract button. Just as I usually do. But it does not work and I cannot really put into words how or why it is not working, so I will try to upload some examples. I have attached (if it works) an illustration of what I am used to doing (top part) and what I want to do (bottom part). Just imagine the white patch to be transparent. The second image shows a design before and after subtraction.


