Mtl_Biker
-
Posts
38 -
Joined
-
Last visited
Everything posted by Mtl_Biker
-
Selecting odd shapes... How?
Mtl_Biker replied to Mtl_Biker's topic in Affinity on Desktop Questions (macOS and Windows)
Duh. You're (of course) right! Working like a charm now. -
Selecting odd shapes... How?
Mtl_Biker replied to Mtl_Biker's topic in Affinity on Desktop Questions (macOS and Windows)
@Old Bruce - You really are patient and most helpful. Thank you very much. There seems to be something wrong either with my settings or with the Wacom tablet itself, as I can't get left/right scrolling to work (two fingers). Up and down works fine. But in any case, the moment I lift the stylus from the tablet, if I was in the process of selecting all the nodes of an object using that ALT-node tool technique, the selection progress stops. And if I try to start again, it unselects whatever was already selected and I have to start again. There doesn't seem to be a way to maintain the initial selected nodes and add to them after scrolling. I've always used the spacebar / stylus combo to scroll so the two-finger sideways scroll may never have worked. SHRUG In any case, I appreciate the kind help from you and others and I will move on and not bother you any longer. Cheers! -
Selecting odd shapes... How?
Mtl_Biker replied to Mtl_Biker's topic in Affinity on Desktop Questions (macOS and Windows)
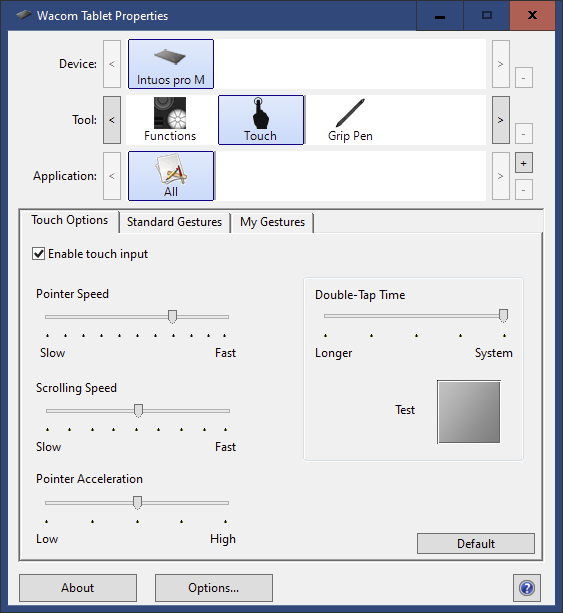
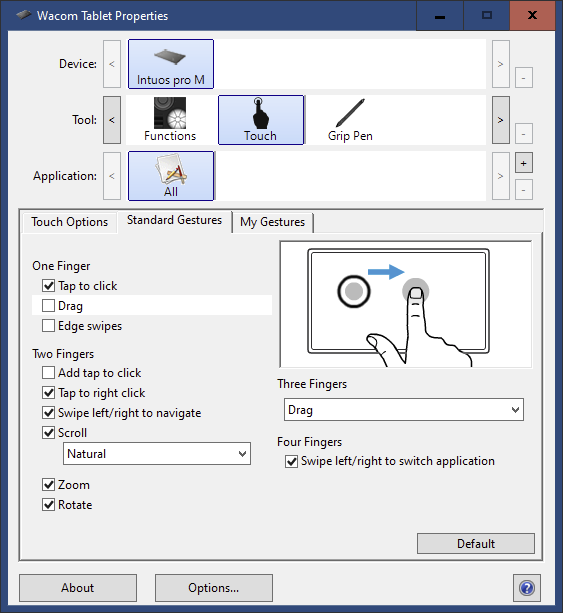
@Old Bruce- I also have the Wacom Intuos Pro (on my PC) and my tablet properties dialog looks like this: Are you saying that you can be using the stylus (like in doing your outline selection) and at the same time use your fingers to scroll the image? If so, that would be terrific and all I'd need is another hand.
-
Selecting odd shapes... How?
Mtl_Biker replied to Mtl_Biker's topic in Affinity on Desktop Questions (macOS and Windows)
Funny, I also use a Wacom tablet on my PC and a Apple Trackpad on my MacBook. But I have not found how to scroll WHILE also using that ALT-Node tool technique to select nodes. Your second suggestion does seem like an option though. Thank you. -
Selecting odd shapes... How?
Mtl_Biker replied to Mtl_Biker's topic in Affinity on Desktop Questions (macOS and Windows)
Darn! That explains it. Thank you. This file is a real mess... no groups of any objects, unconnected line and curve segments (a gazillion of them!) and no names to identify things. Crazy! Any suggestion about scrolling around while trying to ALT-Node select everything on a large object? -
Selecting odd shapes... How?
Mtl_Biker replied to Mtl_Biker's topic in Affinity on Desktop Questions (macOS and Windows)
Great! Thanks very much for that tip. I'd been banging my head against the wall and not getting it. It looks like it's all working well for me now. Only two small issues remain: One of the objects I'm trying to select is very large and very close to another object, so that when using the ALT-Node tool to select all the nodes, I have to zoom in quite a bit to make sure I'm not selecting nodes from an adjacent object. And then because I'm zoomed in, I cannot continue my selection of the entire object I want. Is there a way to scroll the screen while trying to select all the nodes of the object? Second even smaller issue is that on one of the objects I'm trying to select, once I draw my selection around it, it looks like everything is selected, however several small curves and rectangles remain behind when I move the object. I don't understand why they aren't also being selected first by my using the move tool to make a selection rectangle around the entire thing, and then with the node tool and the ALT key, drawing another selection around ALL the nodes. It's almost as if the few small things are not being selected, as if they were on some separate layer or group that is somehow not accessible. I can do without those small things but it's curious that they don't get included in the selection. And they're right smack in the middle of the object. If I move the large object off to the canvas, those little things remain behind and the nodes appear. If I then deselect, and draw a rectangle around the area where the small things remained, they show up in the layers panel simple as curves and rectangles, without being in a group or separate layer. So I select them and delete. But I'm finding it strange and I don't understand it. Thanks again! -
Selecting odd shapes... How?
Mtl_Biker replied to Mtl_Biker's topic in Affinity on Desktop Questions (macOS and Windows)
@MEB - Your suggestion seems like it's going to work but I am having trouble figuring out one part of the steps... I have the nodes of the object selected (ALT-plus node tool to draw a freehand selection around what I need) but I can't figure out how you move it off to the canvas. If I click the move tool that removes my selection. If I try spacebar and move with the node tool, that also doesn't work. So how are you doing that move with all the nodes selected? Thanks again for your kind help. -
Selecting odd shapes... How?
Mtl_Biker replied to Mtl_Biker's topic in Affinity on Desktop Questions (macOS and Windows)
Thank you! I haven't tried that yet, but it certainly does look like it'll work for me. My office is closing in a few minutes and if I get a chance to try it tonight on my MacBook I will, otherwise it'll be tomorrow morning back at work on my PC. Do you have to move the selection onto the canvas? I was hoping to keep the relative positions of the (newly grouped) objects intact. But that's a minor issue. Thanks again! -
Selecting odd shapes... How?
Mtl_Biker replied to Mtl_Biker's topic in Affinity on Desktop Questions (macOS and Windows)
Is there a way to draw a rectangular selection area and then ADD TO IT by drawing another rectangular selection area? It doesn't look like that can be done but if it could, it might help a lot in this situation. I don't know what the person who created this was thinking... No naming of objects (other than the default "curve", etc) and even instead of drawing a dashed line or rectangle, this is just a collection of short dashes. Each one independent. No grouping of components. Total mess. If the file wasn't so large with so incredibly many small objects, I'd be tempted to try to recreate it. What a nightmare! -
Selecting odd shapes... How?
Mtl_Biker replied to Mtl_Biker's topic in Affinity on Desktop Questions (macOS and Windows)
There are hundreds of "things" in each object so shift clicking each would take me forever and I might not even end up with all of them. Wire frame & x-ray views... Huh? Going to the help file to see what those are. Thank you. -
Selecting odd shapes... How?
Mtl_Biker replied to Mtl_Biker's topic in Affinity on Desktop Questions (macOS and Windows)
Unfortunately that option IS deselected. And whoever made this PDF used a gazillion line and curve segments (all named line and curve) without being closed paths. When I draw a selection rectangle around some of these odd shaped objects, I end up also selecting about a hundred other small pieces and even then deselecting them through the layers palette is not going to work because some are so small and the file is so large that I can't even see which thing gets selected/deselected. Being able to draw a lasso around what I want would be the best. And that I haven't been able to figure out if it's even possible. -
Selecting odd shapes... How?
Mtl_Biker replied to Mtl_Biker's topic in Affinity on Desktop Questions (macOS and Windows)
The problem is that there are a gazillion objects on this thing, and they're all named... "curve". There are so many and the file is so large that it's also hard to see which particular line/curve gets selected or deselected. Would be much easier to just draw a selection around everything I want. And that's what I haven't been able to do. -
I've inherited a PDF file that I need to edit. There are several objects consisting of multiple shapes and I want to select only one object at a time (and then group all the shapes). Using the standard rectangular selection tool I can't select what I want - I always get a whole bunch of other items. If I switch to the pixel persona, I can use the freehand selection tool but all that does is draw a selection around the objects without appearing to actually select the objects. What am I missing? Thanks for any help. (Designer v2.0.0)
-
Whether I'm trying to print or export, the setting was "Whole Document" and in my case everything was moved up above all the artboards. So basically the same settings and the same document. Only by exporting to PDF does everything print/appear as it should. In case it makes any difference to this, what I've done was to open a large PDF file that I purchased. It was designed to be printed on a roll plotter using 36" wide paper. I've been trying to set it up so that I could print on my much smaller printer and then trim and tape the pages together. On that large PDF file there are many elements (it's a men's dress shirt) so what I did was (in that large file) to select various elements and copy them to the clipboard. Then paste them into the new document that I'd set up using artboards sized so that I could print them. I paste them and then immediately make them a group and move that group up to the top, above all the artboards. So I have groups like "Shirt Front", "Shirt Collar", "Shirt Sleeve", etc. In the end there are no placed items on any of the artboards. Yet because I've moved them to the top, they all appear like I expect. So I guess what's confusing me is that they "print" (whether exported to PDF or printed directly) differently. The only elements actually on the artboards are a rectangle around to make it easier to trim the pages after printing and alignment triangles for aligning them. The actual artwork is in groups up above everything.
-
I'm (obviously) a little confused about artboards and object containment... I have multiple artboards (all butted together) and if I place a PDF on top that's larger than the artboard size, it is visible only on the artboard it was placed on. I get that. So I select the PDF in the layers panel and drag it up to the top above all the artboards. Now it's visible on all the artboards so the entire PDF can be seen. Okay. But if I try to print it, if I select to print artboads, the PDF does not print. And if I select document to print, only one page prints and it's not even the first one. I don't understand this. It looks like I would have to have copies of the PDF on EVERY artboard that it covers. But if I EXPORT to a PDF format, all the artboards AND the PDF I'd placed go into the new PDF. And I can then print that PDF perfectly. This is all so confusing to a newbie like me. SIGH
-
Wow! Thanks again for your kind help. By "printer's marks" you mean the ones I create, right? The rectangle around each artboard plus the registration triangles? Or are you talking about something else? (Sorry for being such a newbie.) How do you go about placing the PDF onto each artboard, in exactly the right position? If I do all the placing at the top left (of the first artboard) then all the placings would be on that first artboard and again I'd have to select it and move it to the next artboard, etc. Which seems pretty much to be what I'm doing. Am I not seeing an easy solution? And given that I have that bought PDF that's very large, I guess you're suggesting I copy it and paste it onto a new document? Instead of somehow modifying the bought PDF.
-
No apology needed! I appreciate your help! I lack the experience to know how best to handle this. I looked at the slice links you kindly provided and I'm not convinced they are the answer to my needs. Maybe I should approach it from another direction... Say I have a large PDF... (I just bought a PDF pattern.) The size is 35" x 89" (it's meant to be printed on a large format roll plotter). I don't have such a printer. My printer uses 11" x 17" paper, but needs half an inch of border so the actual printable size is 10" x 16". How would you go about printing this beast? In such a way that the pages could be trimmed and then accurately joined/taped together. Thanks for any additional help and suggestions.
-
With my multiple artboards, after I place a PDF on them, I can select it and move it up to the top and then it does show across artboards. And properly prints also. So maybe this is just the way I'll have to continue doing it. I don't quite understand your further suggestion (sorry, newbie here). By "printable area" do you mean my paper size (11" x 17") or the 10" x 16" (allowing for 1/2" margins) that I can actually print? Or are you talking about the actual full size of the design, which may be something like 30" x 36"? I don't see how I could print this if I made my canvas 30" x 36"... or how to get my rectangles with registration marks to print on each paper page as needed. I'm probably dense about this. I appreciate your helpful advice. If I do size my artboard(s) to 10" x 16" and place a rectangle around them and add my registration triangles, each page does print properly and I can easily trim around the rectangles and use the triangles to perfectly align the pages to each other. The only hassle with this is placing my PDFs on this... I always have to grab them and move them up to the top so that they show (and print) across artboards. But in spite of that, it may be the most easily workable solution.
-
Slices? Gotta look that up. Thanks. How about the registration marks (my little triangles) for aligning the pages after I print and cut them?
-
My printer uses 11" x 17" paper but can only print to within 1/2" on each edge. So I have been sizing the artboards to 10" x 16", putting my rectangle around them and placing my registration triangles. Let's say I have a grid of my artboards, 2 x 2. Is there any way to place a PDF in a way that it's on top of all of them? And not just on one, that I then have to grab and move to the top? No way I'm going to have 4 copies of the artwork!
-
I really could use some guidance about the best way to do what I want... I'm trying to make clothing patterns which would end up being larger than pages I can print. So they have to be tiled. What I've tried is to create artboards sized to the maximum printable size my printer supports (1/2" margins) and I've placed a rectangle around the edge of each artboard that should print, and also little triangles. The rectangles would be used for cutting the pages and the triangles for aligning pages to each other. Then I simply copy the artboard to create as many as needed for the full design. Then my design (or a placed PDF) goes on top, spanning several artboards. The problem I'm having is that if I place a PDF on top of an artboard, it ends up showing JUST on the artboard it was placed onto, when I really want it to show on top of as many artboards as needed to show fully. So I select it, and drag it up to the top of the layers palette so that it shows as it should. But if I then select it again and reposition it, the PDF ends up moving onto one of the artboards and again I've got to find find it, select it, and move it to the top again. It's a PITA! Am I approaching this the wrong way? Should I be doing it differently? What I need is a template I can use over and over, sized to the max print size my printer can handle, with my rectangle and registration marks on each page. In a way that I can drop designs on top and move them around with them showing on top of everything. My way IS working but it's super annoying. I'm hoping there's a more efficient way. Thanks for any help.
-
Printing from iPad scaled instead of 100%
Mtl_Biker replied to Mtl_Biker's topic in V1 Bugs found on iPads
How do you think a photo of a printed rectangle could possibly be of help? Using the iPad, I just created a totally new document, using the new document Print setting with US Letter size and scaling in inches. I created a vertical rectangle 3" by 4" with a 1 pt black outline. Printing it from within Designer on the iPad to my Brother L5200-DW laser printer OR my Epson WF-4720 results in a rectangle that is a hair over 1/8" reduced in size. Exporting the document in PDF format and then printing using the Files app to either printer results in an exact 3" x 4" rectangle. Pretty simple to explain (and duplicate). I don't have my MacBook Air with me today but all my prior testing showed that the rectangle printed correctly from within Designer or via export to PDF perfectly. -
Printing from iPad scaled instead of 100%
Mtl_Biker replied to Mtl_Biker's topic in V1 Bugs found on iPads
This simple document should print the rectangle 3.5" x 4". It does so when I print from Designer on my MacBook Air, but is scaled when I print the same thing from Designer on my iPad. It's a US Letter size page. Pouch Flap.afdesign -
Printing from iPad scaled instead of 100%
Mtl_Biker replied to Mtl_Biker's topic in V1 Bugs found on iPads
Yes, I'm using method #1. And it doesn't scale up... it scales DOWN. Meaning the resulting image is smaller than it should be. Using method #2, it does NOT scale at all, but gives 100% sizing. I'm using US Letter size. You guys have mentioned printer apps... I do not have printer apps for iOS (iPad) for either of my two Brother laser printers or for my Epson WF-4720 printer. If I export from Designer using PDF format, I then locate the file using the Files app, and then using the Share sheet, select Print. Both my Brother and Epson printers appear and print to properly (not scaled) without any specific printer app or driver. My printers are all Apple AirPrint compliant. -
Printing from iPad scaled instead of 100%
Mtl_Biker replied to Mtl_Biker's topic in V1 Bugs found on iPads
Thanks for trying that, Walt. I don't have a Windows machine with any Affinity programs on it... my Windows machines have PhotoShop and Illustrator. I hate Adobe's subscription scheme and that's why I went with Affinity on the MacBook Air (M1) and iPad instead. Probably don't have to repeat this, but printing from within Designer on the MacBook results in a perfect full-scale print. As it appears to do from Windows thanks to your testing. But on the iPad the result is scaled. And there doesn't seem to be any way to control the scaling of the print. And it's not like the document is larger than the paper size either, so it really shouldn't be scaled. Exporting the document as a PDF from iPad Designer and printing that from the Files app does give a properly accurate result. Cheers!