meridian360
-
Posts
67 -
Joined
-
Last visited
Everything posted by meridian360
-
I've used symbols in many other programs. And in short order, AD's implementation is industry non-standard. If/when I bother to post about it, we can talk about it then. If you want, download a trial of AI or look up the tutorials of AI's use of them and compare, as one example.
-
Yup. Symbols: Can of worm opened! lol.... And it would be a feature request, so it'd be my own take, with my own experience with decades of experience using both Freehand and Illy. I can't use AD's Symbols as they are now. So, it would probably just me yelling into the void (again) on here. But if enough people are making a stink, as it were, they should take it to heart and think about it. That would be my counter argument to seeing a list of earlier posts and saying, 'it's already been covered, so forget about it.' If something doesn't work as expected by a good number of people, those people need to speak up and they need to respond, is my thinking. -- If they don't respond, they risk becoming no better than Adobe.
-
Yup, I hear ya on that. I'm glad things haven't devolved to the 'usual'...but why would you want to do that... that is too often prevalent in user forums. So I appreciate your inputs here. I sound cranky for sure, but it's because I want to push AD to be better, mostly to stop paying the Adobe tax. But I keep hitting really high barriers to being able to use it for what I call Production Work. SYMBOLS: Oh yeah, I've already opened that can of worms. I use "images/pngs/gif" as "symbols" in the map files. Believe me, I tried to find a way to export the little-s symbol out of the GIS as a text character to no avail. So they are, as yet, still images. But I refer to them as symbols, because they are Map symbols. But what I found with how AD works with Symbols, capital S... That's gonna be its own thread in Feedback. lol... [hand meets forehead]
-
It appears there are two "requests" that are coming out of this: 1) upon pdf import, do not import empty layers and 2) some UI/UX to find/select empty layers once the file is open... Now, why this comes up: because when exporting map data, we cart-heads, export a bunch of point data, like bathrooms, POIs, peaks, falls, springs, pull outs. The GIS source is on the same layer, so they come in on the same PDF layer. -- But in the AD file, they need to be sorted into separate layers for map purposes. That's what I mean by "dealing them them". I have to move the content from the input layer into new layers. -- And when the sorting is done, the input layer is empty (or in AD's case there is still all those empty layers from import). If I could select all the empty layers, it would be easier to 'get to' the real content of the symbols. Meaning, only the symbols are remaining so then it's easier to sort at that point. I still have to deal with AD's layer panel, but that's a different subject. ha!
-
Nope. Because you can have layers with content on import. then you deal the content, say move it to a new layer... Now you need to remove the old, empty layer... so you still might need an option to select the empty layer. OR at least make the layer panel easier to deal with. If AD is all you've used, it might seem normal, but it's far from industry standard. There are other ways that are faster.
-
I'll add that AI doesn't have a "select empty layer" tool, because it's so quick to see which layers are empty and then select and delete them. One because the UI can be made smaller, so you can see more layers at a time, it's easier to see if a layer has content within it, selecting all content within a single layer (and only that layer) is stupid simple and clear, and then to select the layers and delete them is easy. AND THEN... the icing on the cake is when you try to delete a layer that still has content, you get a dialog that asked you to confirm if you really want to delete that layer. -- I have my issues with AI (surprise surprise) but the layer panel makes things like this super easy and super quick.
-
Nope, no toggle to remove it. This file, and others like this that I've brought in, just show up as the symbols being images on the default layer. They are not nested on their own individual layers, let alone nested down in a sub-layer. So, I can just select them in the Layer panel...then use the Layer Panels UI to move those objects that are selected to another layer simply by dragging a small UI element from one layer to another layer. All those selected elements can be in sublayers and such, but they still get moved. If you try the same thing in AD, you have to drag them manually by having the source objects and target layer all visible. If objects are in sub-layers, they won't get moved, they get deselected. Yup, I guess having to push this to the suggestions might get some more eyes on it. Fingers crossed.
-
Have a toggle, "Import layers, even if they empty".... [shrug] ??? Especially when there's no official way to select empty layers and sub-layers. Moreover, the Select All method with Edit All Layers toggle ON, does NOT select object in sub-layers... yeah, having objects all mixed in with empty layers is a pain "easily" avoided??
-
Yup, if you copy and paste one of the text labels into a text editor like Bbedit: AD) pastes the xml code, AI) pasts the formatted text So there is power to the AD engine, but perhaps too much! ha! Le Sigh!!
-
Opening it in Illustrator results in no empty layers. The two PDF interpreters are doing different things with what's in the PDF. So, even if the PDF has all that empty stuff, why does Designer keep it? On my M3 Pro laptop it opens in Designer in about 4 minutes. But the sorting took a lot longer due to Designer leaving in the empty layers (and then how selecting and moving objects around in the Layer Panel are vastly different, ie slower). I can open and sort the file in about 5 minutes (I actually did this) in Illustrator.
-
Yup, it takes a few minutes to open. In Illustrator it opens right away. Usually AD's PDF engine is really good. But there are quirks. Embedding these symbols in empty layers is one, and then combining text labels into Frame text (or area text) is another one. Adobe owns the rights to the PDF format/code, but I'd be curious to know why the two programs deal with these things so differently. The symbols are on top of each other on purpose. That's due to the scale of the map. And part of the "fun" of making a print map. Sorting all that data from the GIS into something meaningful. I have to make new layers for each class of symbol and type, and then move all that stuff into the right place. So having Designer create empty layers is just kinda odd to begin with. But then not having a clear way to deal with them is frustrating. But again, you solution works. Sidenote: And right now, Designer's tools to deal with selecting, moving objects and anything to do with the Layer panel is a lot slower than Illustrator. If I sound like a grump, it's because I want to get away from paying Adobe a monthly fee, but Designer just isn't ready for (my) production work. So I desperately want Designer to be better.
-
Yeah, Designer imports the symbols in the PDF as images. The structure is the image and an empty layer, both inside a layer. Then there are a bunch of those where there are no images, just empty layers with sublayers. --- Then all those layers are grouped ad hoc. So that's where I had to start off by ungrouping everything. top level layer --- image (aka symbol) --- empty layer (in the layer panel it is named the same thing that the symbol is named, from the GIS source, but it's still empty) That structure is repeated over and over for each symbol. But again, some don't have the image, just the two nested layers. And the ones with images are all mixed in with those without. Going through hundreds of those manually would be a huge time sink. -- but for whatever reason, your trick of selecting same object by width works. But why Designer sees layers as things that can be selected by width just seems weird. -- Especially when the select all keyboard shortcut doesn't work on sublayers. thanks for the help.
-
Thank you Carl! The actual phrasing of the method makes no logical sense because the empty entities are all Layers, not Groups or Objects....VERY OBTUSE....sigh. But gosh, if that didn't work! So Affinity: if you folks reads these forums, how are seasoned graphics pros supposed to randomly figure this stuff out? Why not just have a function that "select all empty layers"? or better yet, have the PDF engine not make empty layers in the first place.... ?? If it's a known issue, why hasn't it been addressed yet? [yells into void]
-
Did a search and nothing came up. Sorry. Even tried the node tool and that's inadequate (to me) because of the Layer Selection obtuseness (IMO). Sigh. Thanks for the meaningful, topical reply. I sincerely appreciate that. Cheers, .curt
-
As I said in the other post I made, do you have a solution [to] the problem? Is there a toggle to increase the number of shown objects? The question is why 250? Can we make it higher? Did I miss something? If not, then it becomes a suggestion to make it higher. So again, any helpful ideas? Thanks.
-
Well, does anybody know... CAN we select empty layers? The point still stands, right? Can you help me with the issue?
-
PROBLEM: I import a pdf from a GIS and Designer interprets the point data (think points of interests, etc) as Layers. Each has a symbol, maybe a text label, and then another empty layer inside that. - Note: Illustrator does NOT interpret this PDF data this way. It just seems that as individual objects. No extra empty objects to deal with. I just select by color or stoke, etc and sort into new layers. I'm done in five minutes. - So in Designer: Everything comes in as Groups. So I have to first ungroup everything But then there are those empty layers! And they might be within other layers that do have content. So you have to ungroup everything to get to your content. Designer offers no direct means to select objects from sublayers and transfer them to other layers. (AI layer panel has the extra UI piece next to the layer that lets you move selected objects between layers, doesn't require you to scroll through the whole panel and drag stuff) And you can't select the objects (think park symbols for a map, like ranger stations or toilets) because they are layers deep. And because of Designer's Selection system, you can't select those symbols and easily move them to a new layer. Ok, so one idea is to drag select on the artboard, and then move all the objects to the Top. Nope. Because the objects in the original PDF were interpreted to be in sublayers, Designer only moves them to the top of that sublayer. So the Layer Panel is 'worthless' for this process of having to sort objects from the PDF. You can't turn ON Edit All Layers: because it won't do anything to the empty layers You can't turn OFF Edit All Layers: because then it won't even select the objects two layers deep. (And doing so still selects objects in hidden layers...?? Why...??? sigh.) THE ONLY SOLUTION: Is to somehow select the objects you want to keep, copy into another document, and then paste them back into your 'good' document. Or maybe into a new top level layer. But you still have to deal with the empty layers manually. And hope that they really are empty as you delete them. OBSERVATION: When the only visible indication of what you have selected is one big bounding box, it's almost completely worthless. If objects are in a group and you select the group, it doesn't show you've selected anything; not in the Layer panel or the artboard, not in any meaningful way. --- Show us what we have selected, please. I've attached the PDF from the GIS. Open it in Designer and then Open it in Illustrator. Notice the difference it how objects are interpreted. I opened and had the stuff sorted in about five minutes in AI. Designer is just a mess. There's so much extra work and hoops to go through to do simple production work. - And part of it is the PDF engine and how it's building out the file. Yellowstone 50k roads POI maplabel names_Default.pdf
-
PROBLEM: Designer doesn't, by default, like to show you the object boundary selection "boxes" for Individual Objects. - Click on a layer gives you the Bounding Box for the entire extents of the selected objects. Now, if you start selecting individual objects, either from the Layer panel or from the dartboard, the selection boxes do start to show up (along with the full coverage bounding box.... - BUT, once you select MORE THAN 250 OBJECTS, the individual boxes are removed and we are left with only the full extent bounding box. QUESTION: Why the limitation? Why just 250 objects? Why is Affinity, for the lack of better terms, stingy with the selection boxes? MOREOVER: Selection UI/UX is Designer is so industry non-standard already, this practice of essentially hiding selection boxes just makes it that much more difficult to use Designer. In other words, it makes it hard to see what you have selected, if they aren't highlighted on the artboard with the selection boxes. PLEASE: turn on selection boxes to ALL objects that are selected (or have it an object in program settings) rethink how users select objects on layers! The 'universal' toggle is just cumbersome. -- Shift+Click on a layer should select on a layer - or - click on a UI icon to select all on that layer - or - a keyboard shortcut! THEN, (and I'll keep beating this dead horse until it happens)...let users transfer/move/copy objects to other layers without having to dragging the selected objects in the layer panel ---> keyboard shortcut or drag selection icon between layers once objects are selected (yes, like AI, because it works and so. much. faster.)
-
Sorry, couldn't figure out how to split up the quote so I'll reply as clearly as I can: Oh, ok that replay thing did work.. This has been my experience with Serif completely. No way to give feedback, at all. At least Adobe has Dev forums; more on that in a moment. It's like their choices they've made, and the workarounds WE have to implement (feedback be damned) that are the most frustrating. --- As to the Affinity forums, there are the Super Users, or the Super Excusers, one might say, that really do more harm than good. The ol' "why would you want to do that?" gets really old. Adobe Illustrator Dev Forums. I was active on there a few years ago. It's my impression that Adobe is nothing more than a marketing company that has a few coders locked away in some dark cube farms. And they high five each other when they come up with some new bloat features to add to the product. Again, my impression, being liberal with my estimate, is that the Illustrator team is no more than 10-12 people. It's small. Adobe is starving it. And it is does not share resources with other apps like Photoshop. Features that would cross-pollinate would be met with "we'll have to talk with them but no guarantees" sort of language. (Try copy/pasting intact vectors from AI to InD...doesn't work!!! or didn't the last time I tried). They weren't under any understanding of what their users did with their product. They were "engineers" not designers. It was readily apparent the mission was to add features. As many as they could, as fast as they could, to compete with the competition... [looks around]. Yup, what competition, right? Fix bugs? Nah. Replace the damn type engine that was decades old and causes(!!) regular crashes? Nah. We have new stuff, look at us! They even had this new feature of changing the way Layers and Art Boards interacted!!! Sound familiar? That idea got rejected by Users pretty quickly. Of course not. That why I buy all sorts of apps. But Affinity Designer is NOT ready for prime time. It is NOT ready for production work in my field. It's not a narrow view. It's the reality based on nearly 30 years of experience. I want aD to succeed so I can switch to it. But if I dropped AI, and used aD TODAY, I'd end up charged client more money, they'd be upset and I'd lose those clients. See how that works? If a different tool takes twice as long to get the same output done, is it worth using yet? That's where I'm at with aD. But I'm giving Affinity and any of the devs who actually read this, feedback to make it faster so I >can< use it someday. Right now the right tool is unfortunately still Illustrator, but I desperately want it to be Designer. That's why I'm here, pointing out what's "wrong". And as to the export answer, read the whole thread. It's not just about cutting it up after the work is done. It's about having the pages and layers interact. And having content be free to flow outside the bounds of art boards...before you even get to exporting things. Thanks for the reply.
-
Yup, I was too quick. But it was something so basic, I just went with Spelling. -- But it did take Adobe nearly 20 years to assimilate Freehand's Find such and such graphic spec, so who knows...
-
Yup. As it is right now, I simply can not use aD for paying work projects. Some things are just adjustments in habits (ie. rotating type: using just the type tool and then trying to precisely select the type object to move it into place vs. Rotate tool allowing for rotation at any point, then temporarily switching to command key to select and move it into place, rinse and repeat. That's a habit change.) But, there's too many workflow tools and routines that are too slow compared to the elephant in the room. Those can't be overcome with just a change in habit. They are just slow, by default and no matter how many time you repeat them will they speed up. They're just slow/er. I'm not doing that to paying customers.
-
This is what I'm trying to wrap my noodle around. What aD does well, it does REALLY REALLY well. Opening PDFs, zooming in, snapping (mostly), content display, toolbar display. It's super smooth while panning, zooming and such, even with big files. The display engine seems to be super efficient. But then they just dig in when it comes to 'industry standard' stuff like Find/Replace Text, Selecting Objects, Moving Objects In and Around the Layer Panel. Just standard breaking ui/ux stuff that adds extra (or uh weird) steps to get production work done. There's such great potential for aD and the whole suite to be an Adobe killer. But these user facing workflow protocols that seem to be made up by committee just really seem to get in the way. I don't get it. Just moving objects from one layer to another is soooooo tedious compared to all other graphical program forefathers. Do aD users not know there's a better/faster way? Are there patent issues? Has no one come up with any other way? --- I keep using it on my personal stuff, to become more proficient with it, hoping for a breakthrough. But I keep finding tripping points that slow me down compared to AI and FH. (Select objects, click the 'move to top' button....but the layer panel is still showing you where you were, not at the top with your selected objects! Um...Hm... Maybe I moved them to the top for a reason? Because I now what to do something with them...they're still selected. Sigh. Or moving objects to another layer....only moves the objects in the Layer panel that are showing in the layer panel at that moment. Not all the selected objects, just the ones visible. Um....) Horse --> aD--> Water... aaaaahhhhhh....
-
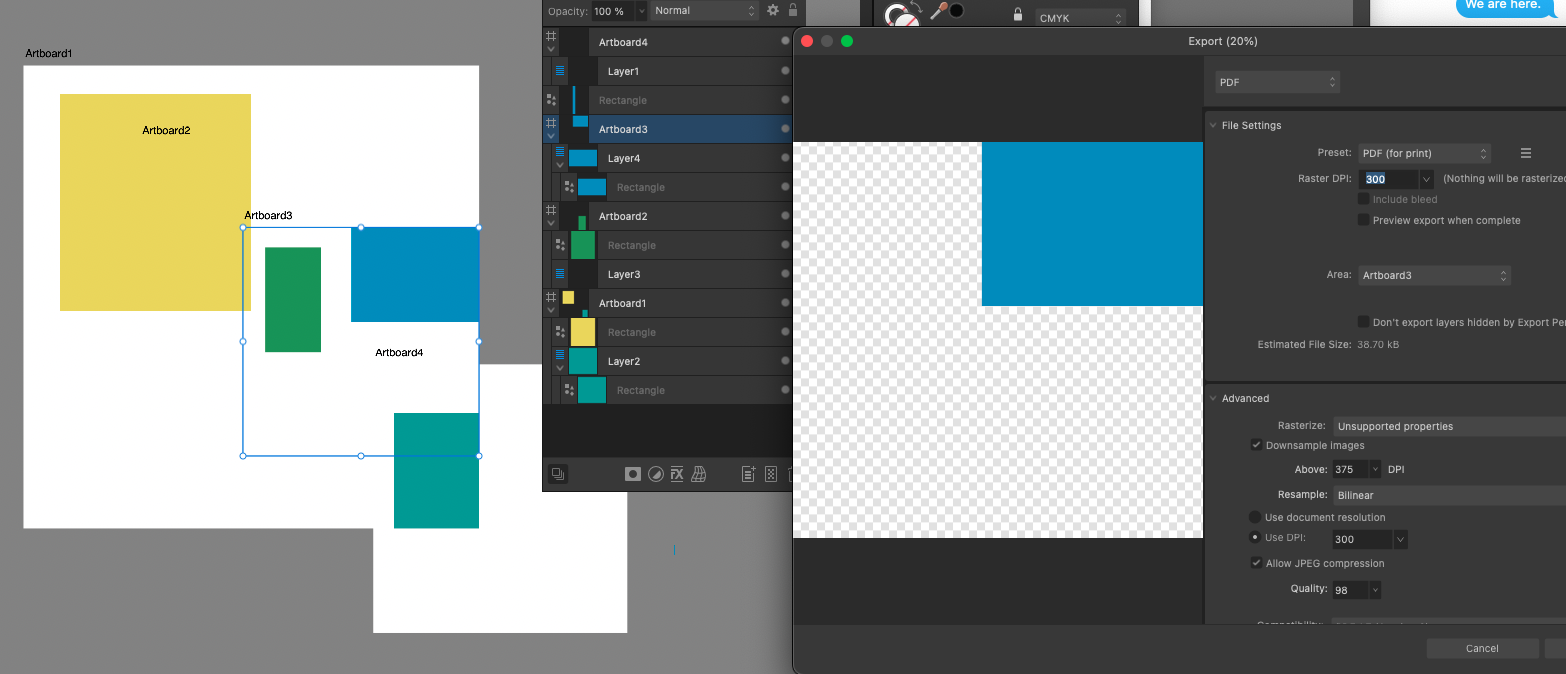
Old Bruce...I mistyped.. I have spell check. Sigh.. I meant >Find and Replace< text. That's what I meant. Going over to Publisher for that 'feature' that even TextPad from lo many years ago...yeah, my hides be chapped on that one. Anyway...ha...um. Ok, but with the Export persona... again, if my understanding is correct... You have to have a stroke attached to this "my Artboard analog"? That wouldn't work because it shouldn't show. I tried making a non-stroke non-fill box and it doesn't show in the Export persona? That would take making it visible each time, going back and forth, and then remembering to hiding it when you export each time. Not idea. And remember this still doesn't deal with the fact of how object interact in the Layers panel before you get to the export process. I really want to be able to share content across art boards/pages and not have things cropped. That's the take home message. How things get exported after that is just gravy. I want content in a roads layer to be accessible and flow across and up/down the workspace. With aD, as soon as you make that next page/art board, that content is sacred and cannot be shared. There might as well be only one artboard allowed. [shrug] Just seems incredibly limiting. Thanks everyone.
-
Thanks fde101 for the input. This is why Slices >might< be a solution, if tweaked some more. Because I do have to wrangle layers and content when exporting PDF for each 'page' anyway, sometimes. But here's the catch. It's so much easier to do that in the layers panel --while working on content-- than later in some other mode/persona. In AI I can set up marginalia and content for each separate page in a top-level layer...turn that stuff on, with the base stuff still on, and export and all is peachy. I know where my page margins are compared to content, etc. -- My example is relay race. Each leg of race has its part of the overall route, but it also has its leg's notes, mile marks, description and page title, leg number, etc. In AI, I just set that meta stuff over the content as part of the workflow, and then export. Easy. Going back and forth with slices would be a pain. (Just like going back and forth between Designer and Publisher just to do Spell check, imho, is a pita.)
-
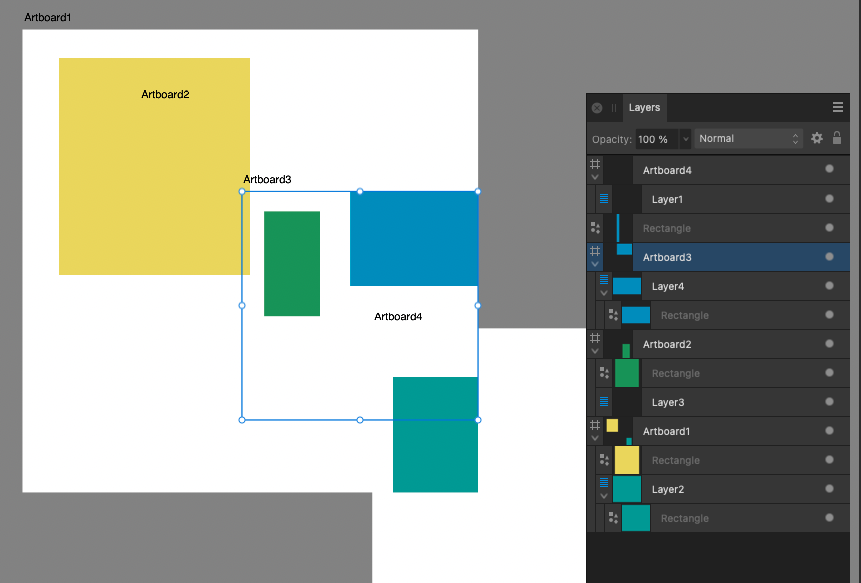
NOT voila. Do it for each art board. And have the objects interact in Vector Persona BEFORE you export/print. The export/print is the end goal, but really it's the layer panel and how the art boards are sandboxed in the first place that is the issue. Sure one can Clip out a portion of a project. But look at my past post with the screenshots. Can you have the contents of one art board interact and be combined with the contents of another art board? Nope. My example: Artboard3....where did the green box go? Gone, because the art boards don't interact. Quarantined from each other. So one can't simple make 'dummy' art boards and export those as 'print boards'. And using slices >might< work, but you can't see them in the Vector Persona so you don't know where your export bounds are while you're working.