JimY
-
Posts
13 -
Joined
-
Last visited
Everything posted by JimY
-
I also have been experiencing this. Inline graphics seem to be a problem in general. Not just on master pages. I have been converting Adobe idml files and have found multiple issues with inline graphics being blown up to enormous sizes and no solution to fix it.
-
Looks like the work-arounds are endless. Just shows that Designer still has a way to go before it is truly the Illustrator killer. And I'm continually finding scenarios where Illustrator has a simple solution, but Designer can't quite do the job. But it keeps getting better. I submitted a "wish list" months ago and hope to see those features introduced in the near future. For now, I'm forced to continue using Illustrator. But with the help of people like you and others, I'm making strides in using Designer to the best of its abilities. Looking forward to the day that I can rely solely on Designer.
-
Now let me reply to iconoclast. Symbols would not be a solution. Symbols allow you to take an object, or group of objects, and have them repeated throughout your document. You may have meant Styles. But unfortunately, that wasn't a solution either (at least everything I tried with Styles didn't work). I really appreciate all the input. It's great to have creative souls like you and carl123 willing to lend a hand.
-
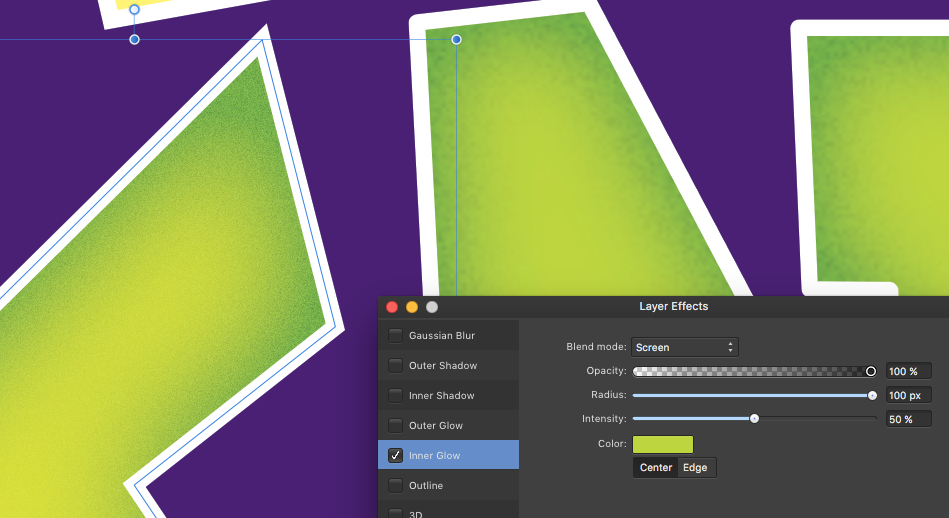
First, I'll reply to carl123. Blending mode did help, but I wish it could have matched my original attempt a bit closer. Instead of using the Inner Glow as a darker color and choosing Edge with a Multiply Blend Mode, I filled the object with the darker color, then used the lighter color as the Inner Glow color and chose Center instead of Edge and with a Blend Mode of Screen. The Screen Mode kept the white stroke from being affected. But then I couldn't get the noise affect to take hold. I would apply noise, but it would not show up. And when I returned to the Effects Panel, Noise would be returned to zero. So for some reason it would not accept noise. So instead, I applied noise to the fill color and then it worked. You can see the differences in the attached shot. On the left is the process described above. Nice sharp corners on the stroke and pretty much the same effect as I tried originally, on the right (with the rounded corner Outline effect applied). My only complaint (and I'm nit-picking) is that the noise doesn't have that nice, funky look as it did originally (on the right). Now the noise is a little too clean. But again, I'm nit-picking. Thank you for making me think in terms of Blending Modes. That helped tremendously!

-
A normal stroke does not have rounded corners (see my attached image in the original post at the top) unless you specify Round Join in the Stroke panel. Miter Join produces nice, sharp corners. I realize that I can create one layer with the stroke and another layer for the fill, but that's exactly what I'm trying to avoid. I know I'll be making edits and I don't want to have to edit two individual objects every time I move a node or adjust a curve. Thanks again for your input and help.
-
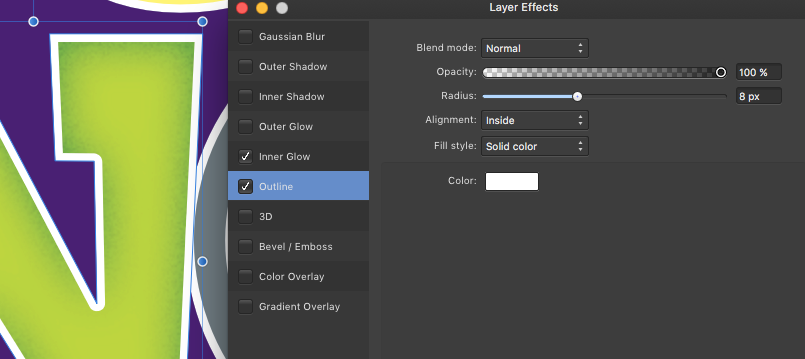
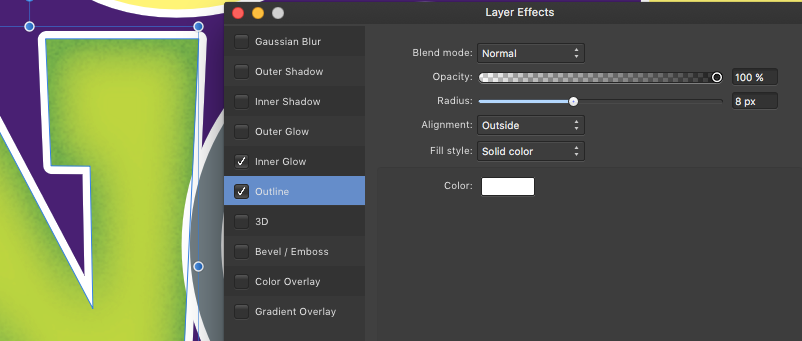
Thank you for your solution. But still not exactly what I need. If you look at my 2 attached samples, if I specify Alignment: Inside, then all the exterior corners are sharp and interior corners are rounded. If I choose Alignment: Outside, then all the exterior corners are rounded and interior corners are sharp. I need ALL corners to be sharp. Alignment: Center will at least be consistent and give all corners a slightly rounded look. I may have to settle with that, but I really wanted all corners to remain sharp. I will probably end up using the Centered option, but wish Designer could pull off the same effect with all sharp corners. Thank you for showing me another feature that I was unaware of!
-
When I apply an Inner Glow effect (in this case set to multiply) it affects the stroke as well as the fill. How do I get it to only apply to the fill? Attached is the image of the applied effect (on the right), but I still need the white stroke (on the left). I've read a few, multi-step solutions to this issue, but none allow making a simple transformation to the object without making the exact same transformation to a duplicate object. This project will indeed have edits and revisions as I go. So it will be a nightmare to repeat each transformation to multiple objects, instead of one. Any way to apply effects to fill only, not stroke? In Adobe Illustrator it's easily done in the Appearance Panel. But not so in Designer.
-
I'm an Affinity newbie. I have no idea what Textured Intensity Brush even means. Thanks for clearing that up.
-
Is this a vector brush or pixel brush?
-
Can Affinity Designer create an Art Brush, as in Illustrator? Create a vector object and make it an ART brush that can then be applied to a stroke, while remaining a vector, and then Expanded back into the individual vector shapes for further modifications of those shapes. Attached jpeg is the sample I'm working on. The top image was created in Designer, which I copied into Illustrator and made it an Art Brush. I then applied that brush to the curved strokes below. Everything I've read about making brushes in Designer says that you need to make your art a png. This means it is no longer vector and its pieces cannot be modified later. You can see where it would be very time consuming to make those curved versions of the original art by hand. An Art Brush accomplished this in seconds. If Art Brushes are doable in Designer, please include a description or a link to the procedure. I'm really trying to make Designer my go-to vector app, but the more I use it, the more I need to go back to Illustrator to perform simple tasks. Shape Builder, Warp Options and Image Trace are also features I use frequently.
-
Tried to flow text into a new text box because of overflow. When text enters the new text box the font size is drastically reduced. I've tried to create the new text box first, then flow the text into it - same problem. Tried to first click the overflow symbol, then create the the new text box from the loaded curser - same problem. What does it take to simply have the text flow into a new text box without it reformatting? Attached is a screen shot. Still a newbie trying to switch from InDesign. There's a LOT I don't understand. DETAILED instructions would be appreciated. Am I using the wrong tool - Move Tool, Frame Text Tool, Artistic Text Tool???
-
Fonts not recognized - Publisher
JimY replied to JimY's topic in Pre-V2 Archive of Desktop Questions (macOS and Windows)
These fonts are not associated with Adobe. They reside in a folder simply named "Master Fonts" on my desktop. As I acquire new fonts, they are put into this folder and then added to Suitcase. I don't understand why a font made active in Suitcase would not be available in Publisher. -
Using the trial version of Publisher on an iMac running Yosemite (10.10). I'm opening InDesign idml files and have been having font issues. Original InDesign document uses Myriad Pro Bold, Regular and Condensed. The Publisher file converts everything to "?Myriad Pro". I use Suitcase Fusion 2 to manage fonts and the necessary fonts are active before launching Publisher. Another idml using Helvetica Neue LT Std 55 Roman, 56 Italic, 75 Bold and 95 Black all get converted to "?Helvetica Neue LT Std". I've tried to go through both documents and replace the font to the correct font and weight, but it's not even listed in the font dropdown menu. Is it a problem with the font manager? Do I need to purchase something other than Suitcase Fusion 2? I have hundreds of InDesign documents that will need to be converted if I am to rely on the Affinity trio of software to replace my Adobe workflow. So far I love Designer and Photo, but they're not going to do me a lot of good if I can't convert all my work into Publisher. Any ideas of what I'm doing wrong?