Fadi
-
Posts
14 -
Joined
-
Last visited
-
Yes, thanks for pointing that out, it indeed does, for the halo that's alright, but with some other items I need to keep that in mind 🤔
-
 Fadi reacted to a post in a topic:
How to make an upper layer overlap another layer only partly?
Fadi reacted to a post in a topic:
How to make an upper layer overlap another layer only partly?
-
 Fadi reacted to a post in a topic:
How to make an upper layer overlap another layer only partly?
Fadi reacted to a post in a topic:
How to make an upper layer overlap another layer only partly?
-
Ah yes, option B is exactly what I was looking for, I managed to replicate what you did in the video. Does this technique have a specific name? For example how would I look for tutorials showcasing this technique. Because I remember seeing an example like this before, but could not remember what the title was. Thanks for your time!
-
 Fadi reacted to a post in a topic:
How to make an upper layer overlap another layer only partly?
Fadi reacted to a post in a topic:
How to make an upper layer overlap another layer only partly?
-
Fadi reacted to a post in a topic:
How to make an upper layer overlap another layer only partly?
-
Fadi reacted to a post in a topic:
How to make an upper layer overlap another layer only partly?
-
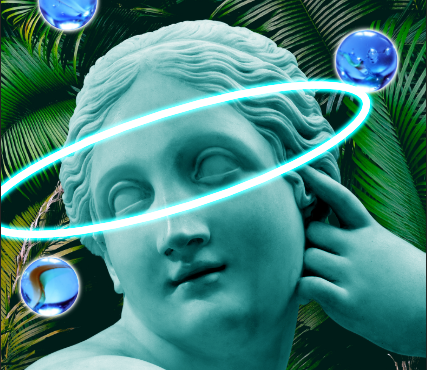
Sure I'll attach it here below. Thanks:) VaporwaveStatue.afphoto
-
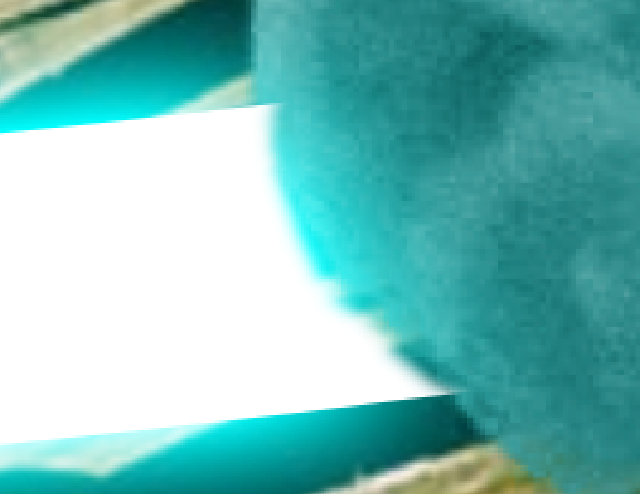
Thanks for such a quick reply. Yes I tried this already, the issue is that the result is not exact, there is either still some overlap between the edge of the statue and the halo, or a small gap. It is too difficult to do this by hand on the pixel level.

-
Dear Affinity People, Firstly sorry for posting a basic question about using the tools in Affinity Photo. I actually remember learning about this topic in a tutorial video, but even after hours searching I simply cannot find it back, or any other video explaining this topic. What I am trying to do: I have two layers, one is the statue in the picture, the other is the halo. I want the bottom part of the halo to go behind the head. I manage to achieve exactly this by duplicating the statue, moving it above the halo layer and then erasing the area that overlaps with the front part of the halo. However this method is quite inconvenient when doing further editing to those layers afterwards. Any recommendations? Thanks a lot!
-
Ah yes that works perfectly, thanks
-
Fadi reacted to a post in a topic:
Unable to fill object imported from PowerPoint
-
Hi, thanks for your reply. Yes I tried to do exactly this (and tried both blend modes Darken and Multiply), but what happens then is that the the entire square gets coloured. I imported this object as a rectangle with a transparent background with the logo in the middle. What makes it confusing to me is that any effects I select recognise the logo in the middle and affect only that, but any fill action affects the entire square (and covers the logo completely). I could try using the selection tool and select the parts of the logo and remove everything else, but I am still curious if there is a more efficient way. Thanks again!
-
Fadi reacted to a post in a topic:
Unable to fill object imported from PowerPoint
-
Dear Affinity Community, I tried making a collage using images supplied in a PowerPoint file. I try to change the fill colours, but cannot see it taking effect inside the actual object. I added a screenshot with an example: The logo that says "MOFEM" is selected and the fill colour on top is set to green, yet the logo remains white. I do not know if this is a bug or something I did wrong with the object type, because I have not worked with imported objects from PowerPoint before. Any effects that I apply affect the logo, just not the fill. Thanks in advance for any answers!
-
Hi Sean, I could not reverse the process after I saved the project and closed it. I tried to repeat the process, but this time it did not have the sliver. Often it works as expected, but sometimes it does not. If it happens again I can post the before/after result in here.
-
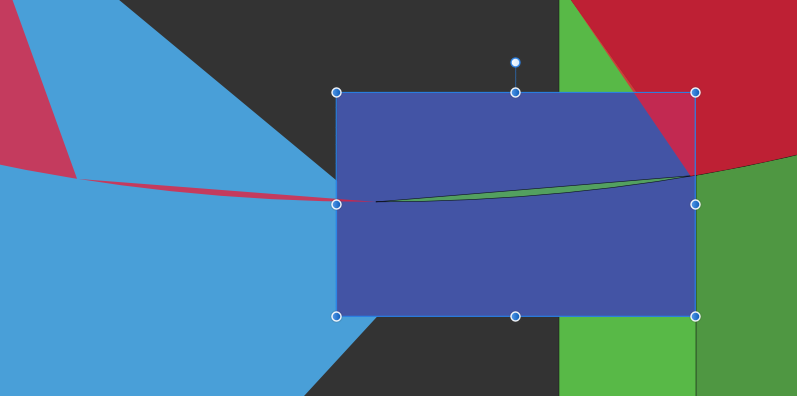
Correct: a large blue square was subtracted from a dark green shape with a curved top. Since this already happened a few times, I reported it as a bug. Thanks for having a look!
-
The dark green layer that you see on the far right stretched all the way from the far right to the far left. In the previous picture I drew a smaller dark blue square to mark the snippet that remained after the operation. The original square that I used for subtraction covered everything except that vertical dark green bar on the far right (as in the picture below) Of course I made sure that the dark blue square was in front of the dark green layer before doing the subtraction. And it did cut away everything that was covered, except for this snippet. I also double checked that the snippet is not part of some other duplicate layer (it really is part of the dark green layer).
-
Dear Affinity Users, I noticed that since recently, whenever I do a boolean subtraction, I am left afterwards with some thin parabolic snippets that stick out from the original shape. Even if I try to do another subtract operation to remove that snippet, it remains unaffected. I thought that this might be a bug, or has it something to do with my settings? Thanks!
-
Ok, that's good to know. Thanks for your reply 🙂
-
Fadi reacted to a post in a topic:
Boolean operations in Affinity Photo create weird shapes.
-
Fadi joined the community
-
Dear Affinity people, I was trying to do some Boolean operations inside Affinity Photo (on Windows desktop) and found that it would add additional lines and corners: For example I try to create an arrow using a triangle and a rectangle. I select both, go to geometry and press add, but what I get is a misshaped pentagon. I wanted to add some screenshots of what it looks like, but it does not seem possible. In any case the shape after adding does not resemble the two original shapes together. Thanks