frank26080115
-
Posts
41 -
Joined
-
Last visited
Everything posted by frank26080115
-
I don't know if that's a valid test, if it's flat, it doesn't mean other software can't extract the background layer. I am more interested in hearing from the software developer themselves how the PDF generation works. Otherwise, a valid test might be disecting the PDF with something like IronPDF, in which I can explorer individual objects within the PDF.
-
I'm using Affinity Photo 1.10.5.1342 I recently used it to blur out (used a gaussian blur layer with rectangular masks) some information on a scanned document and then used the File->Export menu item to export it as a PDF again. Is the PDF generated completely as a single flat raster? Or are the layers preserved? (meaning that there's a way to extract the un-blurred information) Thanks (I know I can probably just merge my layers as a work around)
-
360x200 is what my own website uses for thumbnails, but I also want it to look good on a 3" wide phone screen Maximum Blur did the exact opposite of what I want, Minimum Blur did exactly what I want. Thank you! The filter is very extreme though, so I have to keep the radius low and use opacity to control the amount. And, I probably have to export different versions of the photo just for the thumbnail.
-
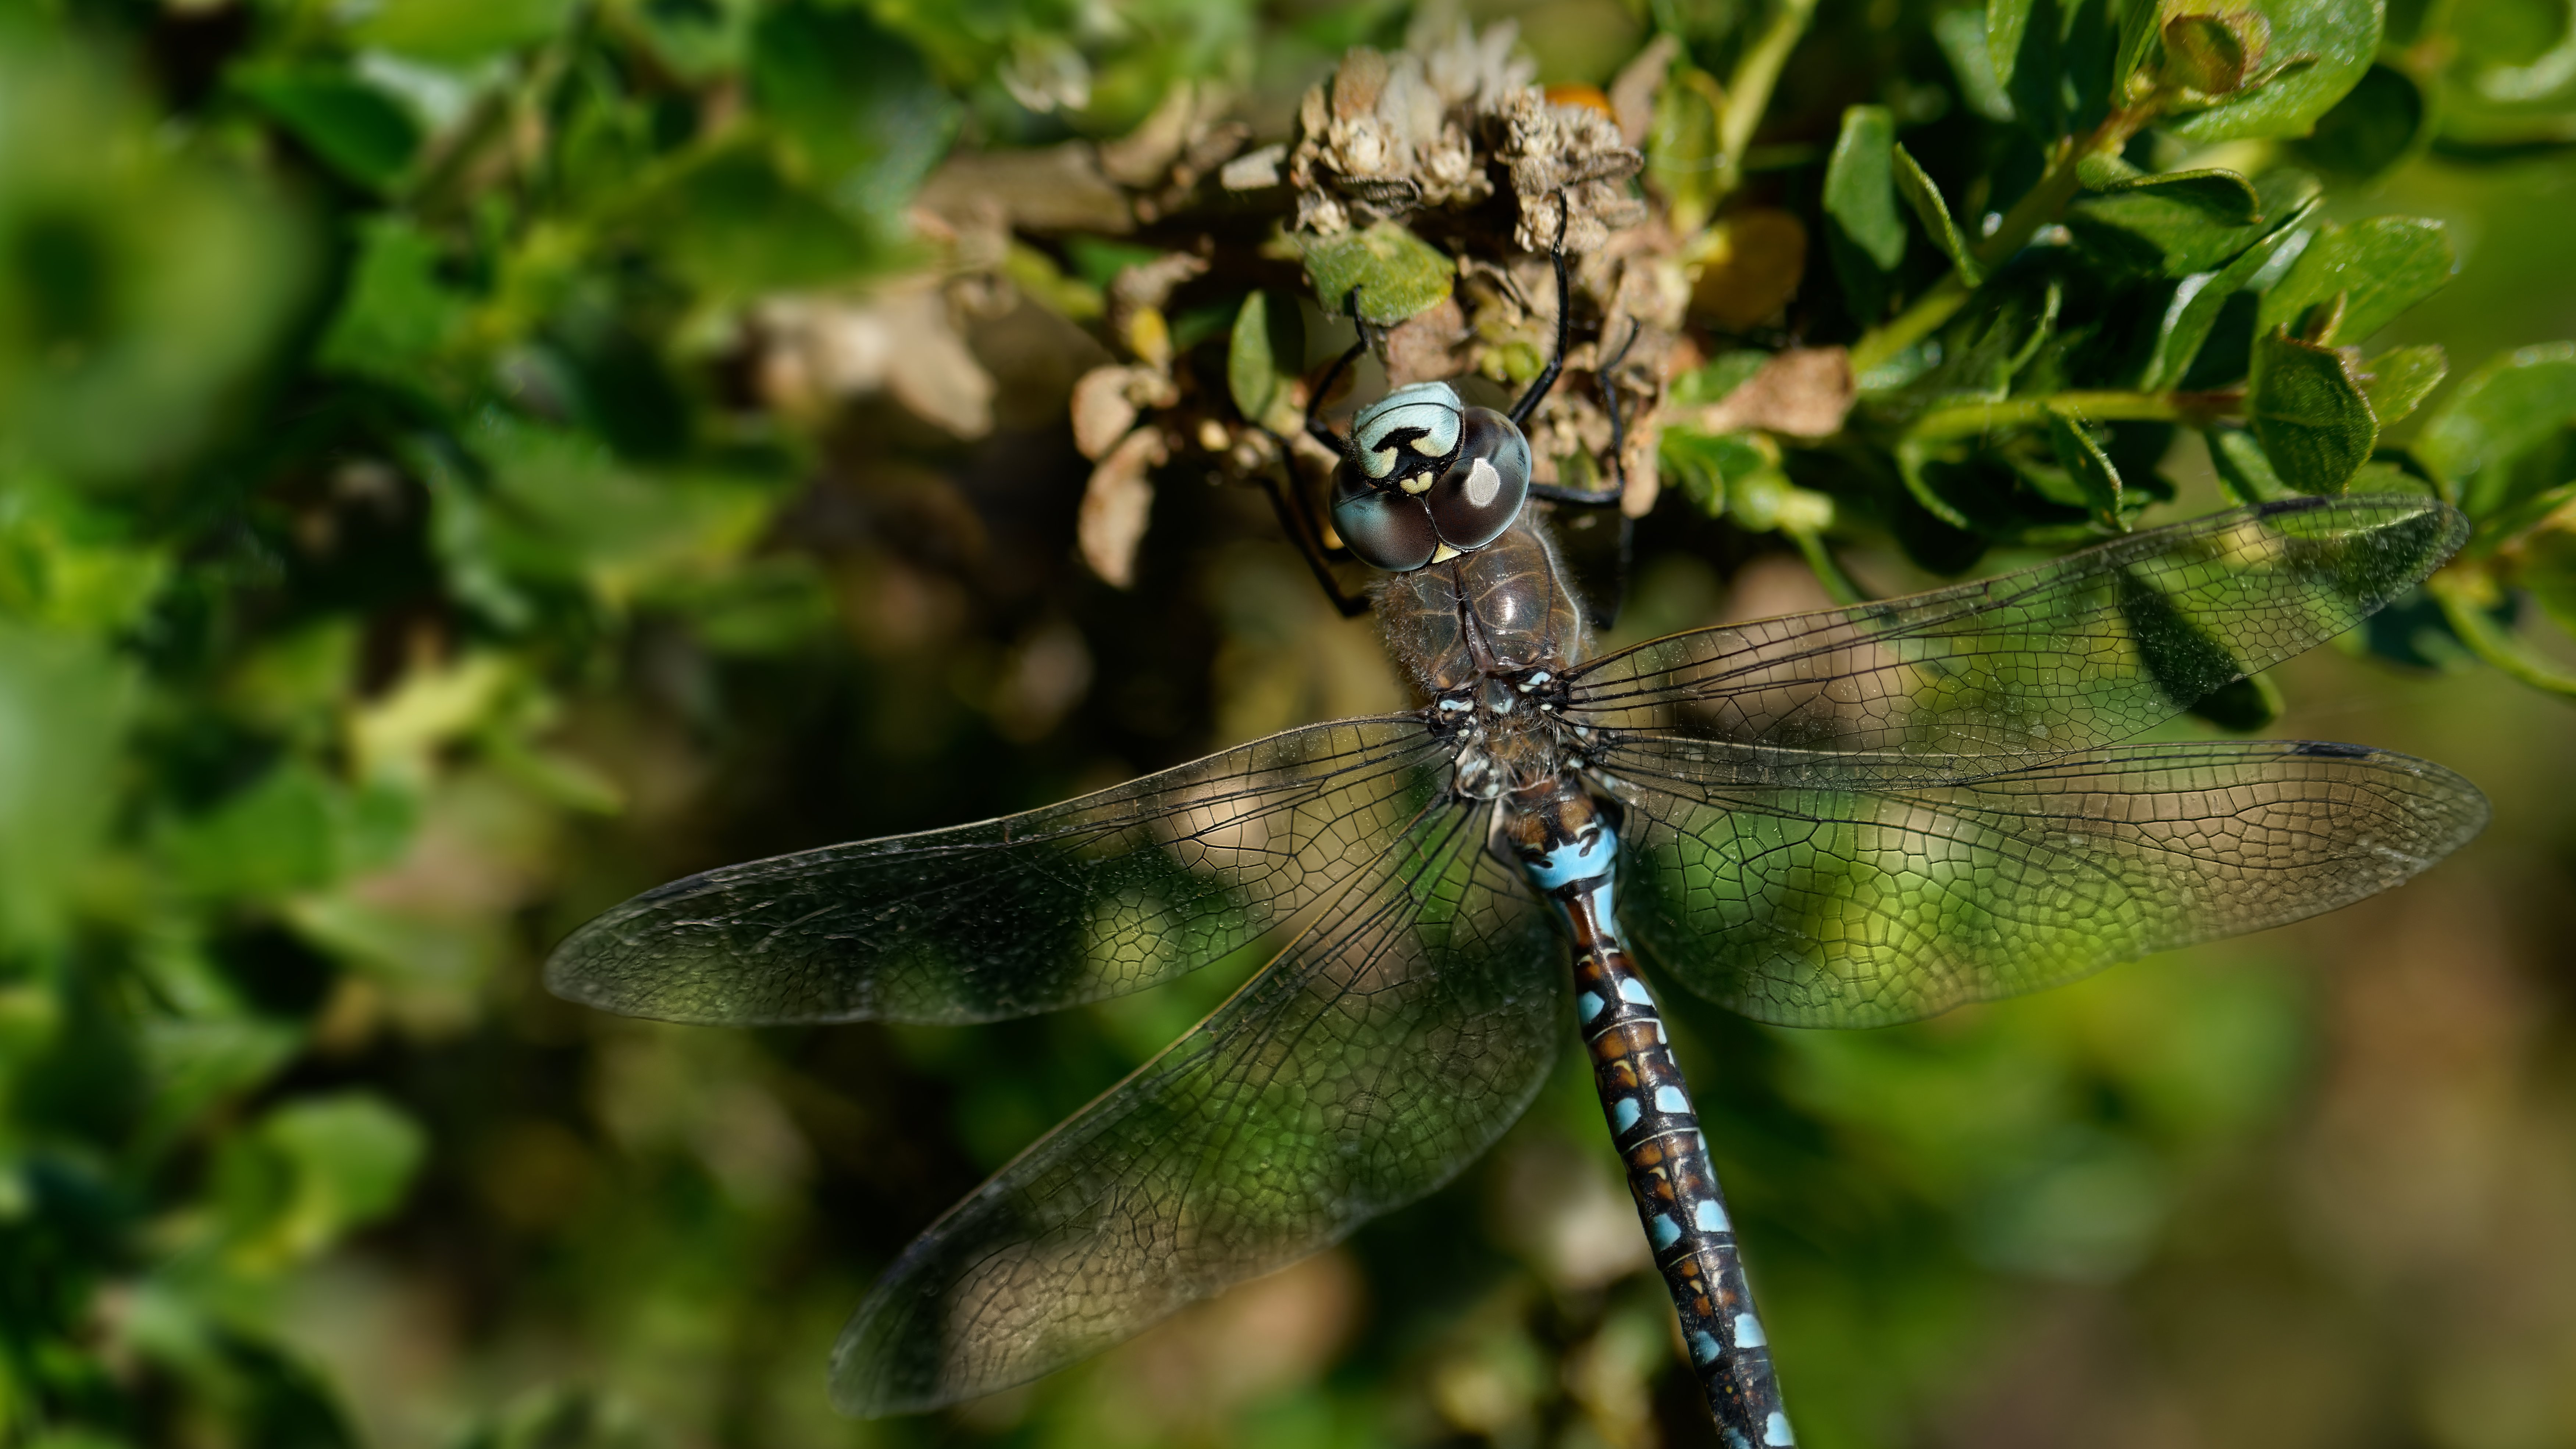
I have this photo of a dragonfly (uploaded), it's kinda up close and decent resolution. The wings are not totally in focus but good enough. The problem is that the wings are basically invisible when the image is shrunk down to a thumbnail size or viewed on a small screen. What are some ways of making the wings more pronounced? I'd like to thicken the outline of the wings, and the veins inside the wings. As far as I can tell, clarity and unsharp mask only really changes local contrast and doesn't make the lines thicker. Thanks

-
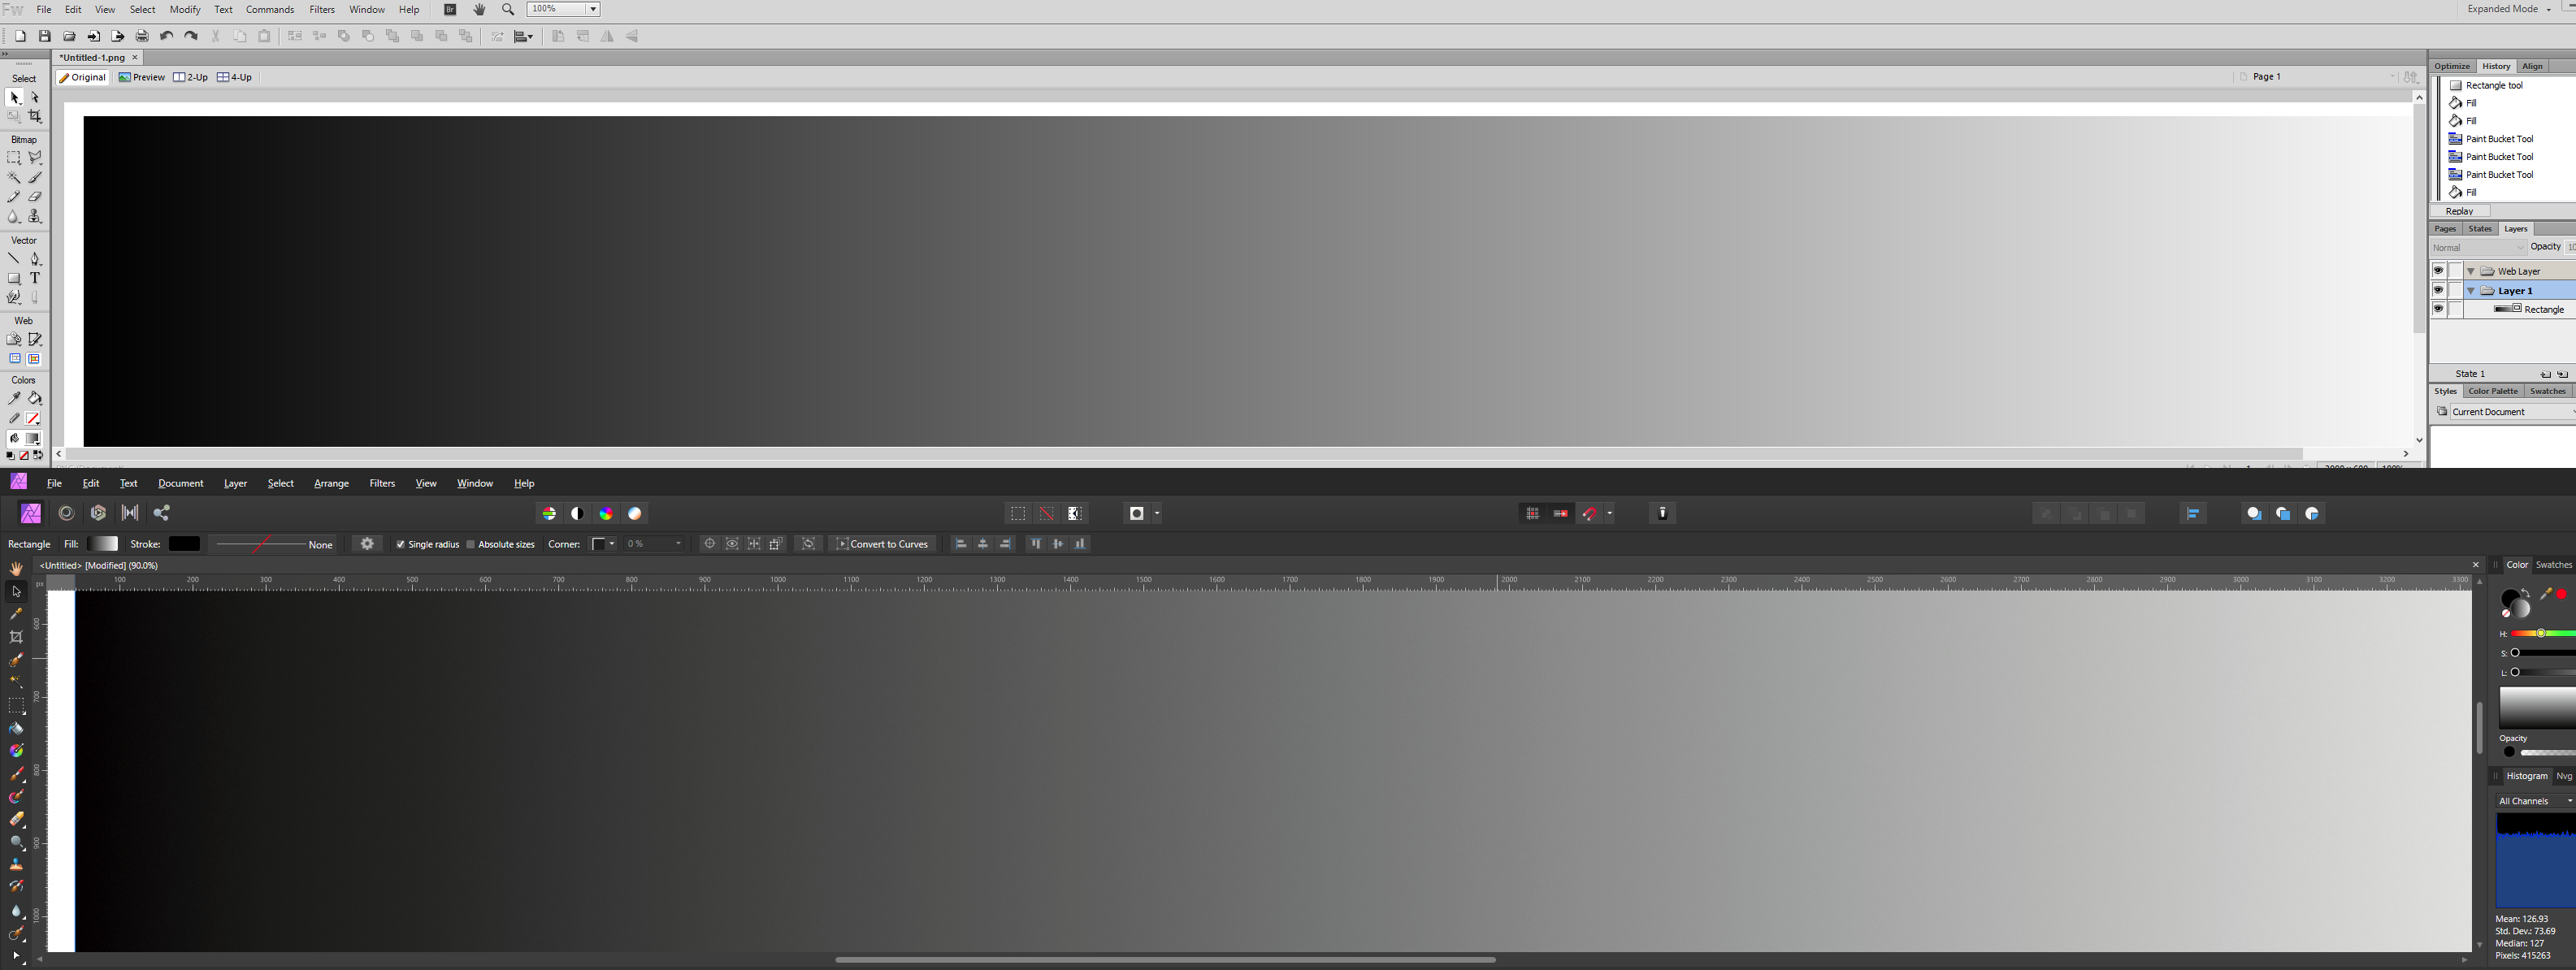
I draw a rectangle, choose the fill to be a gradient from black to white, the noise is set to zero on both ends. The resulting rectangle is still noisy Tried this with both small rectangles and really really 3000px wide rectangles, with document set to 8 bit, 16 bit, and 32 bit HDR modes I understand that it is mixing (dithering) the shades together to give the illusion of having more shades than what is possible But... I don't want that, I want each shade to be a solid vertical line Attached screenshot, I am trying to get the result on the top half of the screenshot, but within Affinity, under 16 or 32 bit processing Thanks
-
HSL adj hue target range selection not working
frank26080115 replied to frank26080115's topic in V1 Bugs found on Windows
Yea I don't expect the general public to do anything here, it's not an open source product. And for QA/developers employed by Serif, they should keep this bug in their head and maybe hopefully some other problem later on correlates and it gets fixed by sheer luck. If they are working on it, they are not expected to notify me... Usually these kind of people keep a tight lip about upcoming fixes just in case they can't actually figure it out. If I encounter it again I will try to replicate the entire history. -
Thanks for the hint! I googled around for tutorials about the procedural texture filter and I found this http://changingminds.org/disciplines/photography/affinity_photo/resources/daves_saturation_selection.htm It doesn't work as well as I'd hope in my situation but I am studying the equation to get a feel for this filter I honestly didn't even know Affinity had macros... Wishing Affinity had RGBtoHSI and HSItoRGB equations, would have made this soooo easy
-
I need some way to put a limit on saturation (or some form of non-linear desaturation). I need a filter that basically runs an algorithm that looks like for every pixel, convert RGB value to HSI value. If the S value is greater than X, set it to X, convert that HSI value back into RGB I tried replicating this effect using a S shaped curve for AOpponent and BOpponent with a Curve filter in LAB mode, but I can't get the desired effect. I tried using a normal curve in RGB and then setting the blend mode the Saturation, but the input axis is brightness, so this does not give me the desired effect I tried the threshold filter but I need the input to be saturation I can't seem to find a way of mixing channels in the same way that I can convert between RGB and HSV colour spaces within OpenCV/Numpy
-
Affinity Photo v1.10.4.1198 on Windows 10 Pro 64 bit 21H1 Take the "original" file, add a "Dust and Scratches" filter. A white grid will appear on the image. The grid will also appear in the preview icon generated for Windows Explorer. The grid will appear in the exported full resolution JPEG image too. All files attached OpenCL is off, card is a GTX 1660 Ti DSC03077-original.afphoto DSC03077-with-dustscratches.afphoto
-
I just paid for the elite version of DxO PhotoLab 5, it's that good. Their implementation of localized masking is jaw droppingly well done (most of the time I can't use Affinity's clarity slider in Develop because it is global). I also need a Lightroom-like photo browser anyways (I've been relying on Windows Explorer thumbnails for 2 years lol) I will still be using Affinity for the actual touch-ups, it's still great, but I've outgrown Develop. As for this problem. I really think Affinity/Serif's colour interpretation is just wrong. I can almost "prove" it. The first experiment is to generate a synthetic DNG file with all 0xFFFF pixels, with as-shot-neutral as [1, 1, 1]. Affinity will show white but if you attempt to adjust white balance, it turns pink (no matter what tint). This happens with BOTH linear raw and bayer filter. DxO won't open the file (it's super picky about what cameras are supported), and Adobe can open the bayer version of the file, and the pure white cannot be changed as the white balance slider is adjusted. I did play around with the other DNG tags like colour matrix, it has no effect on the results of the experiment. The second experiment is to shoot a long exposure into a bright light bulb at native ISO. With this experiment, Affinity shifted the white to pink again. DxO was able to open the file and this time the pure white remained pure white. My CS6 copy of Adobe cannot open files from my camera. Soooo from this I really think something deep inside the Serif raw engine has an affinity for pink If anybody wants to teach me something about colour science, please do. I've only got some background writing code for OmniVision sensors, de-bayering them and calibrating the data detect reagent colours from PCR DNA samples to find specific gene sequences, some image processing code with OpenCV for fun too.
-
HSL adj hue target range selection not working
frank26080115 replied to frank26080115's topic in V1 Bugs found on Windows
Ok sorry that probably sounded like I'm being a difficult jerk but I do want this fixed (well... I want a better defringing workflow) and in my head, I am 99% sure that just uploading a file isn't going to help and probably waste time leading somebody down the wrong direction. I just got a 50MP camera (I'm noting this because I'm seeing a correlation between performance hit and the occurrence of this bug) and I'm seeing this repeatedly and once I figure out the common pattern between these incidents I'll report with something actually useful. The last clue I got was that it doesn't matter if the image was originally from a ARW, DNG, or TIFF (I'm working with a wild mix of Luminar, DxO, and Topaz), or a previously saved afphoto. So far the best clue seems to be "I've made Affinity do something very cycle intensive", and the best way to make Affinity sweat is multiple layers of defringing. But I can't be sure how to reproduce the exact steps because it never happens with a clean fresh start. I can do a fresh start and just load many many many other large files but that doesn't make it happen either. At this point I need either always-on screen recording or test automation software to generate random edits for hours. -
I can see the pink right from the forum post, drag down the highlights slider, and it all turns pink
-
This is a rabbit hole... I just tried using RawTherapee for the first time. I can play with the tone curve and recover the highlights. The highlights slider doesn't go negative. There's still a bit more red than I expected. Adobe Camera Raw can do highlight recovery perfectly with just sliding down the highlights slider Darktable is nearly impossible to do anything with, the highlights slider doesn't go low enough. The rest of the UI manages to make it more complicated and yet less useful than Affinity. The easiest way forward is to use Adobe Camera Raw, unless I find a way to accomplish the same with Affinity, or find definitive proof that this is a bug with DxO PureRAW and have them fix it
-
I am not understanding how you are doing the highlight recovery. I copied your parameters and it made it pink again. Actually, applying the tone curve looks white but it's really hard to edit the white areas, almost anything I do to it turns it back pink. (if you looked really close, it's still slightly pink)
-
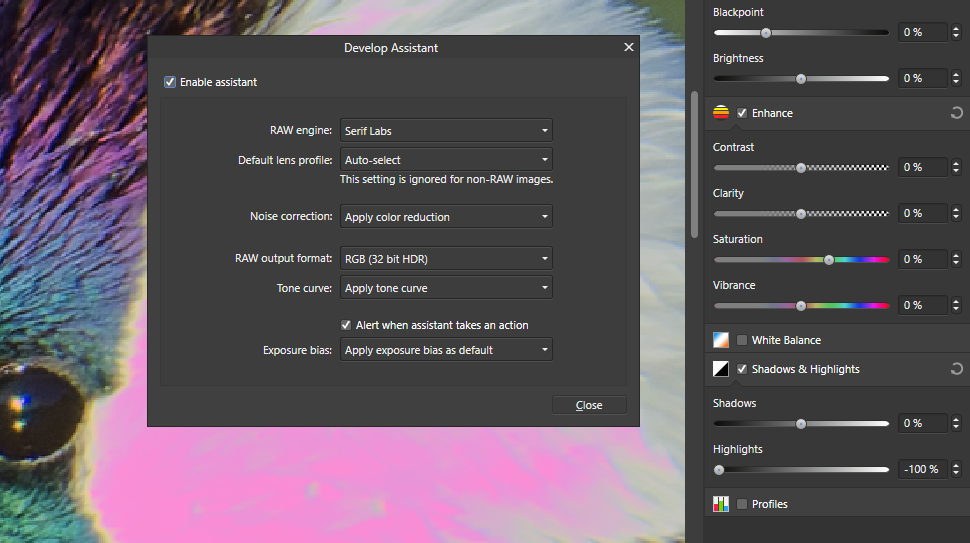
Woooow "What is this assistant thing?" I asked myself... I never knew there was such a dialog, so I went to look for it. It was really hard to find, because my monitor typically looks like this Once I found it, I tried the 16 bit option and it looks ok, it looks much more vibrant too. Thanks guys I feel like I've been using Affinity wrong for 2 years...
-
HSL adj hue target range selection not working
frank26080115 replied to frank26080115's topic in V1 Bugs found on Windows
This bug happened again with another file. And it also stopped happening when I closed Affinity Photo and re-opened the file. Have fun with this ticket. -
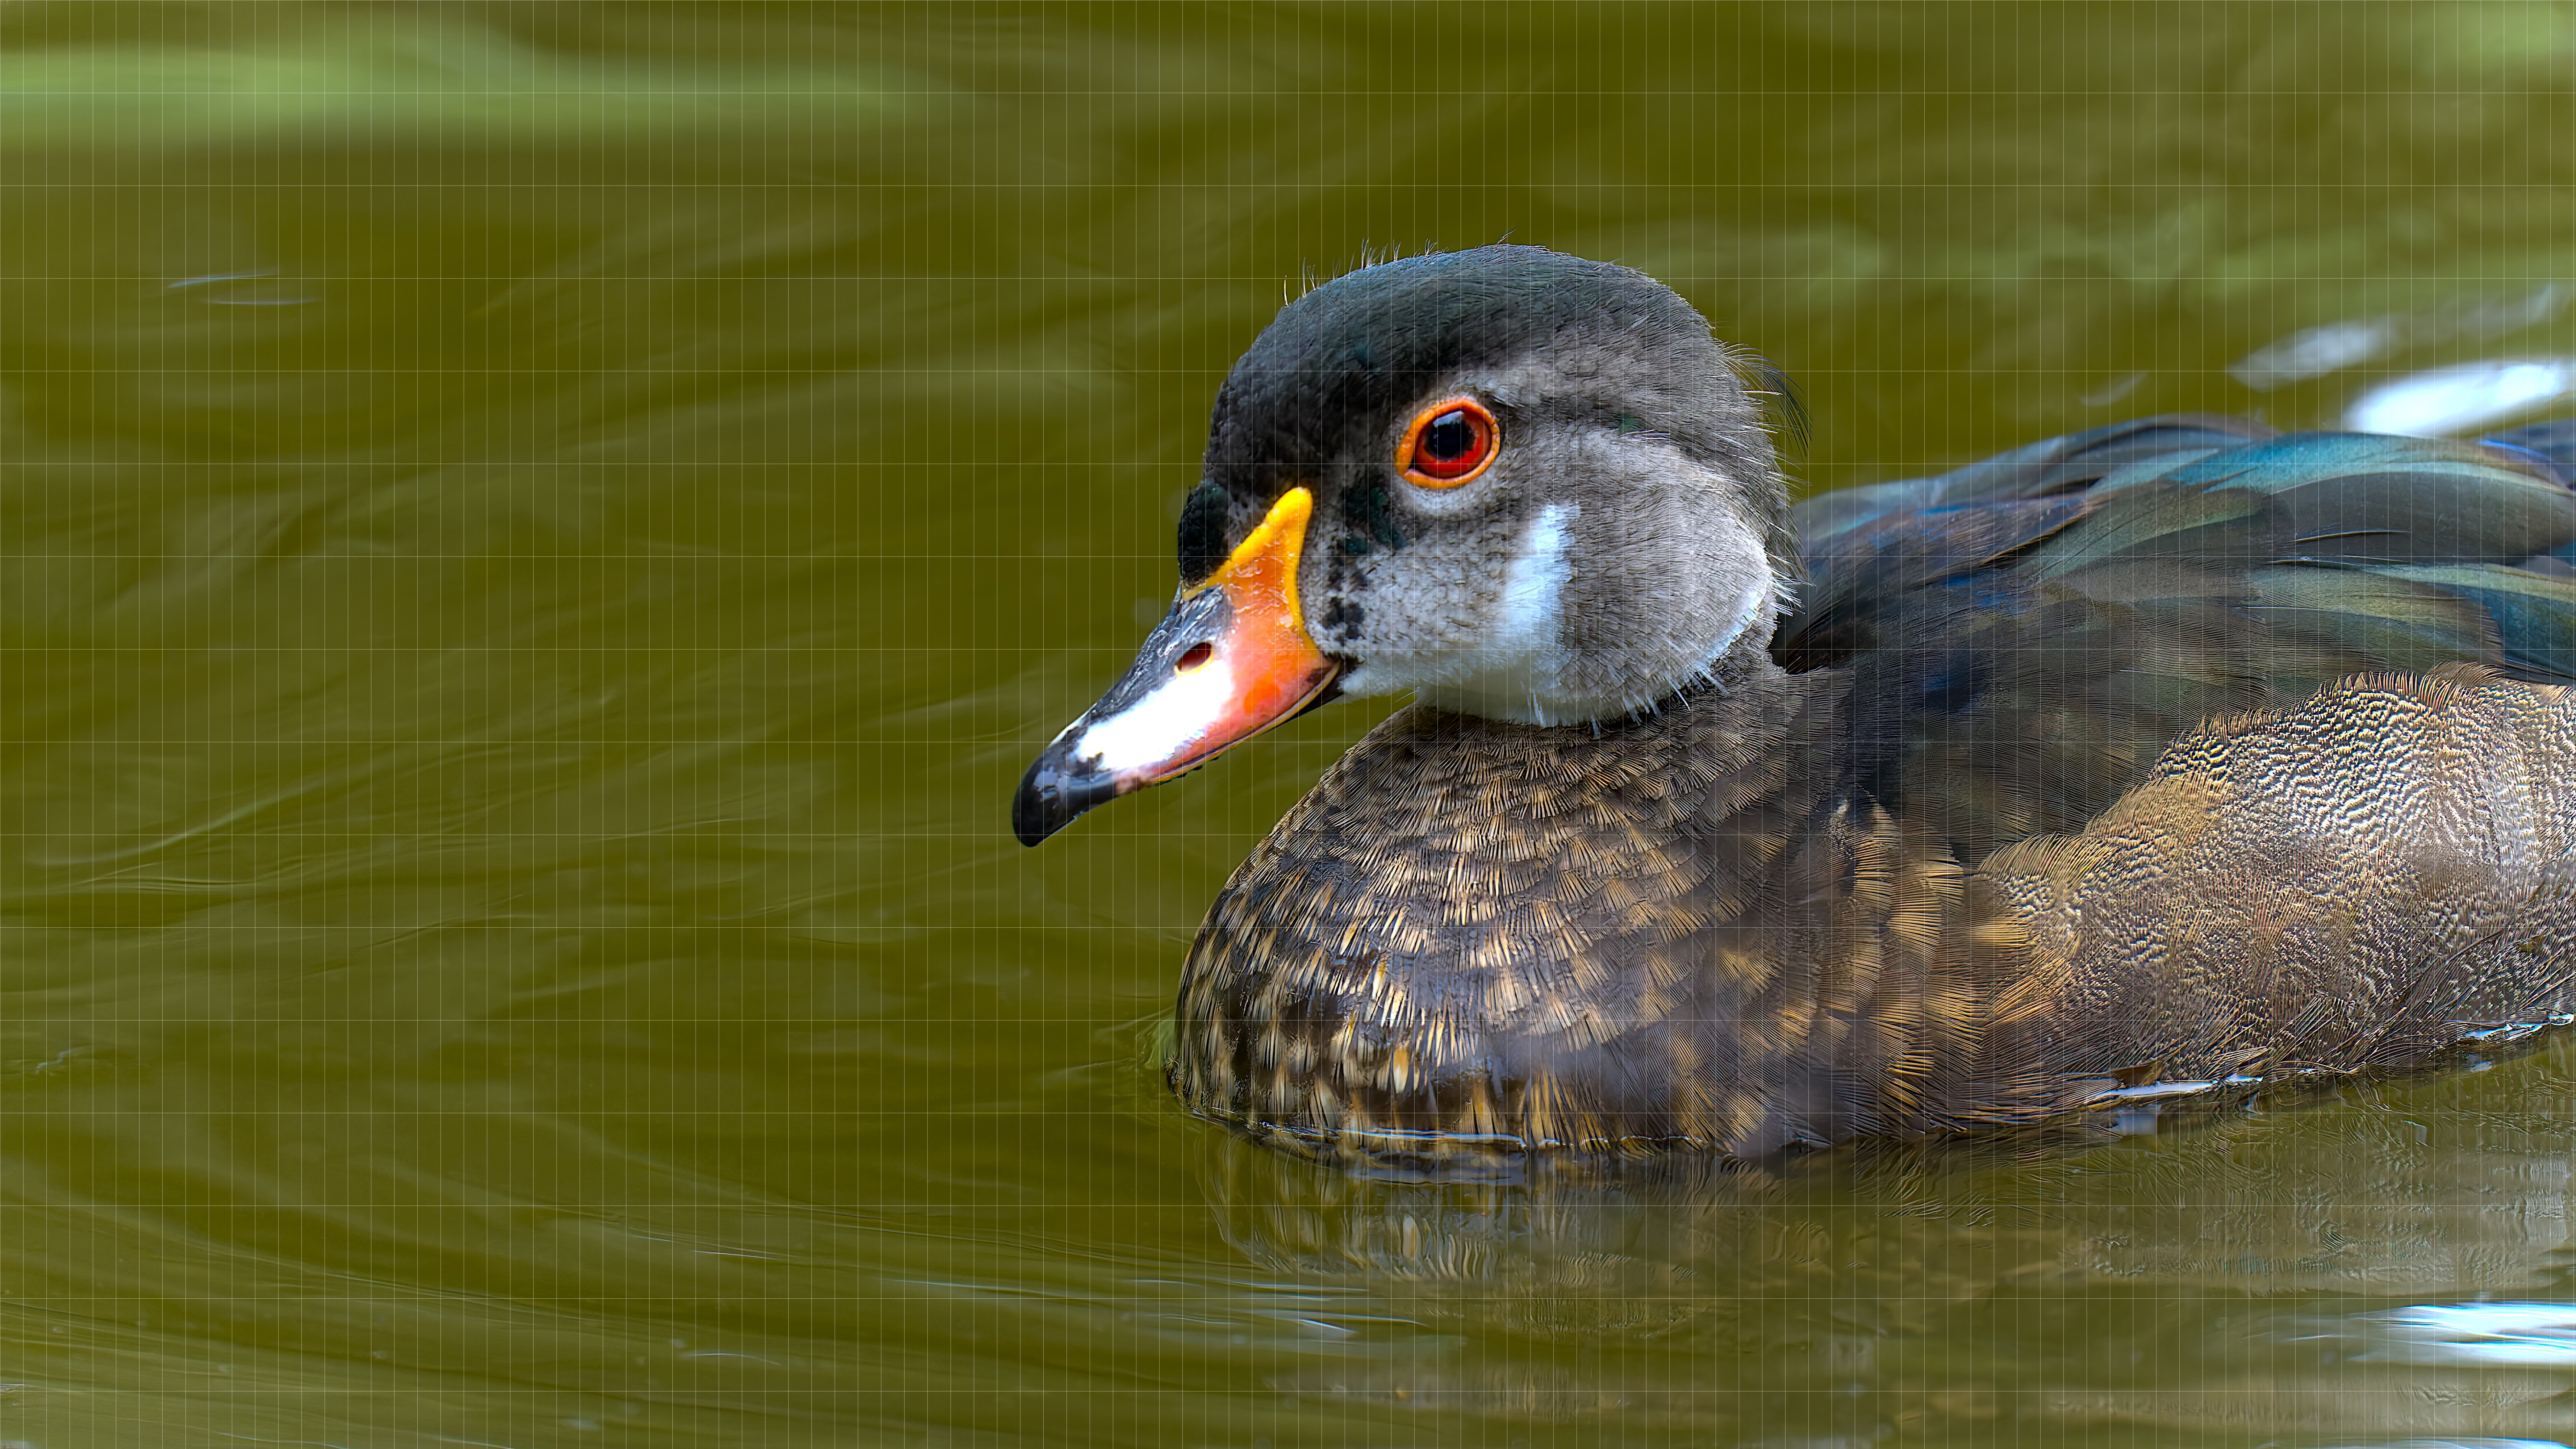
Examples shown and uploaded This has been happening for a while now, and if it does happen I usually fall back to the ARW files instead of the DNG files. But since I just got a new Sony Alpha 1 and Affinity Photo does not open the ARWs, I don't have a fallback, so now this is important. There's gotta be some simple setting that changes the input colour space to be correct... Help please? (there are literally no settings inside PureRAW to adjust, I checked, plus, if Photoshop/Camera Raw can see it correctly, Affinity should too) DSC21112102559-ARW_DxO_DeepPRIME.dng
-
HSL adj hue target range selection not working
frank26080115 replied to frank26080115's topic in V1 Bugs found on Windows
I can't reproduce this issue myself. Between then and now I've restarted Affinity Photo quite a few times. I tried just three RGB splotches and even with the original file I was playing with, it now works perfectly fine. -
ALT and middle mouse wheel Admittedly when I saw this, I said "there's no way this would actually work..." as I knew that I have not actually done anything to the image itself, and the rotation does not mark the file as [modified] but export slices should've counted towards file modification status, but I tried it anyways. From a UI point of view, those boxes are very misleading, I'm pointing that out. As I understand it, ALT-wheel rotation is pretty much is only useful for ergonomic reason while editing and does not actually change the image at all. But I think other people might not realize that.
-
v1.10.4.1198 , Windows 10 Pro 64-bit 21H1 The exported image does not match the rotation shown in export persona. Please see attached screenshot.
-
I am trying to use the clone tool to remove halos, following this video But I usually make my edits on another pixel layer to leave my original "background" layer intact. I set "current and below" for the sampling of the clone tool. I set the mode to "darker colour" as instructed by the video. This basically does not work at all, nothing is drawn onto the pixel layer. If I had to guess at the problem, it's that while the cloning sample is taken from both the current layer and the layers below, the sample for "is this pixel actually darker" is only taken from the current layer, and not the layers below.
-
I'm having the same issue, large files causing crashes, 24MP files It's a total coincidence that I use a GTX 1660 Ti like the original poster Have fun with my crash dumps 0d0aff1e-b9d8-4ba4-a8a2-b41f967625a2.dmp 3b7074b2-acc0-4ede-a69b-bdd87702f954.dmp 08c784c6-3b4f-4a27-b97a-8572aa3c5460.dmp 9d1a98fb-d090-41d4-bb6b-d0711eb19531.dmp 270a8969-3d4a-4f61-9041-e9eab676ae06.dmp 01829f87-7db9-42f2-8491-48b9bec41c42.dmp 50175a68-7661-4ae9-b731-adfd3328e8ff.dmp 676524e3-d824-483e-8f7a-add3c7620c04.dmp c26529d4-1dc1-4b8b-b857-1fd42cf50d35.dmp
-
If the photo has text that can't be flipped, I won't export the flip. If the photo can be flipped, I want to export a normal version and a flipped version both in one click. I am not deciding if the flipped version looks better or not.
-
Can you add a checkbox for each slice in export persona, that will cause a horizontally mirrored copy of the image to be saved along with the unmirrored copy? Reason: lots of bird photos, some of them face left, some of them face right, I have my photos on a custom built raspberry pi digital photo frame. I can't just tell the photo frame to randomly flip the image because some images wouldn't make sense, but it'll be better to decide if a photo can be flipped at export
-
Affinity Photo 1.10.4.1198 on Windows 10 21H1 HSL adjustment layer has a hue wheel where I should be able to target a specific hue, the 4 dots on the wheel can be moved, but moving them has no effect. I have a screen captured video to demonstrate, please see attached (if you are wondering why I am using HSL adjustment and not defringe, this particular edge can't be removed with defringe for some reason, I tried) hsl_adj_not_working.mp4