jackhstephan
-
Posts
6 -
Joined
-
Last visited
-
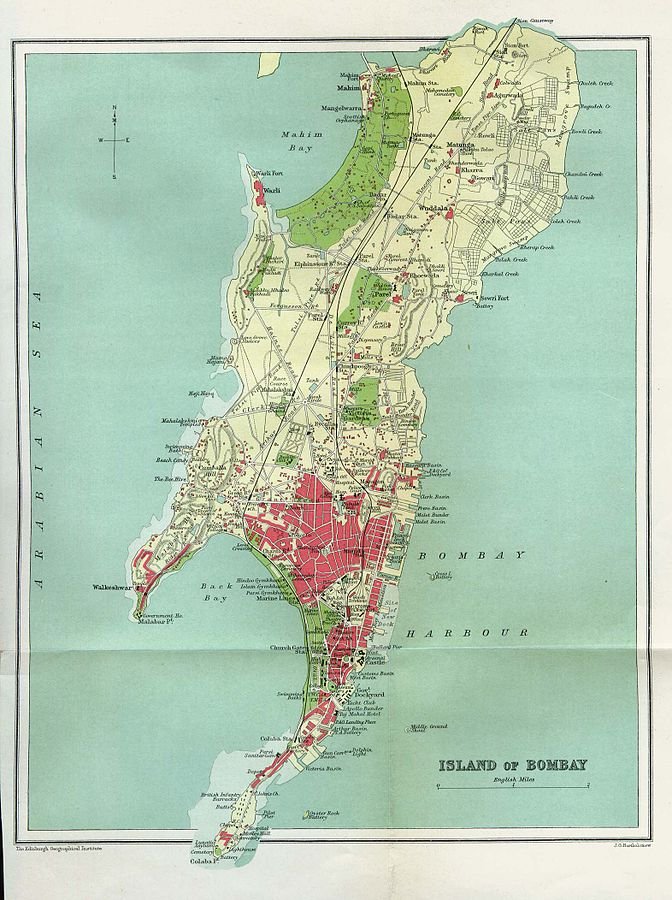
Hey Everyone, I'm quote new to Affinity Photo and I was wondering if anyone can help me out by recommending a workflow. I am fascinated by old maps and I'd love to pint some high quality scans for myself. My question is, what is the best workflow for removing the discoloration from the old paper in the background and just keeping the blacks and colors. I've been tried selecting the sampled color and then deleting the background, but playing around with the tolerance still yields a pretty noisy result. Perhaps I should preprocess the colors so that they are easier to select and lift individually from the original photo? I will provide an example of an old map below. Thanks in advance for any help.

-
That is certainly the problem, and your solution works but it will be a tedious process for all the shapes I would need to do it on. Do you know if there is way to speed up the workflow or to ensure that the pdf is exported with the shapes in the proper orientation? I am exporting from QGIS I appreciate the help! Edit: I a referring to the first solution proposed
-
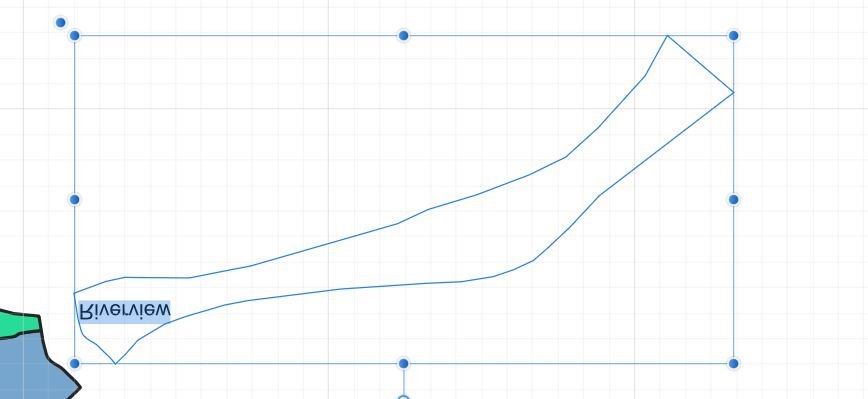
I am taking a pdf file of a map, and I am attempting to turn these polygons into text frames so that I can fill them with colored text to make a specific type of map. When I convert any of these polygons into text frames, the text I write is upside and mirrored (see picture). Does anyone have a solution to this problem? I am unable to simply crop a text frame to the shape because it is import that no text is cut off in the final product. Thanks!
-
Thank you, this is the solution I was looking for. I really appreciate the video tutorial.
-
First, thanks for the reply. One question, can the vector brush be applied to the pen tool? The pen tool is what I'll need to work with for cartographic purposes.
-
Greetings, Can someone please help me with creating a specific type of cartographic line symbol (picture included)? The issue is that the curves will be be have asymmetrical stroke weight on top and bottom so it's not as simple as crating overlapping curves of different weights and colors. I tried by converting the stroke to a shape using Layer > Expand Stroke and them to delete the lines at the caps, thus leaving two lines that run perfectly "parallel" which I can edit individually. The issue is that you cannot delete a the end caps as such. Perhaps there is another method someone can teach me? (See attached picture) Thanks ahead of time for the help!