alecspra
-
Posts
152 -
Joined
Everything posted by alecspra
-
 It's only a temporary hold.
 -
I figured it out. I exported the macros to my desktop and then load them back in after the reinstall.
-
Big Sur and will be updating to Monterrey when it becomes available
-
If I uninstall and then reinstall Affinity Photo, do I lose the macros that I created or that I obtained outside the Affinity Store? Anything else that I might lose? If I do lose the macros, is there a way I can back them up on my computer and upload them later? Where are the actual macros stored anyway? Thank you!
-
Great!
-
Hi MEB I tried it that way and it fails. i get the same problem as before. What are your recommendations? Is this a bug that will be fixed? Am I the only person who has reported this problem? How will I know when it has been fixed? Thank you! Alexander
-
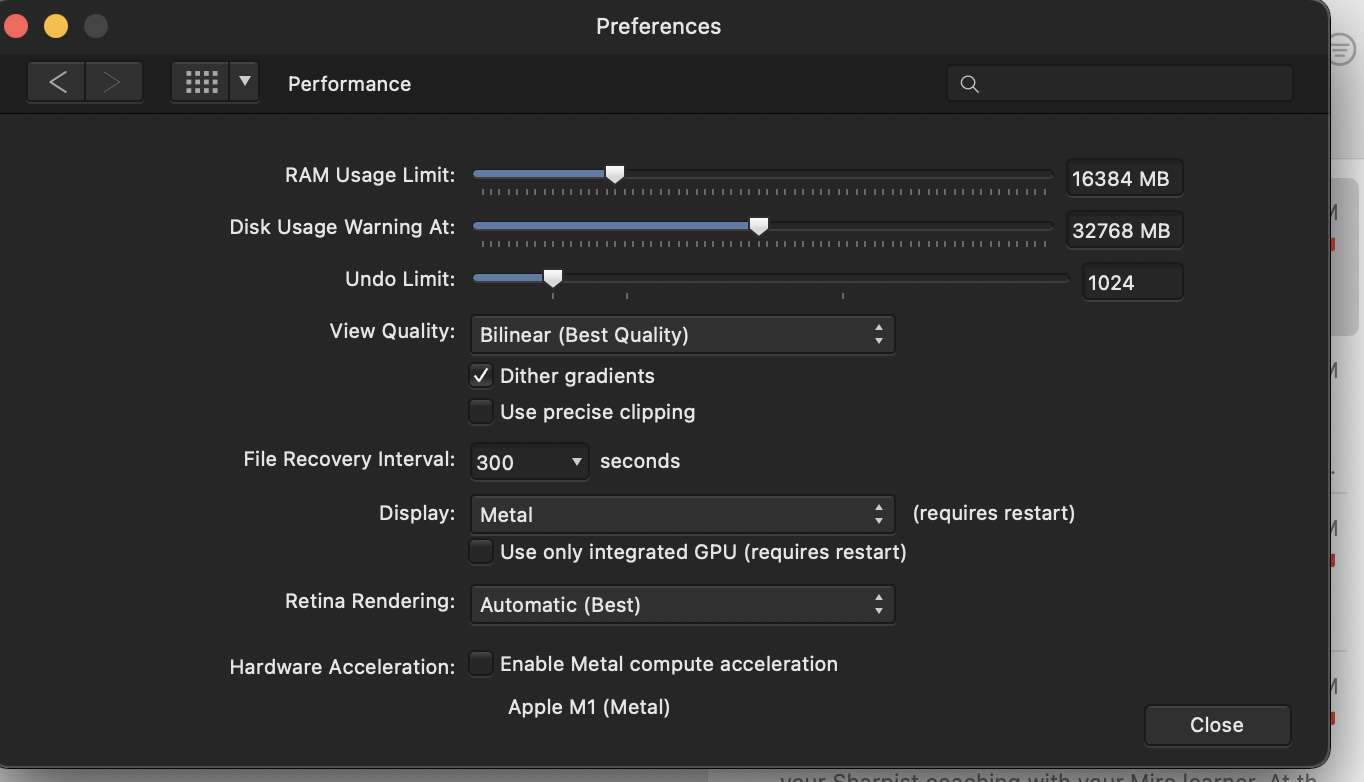
Hi MEB I followed your instructions and it made a difference. After unchecking Metal compute acceleration (screen shot attached below), I tried using the app without ticking Open using Rosetta stone, and it worked fine. Then I tried using it after ticking Open using Rosetta stone and it also worked fine. In other words, i don't think ticking Open using Rosetta stone made a difference. - What do you recommend i do going forward? - Are you going to make AF fully compatible with the M1 chip anytime soon? And how will you let us know when it's done? Thank you, Alexander

-
Thank you Walt for helping out. Attached below is a screen recording. As you can see, this time the problem is that when I am trying to refine the selection, it quits. Screen Recording 2021-09-19 at 9.09.03 AM.mov Screen Recording 2021-09-19 at 9.09.03 AM.mov Screen Recording 2021-09-19 at 9.09.03 AM.mov 589679832_ScreenRecording2021-09-19at9_09_03AM.mov
-
Since updating to 1.10.1 when I try using the Selection Brush tool it behaves in strange ways. If i select an area and then try refining it the brush behaves erratically going from adding to substracting and then the selection disappears and I have to start over. My computer is the same I was using prior to updating to 1.10.1. Macbook Air M1 with 16 MB ram. Is this a bug?
-
Luminosity Masks from Layers
alecspra replied to alecspra's topic in Pre-V2 Archive of Desktop Questions (macOS and Windows)
Thanks Alfred. There is a lot of information and chats on Luminosity masks, but most of it is too geeky for my patience level. My only question and request was about having a menu equivalent for keyboard shortcuts. If there is no menu equivalent, then by definition, it is not a keyboard shortcut. -
Luminosity Masks from Layers
alecspra replied to alecspra's topic in Pre-V2 Archive of Desktop Questions (macOS and Windows)
Thanks Alfred. I looked at the keyboard shortcuts and found no indication of how to create a luminosity mask. It’s all right. I copied the instructions from James video. More broadly, I am concerned that as Affinity Photo continues to grow and increase in complexity, it runs the risk of becoming an esoteric behemoth like Photoshop. Making software really user friendly is not incompatible with making it professional and sophisticated. I sincerely hope the creators of Affinity keep that in mind. -
Luminosity Masks from Layers
alecspra replied to alecspra's topic in Pre-V2 Archive of Desktop Questions (macOS and Windows)
Thank you Callum for your response. Do you know where I can find a list of all the Affinity Photo keyboard shortcuts with an explanation of what they do? -
Hi, I was watching the video "Luminosity Masks from Layers". At the beginning of the video James says to click Alt, Control and left click on the pixel layer in order to create a luminosity mask (on a Mac) but he did not mention what is the corresponding Menu option. I do not use key shortcuts to access features. I prefer using the menu options. So what is the Menu equivalent of that key shortcut? I tried using Select/Tonal Range/Highlights but I got a different result from using the key shortcut so that is not it. Also more broadly, I would like to suggest that anytime someone mentions key shortcuts on a video to do something, please, please also mention what is the Menu option that corresponds to that shortcut. Not everyone likes to use key shortcuts which are much more memory intensive than knowing what is the Menu option. Thanks!
-
Hi, since a couple of days ago, I am unable to access the Help files from Affinity Photo when I click on Search. I am still using the same Mac Desktop Mojave 10.14.2 operating system. I can access the help menu but when I put something on the search box (e.g., filters) I get options on the left but when I click on an option it goes somewhere else that has nothing to do with what I clicked. I tried it several times and get the same result. It looks like a bug to me. By the way, I am using Safari browser latest version.
-
Thanks. I suppose I could do that, and use it as png or gif layer.
-
Hi! Does anyone know how to create a Phi Grid (based on the Golden Ratio) overlay in Affinity Photo? (The Golden Ratio is divides the frame into sections resulting in a grid that is 1:0.618:1). I want to use that overlay for composition and cropping. I know we already have a Golden Spiral, but I like the Phi Grid for landscapes and other types of images. For more basic info on the Golden Ratio you can check this article, specifically for photography: https://www.apogeephoto.com/how-to-use-the-golden-ratio-to-improve-your-photography/ Thanks!
-
Hi, I would love you to consider adding a Phi Grid as an additional option to the existing cropping overlays. As you probably know, it is based on the Golden Mean just like the Golden Spiral but I find it more useful than the later for landscapes and other types of images. Thanks for all the outstanding work you are doing!
-
How do you set up a custom ratio of 3:2 for instance? I have not been able to figure out how to add custom ratios to the ones that come already preset which are 1:1, 5:7 and 8:10. Sorry, I just figured it out! No answer to this post required.
-
Thank you both! That helps me understand better the cropping tool.
-
I am unclear about certain aspects of the cropping tool. Why is it that when I choose 1:1, 5:7 or 8:10 the crop frame preserves the ratio when I move the horizontal or vertical side, but when I choose 6x4 or 8.5x11, the ratio is not preserved when I move either the vertical or horizontal side? And why do the first 3 options use : while the other two use X? Is there a way to create a custom cropping frame that is 6x4 that is "constrained" meaning that it preserves the ratio when I move either the vertical or horizontal line? Thanks!
-
Thank you Walt!
-
Ok. Now I am embarrassed. , I looked more closely and realized that the Profiles only show up in the Develop Persona. I guess that takes care of that problem. Sorry for waisting your time.
-
My apologies but the video where I saw James doing this is "Wide Color Profiles vs RGB". Attached is the screen snapshot that shows what it looks like.
-
Thanks but that is not what I am asking. I know how to change a file's ICC profile for Export. What I want to find out is how to add a Profile tab in my dashboard (if that is the right name of the panel that sits on the right of my AP). I know it can be done because I saw James doing it on the video I mentioned earlier. Now, it is possible that that video was created with a prior version of AP and that in the newest version that is no longer an option. But if it is still an option I would like to know how to enable it. Typically to enable these tabs, you have to go to View/Studio and enable it from there. But when I go there, there is no option for "Profiles". I already know that I can change the ICC profile of an image (prior to exporting) by going to Document/Convert ICC profile or Assign ICC profile. I am looking for a shortcut. Hope this clarifies my query a bit more. Thanks!
-
Thanks for your reply, but I think we are talking about different things. In the video "Big Stopper Effect", James is able to change the ICC Profile directly from the Dashboard, rather than having to go into Document/Convert ICC Profile. Typically the options that show up on the Dashboard (although I am not sure that is the right name for the right hand panel) can be turned on and off by going into View/Studio. When I go there, there is no option for turning on Profiles. So my question is How do you turn it on so it shows up as an option in the Dashboard. Hope this clarifies my query a bit.