

atomikdog
-
Posts
3 -
Joined
-
Last visited
Posts posted by atomikdog
-
-
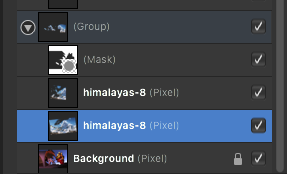
Well, I messed that explanation up a little. It should actually go:
- Open a photo of a landscape with a boring sky in a new document
- Paste or Place another photo with a better sky in the same document
- Hide the second photo for a moment
- Select the sky from the original photo
- Make a mask from that selection
- Move the mask above the other layers. No children, no parents.
- Show the second photo again
- Select the new mask and the second photo
- Group them
- Make sure the mask is above the second photo in the layer stack, inside the new group, and that the original photo is below the group in the layer stack
-
I was searching around for the answer to this question. Didn't find one in any of the tutorial videos. Noticed this topic originated in 2015 so not sure the solution is posted elsewhere or common knowledge at this point, but had an epiphany and just tested something out and it worked. Here's how to do it:
- Start with a photo; for the purposes of this explanation, one with a sky.
- Make a selection. In this instance, the sky in the photo to make a sky replacement.
- Turn that selection into a mask.
- Select both the mask layer and the photo layer.
- Group them.
The grouping is the trick. It allows the mask layer and the photo layer to remain separate from each other, which means they can be edited independently.
Hope this can be applied to the OP's question, even though their masking layer was a vector shape. Not sure it would matter.

Publisher Table of Contents formatting question
in Desktop Questions (macOS and Windows)
Posted
I'd like to format a TOC similar to the attached, outlined in red. How do I include Title [dots] Author [dots] Page Number [line break] Chapter Title? I don't need help with fonts, etc. Some relevant things I don't completely understand yet:
My guess is one trick involves making a text frame on the 1st page of each story that gets hidden and contains all the necessary info?
Thanks in advance.