276ccm Posted August 16, 2018 Share Posted August 16, 2018 Is it possible to use vector shapes as masking in AD for iPad? Ive tried, to make a new mask layer (the same way I do it in AP for iPad) but when I add a shape or dra lines, it won’t mask, only makes a new curves layer.. so if possible, could anyone please explain or link to a video how to use vector masking in AD on iPad ? :-) and if it’s possible, it’s only me that doesn’t quite understand how to yet.. :-) Quote Link to comment Share on other sites More sharing options...
Alfred Posted August 16, 2018 Share Posted August 16, 2018 Unlike the desktop versions, the iPad version of AD doesn’t have a ‘Mask to Below’ command. You have to do it by dragging and dropping the masking layer onto the thumbnail of the target object in the Layers Studio. Quote Alfred Affinity Designer/Photo/Publisher 2 for Windows • Windows 10 Home/Pro Affinity Designer/Photo/Publisher 2 for iPad • iPadOS 17.4.1 (iPad 7th gen) Link to comment Share on other sites More sharing options...
276ccm Posted August 16, 2018 Author Share Posted August 16, 2018 Ah i see.. I did a quick test, but it looks like it mask everything outside the shape I’m drawing, and not inside, but still might do something wrong.. :-) is that normal? I would guess it would mask mask everything inside the shape, when I use black fill color? :-) Quote Link to comment Share on other sites More sharing options...
Alfred Posted August 16, 2018 Share Posted August 16, 2018 13 minutes ago, 276ccm said: it looks like it mask everything outside the shape I’m drawing, and not inside It sounds as though you’re expecting the mask to exclude (i.e. hide) whatever is underneath the shape, but vector masking works the other way around. Apologies if I’ve misunderstood what you’re describing. 276ccm 1 Quote Alfred Affinity Designer/Photo/Publisher 2 for Windows • Windows 10 Home/Pro Affinity Designer/Photo/Publisher 2 for iPad • iPadOS 17.4.1 (iPad 7th gen) Link to comment Share on other sites More sharing options...
276ccm Posted August 16, 2018 Author Share Posted August 16, 2018 Thanks a lot, I just have to think different! :-) I learned something really useful now :-) Alfred 1 Quote Link to comment Share on other sites More sharing options...
toltec Posted August 16, 2018 Share Posted August 16, 2018 11 minutes ago, 276ccm said: Thanks a lot, I just have to think different! :-) I learned something really useful now :-) You could place a vector shape on top and change the Layer Blend Mode to ‘Erase’. That will make a hole where the shape was. It will erase everything below it, so you might want to nest it in the layer you make a ‘hole’ in. zincan, Alfred and 276ccm 1 2 Quote Windows PCs. Photo and Designer, latest non-beta versions. Link to comment Share on other sites More sharing options...
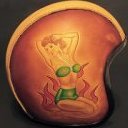
276ccm Posted August 17, 2018 Author Share Posted August 17, 2018 I’m not so smart as I thought I was :-) but anyway, I’m trying.. Im going to try as described above.. but just to confirm, this how vector mask is supposed to work? If you see the picture :-) zincan 1 Quote Link to comment Share on other sites More sharing options...
276ccm Posted August 17, 2018 Author Share Posted August 17, 2018 And if I want it to work as I expected it to work, like pixel masking, I can cover all the canvas with a vector layer, then make another vector shape, and combine then, like this :-) gdenby 1 Quote Link to comment Share on other sites More sharing options...
abstractmark Posted November 3, 2018 Share Posted November 3, 2018 Greetings, I’ve been doing searches on the forums for a few days now - I’m new to Affinity Designer on Ipad (loving it!) but having trouble following the various ways in which objects and layers can be clipped and masked. My questions are strictly about vector masks and doing this in the vector persona. At various stages I’m finding several different procedures and outcomes depending on the object, group, layer or hierarchy. I’m familiar with dragging an object to be a mask onto the target layer, and familiar with pasting an object or group inside a curve or path. But I’m getting confused by getting different results in my trials and seeing at different times, a mask icon with a circle, a crop icon next to a path, a suitcase icon that gives a different result, and an empty mask layer which gives yet a different result. In addition to the forum searches, I’ve looked at the tutorial videos and the help files, and have not yet found information that specifically goes over each of these icons and states, and I’m getting lost. Is there a video or something on line that walks you through all of these, and how they differ? Any links or pointers would be helpful. Thanks! Mark Quote Link to comment Share on other sites More sharing options...
abstractmark Posted November 3, 2018 Share Posted November 3, 2018 4 minutes ago, marcoluna said: Greetings, I’ve been doing searches on the forums for a few days now - I’m new to Affinity Designer on Ipad (loving it!) but having trouble following the various ways in which objects and layers can be clipped and masked. My questions are strictly about vector masks and doing this in the vector persona. At various stages I’m finding several different procedures and outcomes depending on the object, group, layer or hierarchy. I’m familiar with dragging an object to be a mask onto the target layer, and familiar with pasting an object or group inside a curve or path. But I’m getting confused by getting different results in my trials and seeing at different times, a mask icon with a circle, a crop icon next to a path, a suitcase icon that gives a different result, and an empty mask layer which gives yet a different result. In addition to the forum searches, I’ve looked at the tutorial videos and the help files, and have not yet found information that specifically goes over each of these icons and states, and I’m getting lost. Is there a video or something on line that walks you through all of these, and how they differ? Any links or pointers would be helpful. Thanks! Mark P.s. - I’d also really like if it were possible to use a group as a clipping path, without having to combine all of the vectors within to do so...if that’s possible. Quote Link to comment Share on other sites More sharing options...
Merton Dot Posted November 3, 2018 Share Posted November 3, 2018 I am also a little foggy on how vector clipping works on the iPad version of AD. This helps some, though. Quote Link to comment Share on other sites More sharing options...
Staff Affinity Info Bot Posted March 12 Staff Share Posted March 12 The issue "[iOS] Layers Studio menu missing 'Release' and 'Mask to Below' commands" (REF: AF-1919) has been fixed by the developers in internal build "2.5.0.2317". This fix should soon be available as a customer beta and is planned for inclusion in the next customer release. Customer beta builds are announced here and you can participate by following these instructions. If you still experience this problem once you are using that build version (or later) please reply to this thread including @Affinity Info Bot to notify us. Quote Link to comment Share on other sites More sharing options...
Recommended Posts
Join the conversation
You can post now and register later. If you have an account, sign in now to post with your account.
Note: Your post will require moderator approval before it will be visible.