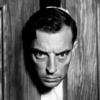
hlarledge Posted March 9, 2017 Share Posted March 9, 2017 This photo was taken in my studio. All post work was done with Affinity Photo. No external programs or plug-ins were involved in any way whatsoever. PLEASE do not share outside of this forum. Thanks! Aammppaa, MEB, Lee D and 2 others 5 Quote Link to comment Share on other sites More sharing options...
nezumi Posted March 9, 2017 Share Posted March 9, 2017 Nice one! Would be cool to see original photo and then final version next to it. Quote Link to comment Share on other sites More sharing options...
hlarledge Posted March 9, 2017 Author Share Posted March 9, 2017 nezumi, You ask for much. I never show my before photos, but I will this once. I really want everyone to see the power of this application. See the updated initial post for the before and after photos now. Aammppaa 1 Quote Link to comment Share on other sites More sharing options...
nezumi Posted March 9, 2017 Share Posted March 9, 2017 Hey, I understand man - It was just hard to say how much work went into editing, you know. Thanks for showing it! hlarledge 1 Quote Link to comment Share on other sites More sharing options...
sDuccio Posted March 9, 2017 Share Posted March 9, 2017 Great job. I wish you could show how you did it. techniques hlarledge 1 Quote OS: windows 10 home 64 bits Lenovo core I7 6700HQ 8Gb Ram Nvidia GTX 950 4 gb Memory SSD 256Gb HD 1TB 5400 rpm Link to comment Share on other sites More sharing options...
Staff MEB Posted March 9, 2017 Staff Share Posted March 9, 2017 Hi hlarledge, Thank you for sharing your work with us. It's amazing. While I understand your reasons to not display the original photo it does make clear as water how much work and knownledge it takes to create an image like this. Thanks for posting it as well. Aammppaa and hlarledge 2 Quote A Guide to Learning Affinity Software Link to comment Share on other sites More sharing options...
hlarledge Posted March 9, 2017 Author Share Posted March 9, 2017 Great job. I wish you could show how you did it. techniques If you look closely and compare the two, I believe you can see how I used the following Affinity Photo tools: I removed minor Noise and corrected the White Balance in the Develop persona, before moving to Photo. In Photo, I used: Selections with Feathering Adjustment Layers with Masks Curves Dodge and Burn (including a Color Dodge layer for hand-painting color adjustments) Lighting (rendering) Perspective Warp (I cut and paste to new layers small parts that might need resizing. It often looks more realistic in smaller areas than using Liquify.) I did not need Liquify here, but I do use it often in Photoshop. This was my first start-to-finish image in AP, but there will be more. I am very happy with the results. PaulAffinity 1 Quote Link to comment Share on other sites More sharing options...
sDuccio Posted March 10, 2017 Share Posted March 10, 2017 Thanks for describing the steps, its what I meant by asking to show the techinques If you look closely and compare the two, I believe you can see how I used the following Affinity Photo tools: I removed minor Noise and corrected the White Balance in the Develop persona, before moving to Photo. In Photo, I used: Selections with Feathering Adjustment Layers with Masks Curves Dodge and Burn (including a Color Dodge layer for hand-painting color adjustments) Lighting (rendering) Perspective Warp (I cut and paste to new layers small parts that might need resizing. It often looks more realistic in smaller areas than using Liquify.) I did not need Liquify here, but I do use it often in Photoshop. This was my first start-to-finish image in AP, but there will be more. I am very happy with the results. hlarledge 1 Quote OS: windows 10 home 64 bits Lenovo core I7 6700HQ 8Gb Ram Nvidia GTX 950 4 gb Memory SSD 256Gb HD 1TB 5400 rpm Link to comment Share on other sites More sharing options...
anon1 Posted March 10, 2017 Share Posted March 10, 2017 thanks for sharing your approach! the messed up white balance in the "before" picture actually makes the difference seem a lot bigger than it actually is additionally I think the D&B on her face is not done very carefully, the lower part of the eye has lost any kind of structure and is just flat and at the transition towards the neck one can even see a clear cut where the dodging just suddenly stops. and maybe use a flash or just get the exposure correct in first place to improve the actual image quality for a print or any larger publication hope this helps cheers Quote Link to comment Share on other sites More sharing options...
Recommended Posts
Join the conversation
You can post now and register later. If you have an account, sign in now to post with your account.
Note: Your post will require moderator approval before it will be visible.