Thomas Helzle Posted July 5, 2016 Share Posted July 5, 2016 Hey, I searched the docs and this forum for a while and could not find the answer: - Is there a way to assign a variable width profile to a curve without pressure information? - Can I edit the width of curves somehow manually? In Illustrator CS6 there is a dedicated line width tool that I use a lot and I can assign pre-saved profiles to existing lines to form tapered strokes. In Affinity Designer for Windows I can only find the tools for pressure-while-drawing, but I use to import files from Rhino/Grasshopper that have no such information and treat them in Illustrator which I would like to replace with AD if possible. I tried loading several AI files that I generated with Rhino/Grasshopper: - Most of them don't open at all although they are small, I only get an empty layer. If I open them in Illustrator CS6 and re-save them there, it works. - What does not work is if the files get rather big, then nothing is imported and AD shows me a "file format not supported" dialog. My Illustrator files easily go over 1 GB and the largest is over 3 GB. Illustrator becomes extremely sluggish with them, but if I'm patient enough, I can work through them. - If I load a large AI file, nothing happens or indicates that anything happens. In Task Manager I can see that something is working, but the GUI does not seem to indicated loading progress. After some time, the file suddenly pops up, but I think it would be good to somehow show the progress. Importing AI files with varying width lines leads to conversion to filled objects. Is there a format that will keep the lines as lines with variable width instead? Can you recommend a format to try for large documents? I'm using Windows 8.1 x64, 32 GB RAM, GeForce GTX 660 TI & GTX 980 TI (for 3D rendering). Thanks and cheers! Tom P.S. I can provide sample documents to support if needed. ScreenDream | Windows 8.1 x64 - 64 GB Ram - i7 6 core @ 4.1 GHz - GeForce GTX 1080 TI & GTX 980 Ti Link to comment Share on other sites More sharing options...
Chris_K Posted July 5, 2016 Share Posted July 5, 2016 Hi Thomas We do not have a tool to directly after the width of a line. The only option we currently have is the pressure curve available on the stroke tab. We are aware of the lack of feedback when opening files, so hopefully we will get that sorted soon For the Ai files, any information not in the PDF stream of the file type cannot be read by us so not all aspects of the file can be opened. If you could provide a couple of sample files for us to look at though that would be great Cheers Serif Europe Ltd - Check the latest news at www.affinity.serif.com Link to comment Share on other sites More sharing options...
Thomas Helzle Posted July 9, 2016 Author Share Posted July 9, 2016 Sorry for the late reply, I didn't get a notification... (changed the settings now - shouldn't that be on by default?). Hm - not being able to edit stroke widths or apply presets that contain stroke widths makes Designer much less useful to me. :( It's one of the most important features to me. Up to Illustrator 8 the format was not PDF but EPS/Postscript and most for instance 3D/CAD applications support that old format directly since it's well documented. Grasshopper/Rhino/Lightwave etc. export to that old format and import it because of that. So that probably is the reason Designer can't open those files if it can only read PDF streams? Seems I'm a bit out of luck here. :( Where would I send the examples, do you have a mail address or FTP server for me? Or is supporting the old AI format out of the question anyway? Then we can probably spare the effort. Cheers, Tom ScreenDream | Windows 8.1 x64 - 64 GB Ram - i7 6 core @ 4.1 GHz - GeForce GTX 1080 TI & GTX 980 Ti Link to comment Share on other sites More sharing options...
Ken Cope Posted July 10, 2016 Share Posted July 10, 2016 Hi Thomas, We are able to alter the width of a line and save the profile. 1) Draw line or in the case of the screenshot a Quick Shape Rectangle 2) With the object selected 3) Select the Stroke Tab 4) Click on the Pressure Profile and adjust to suit 5) Click on the Save Profile button to save a preset for reuse 6) Properties button opens a customisable 'brush' dialogue for the line itself. See screenshot for line properties/profile In this second screenshot there's the Brush Properties dialogue open and the Pressure profile I have saved. Thomas Helzle 1 Windows 11 Pro 64bit ¤ AMD Threadripper 3990x ¤ Nvidia RTX 3090 ¤ 256GB DDR4 Ram ¤ ROG Zenith II Extreme Alpha Link to comment Share on other sites More sharing options...
Thomas Helzle Posted July 10, 2016 Author Share Posted July 10, 2016 Hey Ken, awesome, that at least solves half of my problem! I thought I tried exactly that but I must have done something wrong. It's interesting that you get a smooth line though, with the Windows Beta, I get strange steps in the line with a curve similar to yours: Now I have to try if Affinity is able to deal with the huge files Grasshopper generates if I convert them to another format first. :unsure: Cheers and thanks! Tom ScreenDream | Windows 8.1 x64 - 64 GB Ram - i7 6 core @ 4.1 GHz - GeForce GTX 1080 TI & GTX 980 Ti Link to comment Share on other sites More sharing options...
Ken Cope Posted July 10, 2016 Share Posted July 10, 2016 Hi Tom, I had noticed the stepping on the inside so selected the 'Draw Behind Fill' option in the Stroke tab which provides a smooth outer and inner line. Most times I would guess that placing the stroke behind the fill would be the usual way of working. Perhaps this is a bug that needs reporting? Windows 11 Pro 64bit ¤ AMD Threadripper 3990x ¤ Nvidia RTX 3090 ¤ 256GB DDR4 Ram ¤ ROG Zenith II Extreme Alpha Link to comment Share on other sites More sharing options...
Thomas Helzle Posted July 10, 2016 Author Share Posted July 10, 2016 Hi Tom, I had noticed the stepping on the inside so selected the 'Draw Behind Fill' option in the Stroke tab which provides a smooth outer and inner line. Most times I would guess that placing the stroke behind the fill would be the usual way of working. Perhaps this is a bug that needs reporting? Hey Ken, Well, I often work with strokes only so that wouldn't be a solution. I posted it in the current beta thread. Cheers and thanks, Tom ScreenDream | Windows 8.1 x64 - 64 GB Ram - i7 6 core @ 4.1 GHz - GeForce GTX 1080 TI & GTX 980 Ti Link to comment Share on other sites More sharing options...
Matej Junk Posted July 10, 2016 Share Posted July 10, 2016 Hey Ken, awesome, that at least solves half of my problem! I thought I tried exactly that but I must have done something wrong. It's interesting that you get a smooth line though, with the Windows Beta, I get strange steps in the line with a curve similar to yours: AffinityStrokeSteps.jpg Now I have to try if Affinity is able to deal with the huge files Grasshopper generates if I convert them to another format first. :unsure: Cheers and thanks! Tom Hi, just change the "Miter" value higher on the strokes palette and the stepping should go away. Ken Cope 1 Link to comment Share on other sites More sharing options...
Ken Cope Posted July 10, 2016 Share Posted July 10, 2016 Hi, just change the "Miter" value higher on the strokes palette and the stepping should go away. Yes it does! Windows 11 Pro 64bit ¤ AMD Threadripper 3990x ¤ Nvidia RTX 3090 ¤ 256GB DDR4 Ram ¤ ROG Zenith II Extreme Alpha Link to comment Share on other sites More sharing options...
Thomas Helzle Posted July 11, 2016 Author Share Posted July 11, 2016 Hi, just change the "Miter" value higher on the strokes palette and the stepping should go away. Not for me if I keep round corners active which I use most of the time for my work - I tried 5 and 10. But after more experimenting the steps went away when I set miter to 1. I'd still say it's a bug - why should miter lead to steps in the curve? Cheers, Tom ScreenDream | Windows 8.1 x64 - 64 GB Ram - i7 6 core @ 4.1 GHz - GeForce GTX 1080 TI & GTX 980 Ti Link to comment Share on other sites More sharing options...
Markio Posted July 11, 2016 Share Posted July 11, 2016 Have you tried exporting to pdf from Rhino? Link to comment Share on other sites More sharing options...
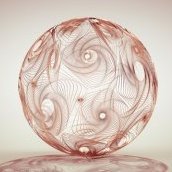
Thomas Helzle Posted July 11, 2016 Author Share Posted July 11, 2016 Just testing exporting PDF since Rhino doesn't offer anything else Affinity supports it seems. AI and EPS come in empty in AD, WMF export seems broken in Rhino or too limited for my files - it could not be opened with any software I have. Export to PDF in Rhino needs an installed PDF printer. It seems to work though (I installed bullzippdfprinter). Seems Affinity is getting even slower than Illustrator on even medium heavy files with for instance 26897 curves and does not show any kind of progress bar if something takes several minutes (like applying a stroke profile to many curves). The app freezes instead... It's also a bit weird how you can apply swatches only to fills directly, not to strokes in the swatches palette. But I may have missed something, it's still early days here and the software is different in unexpected ways. If I select one stroke only with the selection tool, I can change it's colour from the tool palette on top but if I select all strokes, I have to switch to one of the line tools to be able to do so which again takes a long time to paint all those handles. The good thing is, that the file size stays much smaller. The test file is 31 MB as AI from Rhino, 7 MB as PDF, 294 MB when fully treated in Illustrator CS6 (varying line widths, transparency, per-line-layer mode) and saved in it's native AI file format. Affinity Designer saves it as 30 MB with the same treatments. I'll see if I can even get it to import some of my _really_ heavy files (up to 3GB as CS6 AI). :) They take up to half an hour for every update even in Illustrator CS6, but most other software can't handle them at all. Just to give you guys an idea what I'm talking about, this is the testfile I'm using: It's a generative design created in Grasshopper. This is the Illustrator/Photoshop version. I try to get the same look in AD ATM. Cheers, Tom ScreenDream | Windows 8.1 x64 - 64 GB Ram - i7 6 core @ 4.1 GHz - GeForce GTX 1080 TI & GTX 980 Ti Link to comment Share on other sites More sharing options...
Thomas Helzle Posted July 11, 2016 Author Share Posted July 11, 2016 Seems that AD uses different math for the layer modes from Photoshop and Illustrator. I so far was unable to get the same colour buildup as in the image above in AD with "Screen" mode, it goes white much faster and the green is less warm with the same settings in both applications. In the olden times of C and 0-1 colour screen used to be: color[0] = 1.0 - ((1.0 - foreground[0]) * (1.0 - background[0])); color[1] = 1.0 - ((1.0 - foreground[1]) * (1.0 - background[1])); color[2] = 1.0 - ((1.0 - foreground[2]) * (1.0 - background[2])); Or is the difference in how individual strokes are combined somehow? Well, it seems I need to find a different look that works in AD... ;) Cheers, Tom ScreenDream | Windows 8.1 x64 - 64 GB Ram - i7 6 core @ 4.1 GHz - GeForce GTX 1080 TI & GTX 980 Ti Link to comment Share on other sites More sharing options...
Recommended Posts